Here is a guide for what you are in for when doing the job less the timing belt.
https://www.2carpros.com/articles/water-pump-replacement
TIMING BELT
Removal
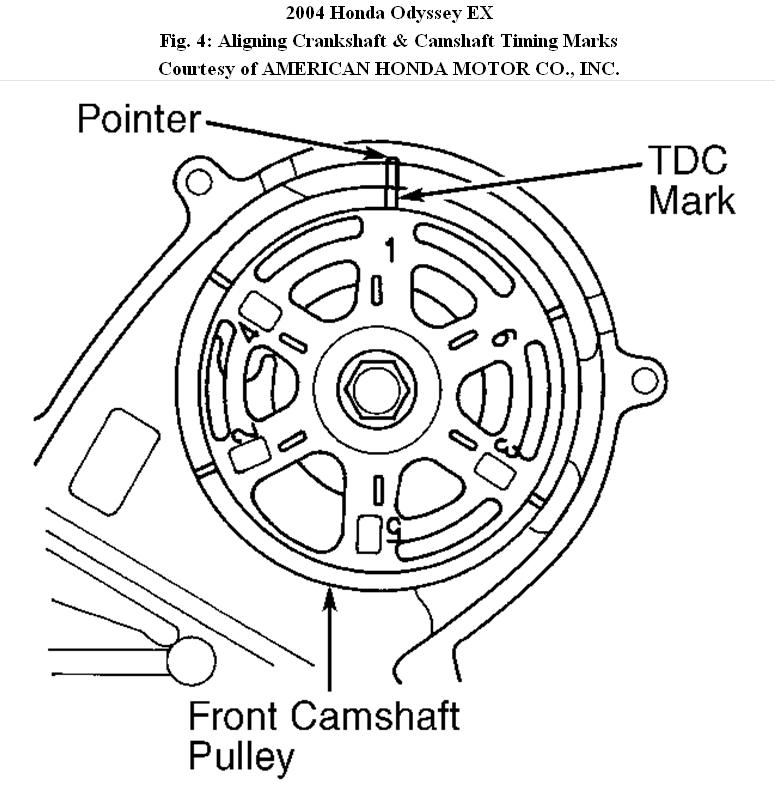
1. Disconnect negative battery cable. Turn crankshaft pulley so that No. 1 piston is at TDC on compression stroke. White mark on crankshaft pulley should align with pointer on front cover. Remove right front wheel. Remove lower engine splash shield. Move auto-tensioner to relieve tension, then remove the generator and power steering pump drive belt(s).
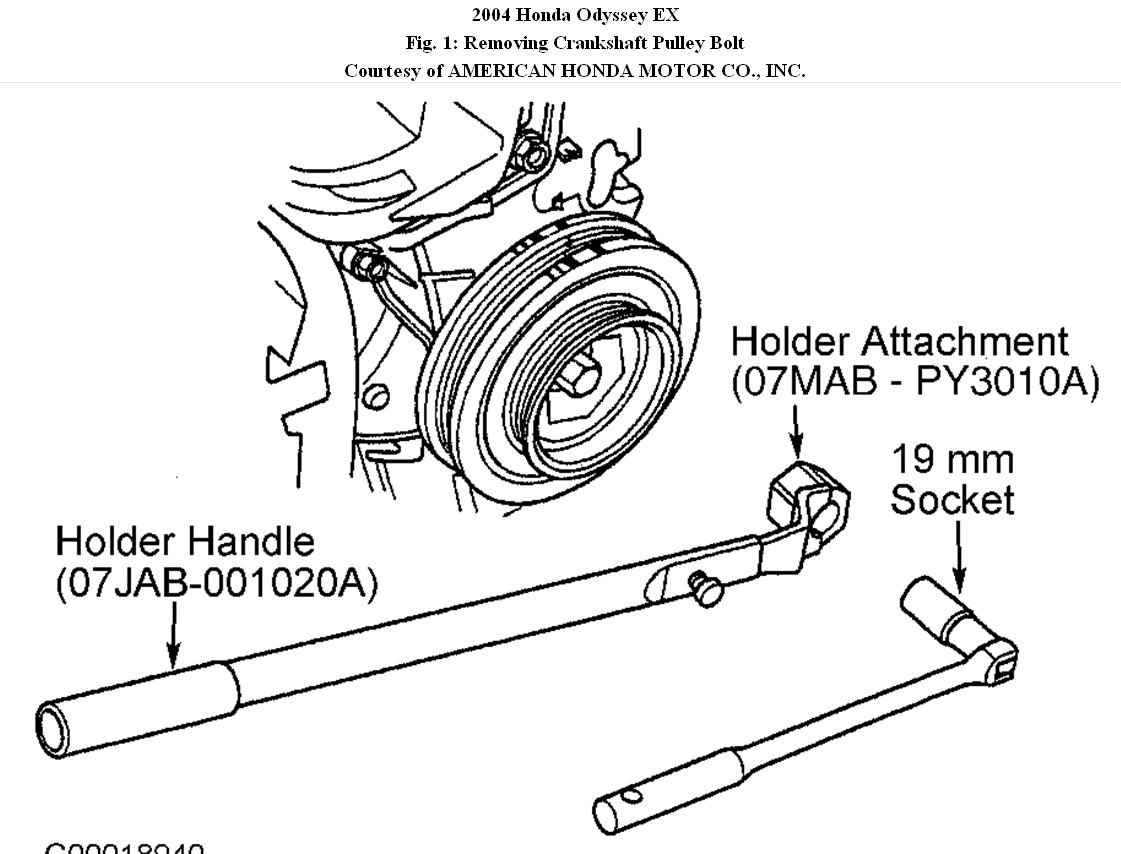
2. Support engine with a jack and wood block under the oil pan. Remove ground cable (if necessary), then remove engine side mount bracket. If necessary, remove dipstick tube from front of engine (discard "O" ring). Remove crankshaft pulley. See Fig. 1. ( A high toruqe impact wrench works but at times it might be rather stiff.
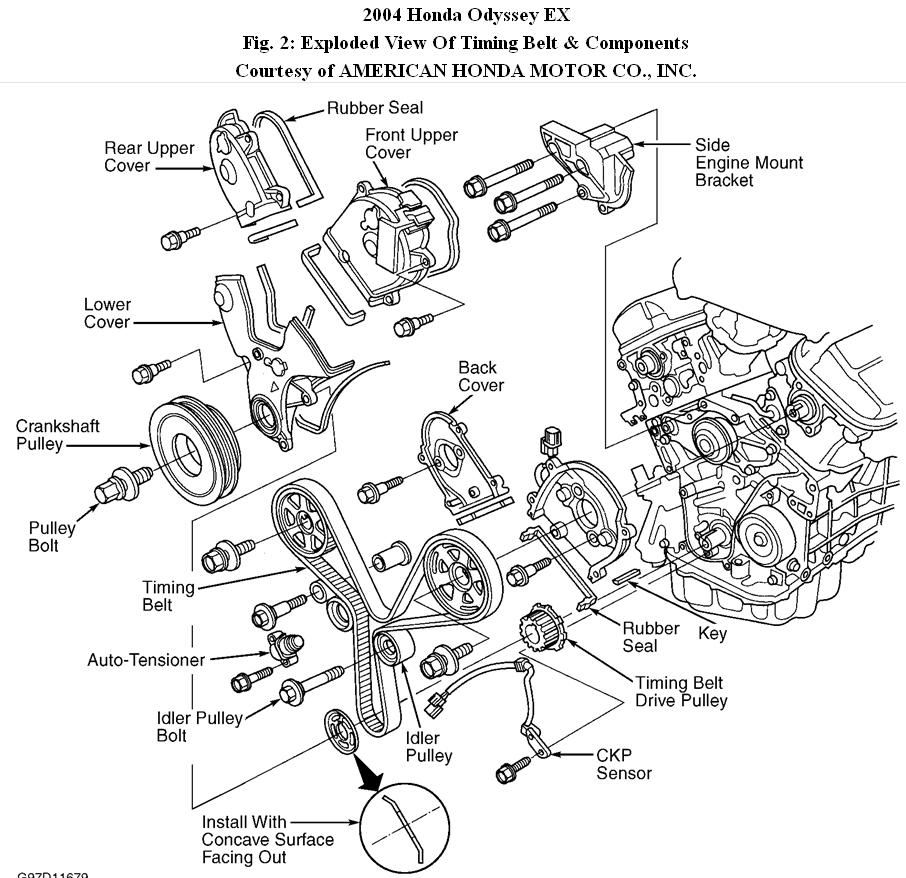
3.Remove upper and lower timing belt covers. See Fig. 2. If reusing timing belt, mark direction of belt rotation for installation reference.
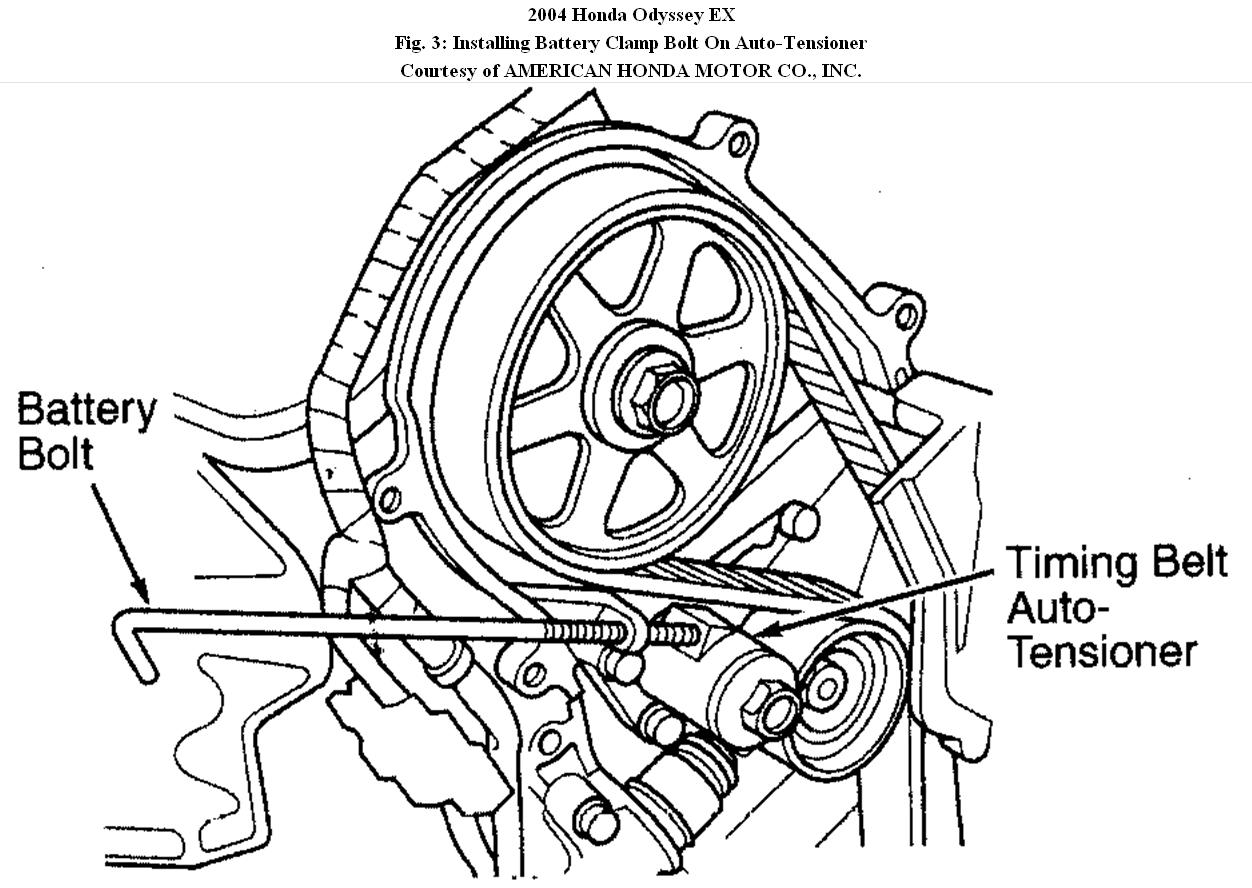
4. Remove one of the battery clamp bolts from battery tray. Grind threaded end of bolt to a partial point (about 45-degree chamfer). Thread battery bolt as shown to hold timing belt adjuster in installed position (hand tighten ONLY). See Fig. 3.
5. If applicable, remove timing belt guide plate from front of crankshaft sprocket. Remove engine mount bracket from front of engine.
6. Remove idler pulley bolt and idler pulley, then remove timing belt.
Installation (New Belt)
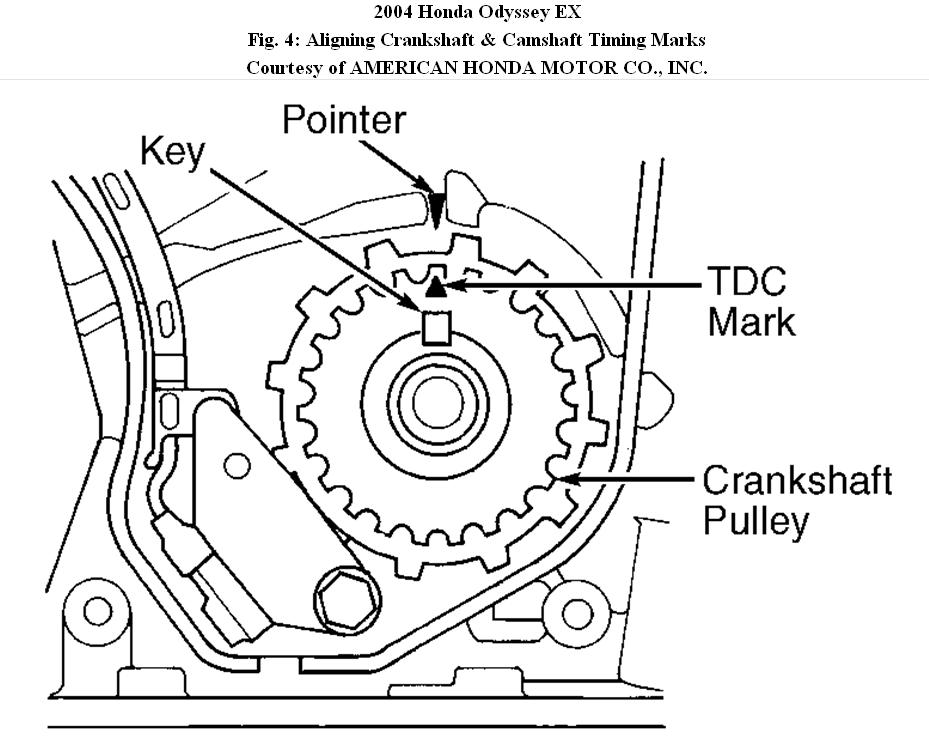
1. Ensure that engine is at TDC. Align dimple on timing belt drive pulley with pointer on oil pump. See Fig. 4. Align camshaft pulleys with pointers on back covers.
2. Remove battery clamp bolt from back cover. Remove the timing belt auto-tensioner.
NOTE:
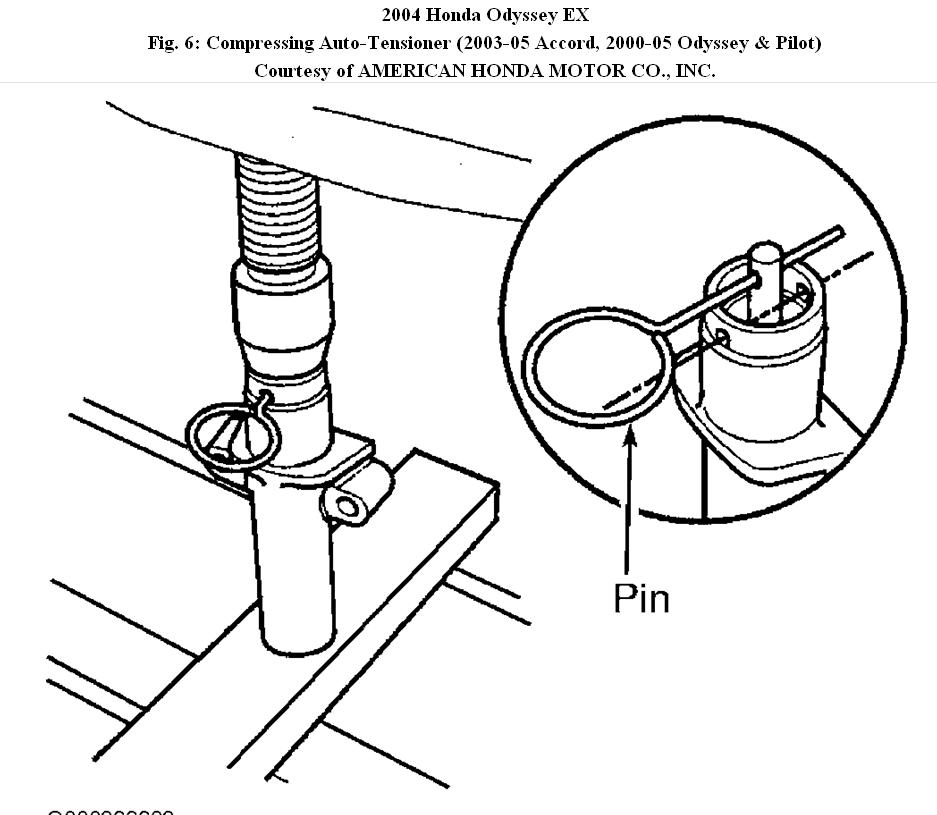
When compressing sealed auto-tensioners, compression pressure should not exceed 2200 lbs. (9800 N).
3. Place sealed auto-tensioner in press. SLOWLY compress tensioner until pin can be inserted through tensioner body, and insert pin. See
Fig. 6. Install auto-tensioner onto engine.
4. Install battery clamp bolt into back cover. Apply liquid thread lock to idler pulley bolt and loosely install idler pulley.
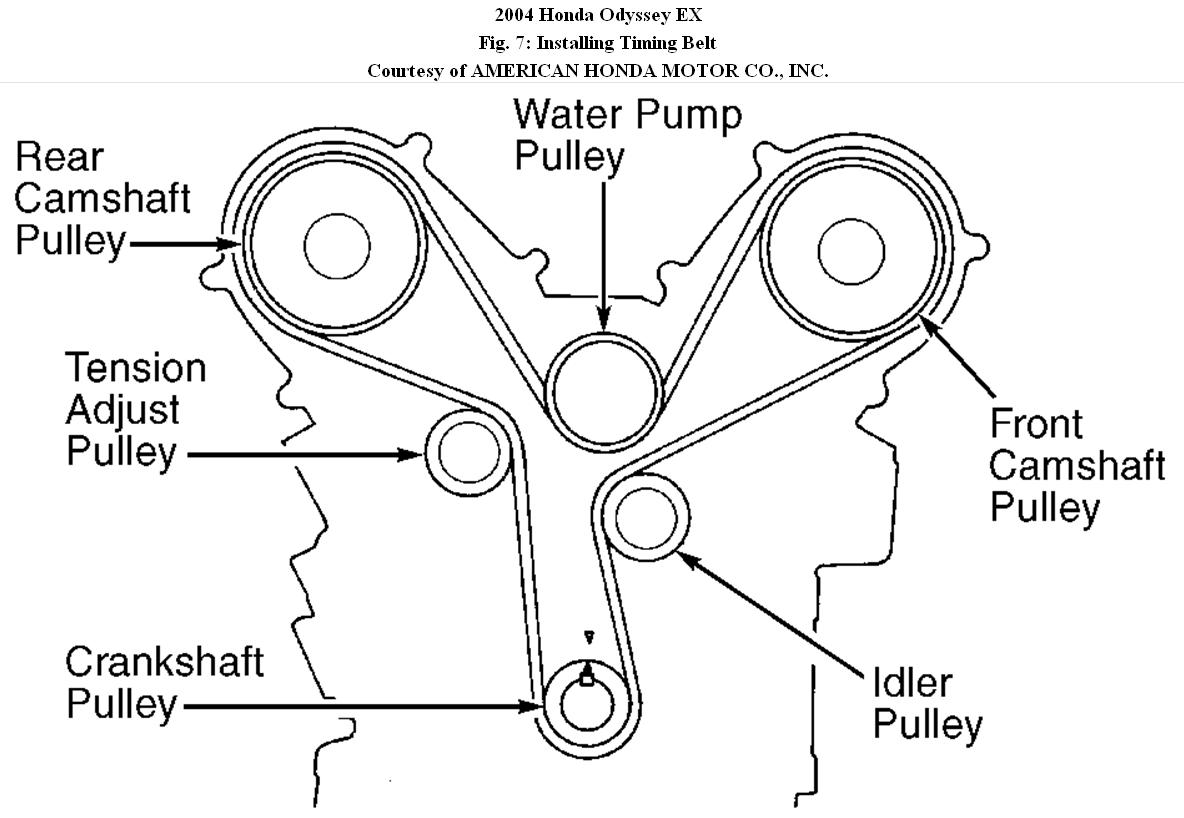
5. Install timing belt in counterclockwise direction in the following sequence:
Crankshaft pulley, idler pulley, front camshaft pulley, water pump pulley, rear camshaft pulley and tension adjust pulley. See Fig. 7. Ensure crankshaft and camshaft pulleys remained aligned with marks on back cover. Tighten idler pulley bolt to specification.
6. Remove stopper or pin from auto-tensioner. Remove battery clamp bolt from back cover, if necessary. Install engine mount bracket to the front of engine. If applicable, install timing belt guide plate with concave surface facing out. Install lower cover, then upper front and rear covers. Clean, then install crankshaft pulley. Lubricate crankshaft pulley bolt threads and install bolt. Tighten crankshaft pulley bolt to specification.
7. Rotate crankshaft about 5-6 turns clockwise to position timing belt on pulleys. Ensure crankshaft and camshaft pulleys are aligned at TDC. Crankshaft pulley White mark should be aligned with pointer on front cover. Remove rubber plugs from upper covers to check camshaft pulley positions.
8. If either camshaft is not at TDC, remove timing belt and readjust position. To complete installation, reverse removal procedure. Tighten all fasteners to specification. Adjust drive belts to proper tension.
Installation (Used Belt)
1. Ensure that engine is at TDC. Align dimple on timing belt drive pulley with pointer on oil pump. See Fig. 4. Align camshaft pulleys with pointers on back covers.
2. Apply liquid thread lock to idler pulley bolt, and loosely install idler pulley. If auto-tensioner has extended and timing belt cannot be installed, perform new belt installation procedure. If auto-tensioner has extended and timing belt cannot be installed, remove and compress auto-tensioner. Install auto-tensioner.
3. Install timing belt in counterclockwise direction in the following sequence:
Crankshaft pulley, idler pulley, front camshaft pulley, water pump pulley, rear camshaft pulley and tension adjust pulley. See Fig. 7. Ensure crankshaft and camshaft pulleys remained aligned with marks on back cover. Tighten idler pulley bolt to specification.
4. Remove battery clamp bolt from back cover. Install engine mount bracket to the front of engine. If applicable, install timing belt guide plate with concave surface facing out. Install lower cover, then upper front and rear covers. Clean, then install crankshaft pulley. Lubricate crankshaft pulley bolt threads and install bolt. Tighten crankshaft pulley bolt to specification.
5. Rotate crankshaft about 5-6 turns clockwise to position timing belt on pulleys. Ensure crankshaft and camshaft pulleys are aligned at TDC. Crankshaft pulley White mark should be aligned with pointer on front cover. Remove rubber plugs from upper covers to check camshaft pulley positions.
6. If either camshaft is not at TDC, remove timing belt and readjust position. To complete installation, reverse removal procedure. Tighten all fasteners to specification. Adjust drive belts to proper tension.
Please let us know
Cheers,
Images (Click to make bigger)
Monday, December 14th, 2020 AT 7:52 PM
(Merged)