Heater Door Actuator Clip/Arm

Tiny
BRAVESTAR1
  • MECHANIC
  • 2002 FORD TAURUS
  • 3.0L
  • 6 CYL
  • FWD
  • AUTOMATIC
  • 120,000 MILES
While replacing the heater core today, I was unscrewing the door to remove the cover, and I don't know what happened, but the plastic clip that holds the actuator arm broke off, and I lost the spring that goes onto the actuator so that when the actuator is activated it slides the position of the door into place, and thus you have heat.


It is possible to replace the small pieces that broke off, and buy a new spring, or do I need to replace the entire actuator housing on this car now?
Sunday, June 8th, 2014 AT 5:50 PM

21 Replies

Tiny
BRAVESTAR1
  • MECHANIC
  • 234 POSTS
The part I am referring to I have circled in red. It goes behind the actuator itself, and goes from one door to another. I'm sure the spring is somewhere in the car, but the clip itself seemed to hold the bar in place, and I doubt highly that I can use it without it.
Was this
answer
helpful?
Yes
No
Sunday, June 8th, 2014 AT 5:57 PM
Tiny
JACOBANDNICKOLAS
  • MECHANIC
  • 108,179 POSTS
If you find the spring, you should be able to find a clip at a parts store. Have you checked?
Was this
answer
helpful?
Yes
No
+2
Sunday, June 8th, 2014 AT 9:08 PM
Tiny
JGONZO2398
  • MEMBER
  • 348 POSTS
Hey there, I hope you reply because I just did the EXACT same thing as you. I know I’m late but I finally replaced the heater core in my car and that same exact plastic piece broke off when installing the actuator arm back, so now that’s just hanging there and it won’t move the door when the actuator is turned on. What did you end up doing because I still have no heat in my car?
Was this
answer
helpful?
Yes
No
+1
Friday, December 29th, 2017 AT 10:47 PM
Tiny
BRAVESTAR1
  • MECHANIC
  • 234 POSTS
JGONZO. You can't buy that part at any Parts Store. Maybe. Maybe. Maybe at the Ford Dealer near you, but I had to go the nearest Pick N' Pull and pull a dash apart and get it myself. I now have a few, and that's for the lower clip, the one that you use a small flat screwdriver to remove, by pushing it into the cylinder and it kinda pops out. The Top one however, is unreplaceable. That little plastic "finger" that goes down over the metal bar, cannot be replaced. I have on an 02 Ford Taurus, drilled an ultra tiny hole using a micro drill into the stem dot, and placed a tiny pin to hold the bar on. I also glued a cap of epoxy onto the little plastic dot that is left, to further help hold the pin in. That has worked.

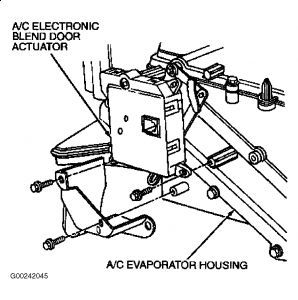
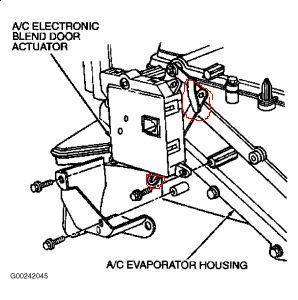
However, on my offending 98 Mercury Sable (which I still drive), I had to cut the heater box open and replaced the whole flap door with a new one, that has a metal protrusion, that facilitates the movement of the blend door. Dorman 902-223 is the part. They are a little expensive right now, as I think I paid only $45 this past summer for mine. But, cheaper than the dealer, and better than going without heat.

Note: You have to take the dash completely off, and with an oscillating tool, and a sideways cutter, cut away at the box. It will show you in the instructions how to do it, and then tape up (I used epoxy to ensure its air tight). When you go to take the dash off, TAPE the STEERING WHEEL to itself. Which means, taping the steering wheel so it can't spin on it's own. When I did this job, I let the wheel free spin, and broke the "Clock Spring", which required another trip to the junkyard and a whole lot of extra time and aggravation, as now the cruise and horn wouldn't work, and the airbag light stays on. Just be sure when you take the dash off, to unplug everything you possibly can. Including heater fan, steering wheel, dash lights, upper controls (requires a screw in the center be removed), everything you can, and the lower shifter will be in the way too. That's a lot of fun to remove, but needs to be done, or the dash gets hung up on it.
Was this
answer
helpful?
Yes
No
+2
Tuesday, January 16th, 2018 AT 11:25 AM
Tiny
JGONZO2398
  • MEMBER
  • 348 POSTS
Thanks for responding man. I honestly never needed any new parts, I managed to simply glue the metal lever to the plastic tube that stuck out through the hole in the lever, and it stayed, thank god I didn’t have to take apart the dash again, who knew gorilla glue would fix my problem. But either way, heater core has been replaced, thermostat has been replaced, blend door actuator works, but I still have no heat in my 02’ Taurus, oh well, at least it’s not as cold in the mornings anymore.
Was this
answer
helpful?
Yes
No
+2
Tuesday, January 16th, 2018 AT 11:49 AM
Tiny
JGONZO2398
  • MEMBER
  • 348 POSTS
Also, for the Dorman part number you gave me, the blend door, it isn't a fit for my 02' Ford Taurus, I was wondering if you know the part number for this specific model because I've been looking everywhere.
Was this
answer
helpful?
Yes
No
+1
Saturday, March 17th, 2018 AT 10:50 AM
Tiny
BRAVESTAR1
  • MECHANIC
  • 234 POSTS
That part number should work. I have the same car as you do. You sure its not a SHO model?
Also I took my dash apart for a third time, verified every thing works, and I still get lousy heat. I also tried to clamp down on the bypass pipe, and that didn't help either. There is just something wrong with these cars that just won't allow heat to come out of the engine somehow and circulate enough to make heat into the car. I replaced all the things you did, and more (I replaced the water pump) and for whatever reason, still lousy heat.
Was this
answer
helpful?
Yes
No
Friday, April 13th, 2018 AT 8:10 PM
Tiny
BRAVESTAR1
  • MECHANIC
  • 234 POSTS
There is one thing I haven't tried yet, and that is to flush the core again (even though I replaced it). I figure these cars are just throwing out a lot of rust, and every year you have to flush the system. I'm going to try it with air this time, as well as water, and clamp the bypass pipe when I do it. Or this guy. https://www.youtube.com/watch?v=9LSWGL3kK44
Was this
answer
helpful?
Yes
No
Friday, April 13th, 2018 AT 8:23 PM
Tiny
JGONZO2398
  • MEMBER
  • 348 POSTS
Yeah for some reason it says it’s not a fit for my car, I have a 2002 Ford Taurus SE, no SHO model or anything. And I had a new water pump installed months ago because a coolant leak which fixed the issue (of the leak), after that I did all of the things I mentioned earlier: coolant flush, heater core flush (first), thermostat replaced, heater core replaced. No heat whatsoever. Honestly, at this point, I don’t even care anymore. I don’t know what the problem with these cars are when it comes to heat, I gave up. I live in Phoenix, Arizona so I don’t really need the heat, it would’ve been nice a couple months ago but not anymore
Was this
answer
helpful?
Yes
No
Friday, April 13th, 2018 AT 8:24 PM
Tiny
JGONZO2398
  • MEMBER
  • 348 POSTS
When you say “clamp the bypass pipe”, what do you mean?
Was this
answer
helpful?
Yes
No
+1
Friday, April 13th, 2018 AT 8:29 PM
Tiny
ABOOM
  • MEMBER
  • 6 POSTS
Behind the engine on the firewall spans horizontally the hose that connects the hose that's going into the heater core and the one coming out of the heater core. It seems odd the bypass exists but I guess Ford knew they were going to be making lots of rusty water in these systems so it stands to reason the bypass might serve to let the engine still cool if the heater core plugs up quickly. Clamping that pipe or using a pair of vice grips on it or even zip ties around a piece of rubber so as to not puncture it will ensure a good flush through your heater core.

I cannot stress flushing enough as I have a 2000 Taurus and must have flushed it a dozen times from different access points of the coolant system before it finally put out heat.

The heat was better but not like it should be. Come to find out the neglected cooling system had eroded away at the Paddle Wheel of the water pump. SO, replacing the water pump May the water circulate like it should the system was clean and the heat was great.
Was this
answer
helpful?
Yes
No
Tuesday, April 17th, 2018 AT 3:09 PM
Tiny
JGONZO2398
  • MEMBER
  • 348 POSTS
So you’d suggest to keep flushing the heater core, even though it is a brand new heater core?
Was this
answer
helpful?
Yes
No
Tuesday, April 17th, 2018 AT 3:57 PM
Tiny
ABOOM
  • MEMBER
  • 6 POSTS
To answer that: does the coolant look dirty? If you did not flush the system from different locations and it was neglected as bad as mine was, it could fool you into thinking its "okay." Mine actually looked clear at one point. I thought "yay" I am done, but I was not getting much heat so I accessed another part of the system and flushed it again thoroughly starting from the "new" spot and kept flushing from the other access spots until it was crystal clear through and through. The reason for flushing from so many points as it was clearing out some from when I location but it would build up in the other nooks and crannies. It was time-consuming and a pain but it was getting personal at that point, lol.

Otherwise, are you sure the blend door is set in the right place for the heat to work and not the AC? I see you replaced the water pump and thermostat already. That is all I got. Hope you get it figured out.
Was this
answer
helpful?
Yes
No
Wednesday, April 18th, 2018 AT 5:39 AM
Tiny
ABOOM
  • MEMBER
  • 6 POSTS
Failed to mention that I added a couple of bottles of CLR and ran with it in over the course of a couple of days in between flushes. It could have been pivotal I cannot say for sure it worked but it is supposed to clean up some of the surfaces in the system. Bought at the local Dollar Store.
Was this
answer
helpful?
Yes
No
Wednesday, April 18th, 2018 AT 5:42 AM
Tiny
JGONZO2398
  • MEMBER
  • 348 POSTS
I flushed the coolant twice now, and it was bright green, no rust whatsoever. The drain plug on the bottom of the car had it pouring out bright green and when I changed the thermostat, the coolant coming out of the radiator hose was bright green as well. Where else can you flush the coolant from? And yes, I have looked down under the dash as I turned the knob from cold to hot, I have even moved the blend door actuator manually and I get no heat.
Was this
answer
helpful?
Yes
No
Wednesday, April 18th, 2018 AT 5:44 AM
Tiny
JGONZO2398
  • MEMBER
  • 348 POSTS
I used radiator flush as well in my first flush.
Was this
answer
helpful?
Yes
No
Wednesday, April 18th, 2018 AT 5:44 AM
Tiny
ABOOM
  • MEMBER
  • 6 POSTS
I flushed both direction on both sides of heater core (between reservoir and core then between thermostat and core. Otherwise flushed radiator on both ends, both ways. Even the small hoses coming to/go from the reservoir were clogged. And lastly, I pulled the reservoir and cleaned it thoroughly which was an experience because it is straight out of "la-la land" with all the little compartments within that were full of crud.
Was this
answer
helpful?
Yes
No
+1
Wednesday, April 18th, 2018 AT 6:06 AM
Tiny
ABOOM
  • MEMBER
  • 6 POSTS
I flushed both direction on both sides of heater core (between resevior and core then between theostat and core. Otherwise flushed radiator on both ends, both ways. Even the small hoses coming to/ go from the resevior were clogged. And lastly, I pulled the resevior and cleaned it thoroughly which was an experience because its straight out of "la-la land" with all the little compartments within that were full of crud.
Was this
answer
helpful?
Yes
No
Wednesday, April 18th, 2018 AT 6:07 AM
Tiny
BRAVESTAR1
  • MECHANIC
  • 234 POSTS
" Even the small hoses coming to/ go from the resevior were clogged."

Okay, I have not done that as of yet, so I will give that a go next. I had to replace the reservoir tank, as the old one cracked. It was just as well, as the tank was clogged at the bottom, and there was no getting it out. Main thing was, the screws holding the thing down, there was no putting them back, so I had to zip-tie it to the frame as the old bolt holders were just junk.

I did note over the winter, that the new tank, and a new radiator cap do not mirror well, so I had to include Teflon tape over the threads to keep the pressurize tank from leaking. Kind of surprised, since it appeared to be the same material as the old tank, but had to put about six revolutions of tape around to keep it from leaking out the top.
Was this
answer
helpful?
Yes
No
Wednesday, April 18th, 2018 AT 4:36 PM
Tiny
ABOOM
  • MEMBER
  • 6 POSTS
"I had to zip-tie it to the frame"

I had a laugh reading that because I did the same thing.

This makes me wonder as you should not have to do that:

" I had to include Teflon tape over the threads to keep the pressurize tank from leaking."

Maybe it is the wrong one. Even so, if you sealed it up, flow should be good enough.
Was this
answer
helpful?
Yes
No
Friday, April 20th, 2018 AT 10:52 AM

Please login or register to post a reply.

Sponsored links