Will not start after being parked for four months

Tiny
MARWEE
  • MEMBER
  • 1997 DODGE DAKOTA
  • 5.2L
  • V8
  • 2WD
  • AUTOMATIC
  • 170,000 MILES
I had new radiator, water pump and starter installed and my vehicle was running well. I parked it for 4 months and now it wont start. I charged the battery added new fuel and also switched around the fuel pump and auto stop relays and still wont start. I checked 4 times on 4 different days to see if I could hear the fuel pump running when the key was turned on and every time not one tick from the fuel pump.
I hooked up an OBD reader and after three attempts I keep getting connection failed. Unable to connect to vehicle computer. Please help! What should I do next?
Thank you
Saturday, January 9th, 2021 AT 8:29 AM

31 Replies

Tiny
ASEMASTER6371
  • MECHANIC
  • 52,797 POSTS
Good afternoon,

I attached the wiring diagram for you of the fuel pump circuit.

https://www.2carpros.com/articles/how-to-check-wiring

We need to do some testing at the fuel pump relay to see if power is getting to the pump.

https://www.2carpros.com/articles/how-to-check-an-electrical-relay-and-wiring-control-circuit

https://www.2carpros.com/articles/how-to-check-a-car-fuse

Check the fuse I circled for power on both sides.

Roy

The fuel pump relay is located in the Power Distribution Center (PDC) (Fig. 67). Refer to label on PDC cover for relay location.

REMOVAL
1. Remove PDC cover.
2. Remove relay from PDC.
3. Check condition of relay terminals and PDC connector terminals for damage or corrosion.
Repair if necessary before installing relay
4. Check for pin height
Pin height should be the same for all terminals within the PDC connector).
Repair if necessary before installing relay.

INSTALLATION
1. Install relay to PDC.
2. Install cover to PDC.
Was this
answer
helpful?
Yes
No
Saturday, January 9th, 2021 AT 1:03 PM
Tiny
MARWEE
  • MEMBER
  • 25 POSTS
I will install a new fuel relay today and check I am getting power to the pump.
Was this
answer
helpful?
Yes
No
Sunday, January 10th, 2021 AT 4:48 AM
Tiny
ASEMASTER6371
  • MECHANIC
  • 52,797 POSTS
Okay, at the relay, can you test for power? One terminal should have power with the key on.

Then another terminal will only have power for 2 seconds after turning on the key. That is the primer from the ECM.

Roy
Was this
answer
helpful?
Yes
No
Sunday, January 10th, 2021 AT 5:06 AM
Tiny
MARWEE
  • MEMBER
  • 25 POSTS
Yes, I do have power to one terminal at the relay but I have not checked that the two second power is feeding through. I will check after I install the new relay. Hopefully it will just start.
Was this
answer
helpful?
Yes
No
Sunday, January 10th, 2021 AT 5:11 AM
Tiny
ASEMASTER6371
  • MECHANIC
  • 52,797 POSTS
You do the check with the relay removed.

When you turn the key with the relay installed, does the relay click?

Roy
Was this
answer
helpful?
Yes
No
Sunday, January 10th, 2021 AT 5:36 AM
Tiny
MARWEE
  • MEMBER
  • 25 POSTS
I installed a new fuel relay and I can't hear any click when key is turned. I'm a bit hard of hearing. Still no start.
Was this
answer
helpful?
Yes
No
Sunday, January 10th, 2021 AT 6:49 AM
Tiny
ASEMASTER6371
  • MECHANIC
  • 52,797 POSTS
Okay, test for voltage at the relay with the key on. It will only be there for 2 seconds.

Roy
Was this
answer
helpful?
Yes
No
Sunday, January 10th, 2021 AT 6:53 AM
Tiny
MARWEE
  • MEMBER
  • 25 POSTS
When I remove the relay there are 5 connector holes. One has constant power.
Are you saying that I should get 2 seconds of power to one of the other holes when the key is turned on?
Was this
answer
helpful?
Yes
No
Sunday, January 10th, 2021 AT 7:07 AM
Tiny
ASEMASTER6371
  • MECHANIC
  • 52,797 POSTS
That is correct. Only 4 terminals are used with the relay.

Roy
Was this
answer
helpful?
Yes
No
Sunday, January 10th, 2021 AT 7:17 AM
Tiny
MARWEE
  • MEMBER
  • 25 POSTS
Okay, now I have the truck in my driveway to work more efficiently.
With the key off I get power at one connector. Key on I get power to that one and another terminal. It stays on during cranking also.
Was this
answer
helpful?
Yes
No
Sunday, January 10th, 2021 AT 9:07 AM
Tiny
ASEMASTER6371
  • MECHANIC
  • 52,797 POSTS
Okay, good. It should have power cranking.

The ECM is what controls that power but if the relay does not click when you turn the key on, then you either have a wire harness issue between the relay and the ECM or the ECM itself.

Roy

REMOVAL
1. Disconnect the negative battery cable at battery.
2. Carefully unplug the three 32-way connectors from PCM.
3. Remove three Powertrain Control Module (PCM) mounting bolts and remove PCM from vehicle.

INSTALLATION
1. Install PCM and mounting bolts to vehicle.
2. Tighten bolts to 3-5 Nm (30-40 in lb).
3. Check pin connectors in the PCM and the three 32-way connectors for corrosion or damage. Repair as necessary
4. Install three 32-way connectors.
5. Install battery cable.
Was this
answer
helpful?
Yes
No
Sunday, January 10th, 2021 AT 9:25 AM
Tiny
MARWEE
  • MEMBER
  • 25 POSTS
The relay does click as the key is turned on and off.
Was this
answer
helpful?
Yes
No
Sunday, January 10th, 2021 AT 9:25 AM
Tiny
ASEMASTER6371
  • MECHANIC
  • 52,797 POSTS
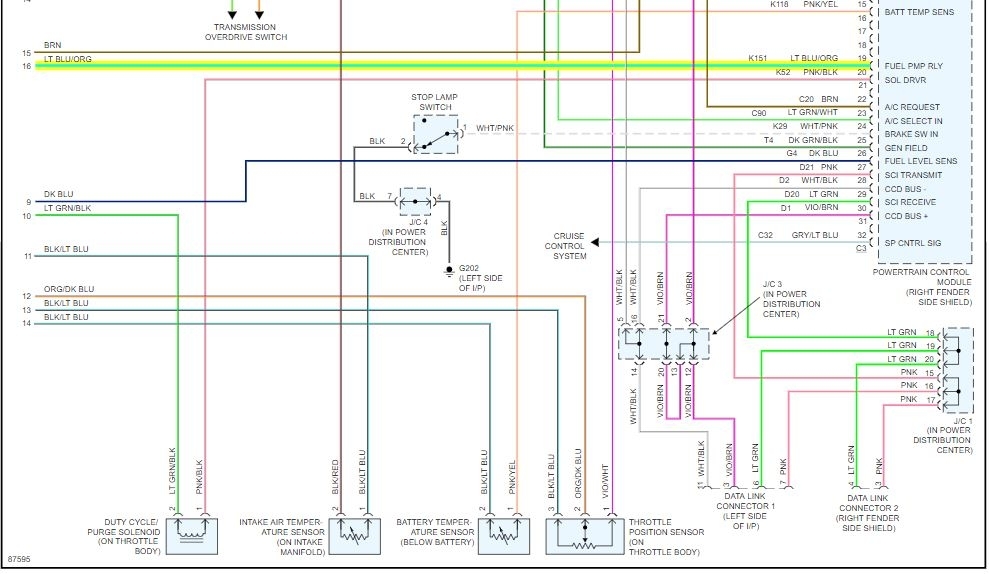
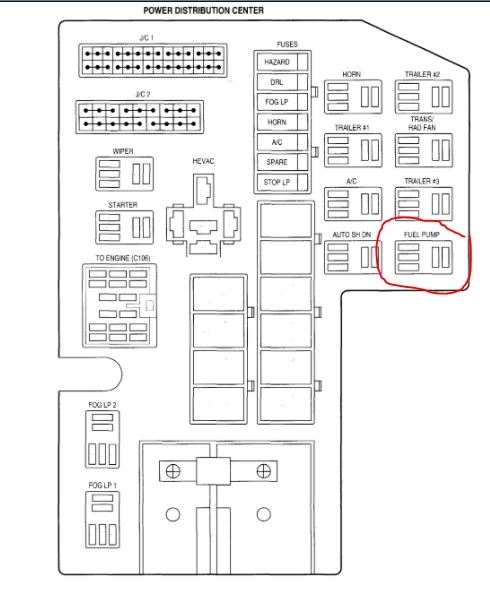
Okay, then you need to go to the fuel pump connector and verify the voltage to the pump.

It looks like you may need a fuel pump.

Roy

Warning: the fuel system is under a constant pressure (even with engine off). Before servicing fuel pump module, fuel system pressure must be released.

FUEL PUMP MODULE
REMOVAL
1. Drain fuel tank and remove tank. Refer to Fuel Tank Removal/Installation.
2. Thoroughly wash and clean area around pump module to prevent contaminants from entering tank.
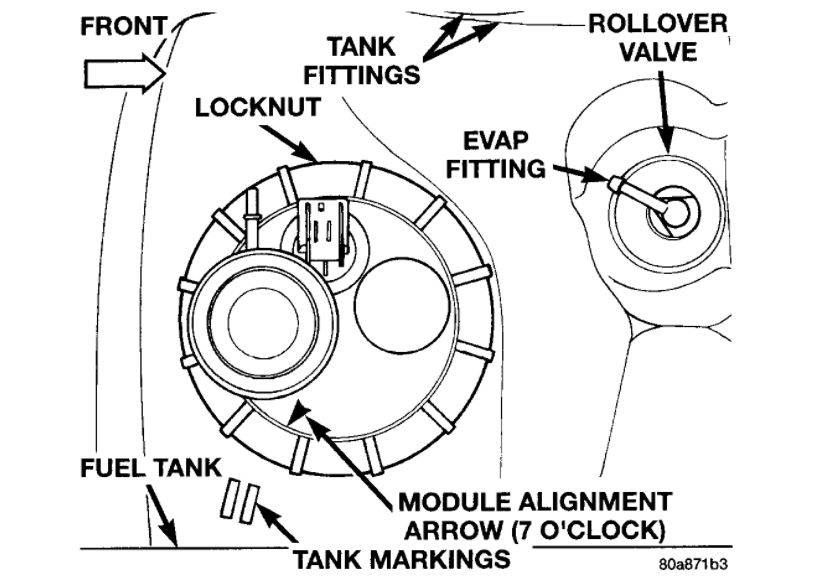
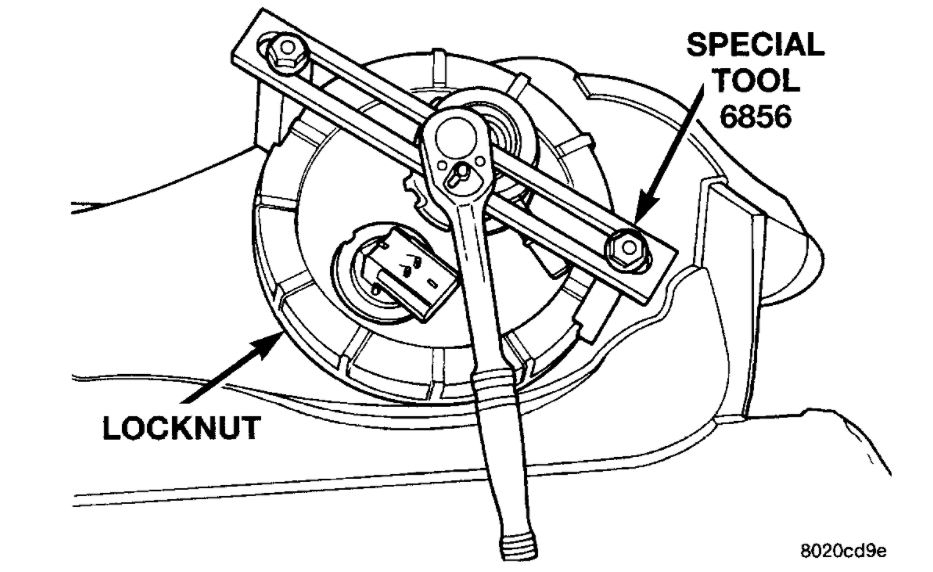
3. The fuel pump module locknut is threaded onto fuel tank (Fig. 28). Install Special Tool 6856 to fuel pump module locknut and remove locknut (Fig. 29).
4. Remove module from fuel tank.

CAUTION: Whenever fuel pump module is serviced, the module gasket must be replaced.

INSTALLATION
1. Using a new gasket, position fuel pump module into opening in fuel tank.
Be sure rubber gasket remains in place.
Rotate module assembly until module alignment arrow is at 7 o'clock position (Fig. 28).
This step must be followed to prevent float/float rod from contacting sides of fuel tank.
2. Position locknut over top of fuel pump module.
Tighten finger tight.
3. Carefully rotate fuel filter/fuel pressure regulator until pointed towards drivers side of vehicle (Fig. 28).
4. Install Special Tool 6856 to locknut.
5. Tighten locknut to 54 Nm (40 ft lb) torque.
While tightening locknut, be sure module has not rotated.
6. Install fuel tank. Refer to Fuel Tank Installation.

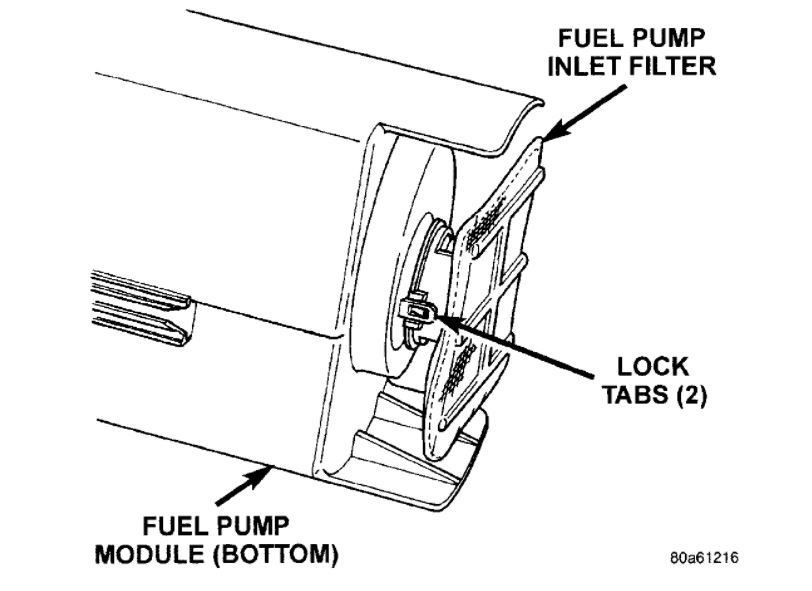
Fig 30 Fuel Pump Inlet Filter
imageOpen In New TabZoom/Print

FUEL PUMP INLET FILTER

NOTE: The fuel pump inlet filter (strainer) is located on the bottom of the fuel pump module (Fig. 30). The fuel pump module is located inside of fuel tank.

REMOVAL
1. Remove fuel tank. Refer to Fuel Tank Removal/ Installation.
2. Remove fuel pump module. Refer to Fuel Pump Module Removal/Installation.
3. Remove filter by carefully prying 2 lock tabs at bottom of module with 2 screwdrivers. Filter is snapped to module.
4. Clean bottom of pump module.

INSTALLATION
1. Snap new filter to bottom of module.
2. Install fuel pump module. Refer to Fuel Pump Module Removal/Installation.
3. Install fuel tank. Refer to Fuel Tank Removal/ Installation.

Tank

WARNING: The fuel system is under a constant pressure (even with engine off). Before draining fuel tank, fuel system pressure must be released.

WARNING: Gasoline is extremely volatile, when servicing fuel systems always wear eye protection, keep open flame away from fuel system components, and prohibit smoking in service areas.

NOTE: Wrap shop towels around fuel hoses to absorb any fuel that spills during fuel tank replacement.

REMOVAL
1. Disconnect negative battery cable at battery
2. Remove fuel tank filler tube cap.
3. Perform Fuel System Pressure Release procedure.
4. Reinstall fuel fill cap.
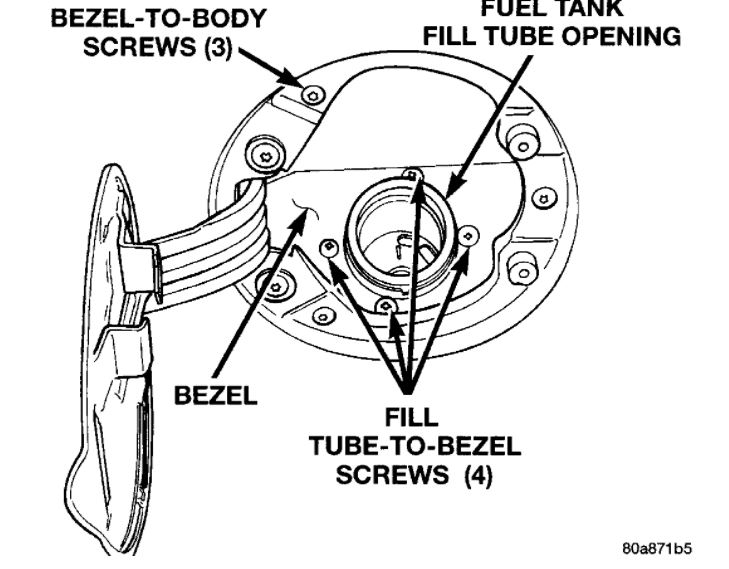
5. The fuel fill tube assembly is mounted to a plastic bezel behind fuel fill door. Remove 3 bezel-to-body mounting screws (Fig. 40). Do not disconnect fuel tubes from tank at this time.
6. Raise vehicle on hoist.
7. Place and secure a transmission jack under center of fuel tank and apply slight pressure.

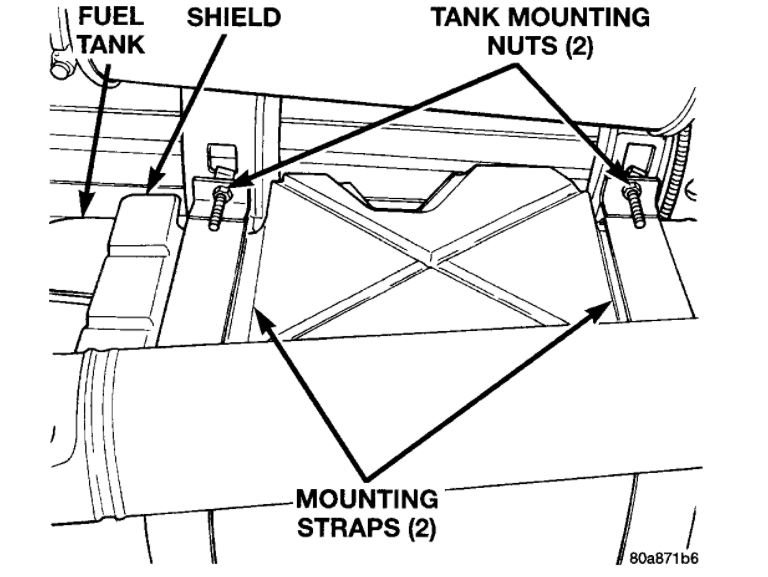
Fig 41 Fuel Tank Mounting
imageOpen In New TabZoom/Print

8. Remove two tank mounting nuts from mounting straps (Fig. 41).
Position tank mounting straps to side of vehicle and lower tank just enough to allow access to connections at top of tank.
To prevent fuel loss, be sure fuel fill cap is securely installed.
9. Disconnect fuel supply line from fuel filter/fuel pressure regulator fitting at top of tank.
Refer to Quick-Connect Fittings for procedures.
10. Disconnect fuel vapor line from rollover valve at top of tank.
11. Disconnect electrical connector at pump module at top of tank.
12. Lower tank from vehicle.
13. Remove tank from hydraulic jack.
14. To drain fuel from tank, one of the fuel tubes must be disconnected at side of fuel tank.
A. Rotate fuel tank until the tube fittings at side of fuel tank are at highest point.
B. Clean quick-connect fittings of any dirt/contaminants before removal.

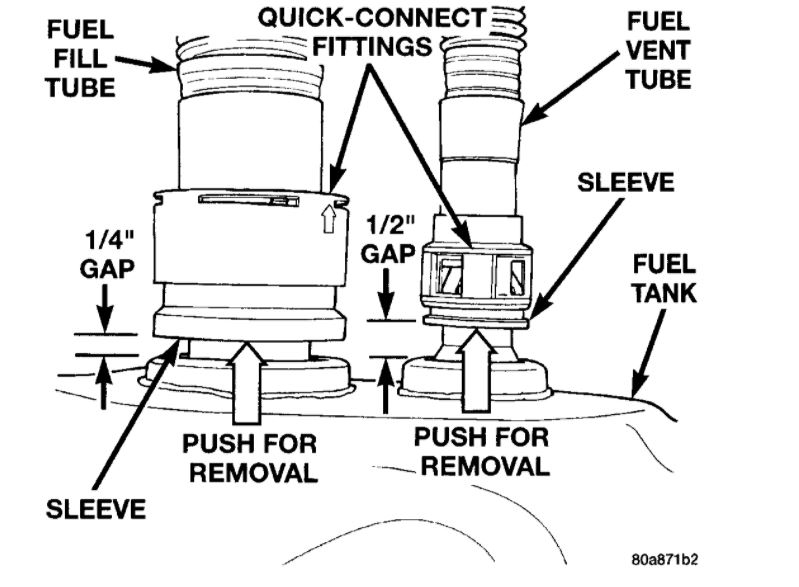
Fig 42 Quick-Connect Fittings At Fuel Tubes
imageOpen In New TabZoom/Print

c. Disconnect fuel vent tube quick-connect fitting at tank (Fig. 42).
The fuel vent tube is smallest of two tubes.
First, push quick-connect fitting and tube as far as possible onto fuel tank fitting.
While holding quick-connect fitting and tube as far as possible onto fuel tank fitting, push release sleeve (Fig. 42) squarely into quick-connect fitting to unlock release tabs.
Hold sleeve into quick-connect fitting while removing tube from tank.
Failure to push quick-connect fitting onto fuel tank fitting before pushing release sleeve into quick-connect fitting will damage metal retainer within fitting.
D. Position a drain hose into this open fitting on tank.
E. Drain fuel into an approved portable holding tank or a properly labeled gasoline safety container.
15. If fuel fill tube removal is necessary (fuel fill tube is largest of two tubes), push fitting sleeve (Fig. 42) into quick-connect fitting and pull tube from tank fitting for removal.
Fitting is similar to an air hose connector.
16. If fuel pump module requires service, refer to Fuel Pump Module Removal/Installation.

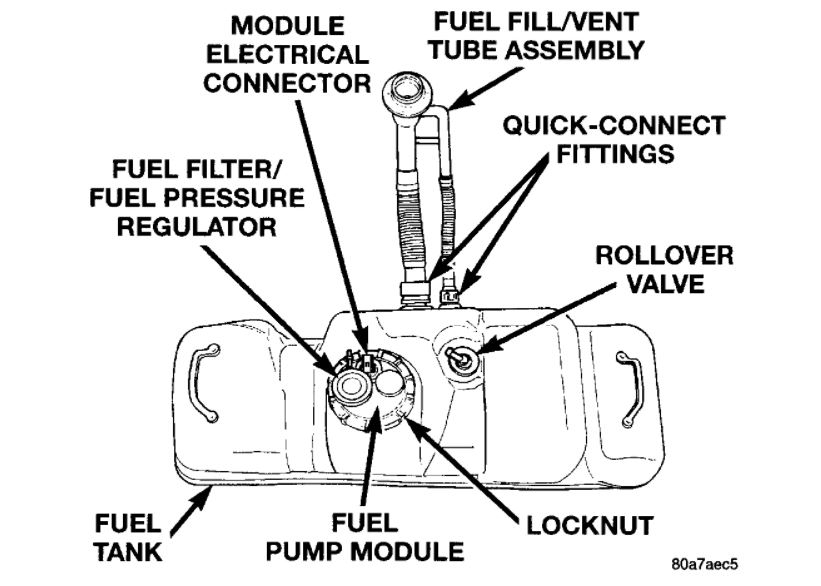
Fig 43 Top View Of Fuel Tank
imageOpen In New TabZoom/Print

INSTALLATION
1. If fuel pump module is being installed, refer to Fuel Pump Module Removal/Installation.
2. Place and secure fuel tank on top of transmission jack.
3. Raise tank up enough to connect fuel line, electrical connector and vapor hose to top of fuel tank.
Refer to Quick-Connect Fittings for fuel line procedures.
4. Continue raising tank into position and install mounting straps and nuts.
Tighten nuts to 27-54 Nm (2O-4O ft lb) torque.
Do not over tighten mounting strap nuts.
5. Install fuel tube quick-connect fittings to tank fittings.
Be sure they are clean of any dirt/contaminants before installation.
Quick-Connect fittings snap on to tank fittings.
After installation, pull firmly on each tube to confirm good connection to tank fitting.
After verifying good connection, gap from bottom of fuel fill tube sleeve to top of tank fitting should be approximately 1/4 inch (Fig. 42).
Gap from bottom of fuel vent tube sleeve to top of tank fitting should be approximately 1/2 inch. (Fig. 42).
6. Remove transmission jack.
7. Install fuel tube assembly and plastic bezel to body (3 screws).
8. Connect negative cable to battery
9. Refill fuel tank and install fill cap.
10. Inspect all hoses and lines for leaks.
Was this
answer
helpful?
Yes
No
Sunday, January 10th, 2021 AT 9:46 AM
Tiny
MARWEE
  • MEMBER
  • 25 POSTS
Thank you. I will check for 12v at the fuel pump connector when the key is turned on.
If power is present then I will replace the pump. Question, if power is not present at the fuel pump connector then are we back to the ECM?
Was this
answer
helpful?
Yes
No
Sunday, January 10th, 2021 AT 10:07 AM
Tiny
ASEMASTER6371
  • MECHANIC
  • 52,797 POSTS
No, if there is no power, then it is a wiring issue between the relay and the pump.

Roy
Was this
answer
helpful?
Yes
No
Sunday, January 10th, 2021 AT 10:11 AM
Tiny
MARWEE
  • MEMBER
  • 25 POSTS
Thank you very much. I will do what I can and let you know.
Was this
answer
helpful?
Yes
No
Sunday, January 10th, 2021 AT 10:28 AM
Tiny
ASEMASTER6371
  • MECHANIC
  • 52,797 POSTS
You are welcome.

Always glad to help.

Roy
Was this
answer
helpful?
Yes
No
Sunday, January 10th, 2021 AT 10:54 AM
Tiny
MARWEE
  • MEMBER
  • 25 POSTS
I was able to drop the fuel tank and get the connector off. There is no power to any of the four female terminals at the fuel pump connector when the key is on. The relays seem to be clicking, I have switched them around and bought new to make sure the relays are not the problem. The wiring from the tank to firewall looks good.
Was this
answer
helpful?
Yes
No
Saturday, January 16th, 2021 AT 1:14 PM
Tiny
ASEMASTER6371
  • MECHANIC
  • 52,797 POSTS
You have a wiring issue from the relay to the tank if all your readings are accurate that you gave me.

Wiring issues are not external, they are internal inside the wire itself.

Roy
Was this
answer
helpful?
Yes
No
Saturday, January 16th, 2021 AT 2:44 PM
Tiny
MARWEE
  • MEMBER
  • 25 POSTS
I can check for continuity from tank to a terminal at the relay. That should verify the wiring is good, right?
Was this
answer
helpful?
Yes
No
Saturday, January 16th, 2021 AT 2:52 PM

Please login or register to post a reply.

Sponsored links