Welcome back.
(Timing belt instructions below. This car has two different engines)
If the cam shaft will not turn a full revolution, something is wrong internally, or the timing is incorrect and a valve is hitting the top of a piston. Again, if it will not turn a full revolution, the engine will not run regardless of spark and fuel.
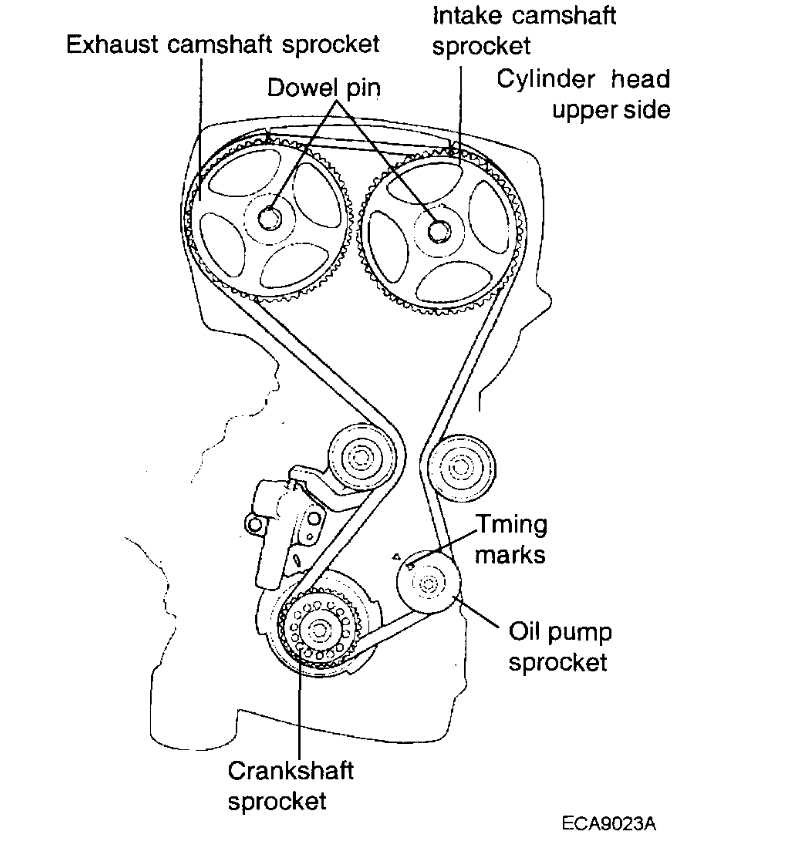
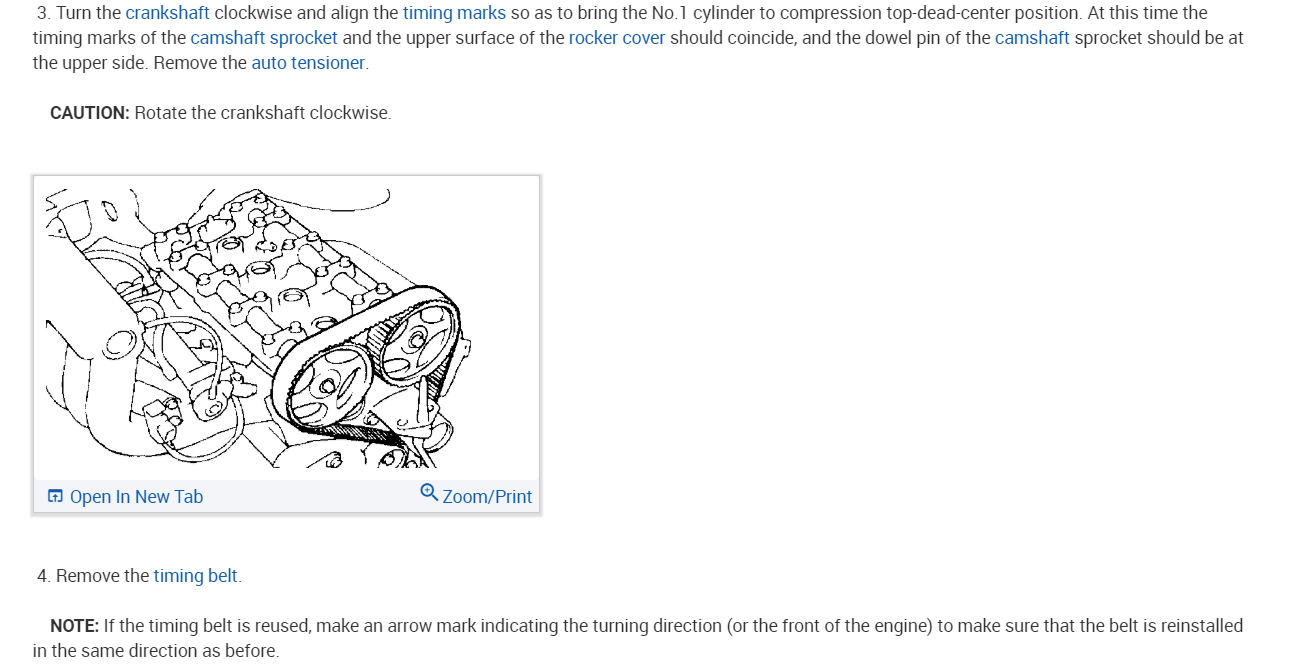
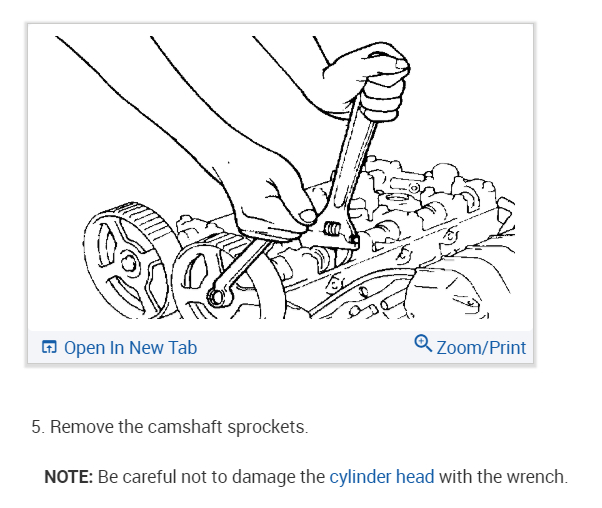
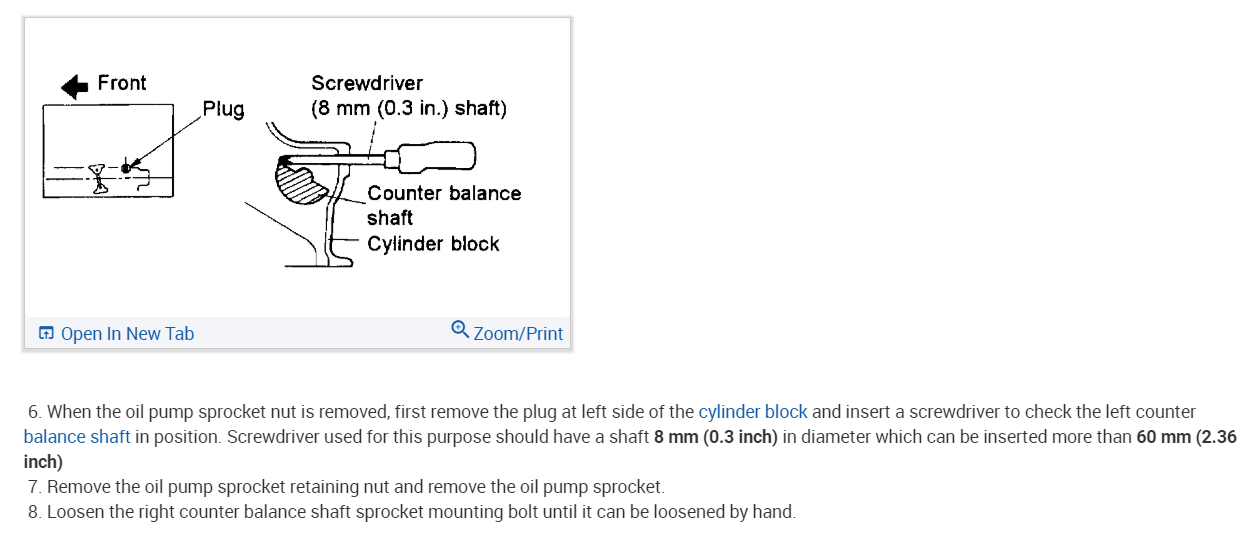
Before you do anything as far as trying to start it, confirm the timing is correct. Here are the directions specific to your vehicle for replacing a timing chain. This is an interference engine. Basically, that means if timing is off, there will be internal damage done to the engine. You must make sure it is correct before doing anything else, and do not force the cam shaft to turn.
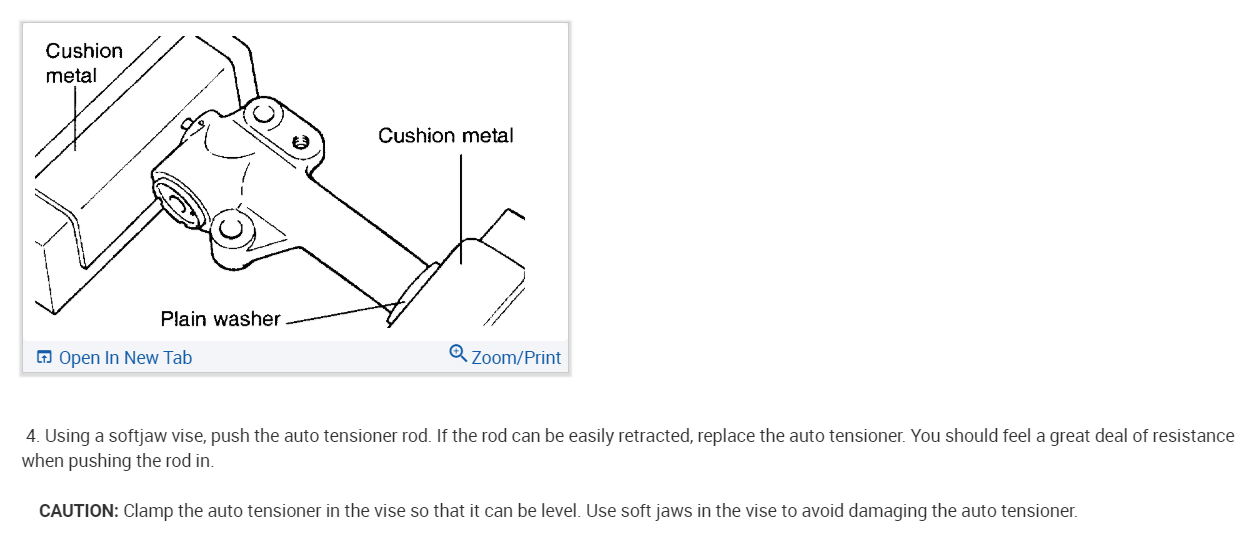
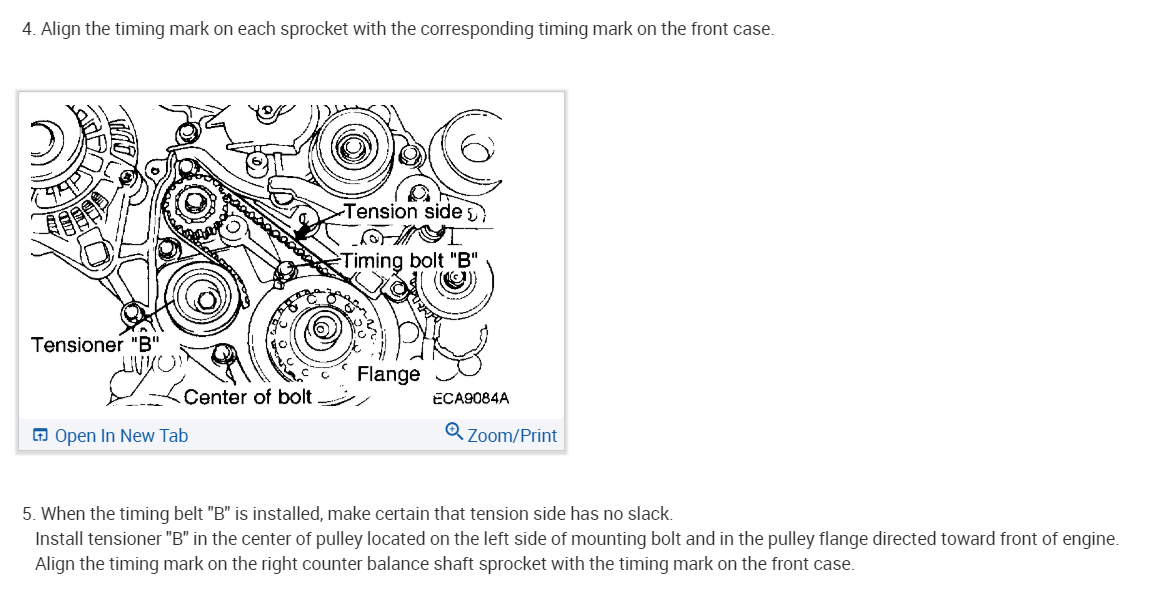
Note: All pictures correlate with these directions.
________________
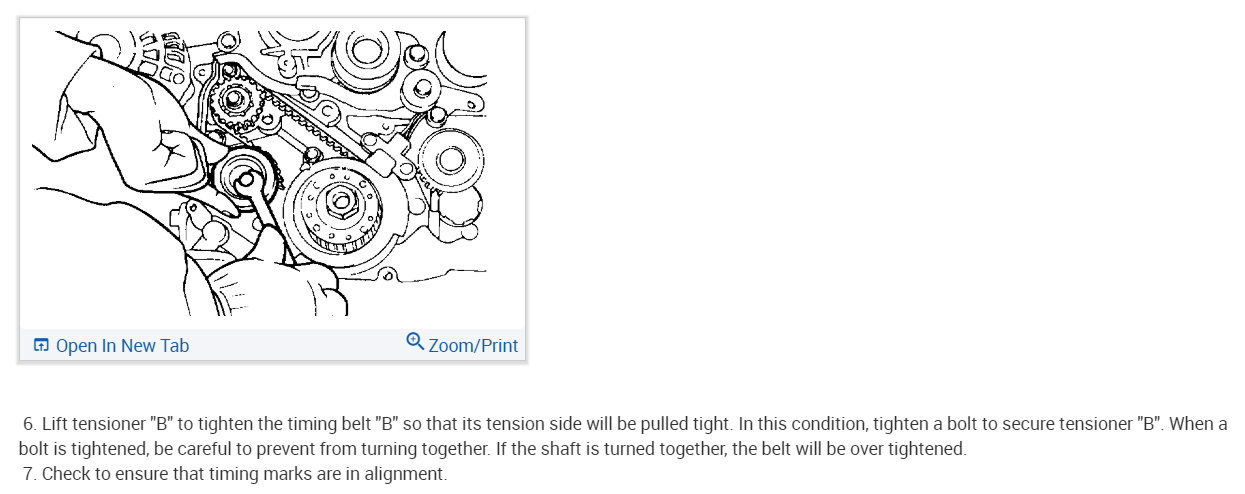
TIMING SYSTEM
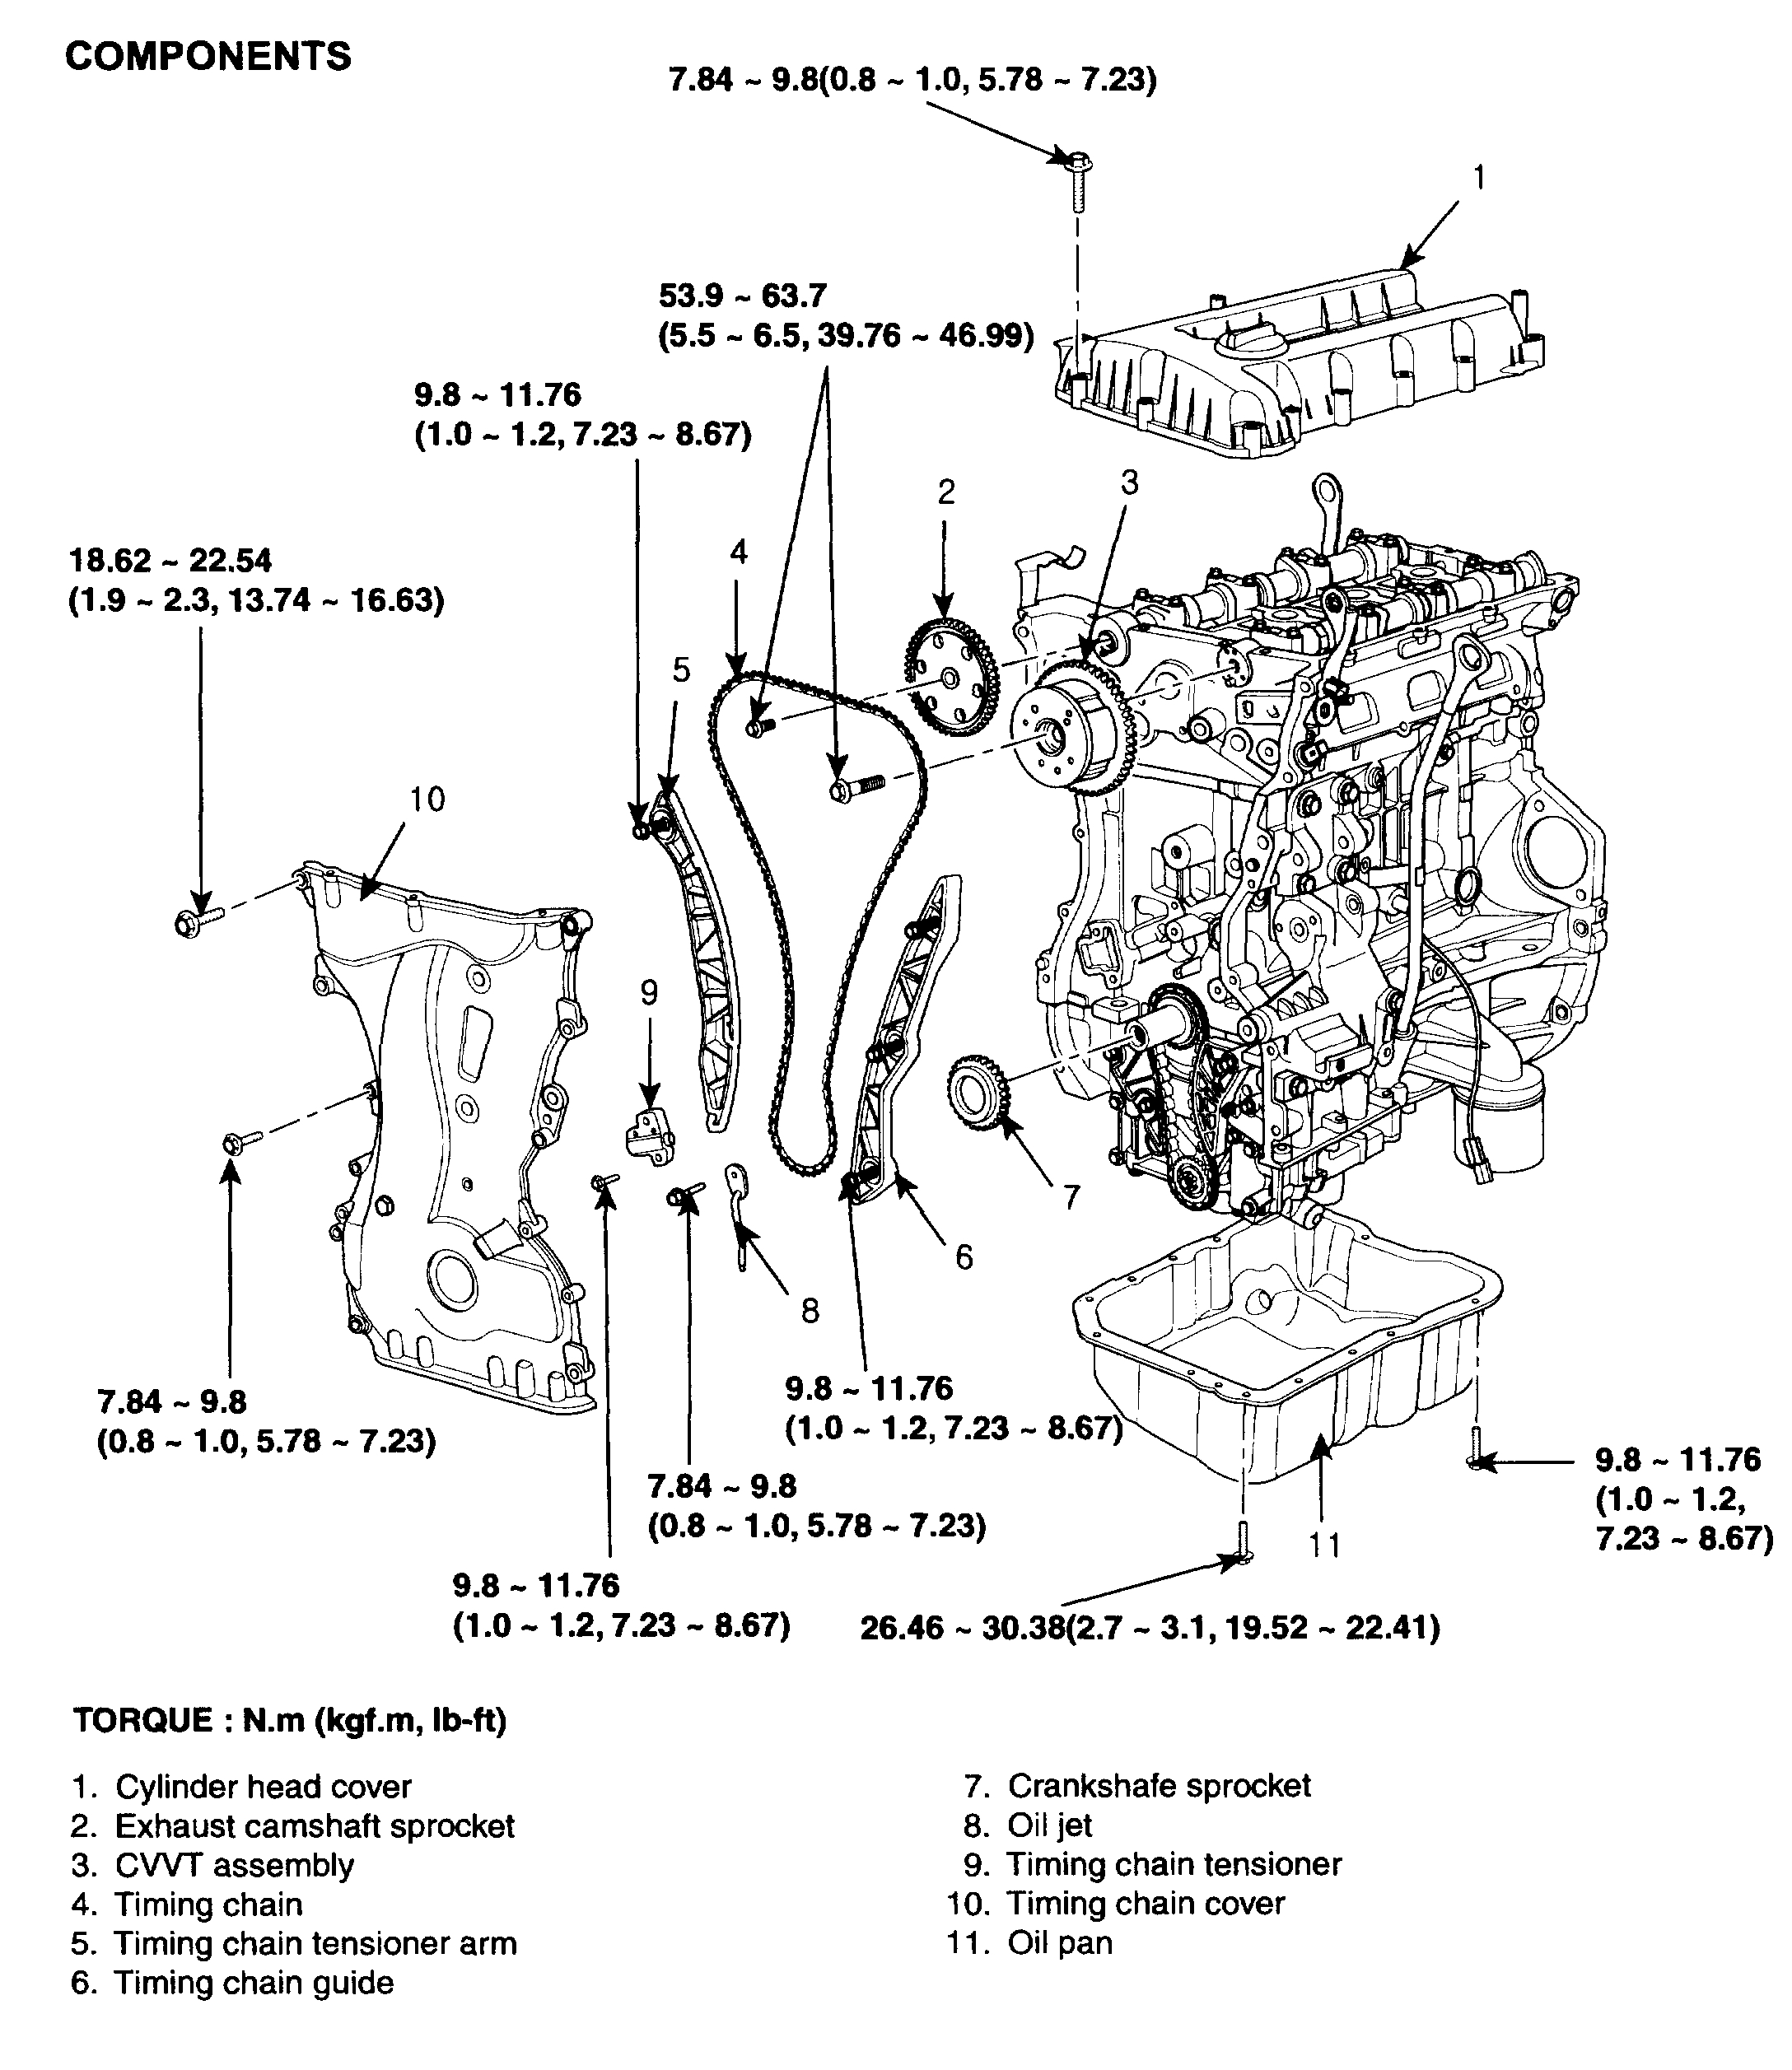
COMPONENTS
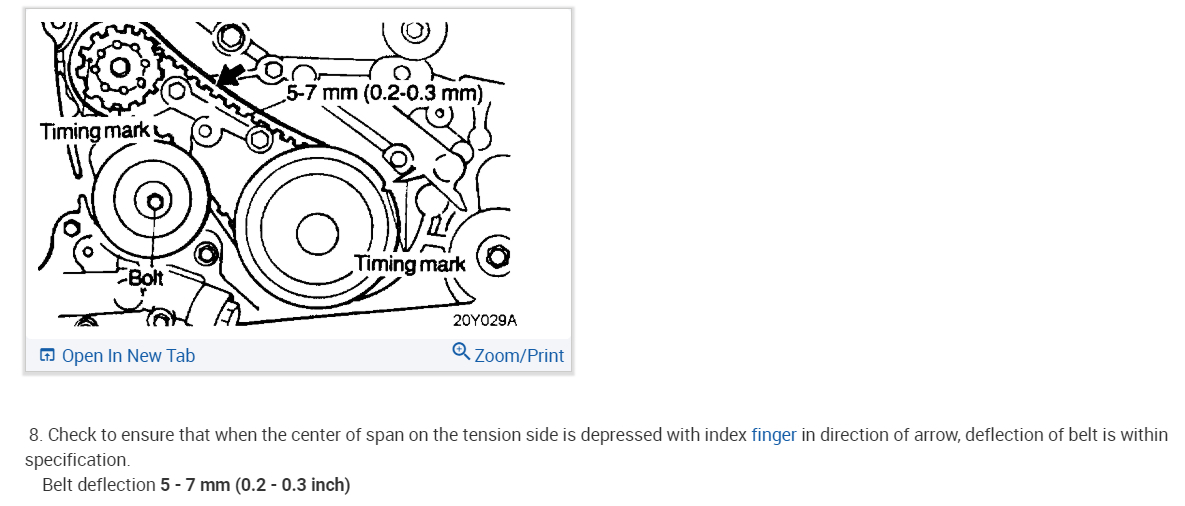
REMOVAL
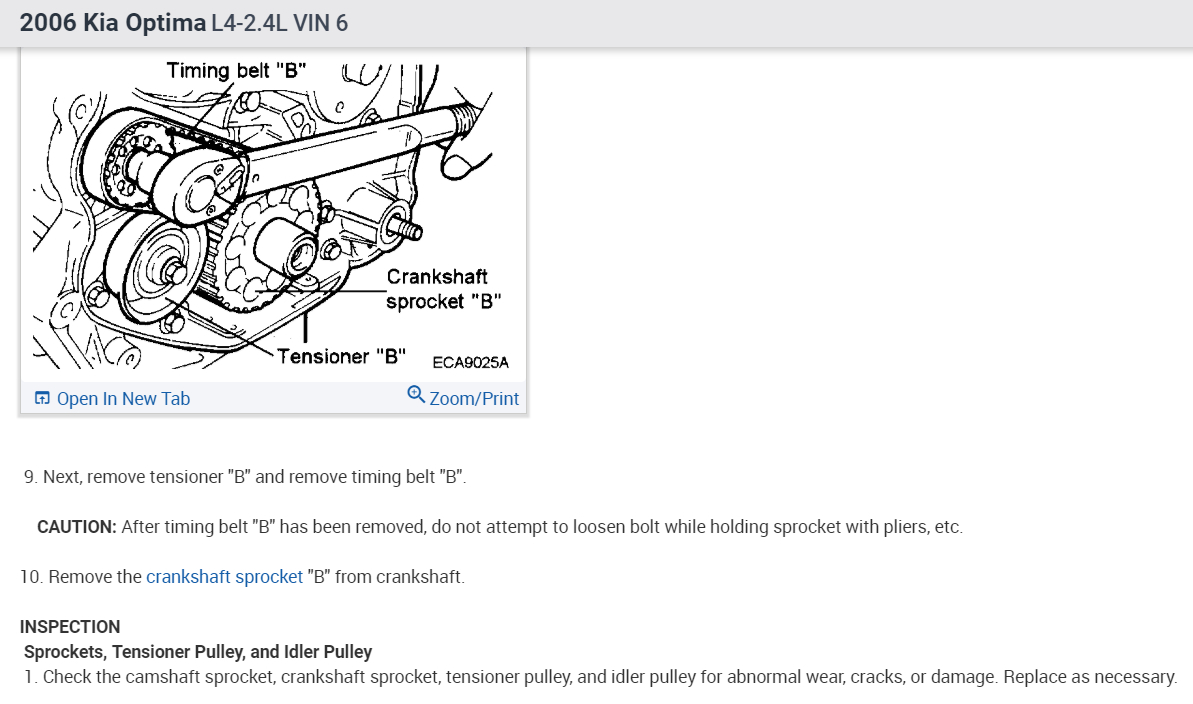
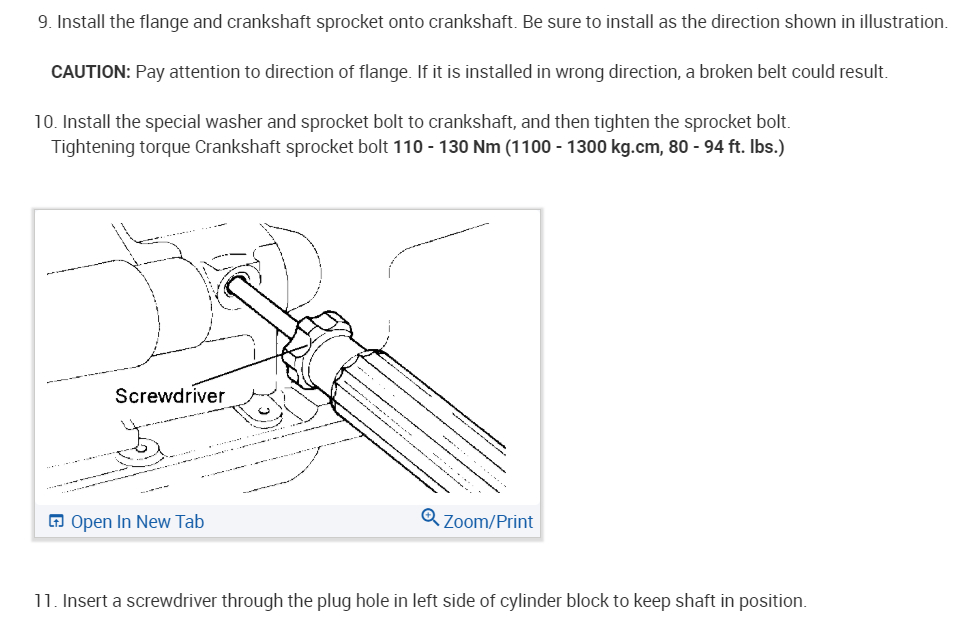
Engine removal is not required for this procedure.
TIMING CHAIN
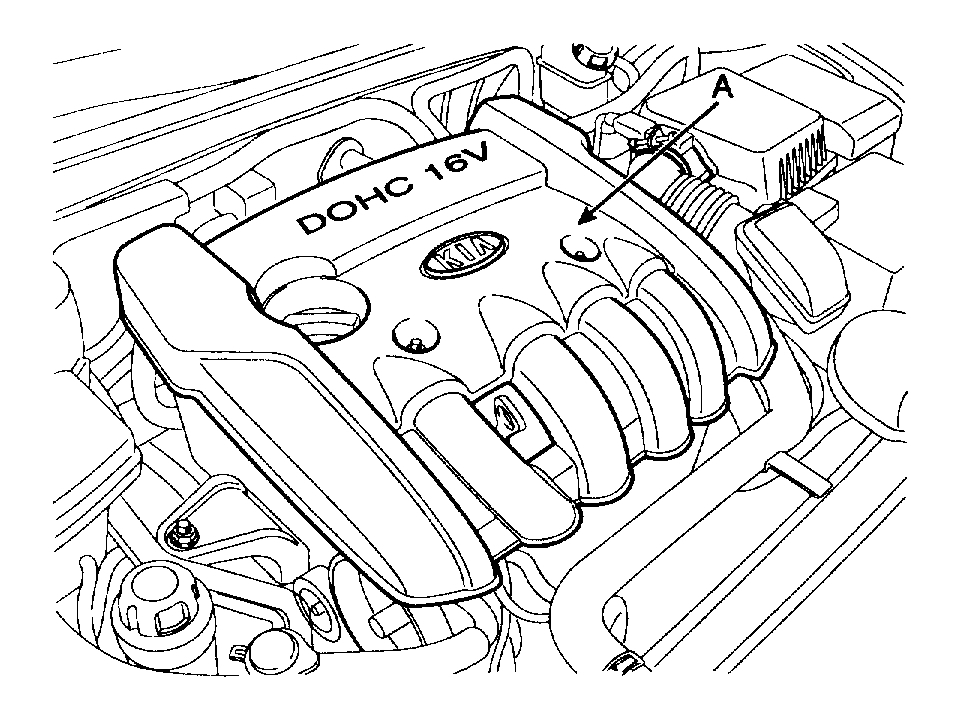
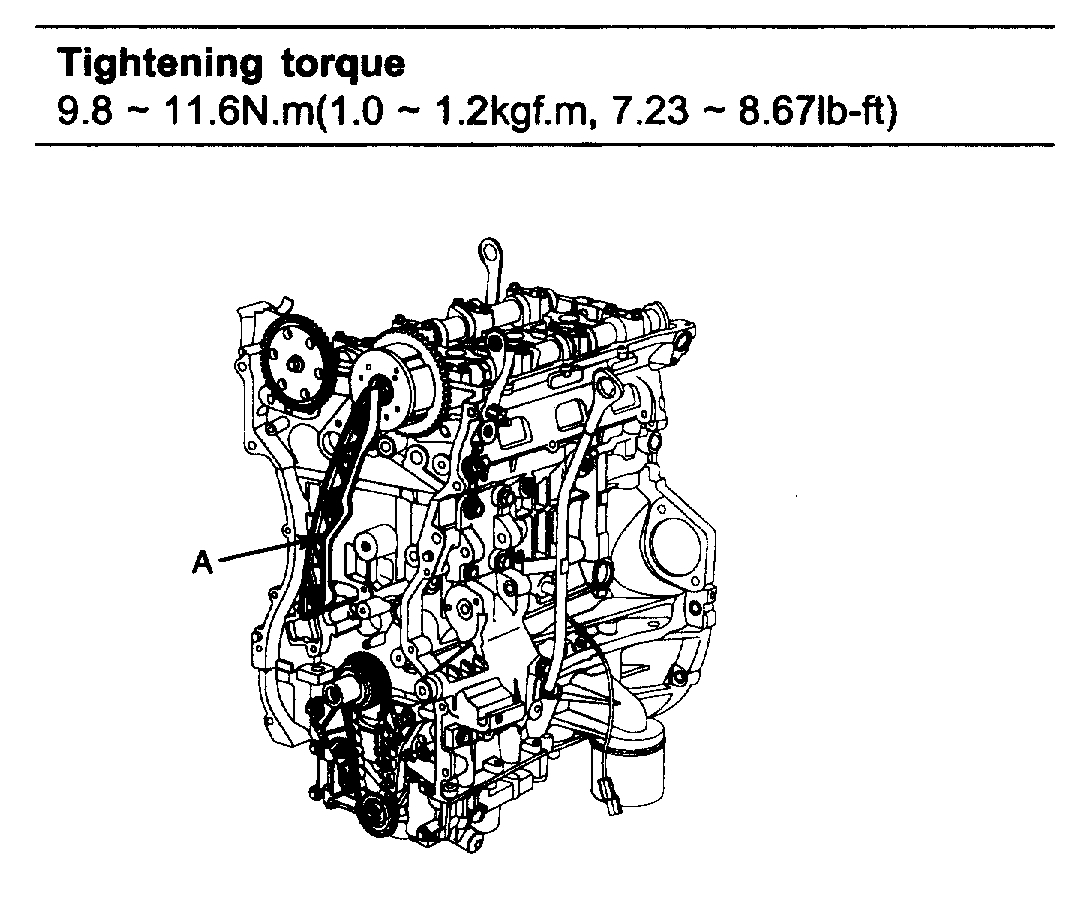
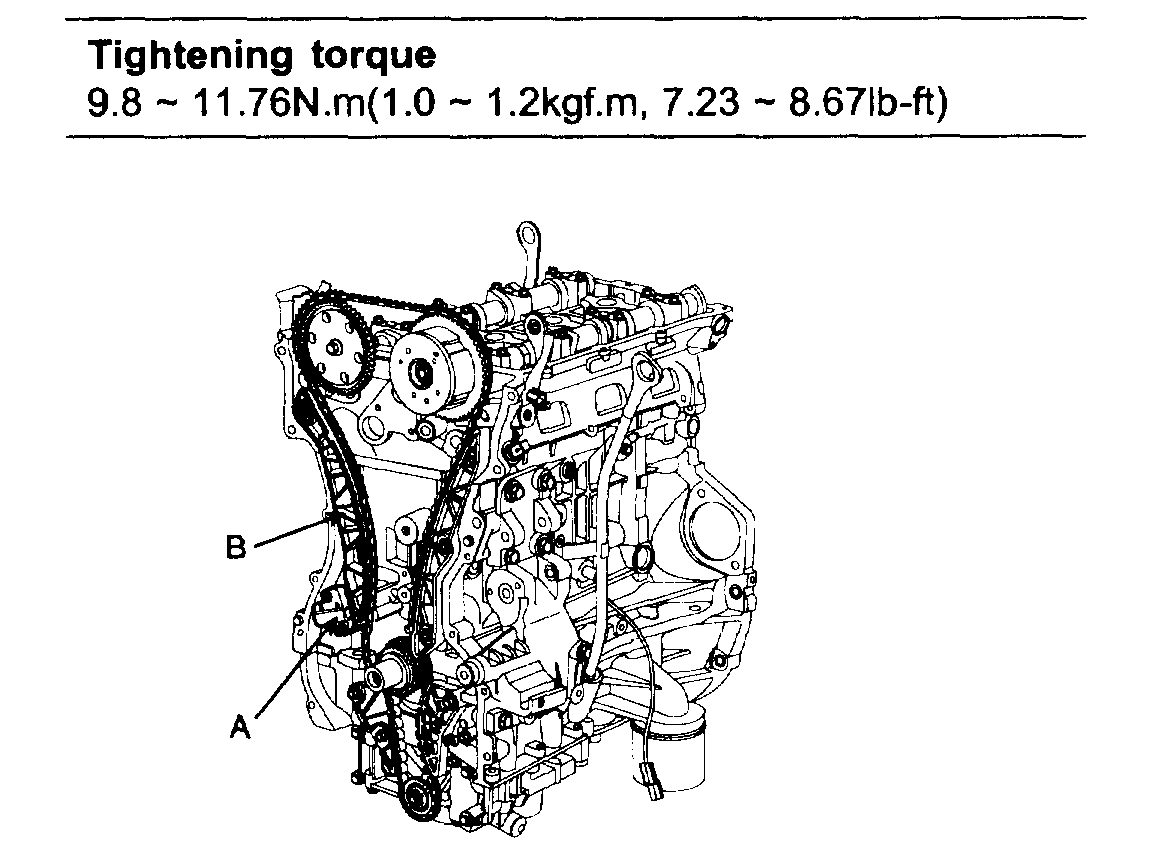
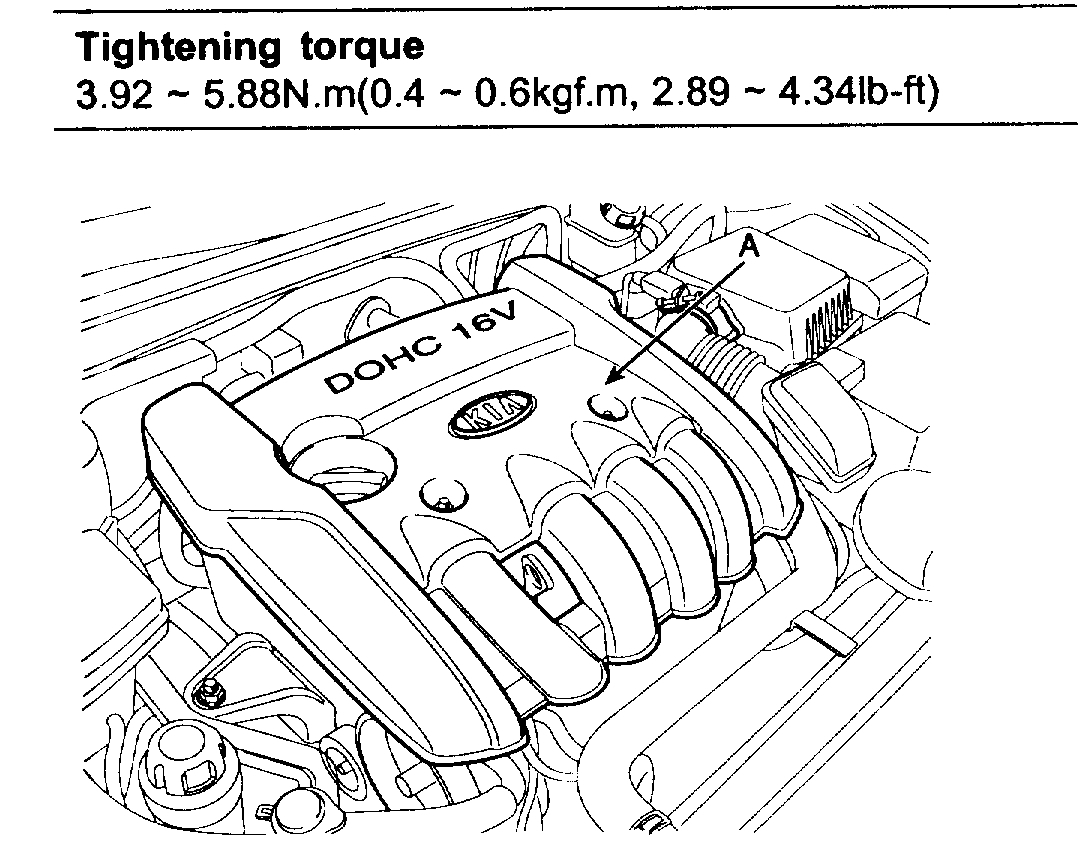
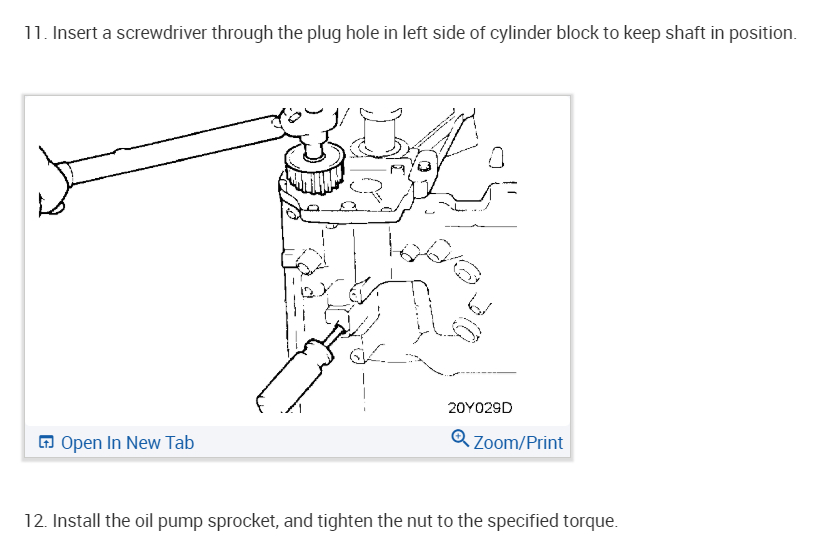
1. Remove the engine cover (A).
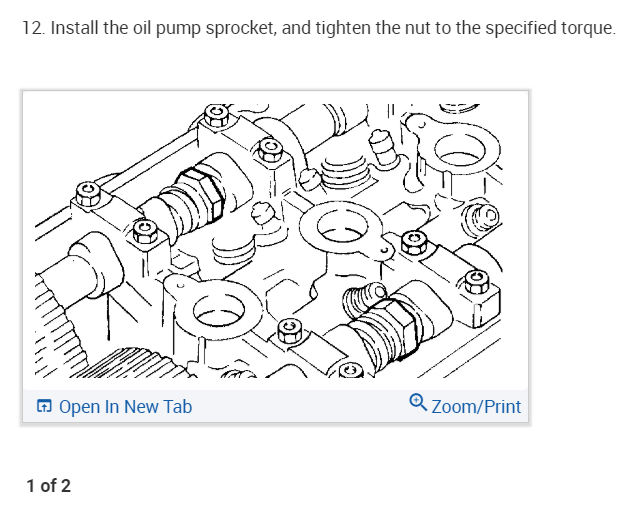
2. Remove RH front wheel.
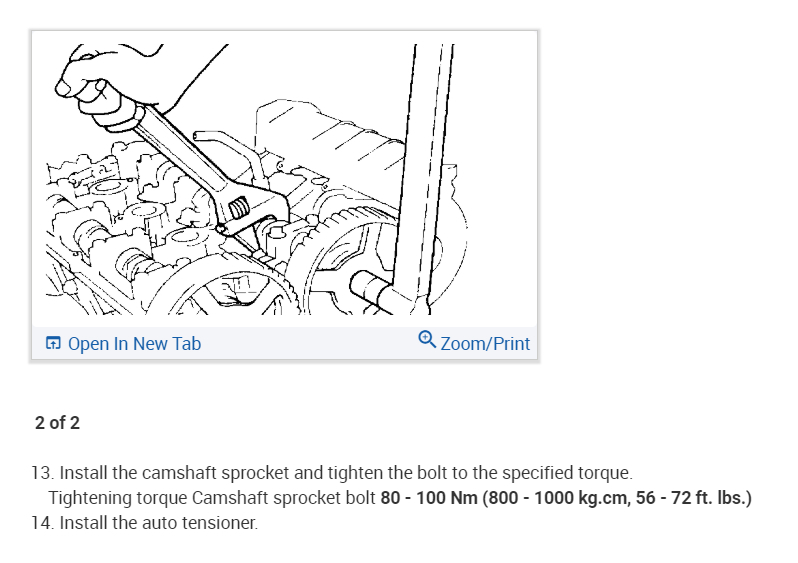
3. Remove RH side cover.
4. Set No.1 cylinder to TDC/compression
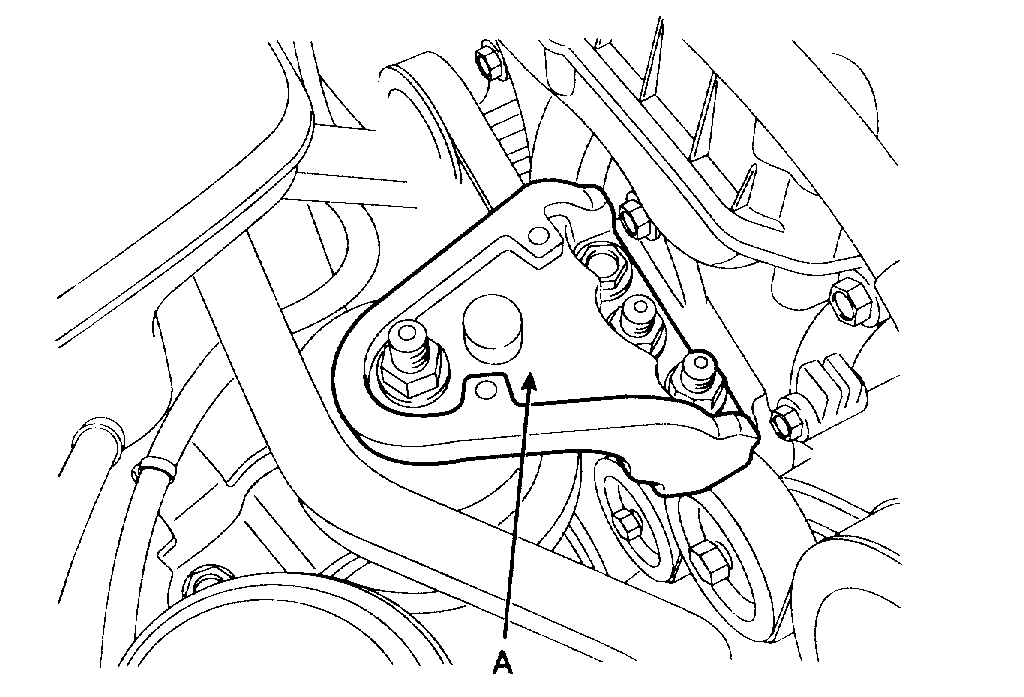
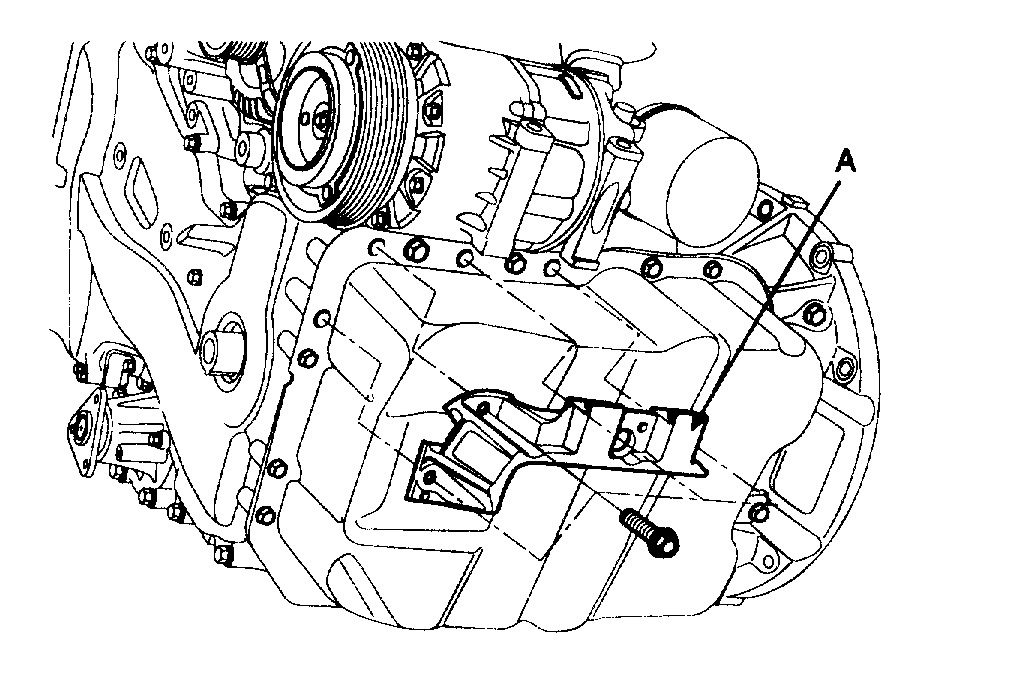
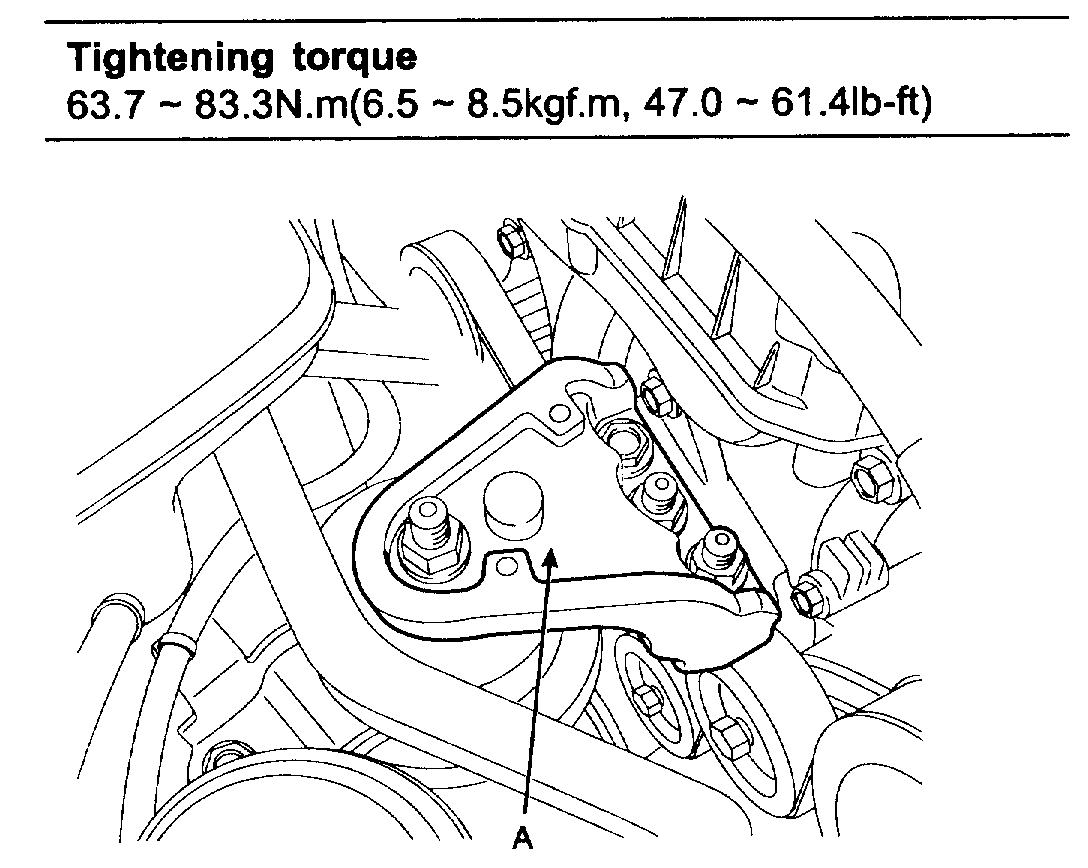
5. Remove the engine mount bracket (A).
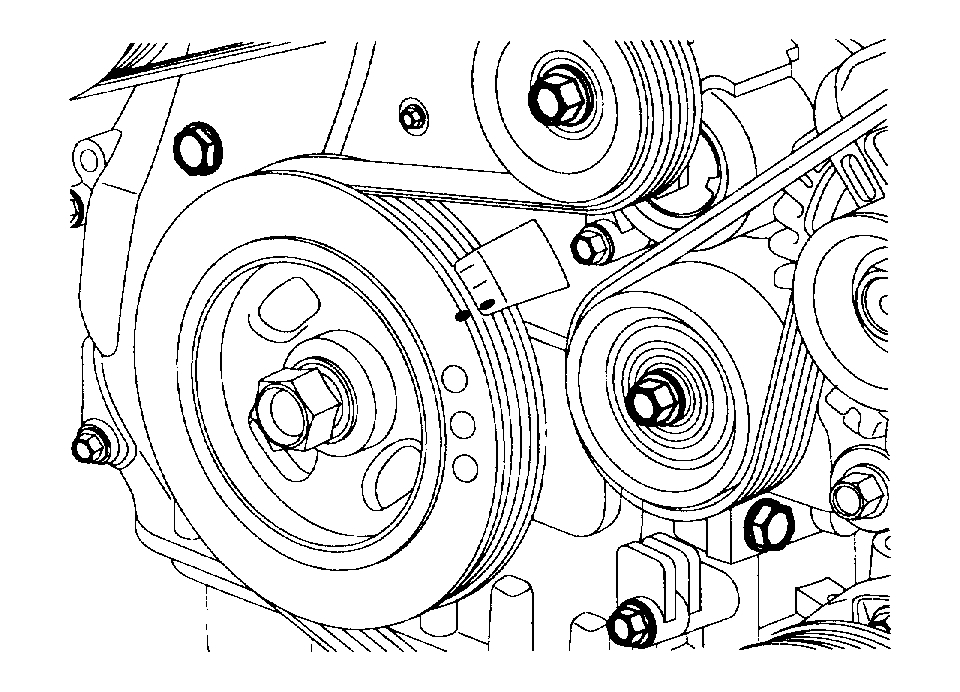
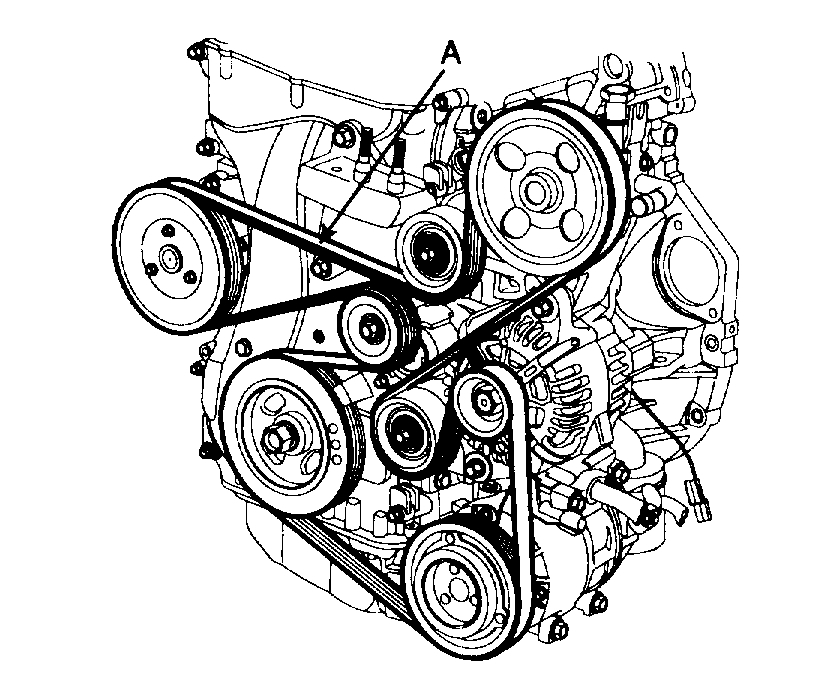
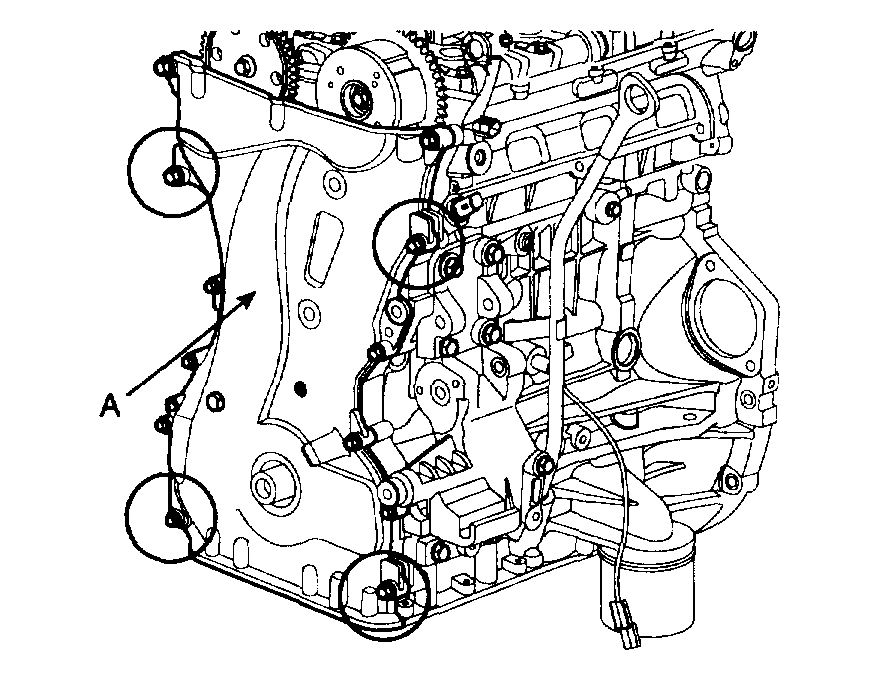
6. Remove drive belt (A).
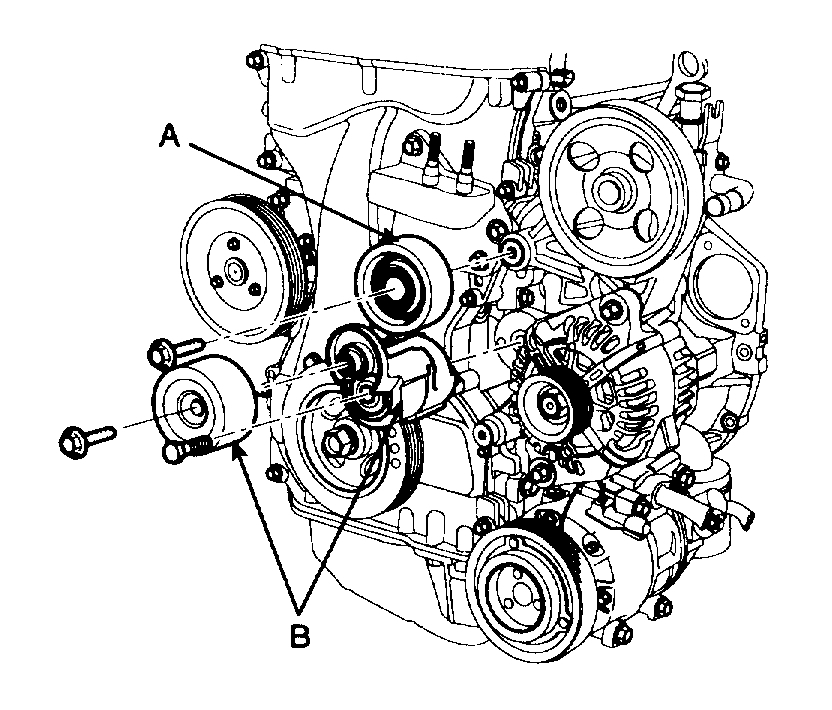
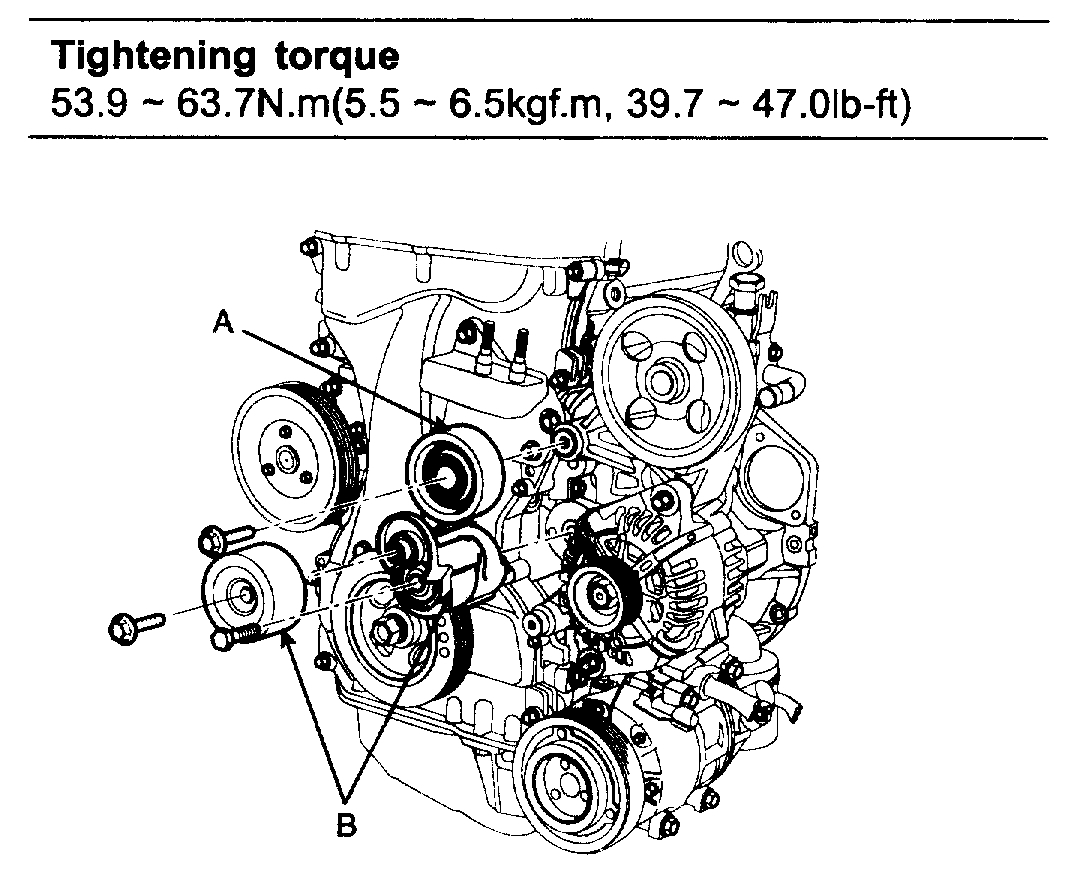
7. Remove the idler pulley (A).
8. Remove the drive belt tensioner (B).
NOTE: Tensioner pulley bolt is left - handed screw
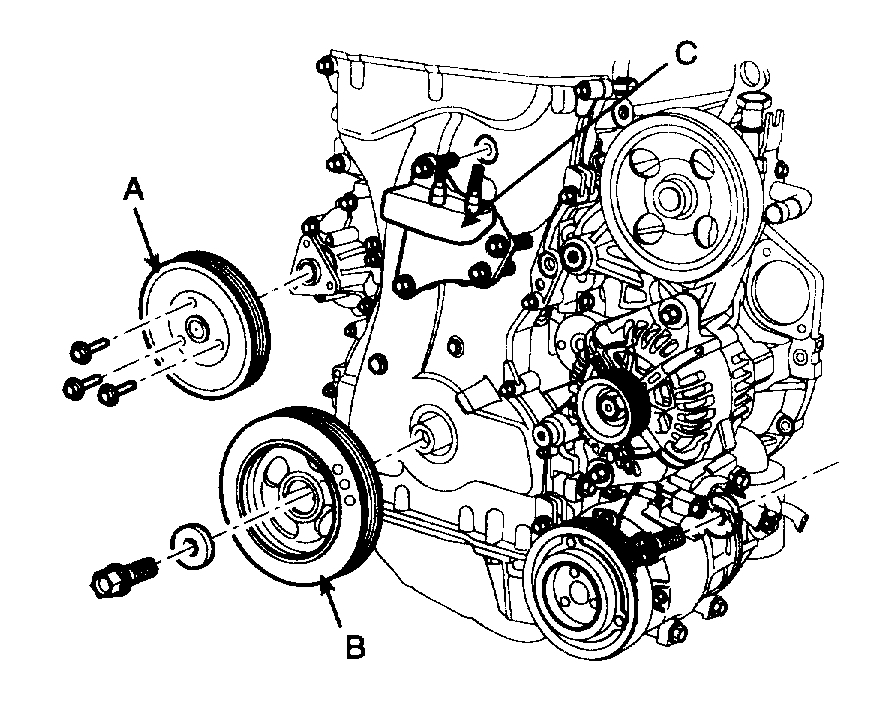
9. Remove the water pump pulley (A).
10. Remove the crankshaft pulley (B).
11. Remove the engine support bracket (C).
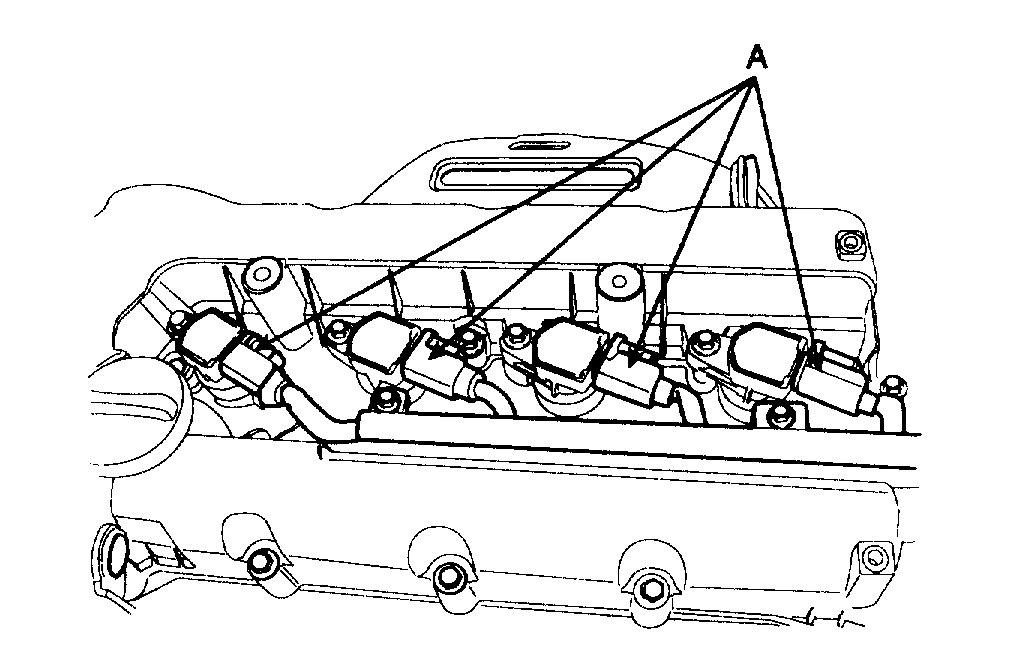
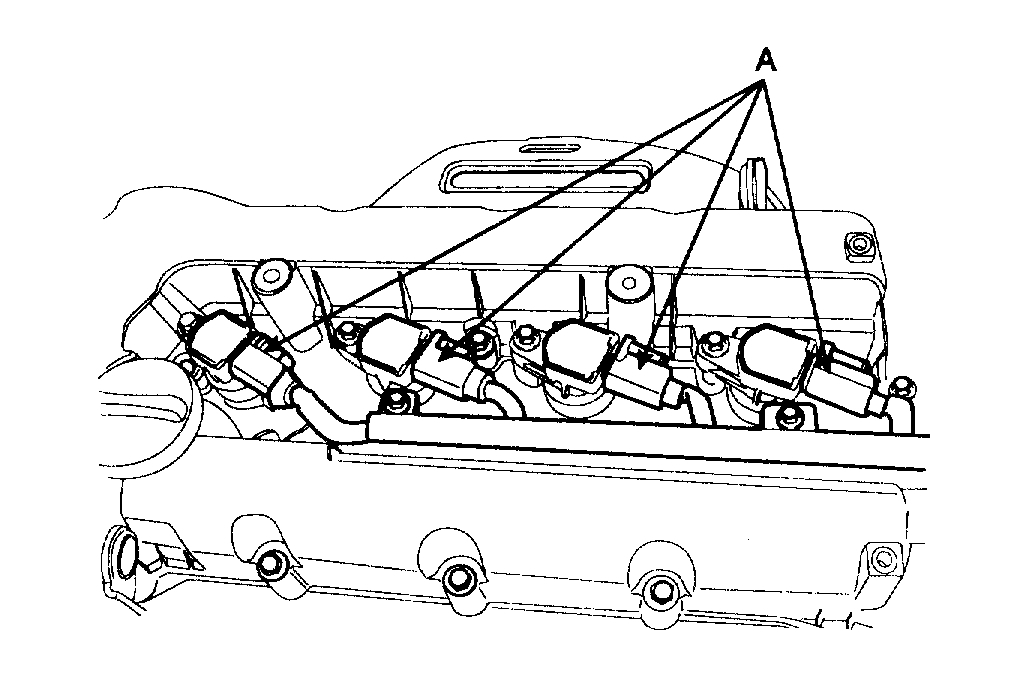
12. Disconnect the ignition coil connector (A).
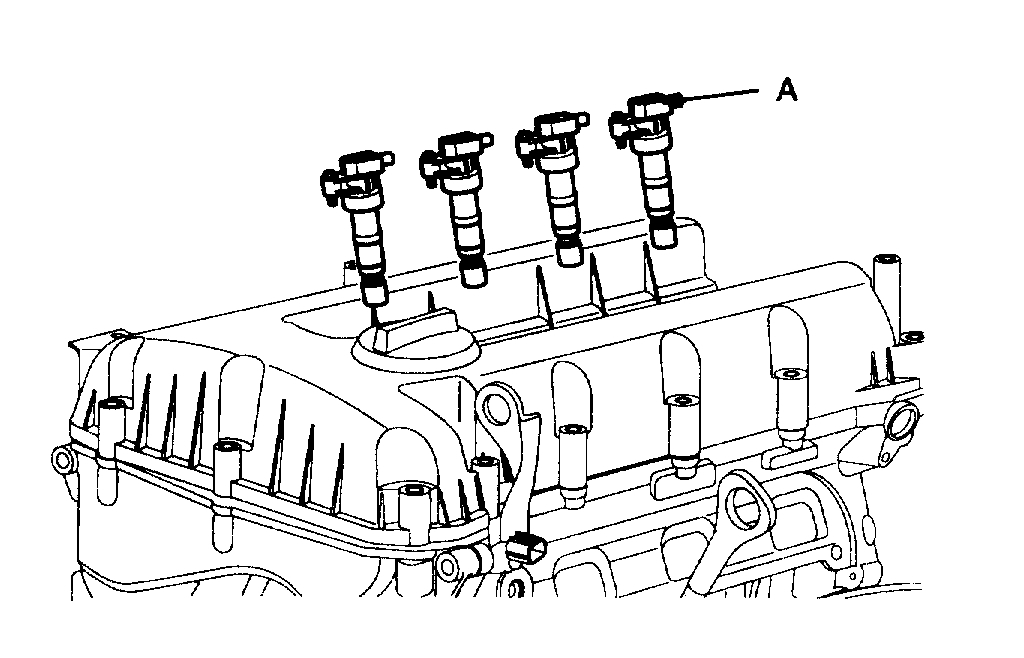
13. Remove the ignition coil (A).
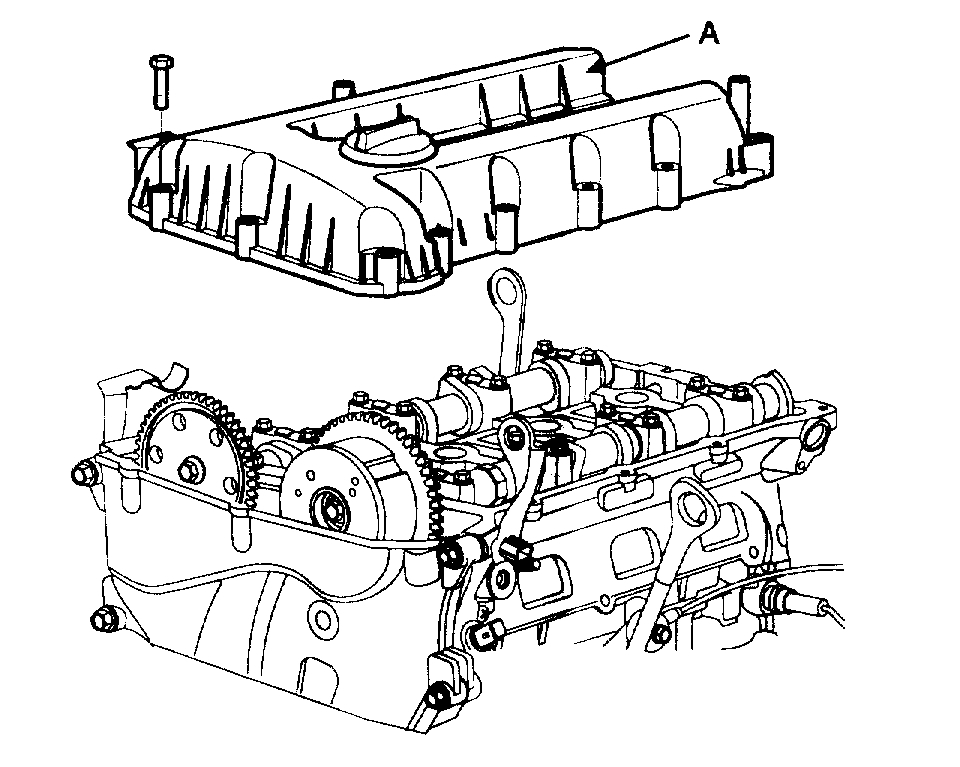
14. Remove the PCV hose and breather hose from the cylinder head cover.
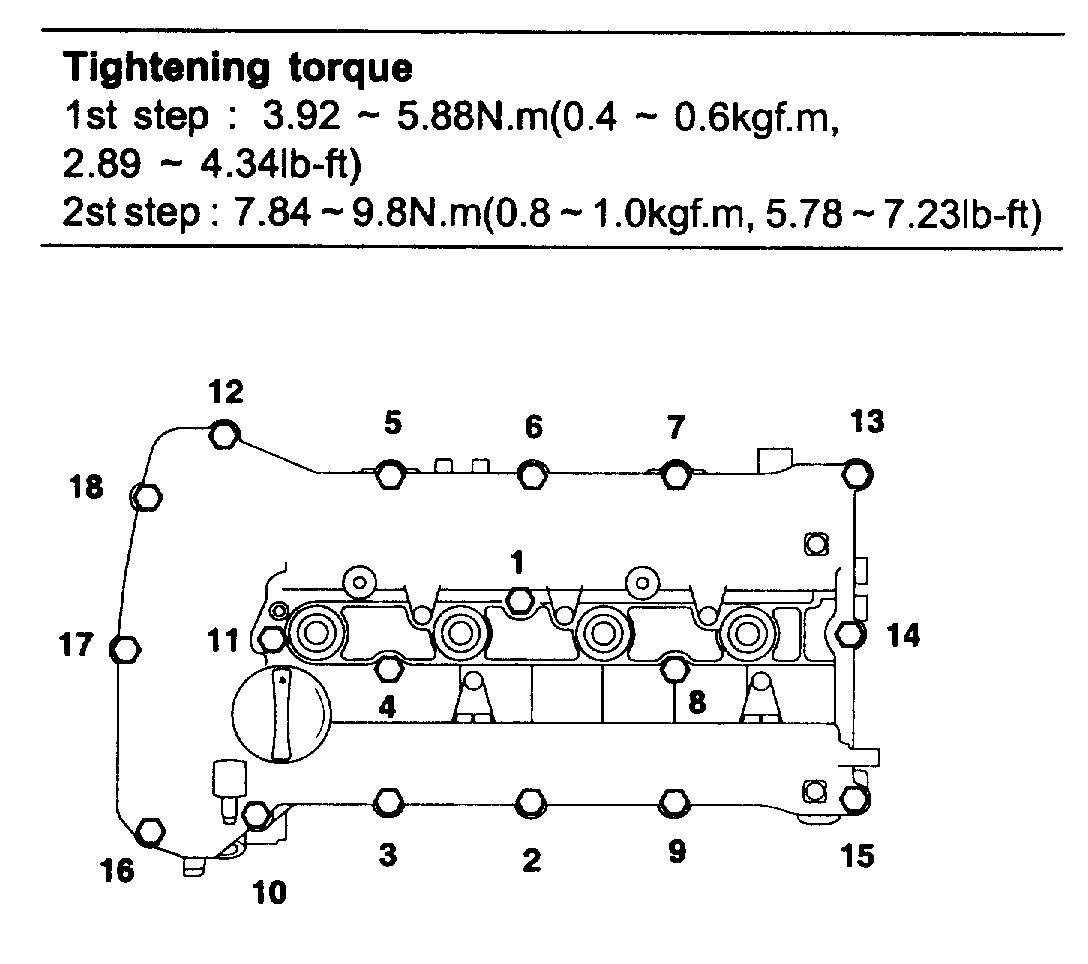
15. Loosen the cylinder head cover bolts and then remove the cylinder head cover (A) and gasket.
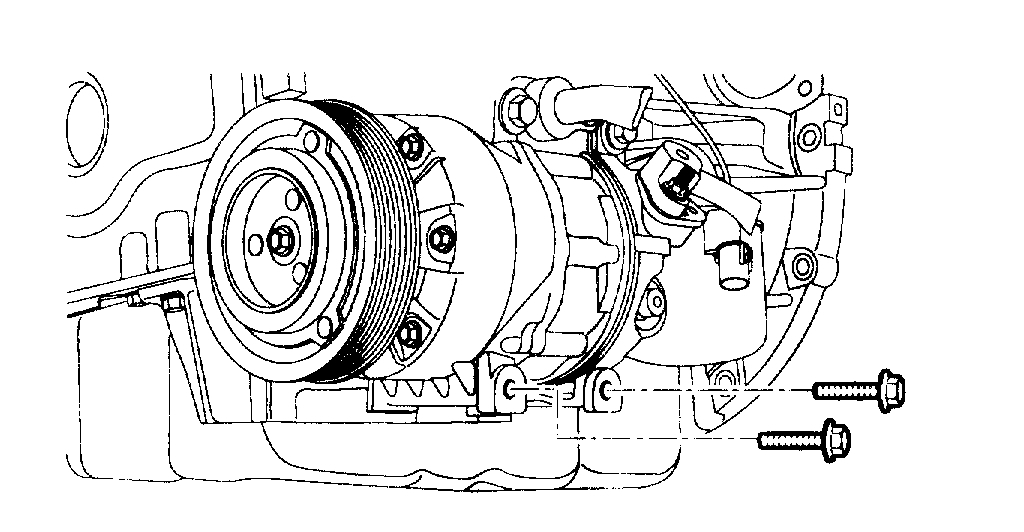
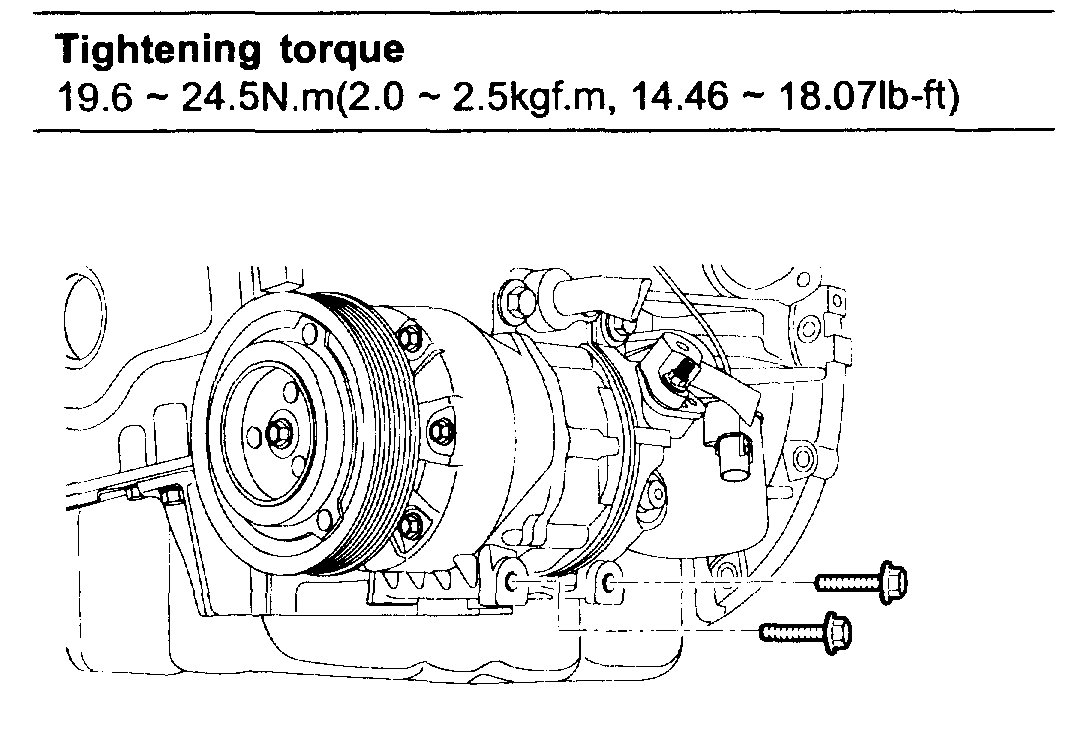
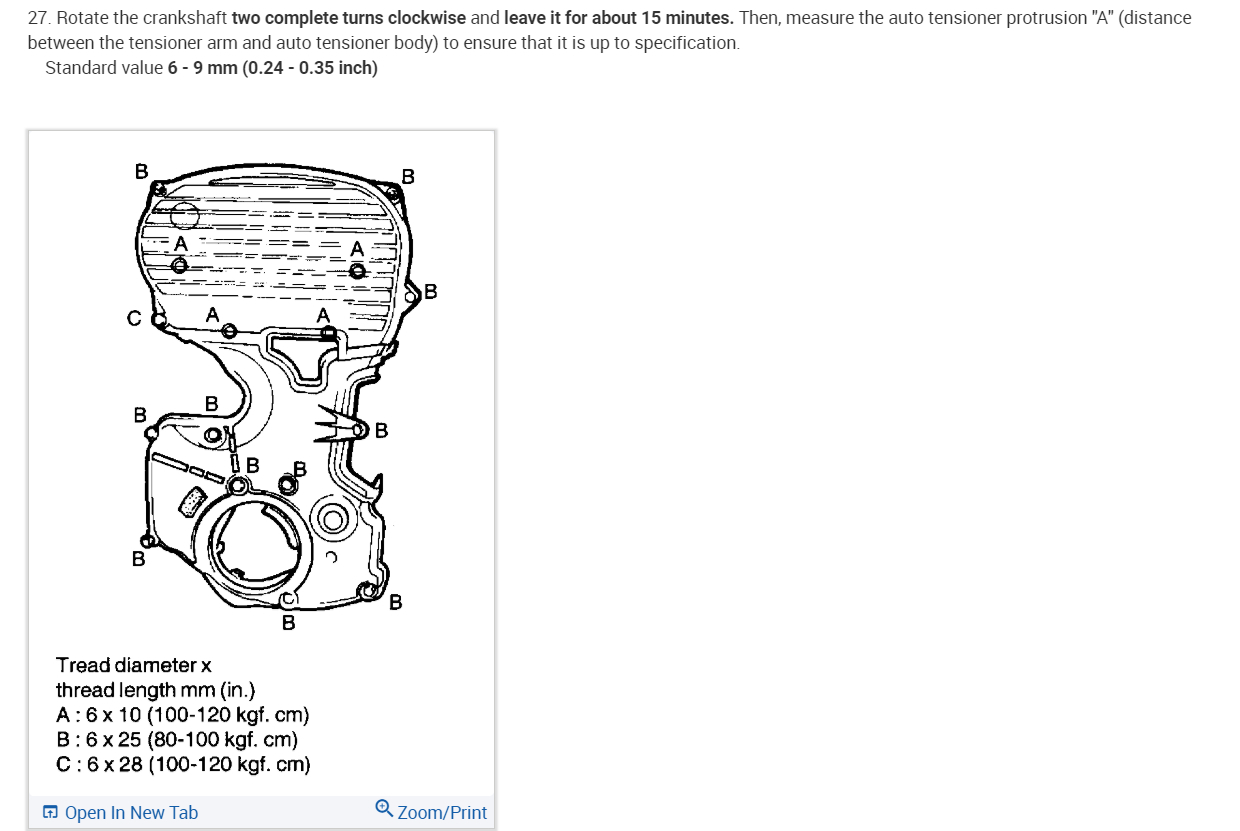
16. Remove the compressor lower bolts.
17. Remove the compressor bracket (A).
18. Drain the engine oil.
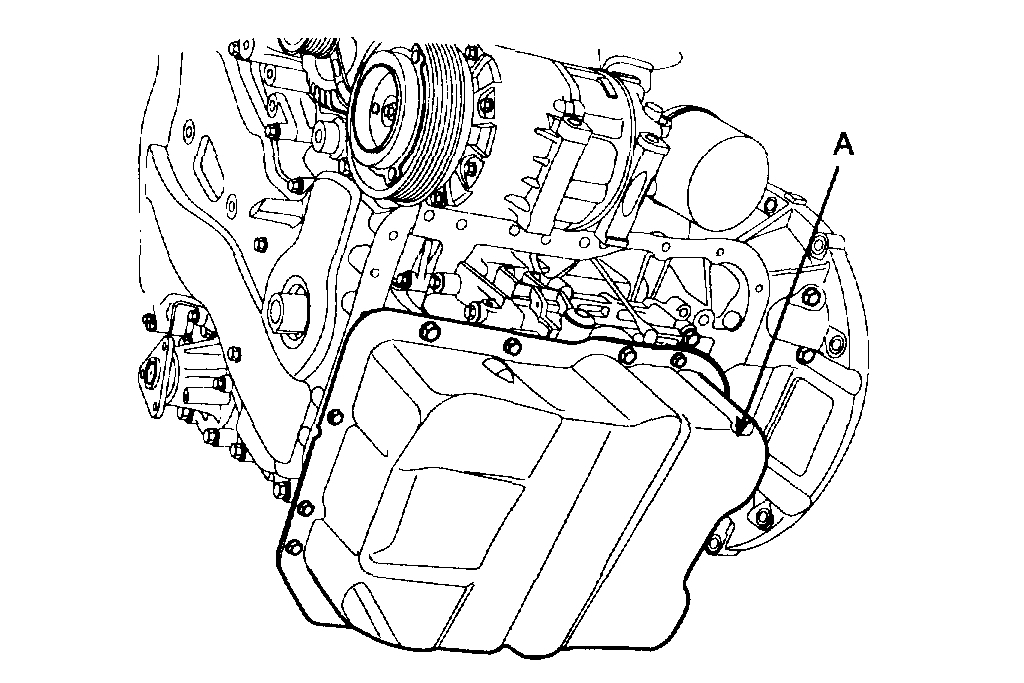
19. Remove the oil pan (A).
CAUTION: Be careful not to damage the contact surfaces of cylinder block and oil pan.
20. Remove the timing chain cover (A) by prying the portions between the cylinder head and cylinder block with a screwdriver.
CAUTION: Be careful not to damage the contact surfaces of cylinder block, cylinder head and timing chain cover.
21. The key of crankshaft should be aligned with the mating face of main bearing cap. As a result of this, the piston of No.1 cylinder is placed at the top dead center on compression stroke.
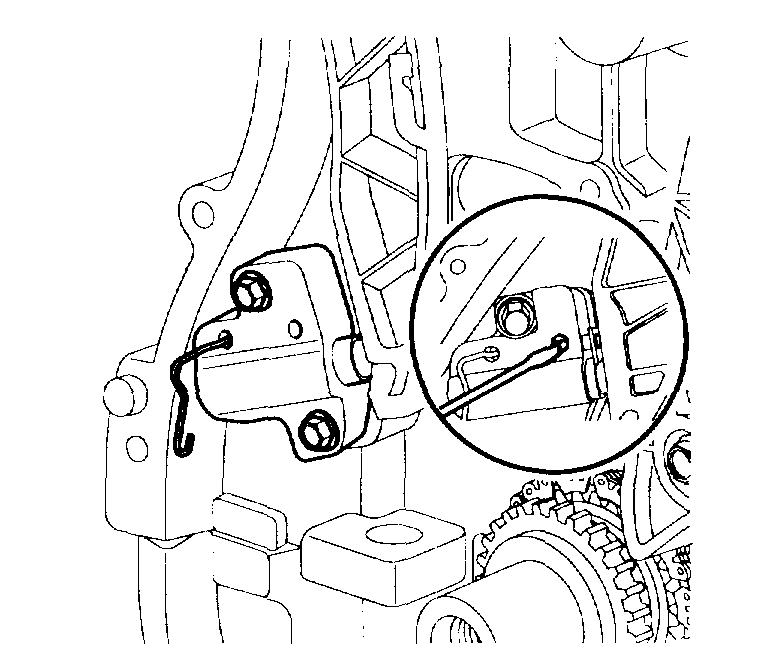
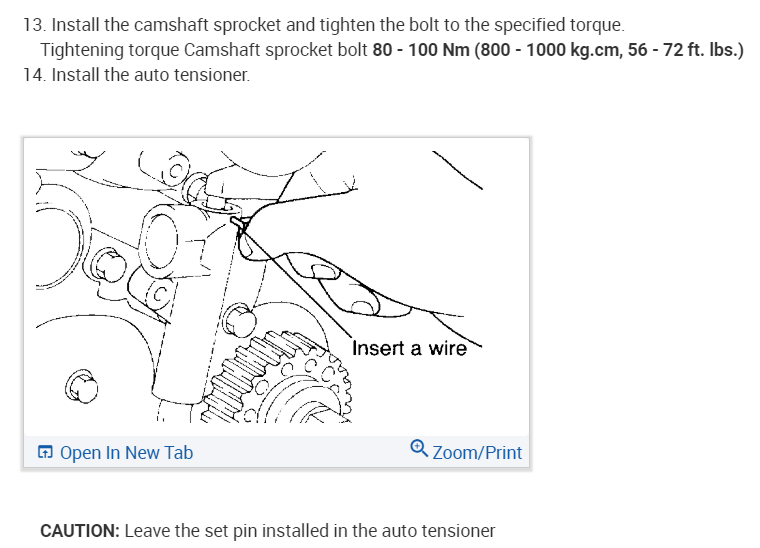
22. Install a set pin after compressing the timing chain tensioner.
23. Remove the timing chain tensioner (A).
24. Remove the timing chain tensioner arm (B).
25. Remove the timing chain.
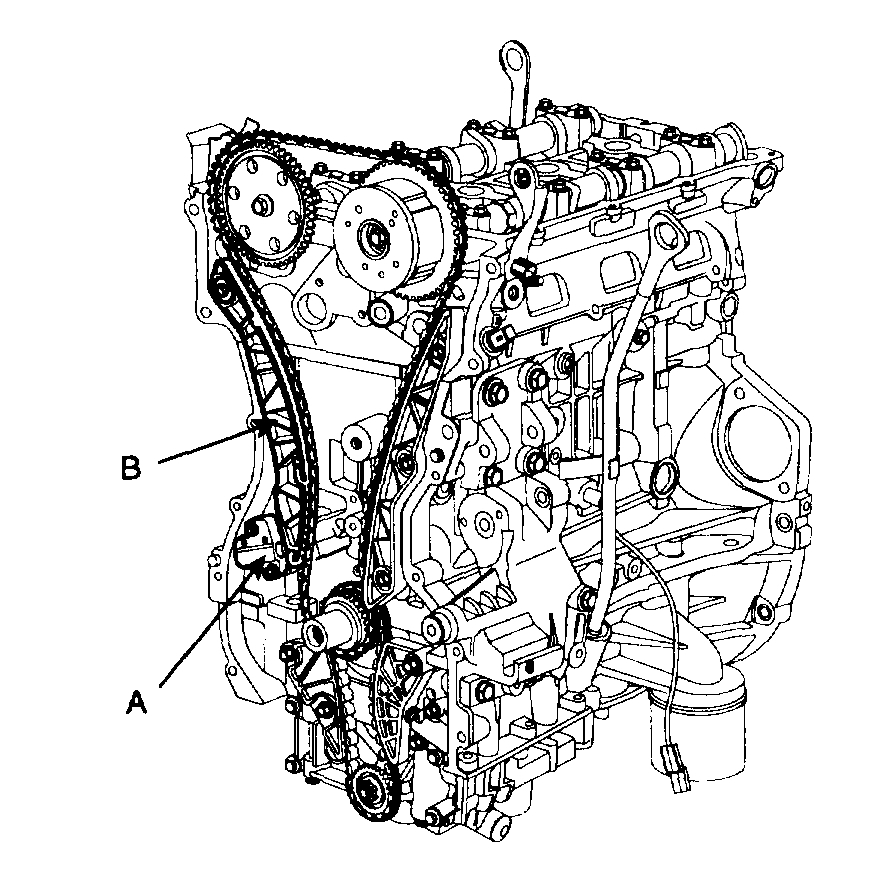
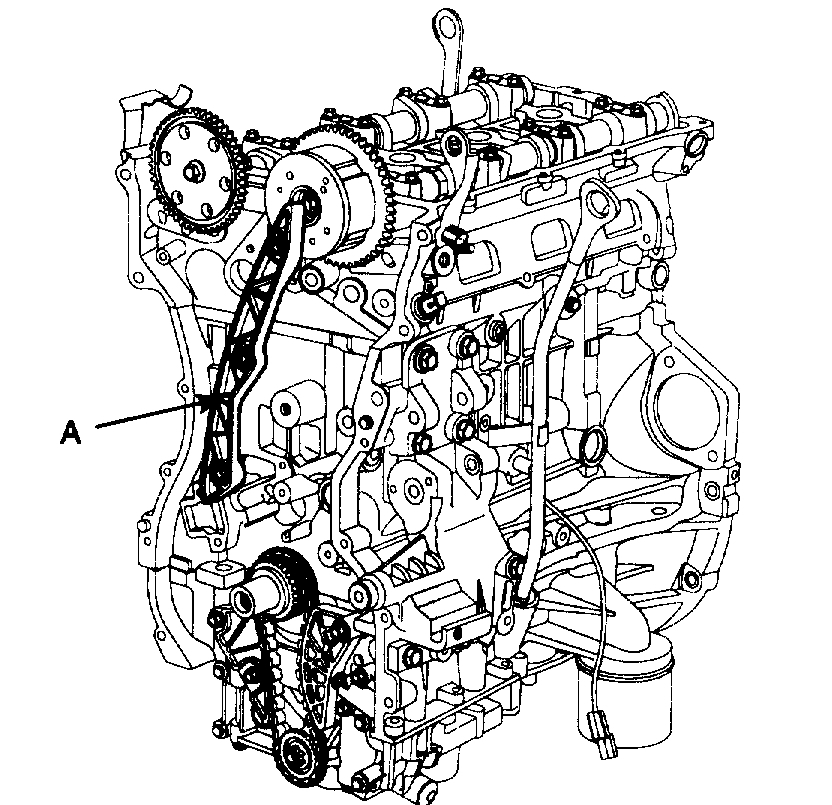
26. Remove the timing chain guide (A).
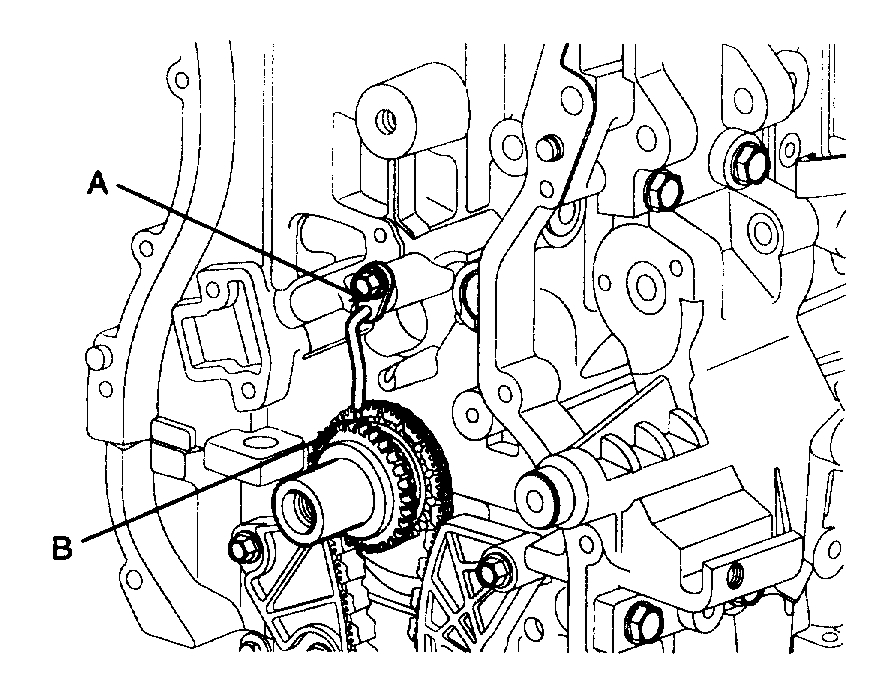
27. Remove the timing chain oil jet (A).
28. Remove the crankshaft chain sprocket (B).
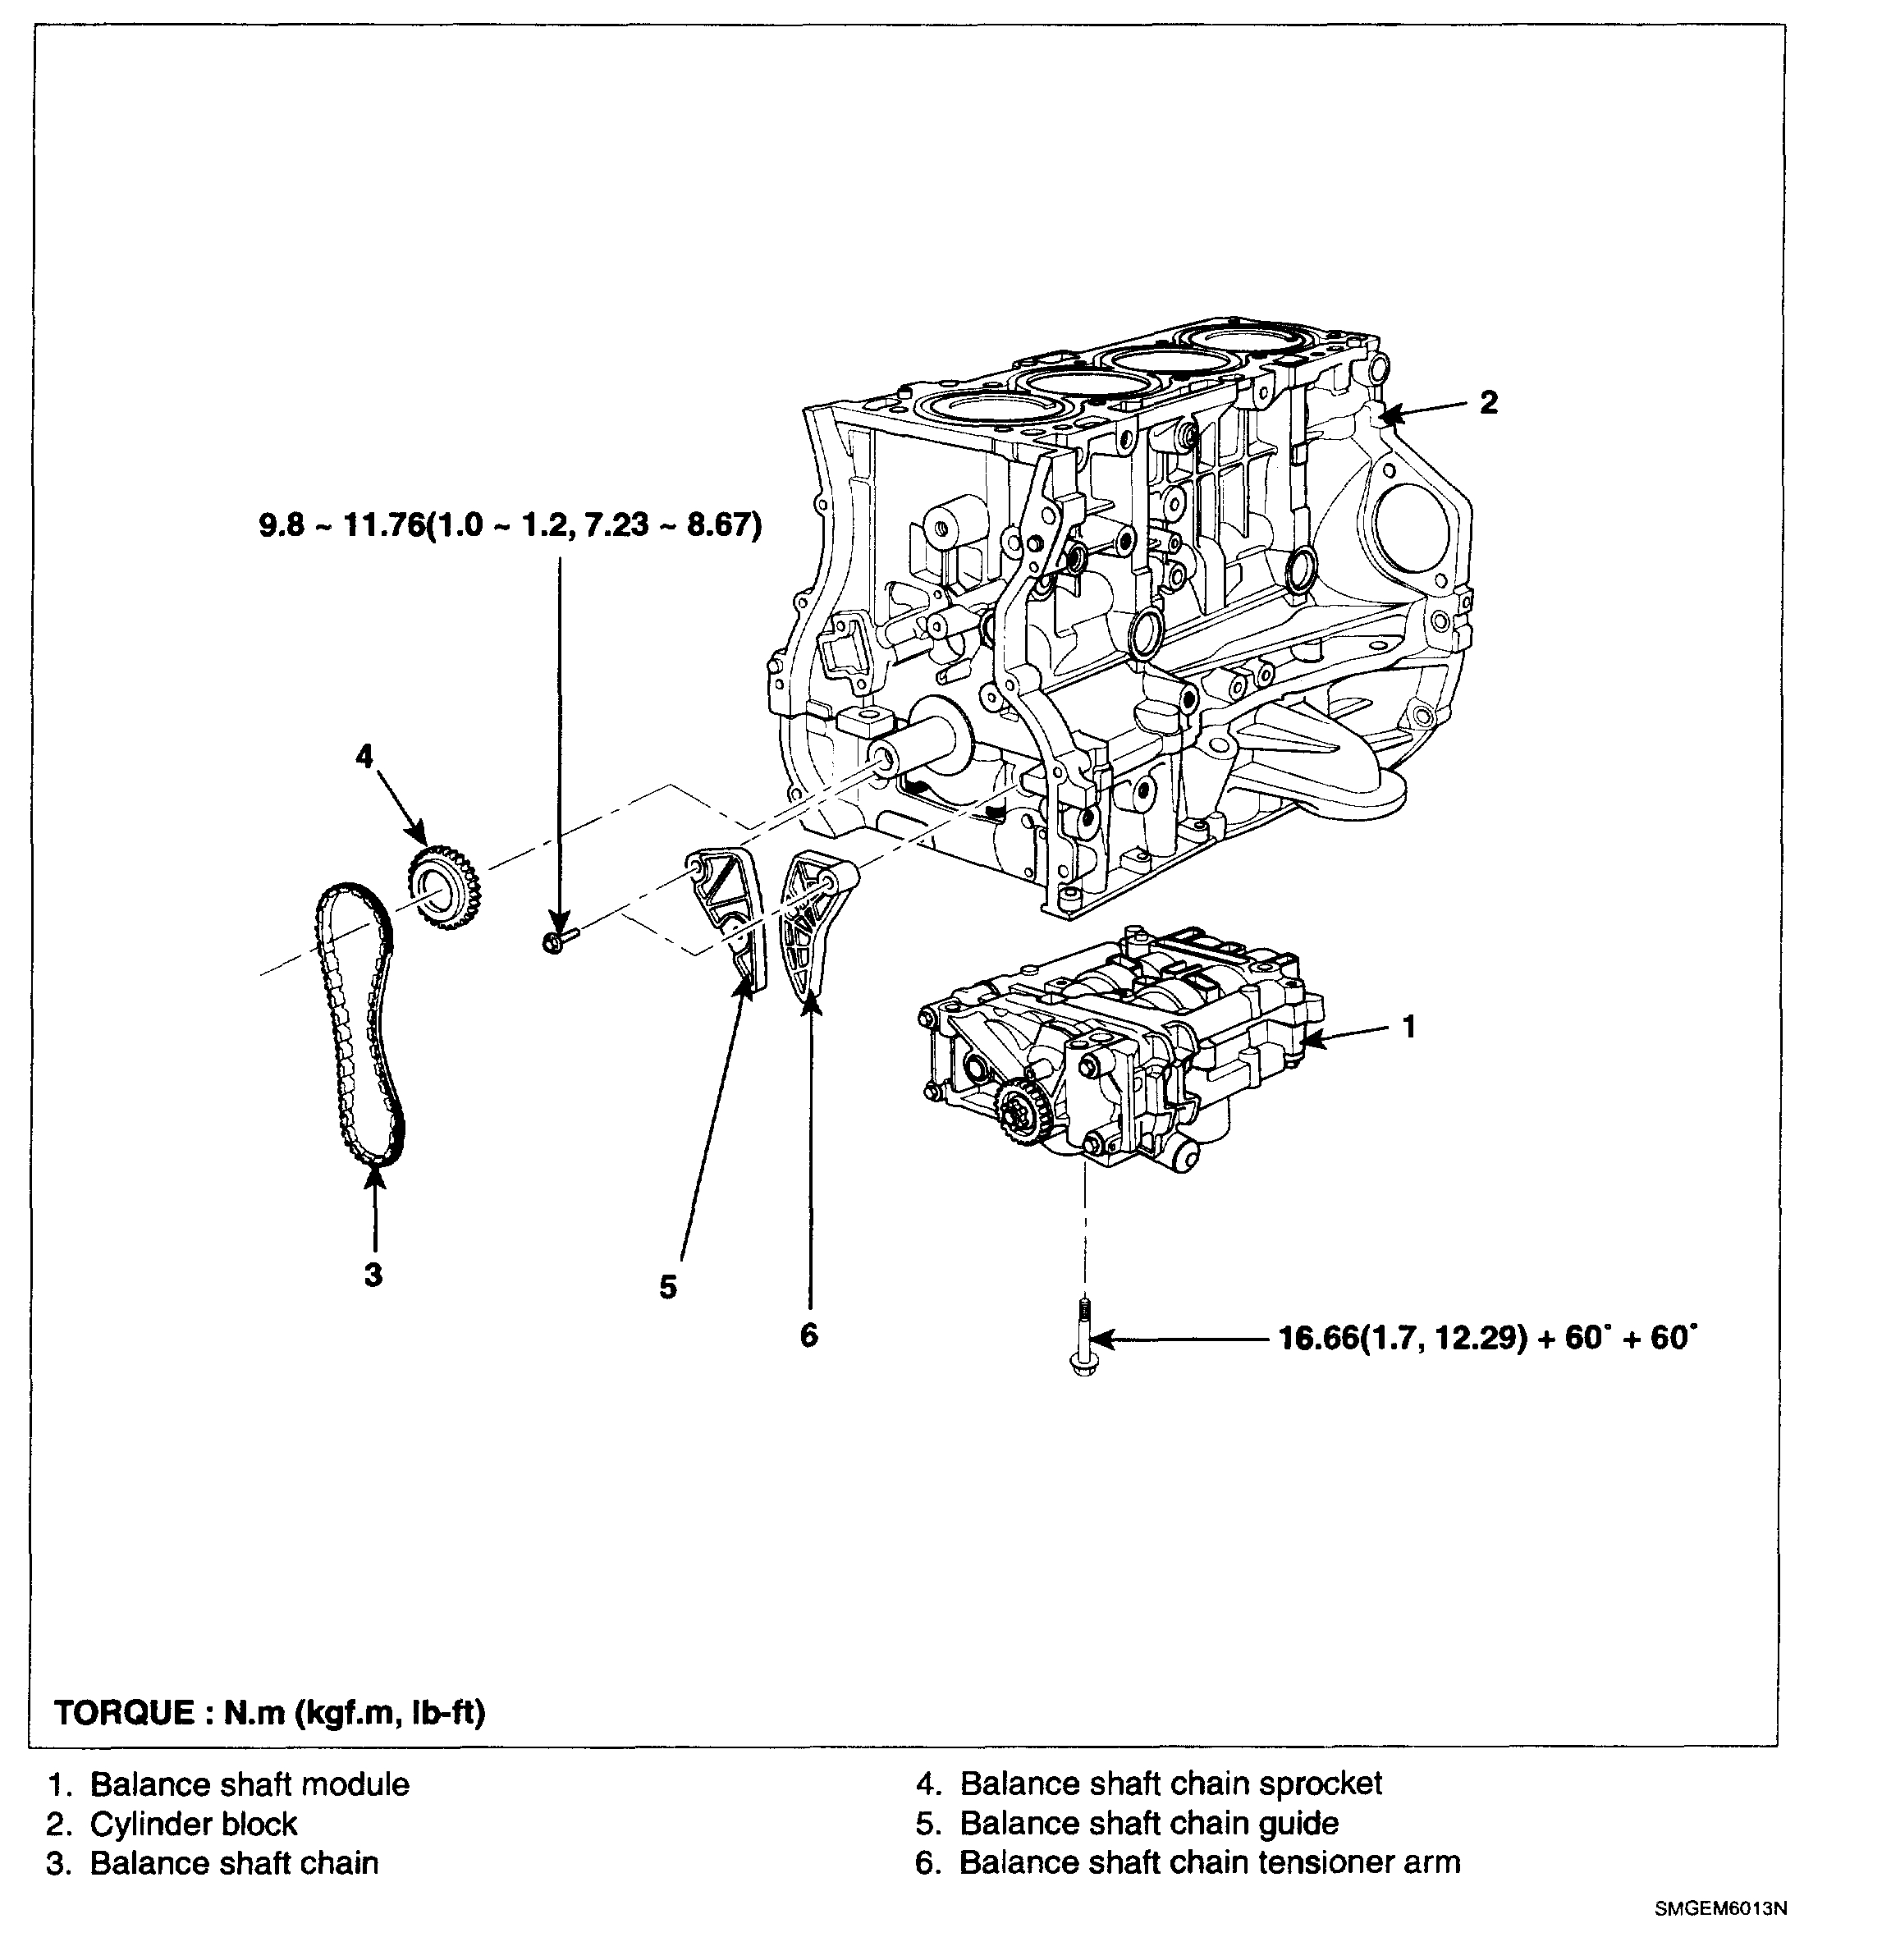
BALANCE SHAFT CHAIN
1. Remove the timing chain.
2. Install a set pin after compressing the balance shaft chain tensioner.
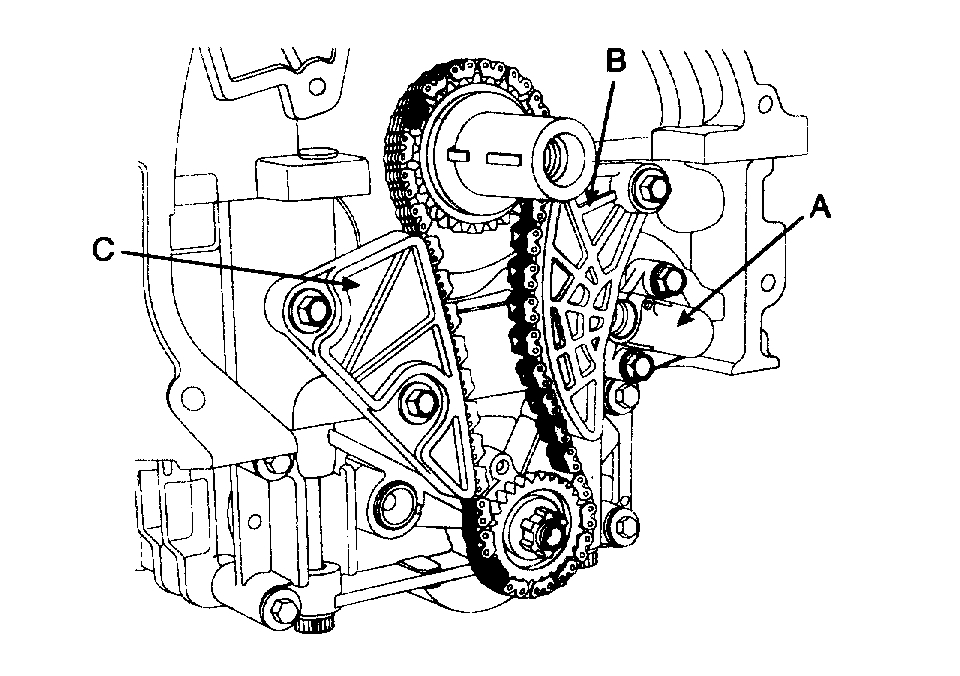
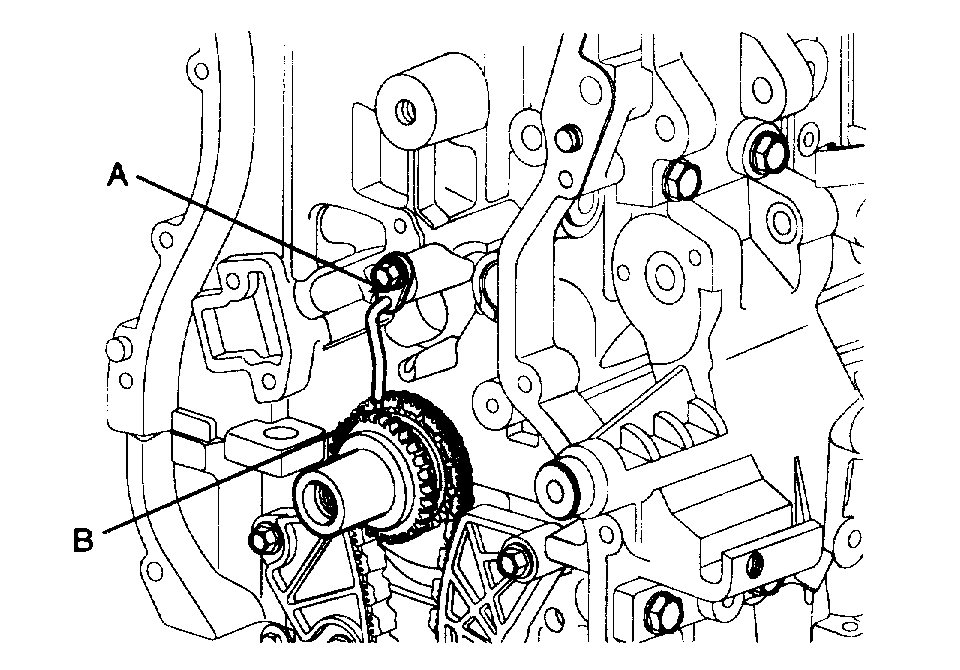
3. Remove the balance shaft chain tensioner (A).
4. Remove the balance shaft chain tensioner arm (B).
5. Remove the balance shaft chain guide (C).
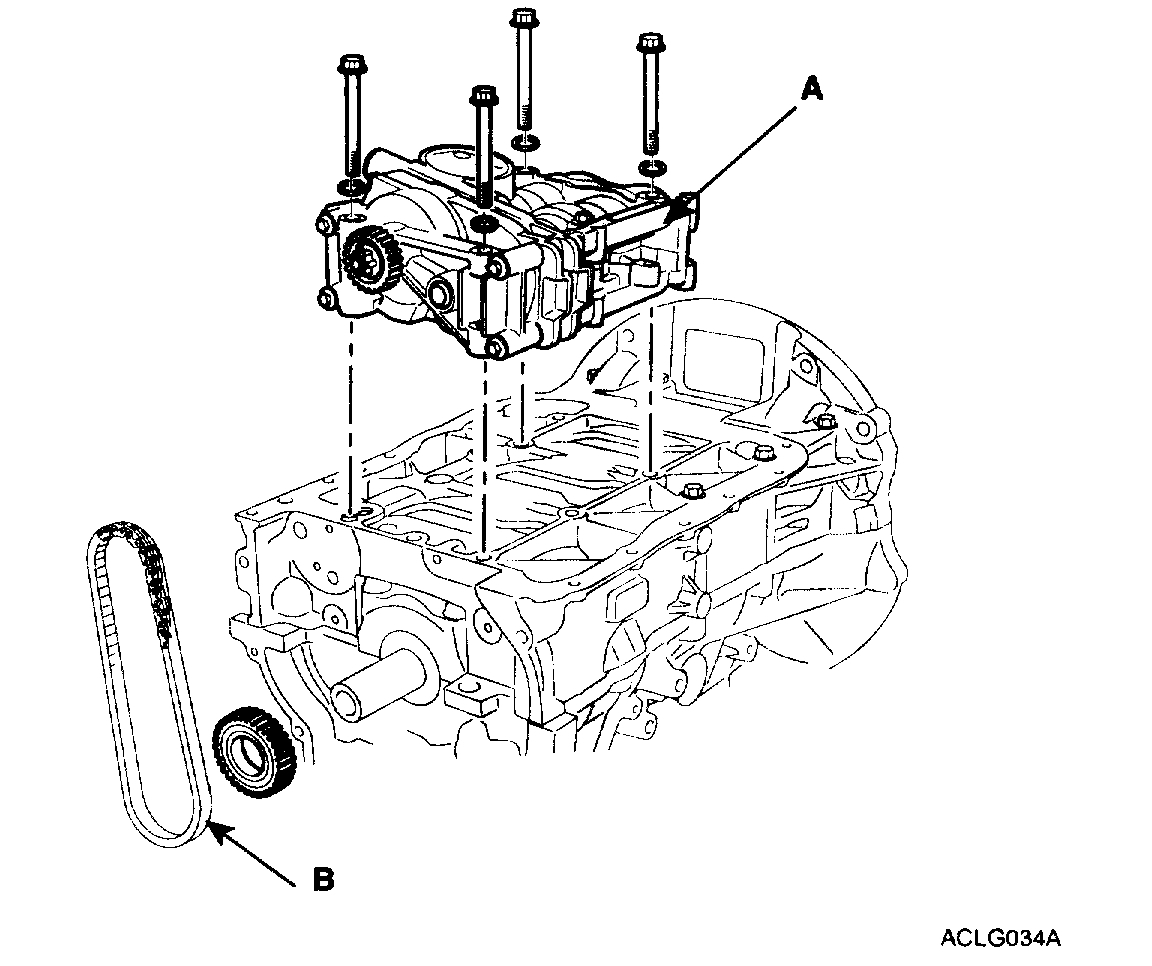
6. Remove the balance shaft module (A) and balance shaft chain (B).
INSPECTION
SPROCKETS, CHAIN TENSIONER, CHAIN GUIDE, CHAIN TENSIONER ARM
1. Check the camshaft sprocket and crankshaft sprocket for abnormal wear, cracks, or damage. Replace as necessary.
2. Inspect the tensioner arm and chain guide for abnormal wear, cracks, or damage. Replace as necessary.
3. Check that the tensioner piston moves smoothly when the ratchet pawl is released with thin rod.
BELT, IDLER, BELT TENSIONER, PULLEY
1. Check the belt for oil or dust deposits.
Replace, if necessary.
Small deposits should be wiped away with a dry cloth or paper. Do not clean with solvent.
2. When the engine is overhauled or belt tension adjusted, check the belt carefully. If any of the following flaws are evident, replace the belt.
NOTE:
^ Do not bend, twist or turn the timing belt inside out.
^ Do not allow the timing belt to come into contact with oil, water and steam.
3. Inspect the idler for easy and smooth rotation and check for play or noise.
INSTALLATION
BALANCE SHAFT CHAIN
1. The key of crankshaft should be aligned with the mating face of main bearing cap. As a result of this, the piston of No. 1 cylinder is placed at the top dead center on compression stroke.
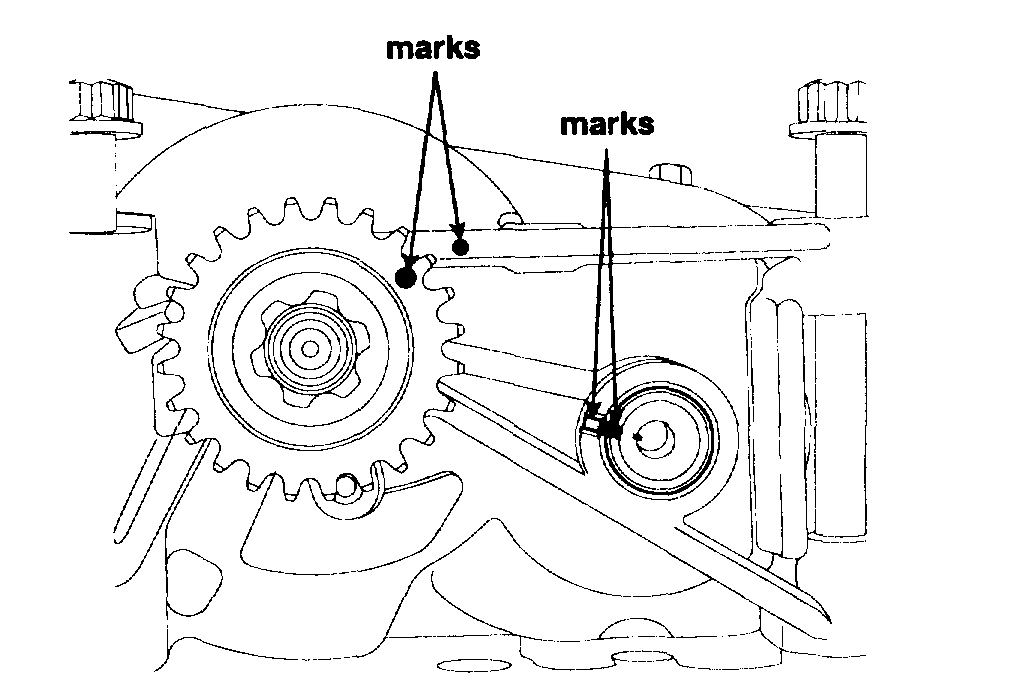
2. Confirm the balance shaft module timing mark.
Timing marks to be visually aligned with centers of adjacent cast timing notches.
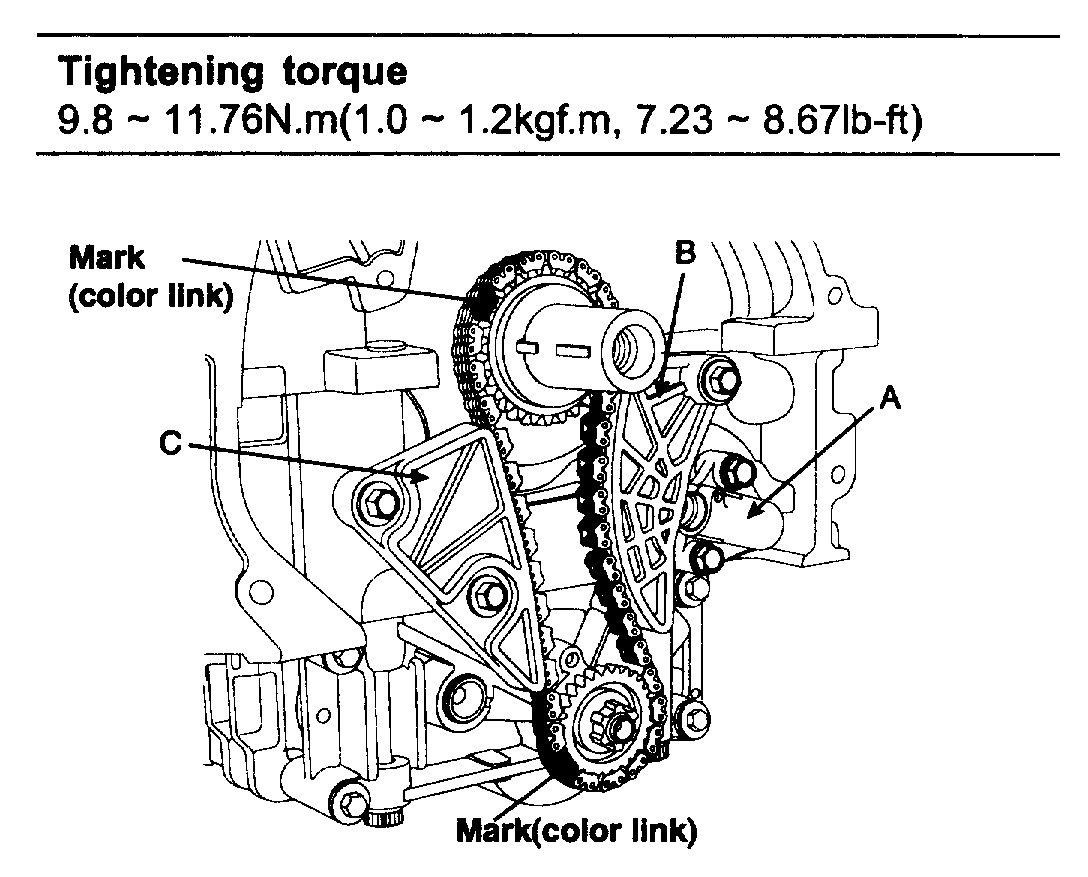
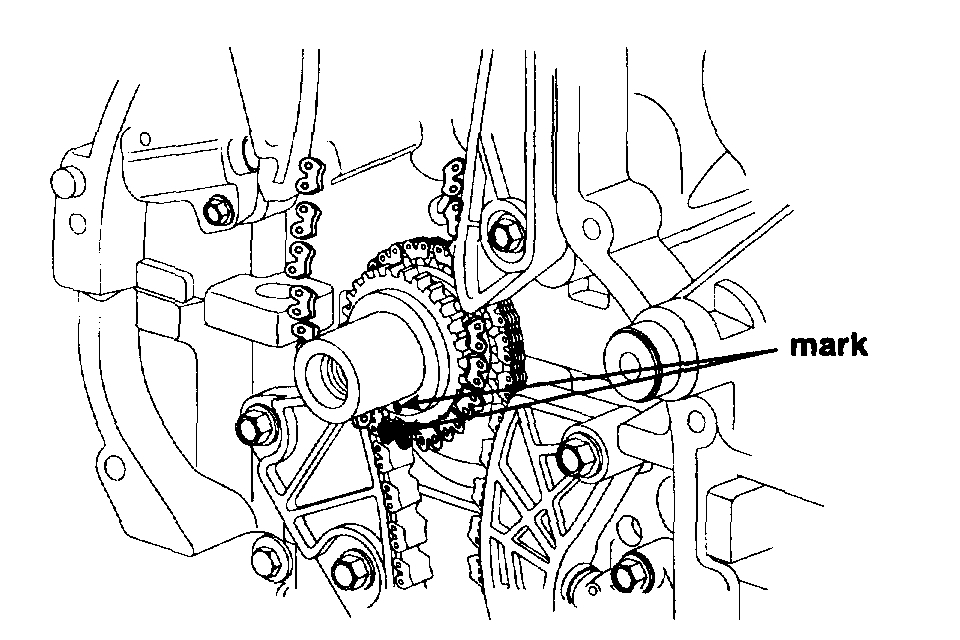
3. Install balance shaft module (A) that the timing mark of balance shaft module sprocket should be matched with the timing mark (color link) of balance shaft chain.
4. Install the balance shaft chain guide (C).
5. Install the balance shaft tensioner arm (B).
Tightening torque 9.8 - 11.76 Nm (1.0 - 1.2 kgf.m, 7.23 - 8.67 ft. lbs.)
6. Install the balance shaft tensioner (A) and remove the set pin.
Tightening torque 9.8 - 11.76 Nm (1.0 - 1.2 kgf.m, 7.23 - 8.67 ft. lbs.)
7. Confirm the timing marks.
TIMING CHAIN
1. Install crankshaft chain sprocket (B).
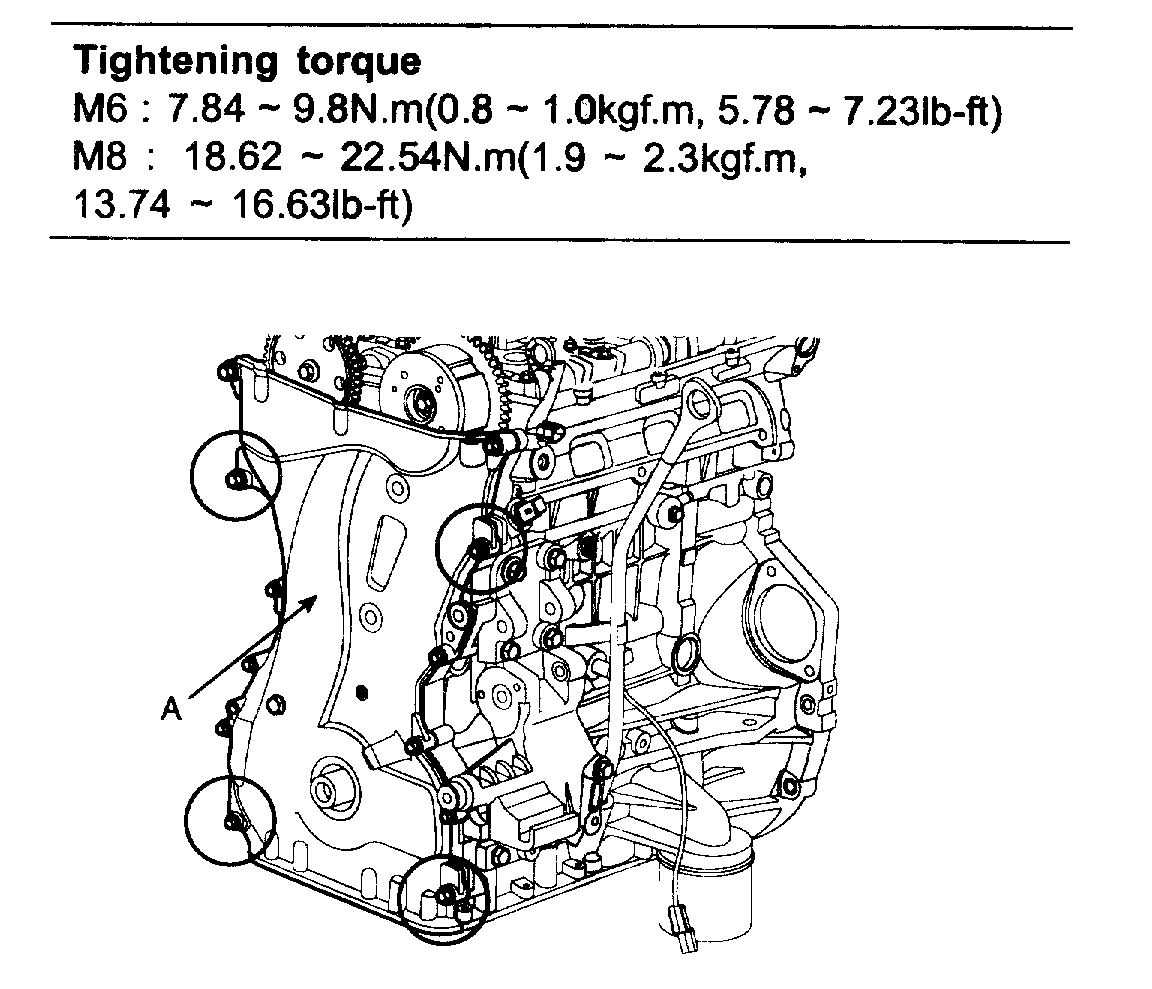
2. Install timing chain oil jet (A).
Tightening torque 7.84 - 9.8 Nm (0.8 - 1.0 kgf.m, 5.78 - 7.23 ft. lbs.)
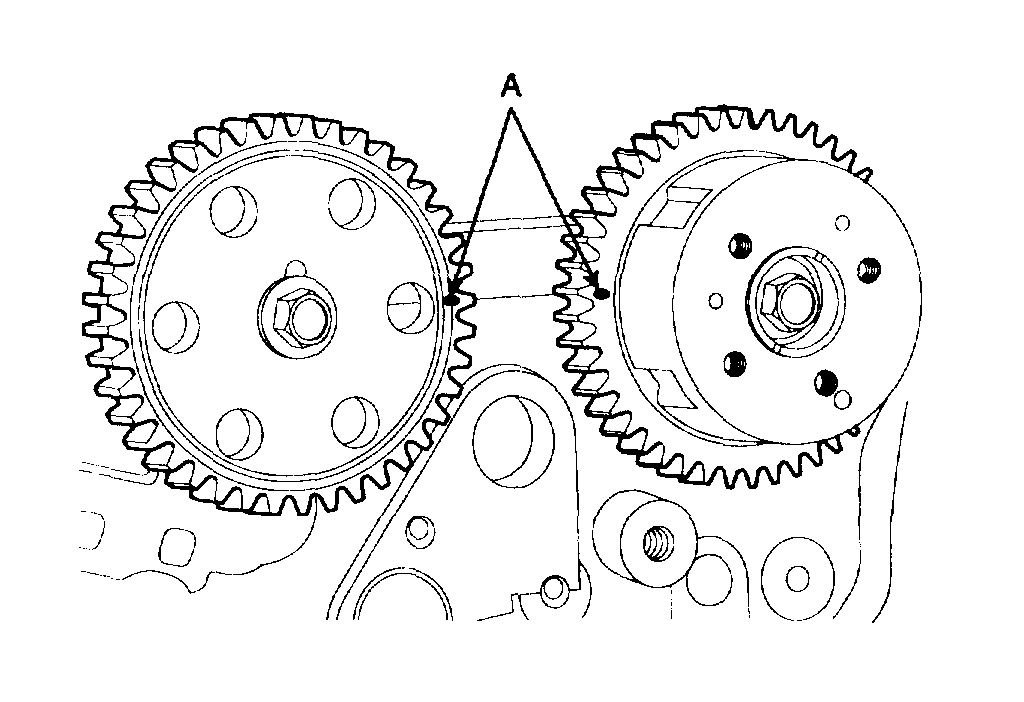
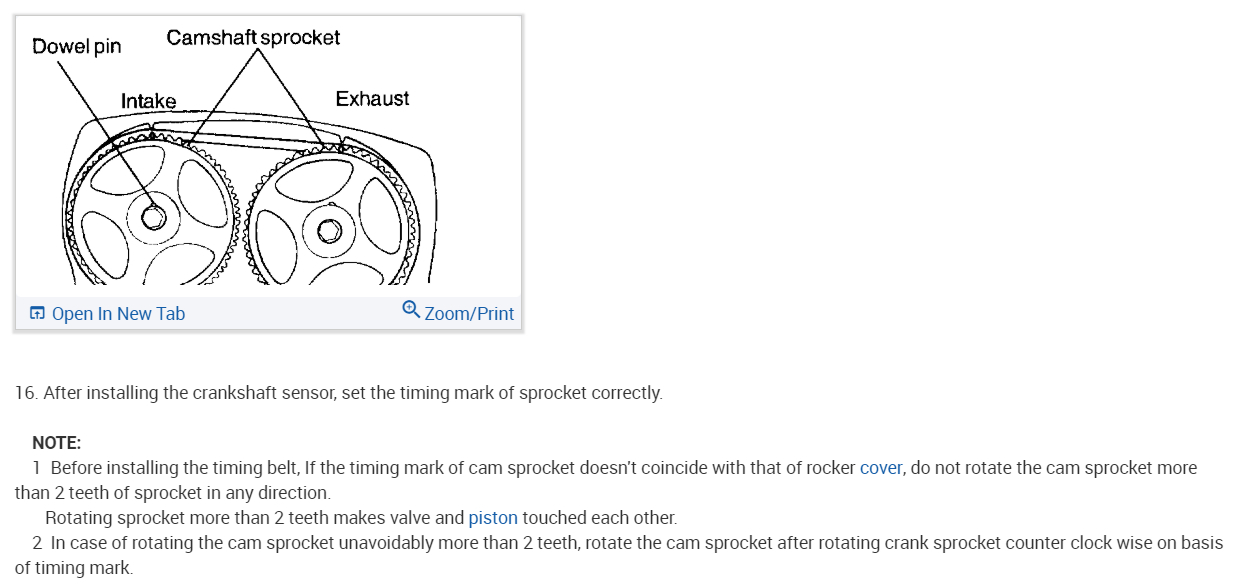
3. Set crankshaft that the key of crankshaft should be aligned with the mating surface of main bearing cap. Put the intake, exhaust camshaft assembly that the TDC mark of intake sprocket and exhaust sprocket should be aligned with the top surface of cylinder head. As a result of this, place the piston on No.1 cylinder at the top dead center on compression stroke.
4. install timing chain guide (A).
5. Install timing chain.
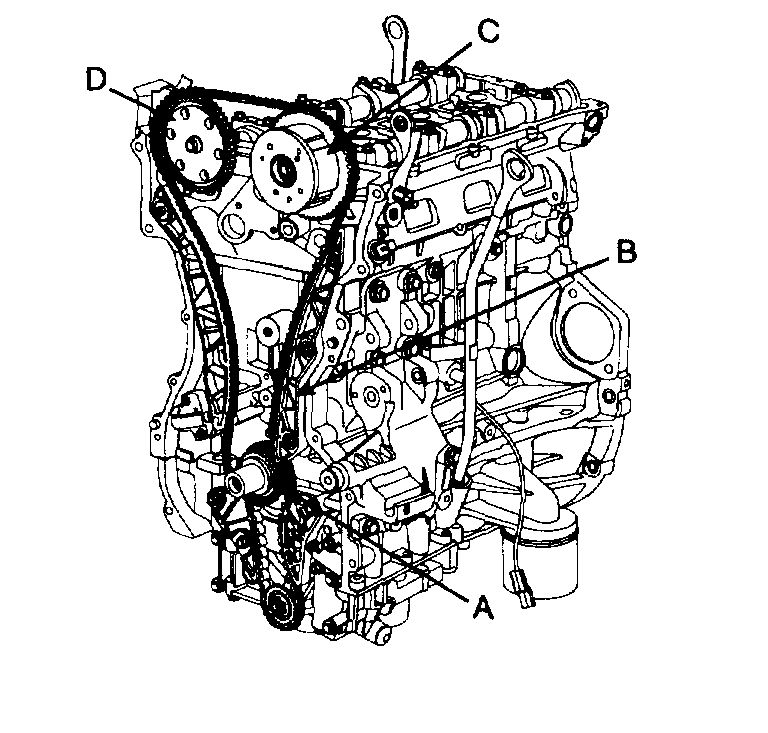
To install the timing chain with no slack between each shaft (cam, crank), follow the below procedure.
Crankshaft sprocket (A) -> Timing chain guide (B) Intake camshaft sprocket (C) -> Exhaust camshaft sprocket (D).
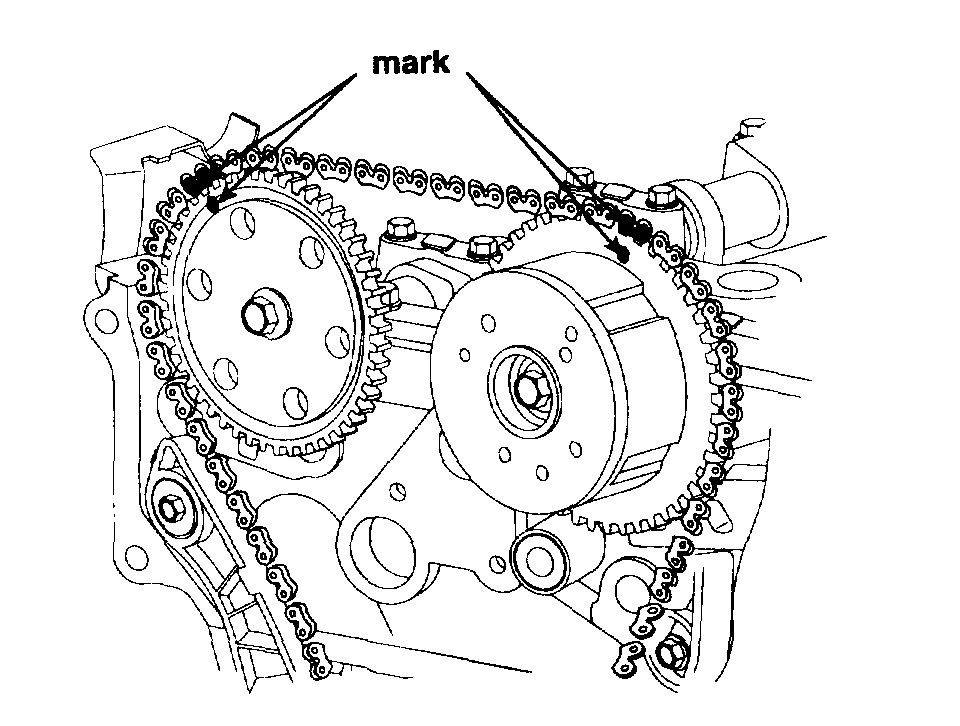
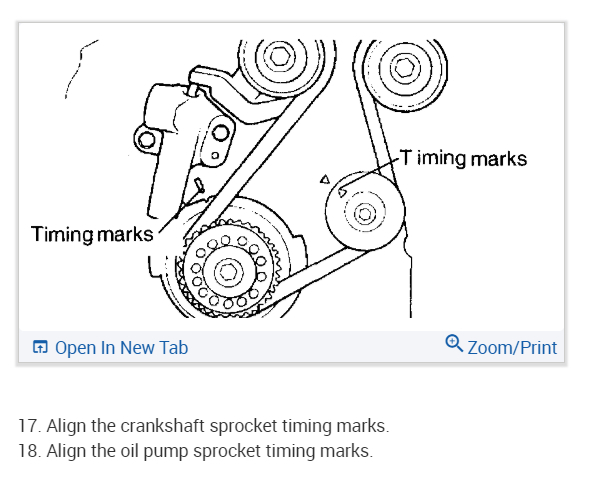
The timing mark of each sprockets should be matched with timing mark (color link) of timing chain at installing timing chain.
7. Install timing chain auto tensioner (A) and remove set pin.
Tightening torque 9.8 - 11.76 Nm (1.0 - 1.2 kgf.m, 7.23 - 8.67 ft. lbs.)
8. After rotating crankshaft 2 revolutions in regular direction (clockwise viewed from front), confirm the timing mark.
9. Install timing chain cover.
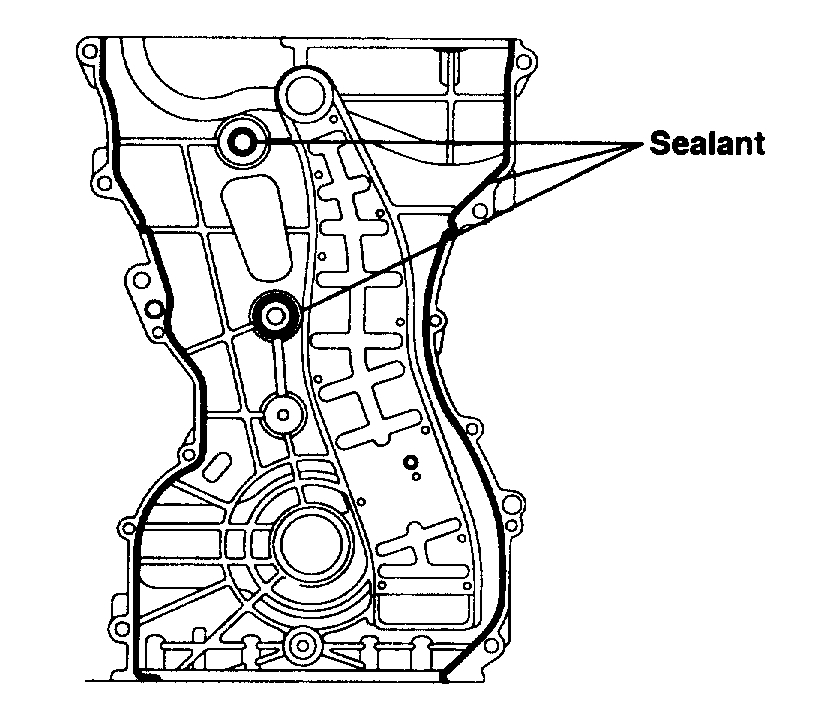
1) The sealant locations on chain cover and on counter parts (cylinder head, cylinder block, and ladder frame) must be free of engine oil and ETC.
2) Before assembling the timing chain cover, the liquid sealant Loctite 5900 should be applied on the gap between cylinder head and cylinder block. The part must be assembled within 5 minutes after sealant was applied.
Bead width: 2.5 mm (0.1 inch)
3) After applying liquid sealant Loctite 5900 on timing chain cover. The part must be assembled within 5 minutes after sealant was applied. Sealant should be applied without discontinuity.
Bead width: 2.5 mm (0.1 inch)
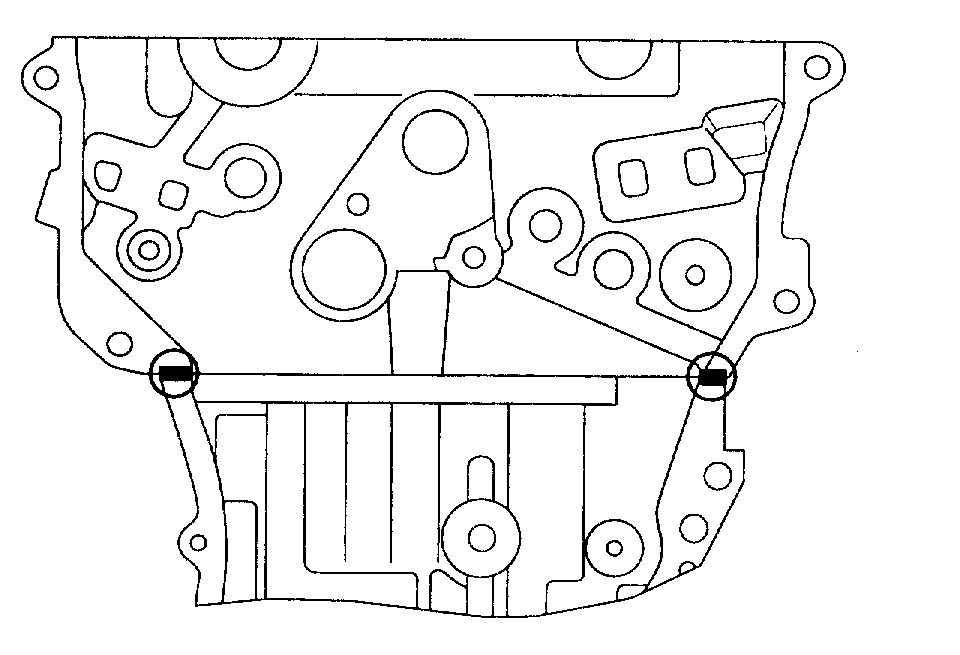
4) The dowel pins on the cylinder block and holes on the timing chain cover should be used as a reference in order to assemble the timing chain cover (A) to be in exact position.
5) The firing and/or blow out test should not be performed within 30 minutes after the timing chain cover was assembled.
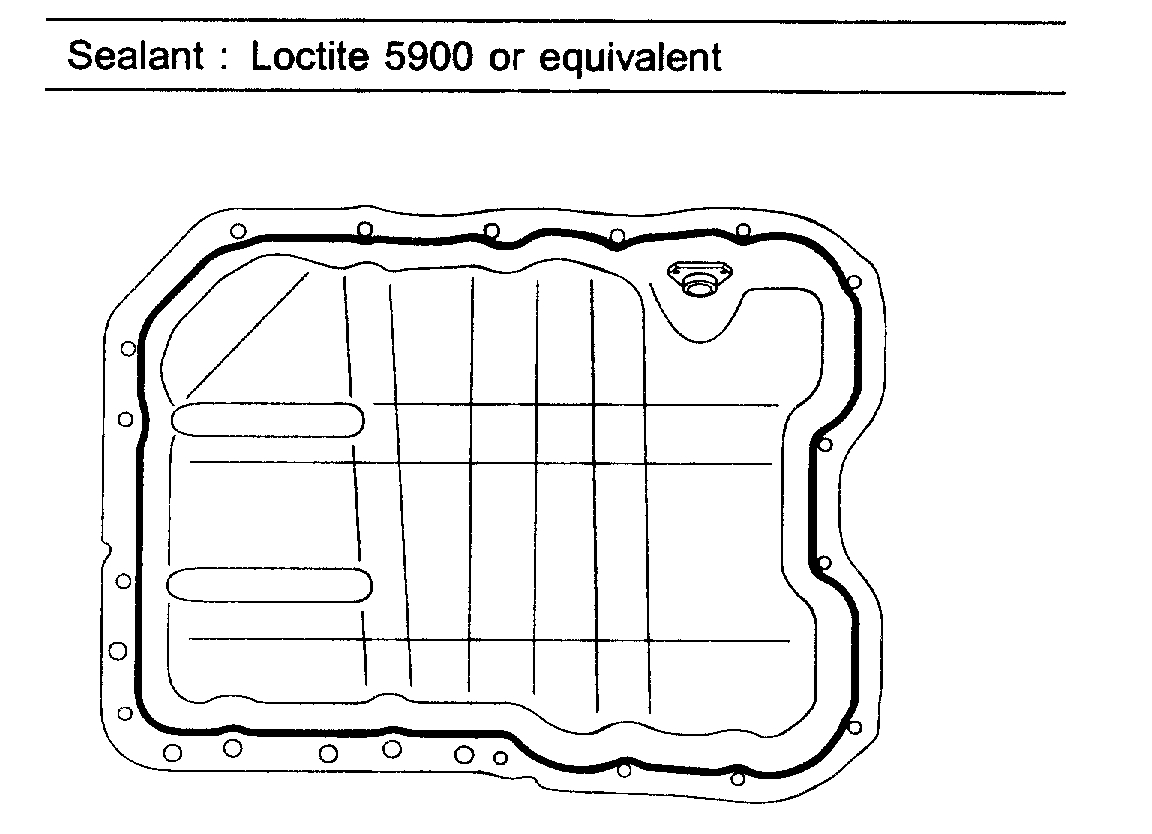
10. Install oil pan.
1) Using a gasket scraper, remove all the old packing material from the gasket surfaces.
2) Before assembling the oil pan, the liquid sealant Loctite 5900 should be applied on oil pan. The part must be assembled within 5 minutes after the sealant was applied.
CAUTION:
^ When applying sealant gasket, sealant must not be protruded into the inside of off pan.
^ To prevent leakage of oil, apply sealant gasket to the inner threads of the bolt holes.
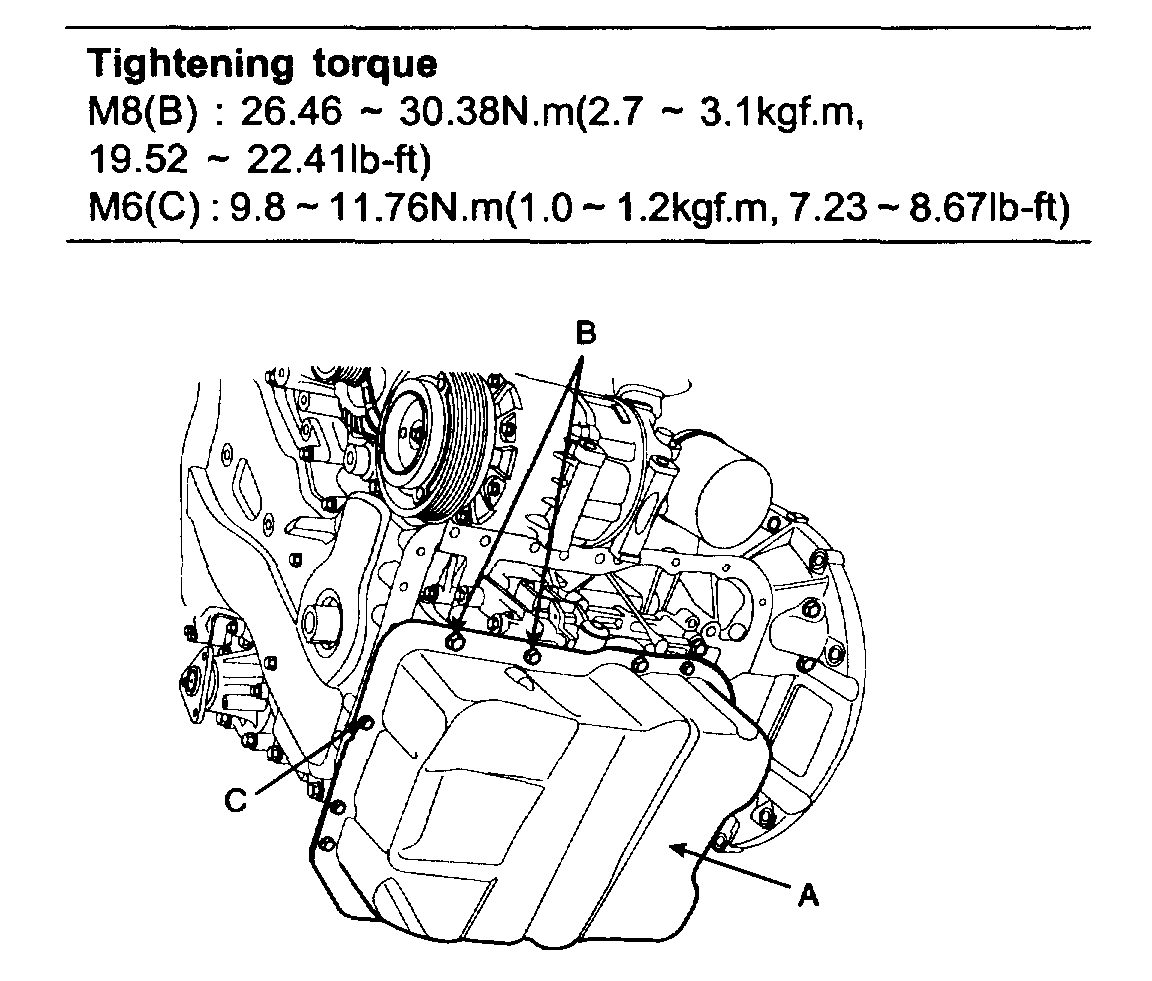
3) Install oil pan (A). Uniformly tighten the bolts in several passes.
4) After assembly, wait at least 30 minutes before filling the engine with oil.
11. Install air compressor bracket (A).
12. Install air compressor bolt
13. Install cylinder head cover.
1) The hardening sealant located on the upper area between timing chain cover and cylinder head should be removed before assembling cylinder head cover.
2) After applying sealant, it should be assembled within 5 minutes.
Bead width: 2.5 mm (0.1 inch)
3) The firing and/or blow out test should not be performed within 30 minutes after the cylinder head cover was assembled.
4) Install the cylinder head cover bolts as following method.
CAUTION: Do not rouse cylinder head cover gasket
14. Install ignition coil.
15. Connect ignition coil connector (A).
16. Install engine support bracket (C).
17. Using flywheel stopper, install crankshaft pulley (B).
Tightening torque 166.6 - 176.4 Nm (17 - 18 kgf.m, 122.9 - 130.13 ft. lbs.)
18. Install water pump pulley (A).
Tightening torque 7.84 - 9.8 Nm (0.8 - 1.0 kgf.m, 5.78 - 7.23 ft. lbs.)
19. Install drive belt tensioner (B) and tensioner pulley.
NOTE: Tensioner pulley bolt is left-handed screw
20. Install idler pulley (A)
Tightening torque 53.9 - 63.7 Nm (5.5 - 6.5 kgf.m, 39.7 - 47.0 ft. lbs.)
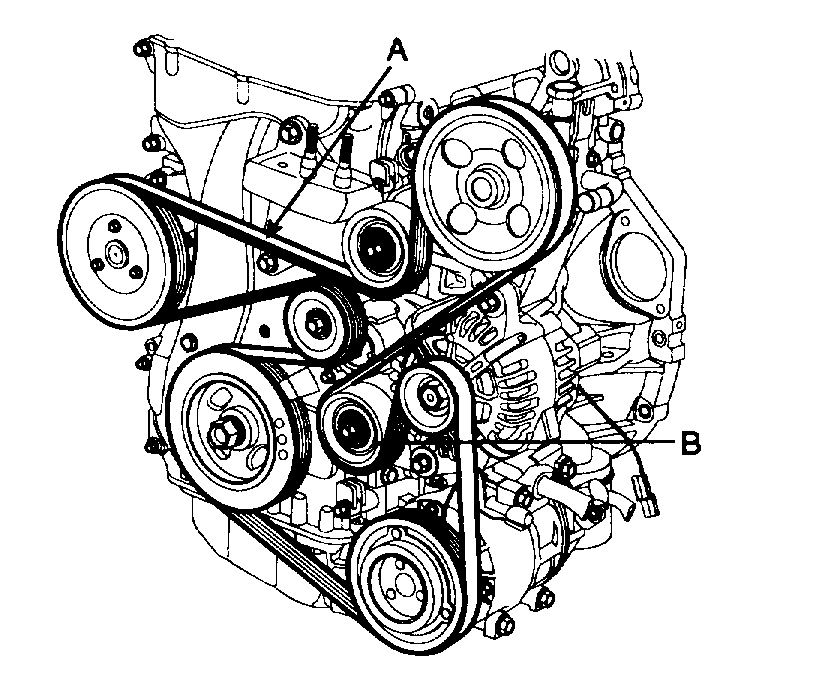
21. Install drive belt (A)
Crankshaft pulley -> A/C pulley -> alternator pulley idler pulley -> P/C pump pulley -> idler pulley -> water pump pulley -> tensioner pulley.
Rotate auto tensioner arm in the counter -> clockwise moving auto tensioner pulley bolt with wrench. After putting belt on auto tensioner pulley, release the auto tensioner pulley slowly.
22. Install engine mounting bracket (A).
23. Install RH side cover.
24. Install RH front wheel.
25. Install engine cover (A).
__________________________________
I realize this is extensive, but I cannot express the importance of this being done correctly. Please let me know if this helps.
Take care,
Joe
Images (Click to enlarge)
Oct 14, 2018 at 4:21 PM