A/C suddenly stopped working

Tiny
TRAEN
  • MEMBER
  • 2016 FORD EXPLORER
  • 3.5L
  • 6 CYL
  • 2WD
  • AUTOMATIC
  • 80,000 MILES
Fully charged, doesn't appear to be any leaks. Fuse was blown. Replace fuse. Fuse is blown immediately again. Compressor? Something else?
Thursday, September 10th, 2020 AT 11:07 AM

17 Replies

Tiny
ASEMASTER6371
  • MECHANIC
  • 52,797 POSTS
Good afternoon,

Can you tell me the fuse number or post a picture of the location?

Disconnect the A/C compressor and see if the fuse still fails.

https://www.2carpros.com/articles/how-a-car-fuse-works

https://www.2carpros.com/articles/how-to-check-a-car-fuse

Roy
Was this
answer
helpful?
Yes
No
Thursday, September 10th, 2020 AT 12:28 PM
Tiny
TRAEN
  • MEMBER
  • 9 POSTS
16 - A/C clutch. Definitely blown.
Was this
answer
helpful?
Yes
No
+3
Thursday, September 10th, 2020 AT 1:27 PM
Tiny
ASEMASTER6371
  • MECHANIC
  • 52,797 POSTS
Okay, it only controls the clutch relay.

Did you disconnect the clutch as I suggested to see if it fails?

I attached the diagram for you.

Roy
Was this
answer
helpful?
Yes
No
+1
Thursday, September 10th, 2020 AT 1:32 PM
Tiny
ASEMASTER6371
  • MECHANIC
  • 52,797 POSTS
I also attached the location of the relay and a wiring diagram for you.

https://www.2carpros.com/articles/how-to-check-wiring

https://www.2carpros.com/articles/how-to-check-an-electrical-relay-and-wiring-control-circuit

Roy
Was this
answer
helpful?
Yes
No
Thursday, September 10th, 2020 AT 1:39 PM
Tiny
TRAEN
  • MEMBER
  • 9 POSTS
Thanks so much for the replies!! i will check that. interestingly enough, i am apparently not the first person with this issue.

https://www.explorerforum.com/forums/threads/2016-blowing-ac-clutch-relay-fuse-16.484933/
Was this
answer
helpful?
Yes
No
Thursday, September 10th, 2020 AT 1:40 PM
Tiny
ASEMASTER6371
  • MECHANIC
  • 52,797 POSTS
You are welcome.

Keep me updated.

Roy
Was this
answer
helpful?
Yes
No
Thursday, September 10th, 2020 AT 1:46 PM
Tiny
TRAEN
  • MEMBER
  • 9 POSTS
When you say disconnect the clutch, do you mean disconnect the wiring to the compressor? Also, I probably need to replace the fuse for that test right?
Was this
answer
helpful?
Yes
No
Thursday, September 10th, 2020 AT 3:18 PM
Tiny
ASEMASTER6371
  • MECHANIC
  • 52,797 POSTS
Yes, remove the connector at the compressor clutch and install a new fuse.

Roy
Was this
answer
helpful?
Yes
No
Thursday, September 10th, 2020 AT 3:57 PM
Tiny
TRAEN
  • MEMBER
  • 9 POSTS
I disconnected what I believe to be the clutch relay in the photo. It did not blow the fuse.
Was this
answer
helpful?
Yes
No
-1
Friday, September 11th, 2020 AT 7:39 PM
Tiny
ASEMASTER6371
  • MECHANIC
  • 52,797 POSTS
I asked you to remove the connector at the compressor, not the relay.

The reason is this, if the relay has stopped the short, it means there is an issue between or at the relay down to and including the compressor.

If you remove the connector at the compressor and the fuse fails, then we have to check wiring up to the compressor.

If the fuse does not fail, the compressor needs to be replaced.

Please remove the connector at the compressor and re test. I attached a picture of the connectors.

Roy
Was this
answer
helpful?
Yes
No
Saturday, September 12th, 2020 AT 4:55 AM
Tiny
TRAEN
  • MEMBER
  • 9 POSTS
I reconnected the relay. Put a fuse in slot 16. Disconnected compressor wiring. Started vehicle. Turned on air. Fuse is not blown. Also included a photo that there is some oil underneath the compressor.
Was this
answer
helpful?
Yes
No
Saturday, September 12th, 2020 AT 2:07 PM
Tiny
TRAEN
  • MEMBER
  • 9 POSTS
I'm not 100% confident I disconnected the wiring correctly. Please check that picture I included. The black connector, which I think is the relay, is connected but the gray connector at the compressor, furthest from the clutch, is disconnected.
Was this
answer
helpful?
Yes
No
Saturday, September 12th, 2020 AT 2:12 PM
Tiny
ASEMASTER6371
  • MECHANIC
  • 52,797 POSTS
Good.

You need a compressor for the repair.

You will need the compressor and the receiver dryer, evacuate and recharge the system.

https://www.2carpros.com/articles/replace-air-conditioner-compressor

https://www.2carpros.com/articles/re-charge-an-air-conditioner-system

Roy

412-00 Climate Control System - General Information 2016 Explorer, Police Interceptor - Utility
Removal and Installation
Air Conditioning (A/C) Compressor - 3.5L Duratec (209kW/284PS)
Materials

Name Specification
Motorcraft PAG Refrigerant Compressor Oil
YN-12-D WSH-M1C231-B

Removal

NOTICE: If installing a new A/C compressor due to an internal failure of the old unit, carry out the following procedures to remove contamination from the A/C system. Failure to remove contamination from the A/C system, if present, will result in poor A/C performance and/or damage to the new A/C compressor and other components.

If A/C flushing equipment is available, carry out flushing of the A/C system prior to installing a new A/C compressor.
If A/C flushing equipment is not available, replace all contaminated components after a new A/C compressor has been installed.
Install a new Thermostatic Expansion Valve (TXV) as directed by the A/C flushing.
Install a new receiver drier element as directed by the A/C flushing.
NOTE: Installation of a new receiver drier element is not required when repairing the A/C system except when there is physical evidence of system contamination from a failed A/C compressor or damage to the receiver drier element.

NOTE: A new A/C compressor may come equipped with an A/C clutch disc and hub, A/C compressor pulley and A/C clutch field coil already installed. If these components are not pre-installed, it will be necessary to transfer these parts from the old A/C compressor to the new compressor prior to installation of the A/C compressor if suitable for reuse.

NOTE: Removal steps in this procedure may contain installation details.

Recover the refrigerant.
Refer to: Air Conditioning (A/C) System Recovery, Evacuation and Charging (412-00 Climate Control System - General Information, General Procedures) .
With the vehicle in NEUTRAL, position it on a hoist.
Refer to: Jacking and Lifting - Overview (100-02 Jacking and Lifting, Description and Operation) .
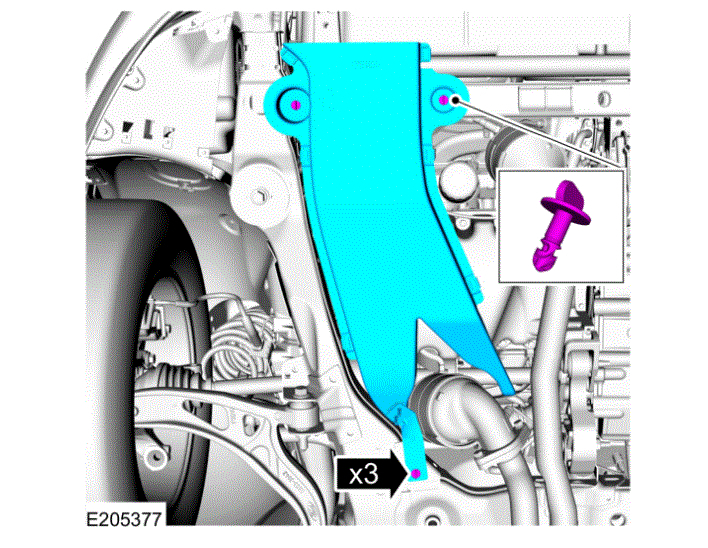
Remove the retainers and the underbody shield.
image

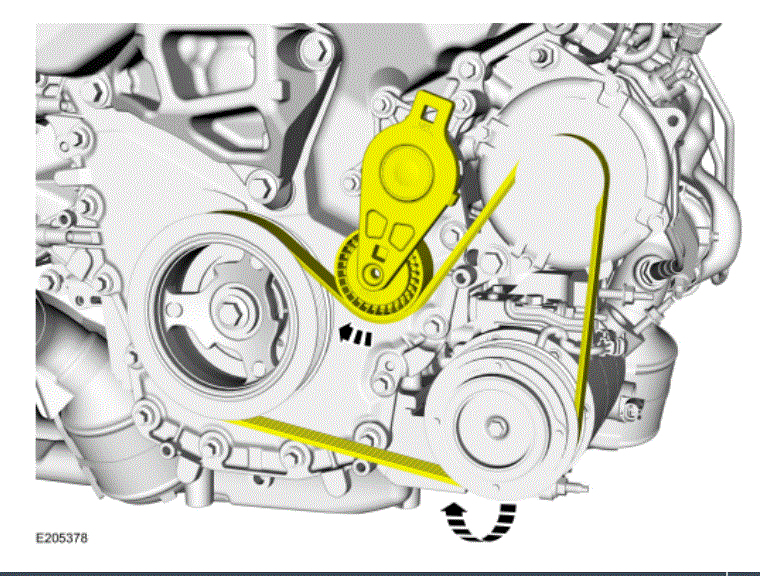
Rotate the A/C compressor belt tensioner clockwise and position the A/C compressor belt off the A/C compressor pulley.
imageOpen In New TabZoom/Print

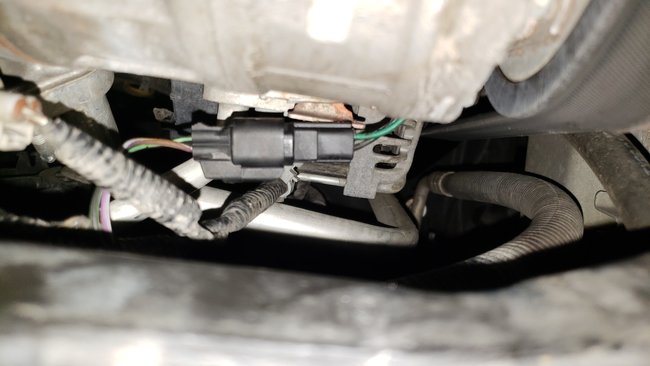
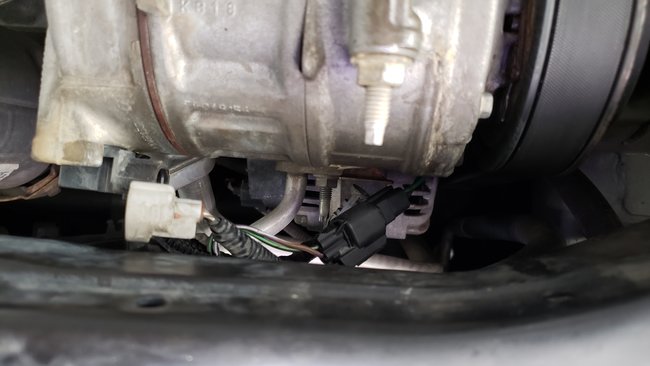
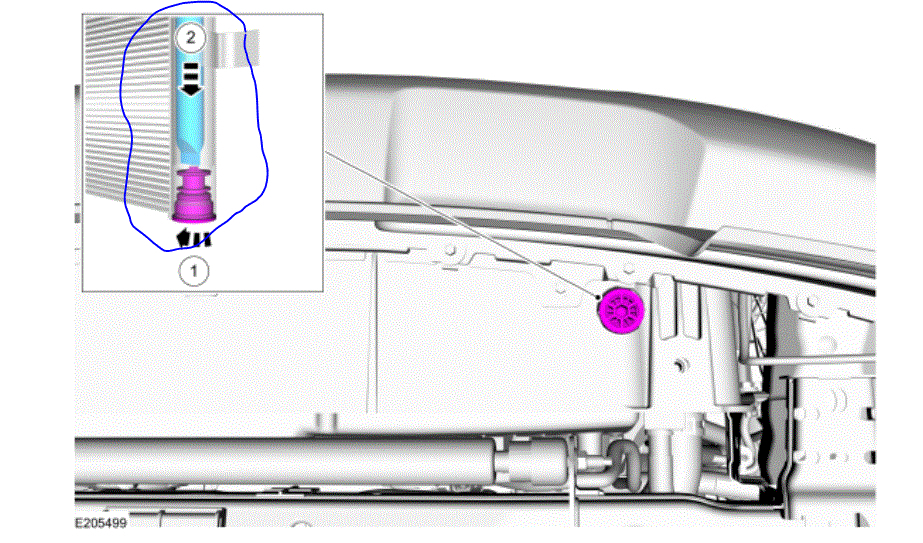
Detach the wiring harness retainer, disconnect the electrical connectors.
image

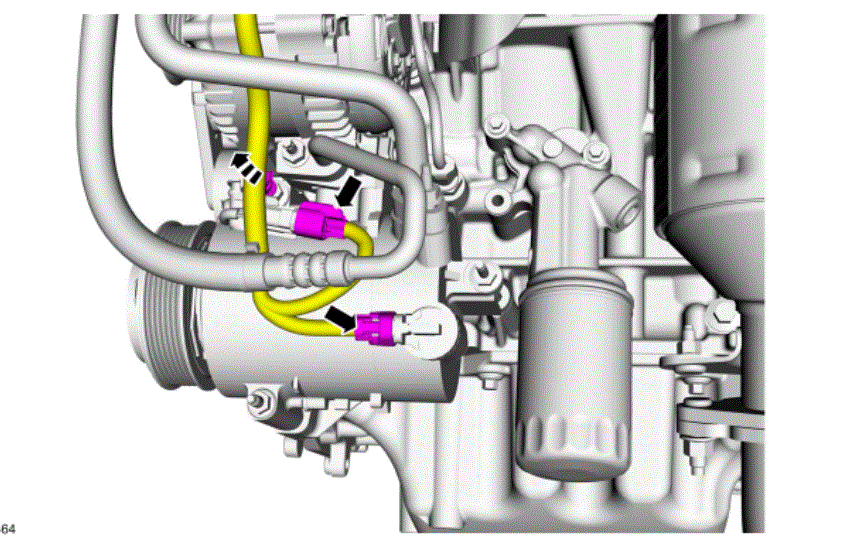
NOTICE: Make sure that all openings are sealed.

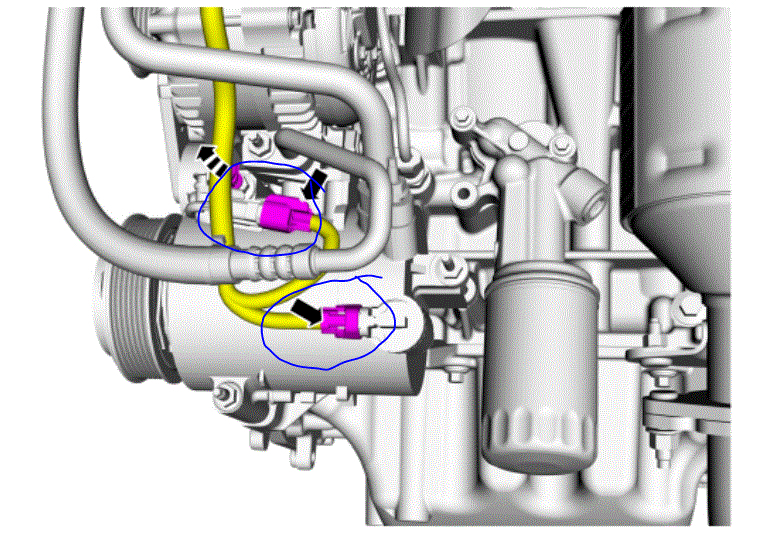
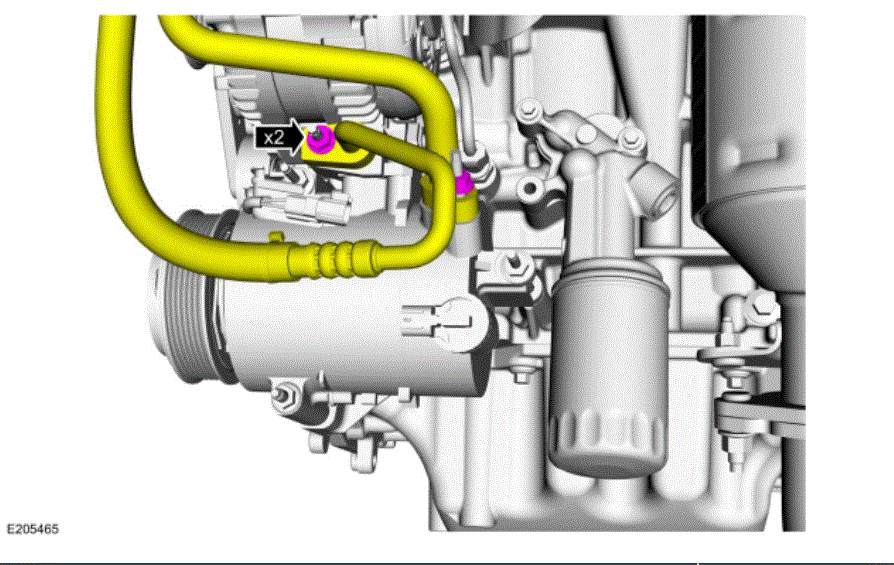
Remove the A/C compressor inlet and outlet line nuts and disconnect the fittings. Discard the O-ring seals and gasket seals.
Torque : 177 lb.in (20 Nm)
imageOpen In New TabZoom/Print

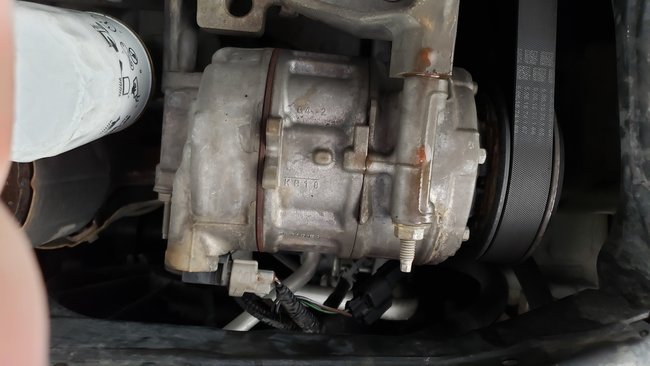
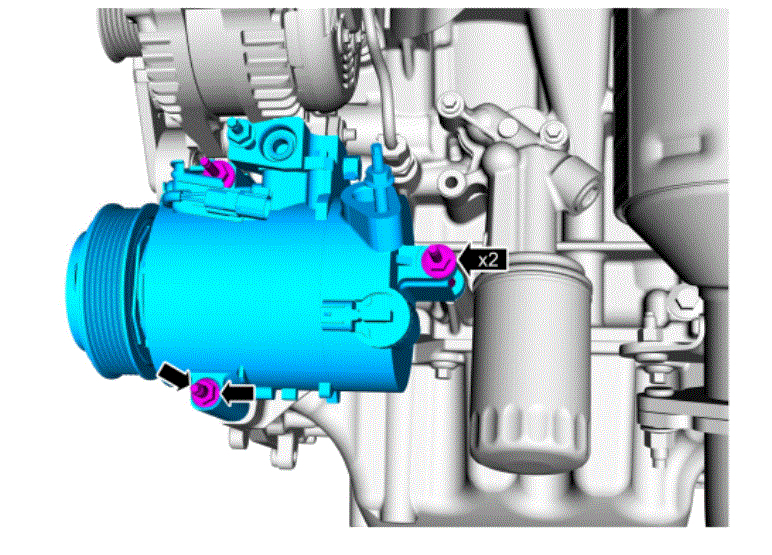
Remove the nut, studbolts, stud and the A/C compressor.
image
Was this
answer
helpful?
Yes
No
Sunday, September 13th, 2020 AT 4:21 AM
Tiny
TRAEN
  • MEMBER
  • 9 POSTS
In the e205377, I see a plastic cover that needs to be removed. Does that require removing the front bumper cover and the radiator to access?
Was this
answer
helpful?
Yes
No
Sunday, September 13th, 2020 AT 8:40 AM
Tiny
ASEMASTER6371
  • MECHANIC
  • 52,797 POSTS
No, it does not. It is in the open and has plastic pins that hold it.

Roy
Was this
answer
helpful?
Yes
No
Sunday, September 13th, 2020 AT 8:48 AM
Tiny
TRAEN
  • MEMBER
  • 9 POSTS
Also, any advice on parts? Insist on motorcraft or another part that has a decent warranty?
Was this
answer
helpful?
Yes
No
Sunday, September 13th, 2020 AT 9:29 AM
Tiny
ASEMASTER6371
  • MECHANIC
  • 52,797 POSTS
I would go to Rock Auto for the parts. They are fine and have a good warranty.

Roy
Was this
answer
helpful?
Yes
No
Sunday, September 13th, 2020 AT 9:44 AM

Please login or register to post a reply.

Sponsored links