Good evening,
Do you have a normal pedal?
If you do, then the clutch itself has failed and the pressure plate and disc has to be replaced.
https://www.2carpros.com/articles/clutch-doesnt-work-sometimes-or-not-at-all
https://www.2carpros.com/articles/how-to-replace-a-clutch
https://www.2carpros.com/articles/transmission-replacement-removal-manual
If the pedal is not normal, then you may have air and needs to be bled.
Roy
The hydraulic clutch control system consists of a fluid reservoir, a master cylinder, a slave cylinder and connective tubing. The clutch master cylinder converts mechanical clutch pedal movement into hydraulic fluid movement. The slave cylinder converts hydraulic fluid movement to mechanical movement to activate the clutch release lever. The hydraulic clutch system locates the clutch pedal and provides automatic clutch adjustment. Adjustment of clutch pedal position or clutch linkage is not required.
Bleeding
NOTE: Under normal conditions, disconnecting the clutch coupling will not introduce air into the system. However, if there appears to be air in the system, (spongy pedal, or insufficient bearing travel) the system must be bled. The largest portion of bleeding is carried out by gravity.
REMOVAL AND INSTALLATION
1. Disconnect coupling at transmission with Clutch Coupling tool No. T88T-70522-A or equivalent by sliding white plastic sleeve toward clutch slave cylinder while applying a slight tug on clutch tube.
2. Clean dirt and grease from around the reservoir cap.
3. Remove cap and diaphragm, then fill reservoir to step with Heavy Duty Brake Fluid part No. C6AZ-19542-AA or -BA (ESA-M6C25-A) or equivalent. Brake fluid must be certified DOT 3 or 4 specification.
4. Using a screwdriver, depress internal mechanism of male coupling to open valve. While continuing to hold valve open, slowly depress and hold clutch pedal to floor.
5. Remove screwdriver from coupling, closing valve. Release clutch pedal.
6. Refill reservoir to level at step, then repeat Steps 4 and 5.
7. Close reservoir. Reconnect coupling to clutch slave cylinder. Check that connection is secure by applying a slight tug to clutch tube.
8. Stroke clutch pedal as rapidly as possible 5 to 10 times, wait one to three minutes, then repeat three more times.
9. Loosen bleed screw (located in clutch slave cylinder next to inlet connection), then depress and hold clutch pedal while tightening bleed screw.
10. Refill clutch master cylinder reservoir to level at step.
Clutch
REMOVAL
1. Disconnect battery ground cable, then the clutch master cylinder from clutch pedal.
2. Raise and support vehicle, then remove starter.
3. Disconnect hydraulic coupling at transmission with coupling disconnect tool No. T88T-70522-A or equivalent by sliding white plastic sleeve toward slave cylinder and tugging on tube.
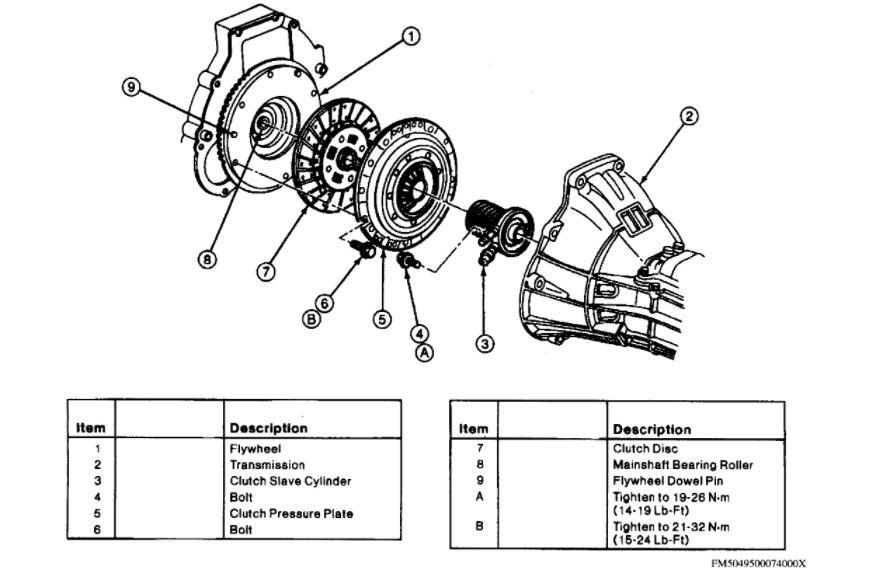
4. Remove transmission. If original components are to be reinstalled scribe pressure plate/cover and fly wheel for assembly reference.
5. Loosen pressure plate and cover attaching bolts evenly until pressure plate springs are completely expanded, then remove bolts.
6. Remove pressure plate, cover assembly, and clutch disc from flywheel. Remove pilot bearing, if required.
INSTALLATION
NOTE: Clean the pressure plate and flywheel surface with a suitable commercial alcohol base solvent to be sure that surfaces are free from any oil film. Do not use cleaners with a petroleum base and do not immerse the pressure plate in the solvent.
1. Reverse procedure to install, noting the following:
a. Before tightening pressure plate bolts, insert clutch alignment tool No. T74P-7137-k or equivalent into clutch pilot bearing hole. Ensure clutch disc is properly aligned on flywheel.
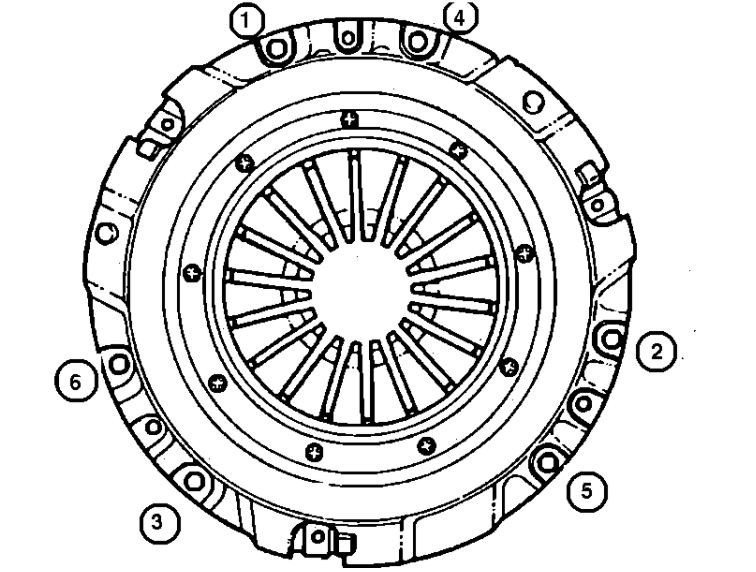
Pressure Plate Tightening Sequence
imageOpen In New TabZoom/Print
b. Torque pressure plate bolts in sequence to 21-32 N.m 15-24 ft lbs.
3. Install the transmission.
4. Connect the coupling by pushing the male coupling into the slave cylinder female coupling.
5. Connect the hydraulic clutch master cylinder push rod to the clutch pedal.
6. Bleed the clutch system (only if required).
7. When battery has been disconnected and then reconnected, abnormal drive symptoms may be noted for 10 or more miles due to Powertrain Control Module (PCM) reset.
Images (Click to make bigger)
Monday, May 3rd, 2021 AT 2:19 PM