Wires are crossed to pig tails to PCM

Tiny
AGNUS
  • MEMBER
  • 2005 CHRYSLER 300
  • 5.7L
  • V8
  • 2WD
  • AUTOMATIC
  • 107,856 MILES
It will start but red lighting is on and the rpm's stay at 3. I can't give it gas and runs real rough. Can someone please help and tell me which wires they are so I can get my 300C back on the road? Thank you.
Saturday, March 7th, 2020 AT 1:58 PM

66 Replies

Tiny
ASEMASTER6371
  • MECHANIC
  • 52,797 POSTS
Good afternoon.

I attached the connector diagrams for you of all 4 connectors. It shows the pin number, wire color for the pin and what it controls.

Roy
Was this
answer
helpful?
Yes
No
+1
Saturday, March 7th, 2020 AT 2:32 PM
Tiny
AGNUS
  • MEMBER
  • 37 POSTS
Okay. Um, I don't really understand how that works what I really need is like color coated maybe. Okay, this is what went down: I had ordered new pigtails because the other ones were shot so me and a buddy we're going to do a one wire at a time I come outside and he's got them all cut I want. So I spent seven hours wiring them back together the best I could so that's what happened. So I need something a little easier comprehend like I don't know what to do because what you sent me I really don't understand because I'm not really good with wiring. But like I said I know a couple wires off give or take. I thank you for what you sent me, but I really don't understand it. Is there anyway you can send me something easier maybe or something like color coded like this? Why I go to this one or I don't know what to do. All I know is I want to get my 300 back on the road. There's any thing easier you can send me or something that would be awesome. Please let me know. Thank you. Or maybe a video or something?
Was this
answer
helpful?
Yes
No
Saturday, March 7th, 2020 AT 4:54 PM
Tiny
CARADIODOC
  • MECHANIC
  • 33,742 POSTS
If you don't mind me sticking my nose in here, this is what we use, and to my knowledge, Chrysler is the only manufacturer that puts these tables in their service manuals. There isn't anything any easier. Ford has something similar in their "Electrical, Vacuum, Troubleshooting Manuals" (EVTM), but you have to look on multiple pages to find all the wires.

If you find these too hard to read, right click on a list, then click "Copy". Next, open a typing program on your computer like Microsoft "Word" or "Word Pad", then right click, then click "Paste". That program will have an option to expand it so you can read it easier.

As an alternative, Roy already went through the hard part of finding the drawings. Either of us can cut them in half, expand the parts, then repost them in a larger format, if that will help.

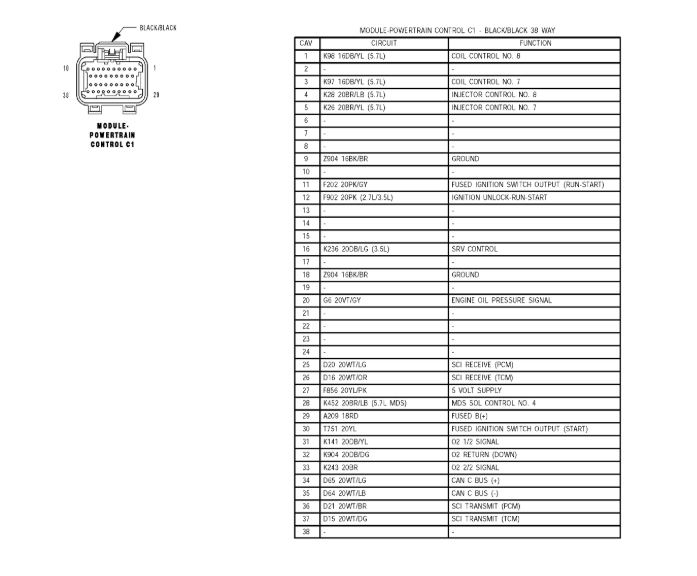
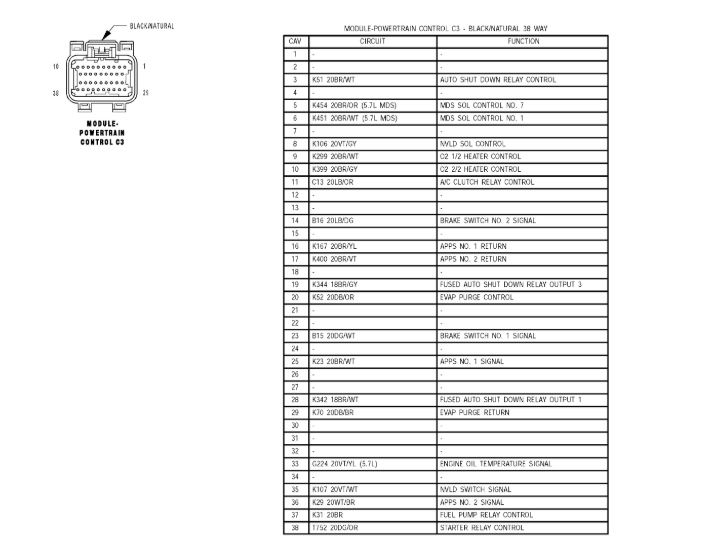
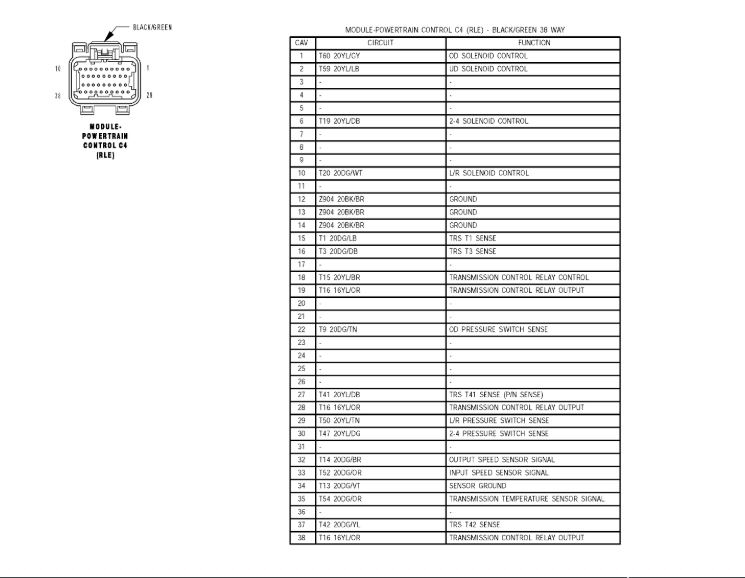
Each drawing shows a different connector with the color of its body, the number of terminals it can hold, and the shape of any key ways and latches built into it. You're looking at the terminal end of the connector body, not the end where the wires come out. In the first drawing, terminals 1, 10, 29, and 38 are pointed out in the four corners. You just count between them to find the other terminals.

Each terminal location is listed in the chart along with the wire color. Here's where some care is needed. The wire colors are usually pretty distinct, but the stripes, or "tracers" can be of two different but very similar colors. Watch out, for example, for light brown, yellow, or tan tracers that can look the same.

The wire listed for terminal # 1 is K96 16DB/YL. The "K" is for the type of circuit, and the "96" is just to show it's different from the others. You don't have to concern yourself with those. The "16" means it's a 16 gauge wire. What you're really asking about is the "DB/YL". That's dark blue with a yellow tracer. You need to find the dark blue / yellow wire and connect it to terminal # 1.

It sounds like you're making a lot of work for yourself by changing the plugs, or at least changing a lot of terminals. A better solution would be to snip the connectors, along with a few inches of wire, from a car in the salvage yard. Be sure they come from a car that had the same size engine. Rather than cutting and splicing every wire, if you have one that is good on your car, remove that terminal from the connector, then plug it into the replacement connector. All connectors have some type of locking wedge, or "pimento" as I call them, that has to be pried out. That allows you to use a small pick to lift a plastic finger, then you can pull the terminal out by tugging on the wire. Don't use a lot of force to pull a terminal out. If the finger is moved out of the way far enough, the terminal will slide right out. If the finger isn't moved far enough, no amount of tugging will get the terminal out. You'll just damage the finger or tear the wire off. Bending the fingers out of the way takes practice and patience, but it will be fairly easy once you get the hang of it.
Was this
answer
helpful?
Yes
No
+1
Saturday, March 7th, 2020 AT 10:46 PM
Tiny
AGNUS
  • MEMBER
  • 37 POSTS
Hey, thank you very very much. It all means a lot. I know where to come if I ever have any questions. You guys rock! You are the man awesome or woman. Thank you. You are a life saver. God Bless you All.
Was this
answer
helpful?
Yes
No
Sunday, March 8th, 2020 AT 12:52 AM
Tiny
ASEMASTER6371
  • MECHANIC
  • 52,797 POSTS
You are welcome.

Roy
Was this
answer
helpful?
Yes
No
+1
Sunday, March 8th, 2020 AT 1:20 AM
Tiny
AGNUS
  • MEMBER
  • 37 POSTS
If I have any trouble later I can hit you back, right?
Was this
answer
helpful?
Yes
No
Sunday, March 8th, 2020 AT 7:38 AM
Tiny
AGNUS
  • MEMBER
  • 37 POSTS
Oh ya, I forgot to tell you I put a brand new throttle body on as well.
Was this
answer
helpful?
Yes
No
Sunday, March 8th, 2020 AT 7:40 AM
Tiny
ASEMASTER6371
  • MECHANIC
  • 52,797 POSTS
You can come back at any time and continue.

Roy
Was this
answer
helpful?
Yes
No
+1
Sunday, March 8th, 2020 AT 2:26 PM
Tiny
AGNUS
  • MEMBER
  • 37 POSTS
Hey not trying to bug, but I need help.
Was this
answer
helpful?
Yes
No
Sunday, March 8th, 2020 AT 2:53 PM
Tiny
ASEMASTER6371
  • MECHANIC
  • 52,797 POSTS
Okay, go.

Roy
Was this
answer
helpful?
Yes
No
+1
Sunday, March 8th, 2020 AT 3:01 PM
Tiny
AGNUS
  • MEMBER
  • 37 POSTS
Is there any kinda easier way? Because I don't comprehend very well and all I have is my crappy phone so of course the pictures are a little blurry. I hate to bug but I just want this done.
Was this
answer
helpful?
Yes
No
Sunday, March 8th, 2020 AT 3:01 PM
Tiny
ASEMASTER6371
  • MECHANIC
  • 52,797 POSTS
I suggest you go somewhere and have the attachments printed out for you. Then it will be larger and more legible for you to match up the wires.

Roy
Was this
answer
helpful?
Yes
No
Sunday, March 8th, 2020 AT 3:11 PM
Tiny
AGNUS
  • MEMBER
  • 37 POSTS
Okay, so what about the ones where there's like 4 or 5 of the same. Does it matter?
Was this
answer
helpful?
Yes
No
Sunday, March 8th, 2020 AT 3:15 PM
Tiny
ASEMASTER6371
  • MECHANIC
  • 52,797 POSTS
See what is correct in each connector first. Then identify the ones that are not correct. Then let me know one connector at a time.

Roy
Was this
answer
helpful?
Yes
No
+1
Sunday, March 8th, 2020 AT 3:21 PM
Tiny
AGNUS
  • MEMBER
  • 37 POSTS
It's me again. I had a question, do all the wires match up or is there a like ones that mismatch? I'm still having trouble with this. I'm trying to say is; they don't all match up correct.
Was this
answer
helpful?
Yes
No
Wednesday, March 11th, 2020 AT 1:12 PM
Tiny
ASEMASTER6371
  • MECHANIC
  • 52,797 POSTS
The wires for the pins need to go exactly where they are needed.

Roy
Was this
answer
helpful?
Yes
No
Wednesday, March 11th, 2020 AT 2:11 PM
Tiny
AGNUS
  • MEMBER
  • 37 POSTS
I followed the diagram to a t but I turn the key no click no nothing.
Was this
answer
helpful?
Yes
No
Wednesday, March 11th, 2020 AT 5:17 PM
Tiny
AGNUS
  • MEMBER
  • 37 POSTS
P06855, P0688, P0113, P2122, P2101 and P2111.
Was this
answer
helpful?
Yes
No
Wednesday, March 11th, 2020 AT 5:26 PM
Tiny
AGNUS
  • MEMBER
  • 37 POSTS
Now I got all those codes I don't get it, I don't know what to do. My car has been down for 6 months now. I need you out here every other freaking day. Try my best you know. One time it took me 7 hours to rewire that they took me 2.
Was this
answer
helpful?
Yes
No
Wednesday, March 11th, 2020 AT 5:27 PM
Tiny
ASEMASTER6371
  • MECHANIC
  • 52,797 POSTS
I would go over the connectors again one at a time and make sure the wires are in the correct locations.

Were there any codes prior to all this happening with the wiring?

Roy
Was this
answer
helpful?
Yes
No
Thursday, March 12th, 2020 AT 3:04 AM

Please login or register to post a reply.

Sponsored links