I would also check the actual fuel pressure. Even if the pump works, it may not be proving sufficient pressure for it to run.
https://www.2carpros.com/articles/how-to-check-fuel-system-pressure-and-regulator
Fuel System Pressure
Key On Engine Off 41-47 psi
https://www.2carpros.com/articles/how-to-replace-an-electric-fuel-pump
Is the check engine light on? If it is, can you give me the code?
https://www.2carpros.com/articles/checking-a-service-engine-soon-or-check-engine-light-on-or-flashing
Roy
Removal Procedure
1. Remove the negative battery cable.
2. Drain fuel tank. Refer to Draining Fuel Tank.
3. Raise vehicle and suitably support.
4. Remove the muffler hanger bolts.
5. Remove the exhaust rubber hangers. Allow exhaust system to rest on rear axle.
6. Remove the hoses at tank from filler, vent and vapor pipes.
7. With aid of an assistant, support fuel tank and disconnect the two fuel tank retaining straps.
8. Lower the fuel tank.
9. Remove the fuel tank pressure sensor electrical connector.
10. Remove the fuel sender electrical connector.
11. Remove the hoses from fuel tank sender.
12. Grasp filter and one nylon fuel connection line fitting. Twist quick-connect fitting 1/4 turn in each direction to loosen any dirt within fitting. Repeat for other nylon fuel connection line fitting.
Caution: Wear safety glasses when using compressed air because flying dirt particles may cause eye injury.
13. Using compressed air, blow out dirt from quick-connect fittings at end of fuel filter.
14. Remove the quick connect fittings by pulling release tabs back on fuel line quick connector and pulling apart.
15. Remove the tank from vehicle.
16. Remove the sound insulators.
17. Remove the fuel sender assembly from tank. Refer to Fuel Sender Assembly.
Removal Procedure
Caution: To reduce the risk of fire and personal injury that may result from a fuel leak, always replace the fuel sender gasket when reinstalling the fuel sender assembly.
1. Remove the negative battery cable.
2. Relieve system fuel pressure. Refer to Fuel Pressure Relief Procedure. See: Fuel Pressure Release > Procedures > Fuel System Pressure Relief Procedure
3. Drain fuel tank. Refer to Draining Fuel Tank.
4. Remove the fuel tank. Refer to Fuel Tank/Service and Repair.
Important:
The modular fuel sender assembly may spring up from its position.
When removing the modular fuel sender assembly from the fuel tank, be aware that the reservoir bucket is full of fuel. It must be tipped slightly during removal to avoid damage to the float. Discard fuel sender O-ring and replace with a new one.
Carefully discard the reservoir fuel into an approved container.
5. While holding the modular fuel sender assembly down, remove the snap ring from designated slots located on the retainer.
Installation Procedure
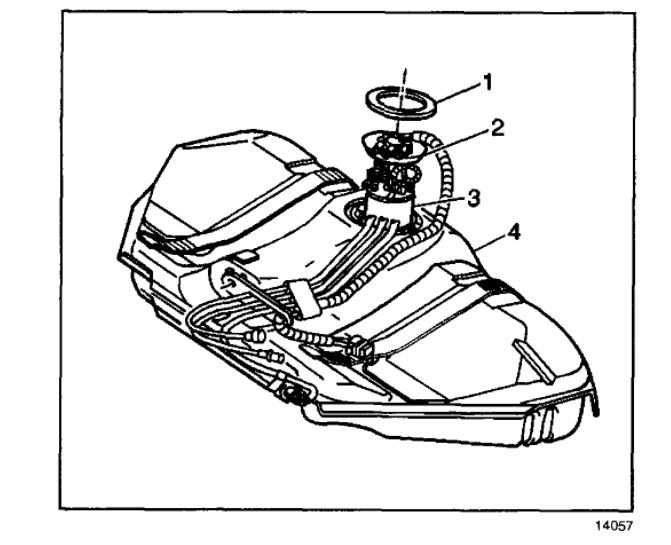
1. Install a new O-ring on modular fuel sender (3) to tank.
2. Align tab on front of sender (2) with slot on front of retainer snap ring.
3. Slowly apply pressure to top of spring loaded sender until sender aligns flush with retainer on tank.
Important: Be sure that the snap ring is fully seated within the tab slots.
4. Insert snap ring (1) into designated slots.
5. Install the fuel tank. Refer to Fuel Tank.
6. Lower vehicle.
7. Refill tank.
8. Inspect for fuel leaks through the following steps:
8.1.Turn the ignition to the ON position for two seconds.
8.2.Turn the ignition to the OFF position for ten seconds.
8.3.Turn the ignition to the ON position.
8.4.Check for fuel leaks.
Image (Click to make bigger)
Wednesday, June 16th, 2021 AT 3:38 PM