A check engine light, also known as a service engine light, or a MIL (malfunction indicator light) is designed to let you know there is a problem with one of your car's computer monitored systems. The computer system is programmed to identify a malfunction by producing a trouble code which will point you in the right direction of the problem, it also determines if the car is safe to drive or not. By using a simple code reader which is available on Amazon starting at $19.00 (US) anyone can gather these codes and fix the issue themselves or be informed when taking the car into a repair shop.
In this guide we will show you how to gather codes, popular reasons that trigger a check engine light, if the car is safe to drive and how to clear codes.
What Goes Wrong?
Popular problems include: shorted oxygen sensor heater, broken vacuum line, loose gas cap, bad spark plug, shorted ignition coil or clogged injector. Sometimes a code can be set by error such as a sensor was disconnected during a repair or service or if the ignition key was turned on while a repair has been made. Video - Top 8 reasons for a check engine light
Let's Jump In!
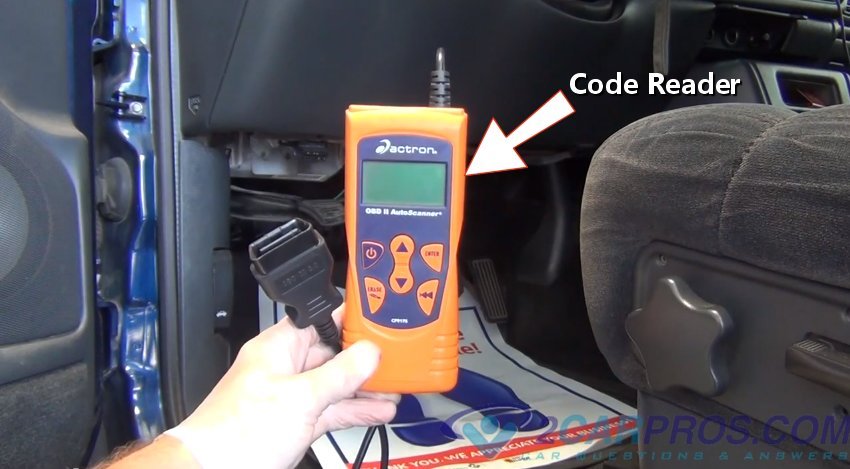
Begin with your code reader ready to be plugged into the ALDL data connection
port, (Assembly Line Diagnostic Link).
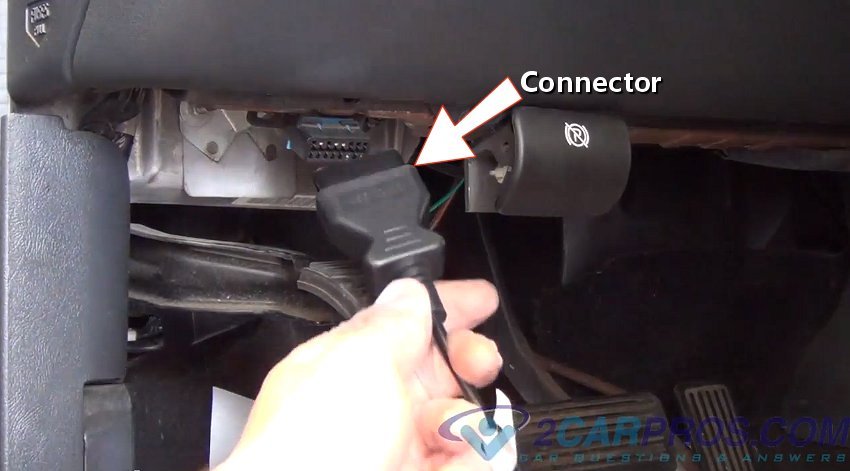
With the vehicle's engine off, have your code reader in hand. Locate the ALDL
"D" shaped 16 pin connector located under the dashboard on the driver’s side in
plain sight, in most cases. If you cannot find your car's connector it can be behind
a small plastic trap door or have a cover over the connector. Can't find it? You
can ask one of our experts to help for free.

Securely insert code reader plug onto the ALDL connector and turn the ignition
key on, do not crank or start the engine, the scanner should light up and display
the welcome screen. If the screen does not come on, wiggle the reader connector
while in the ALDL data port, sometimes the connector pins can become corroded which
will make a poor connection. If the reader still doesn't power up, retry the reader
on an alternative car to make sure it is working. This video shows
how to fix a ALDL that is not working.
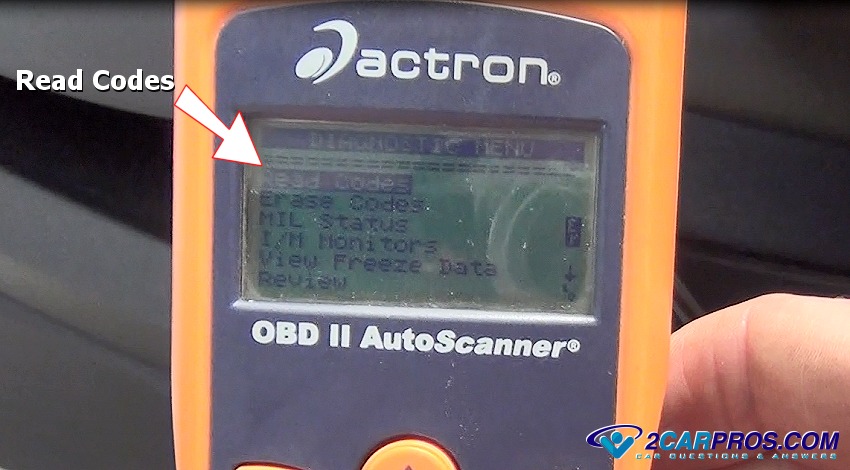
After the welcome screen appears, follow the prompt which will include: Read
Codes, Clear Codes, MIL Status, I/M Data, Freeze Frame Data and Code Review. While
using the up and down arrows select the "Read Codes" option. This will allow the
reader to configure a connection to the automobiles computer and display the error
codes, this can take up to 15 seconds. If the reader or scanner "hangs" on the working
screen for over two minutes, turn the ignition key off and restart the process.
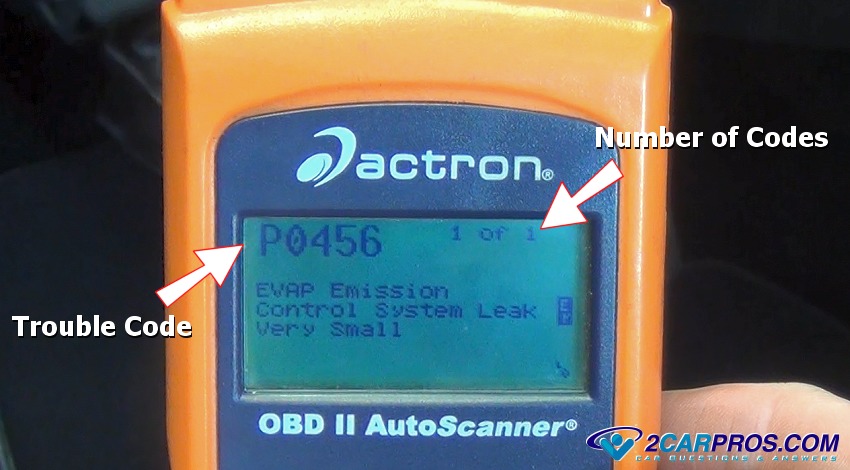
If there are multiple codes stored it will say 1 of 2 or 1 of 3 which is an
indication that more than one code is present. In this case there is one code number,
P0456 which is for a small EVAP leak
which can be a loose gas cap or a broken vacuum line in the EVAP system. Use the
up and down arrow buttons to toggle between the codes so you can identify each code
and start the repair or have an idea of what the problem is, turn the ignition key
off and perform the repairs. If multiple codes are present, start with the lowest
code number which can cause additional codes to be triggered.
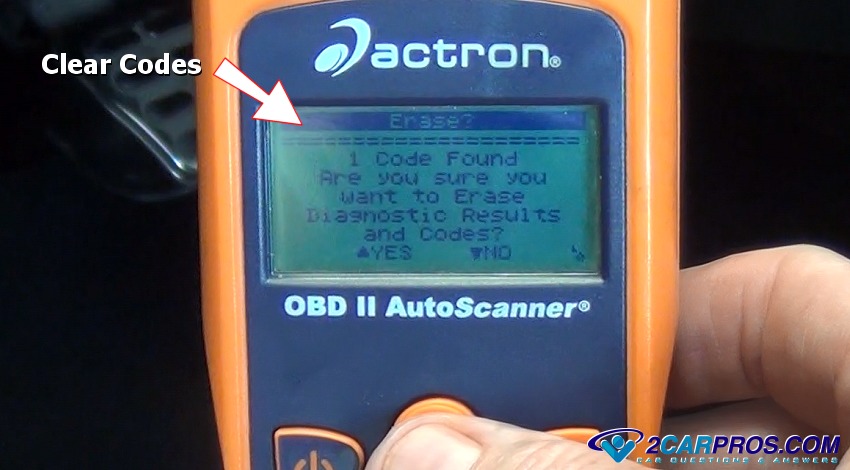
Clear Codes
Once the repairs have been made you must clear the codes to reset the system
and turn the check engine warning light off. Navigate to prompt the scanner to clear
all trouble codes and then hit enter, the code reader will then display a pass message
if no problems are detected. This pass state might be temporary if a problem still
exists which will only show up after a while of driving. The check engine light
will come back on immediately if a hard code problem is detected.
Watch the Video
On cars made before 1996 you can clear the trouble codes by simply disconnecting the negative battery cable and wait for 15 seconds, then reconnect the battery. You will still need to drive the car for about 50 miles to be sure the code doesn't not come back on, in which case the codes will need to be gathered again to see what is wrong.
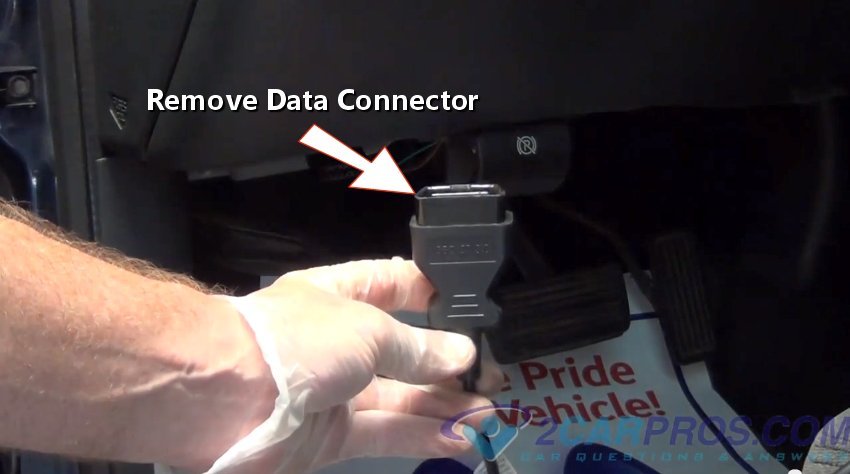
Disconnect Code Reader
Once code gathering or code clearing is complete turn the ignition key off, then
grasp the connector firmly and pull gently outward unplugging the code reader from
the ALDL data port. Replace the cover over the port if equipped to prevent any corrosion
causing moisture that could cause damage to the connector. Once the code reader
or scanner is disconnected find a cool dry place to store it in such as the top
drawer of your tool box, that's where most mechanics keep theirs.
Helpful Information
Here is a chart of OBD2 trouble code definitions. Occasionally you will have problems gathering the codes and the code reader will display a code P1000 which means the code gathering was incomplete.
A "hard code" is when the ignition key is first turned to the on position and engine runs for a few seconds compared to a regular code which can take a few cycles of the car being run and then turned off and then run again before it shows up. After completing the code run sequence you should get a "Pass" message on the screen letting you know the codes have been successfully erased. The check engine light will come back on again if the computer detects the same or a different problem within about 50 miles of driving.
Watch the Video!
Please watch this video of the job being done, then continue down the guide to glean additional helpful information.
Questions?
Our certified technicians are ready to answer trouble code reader questions for free. We hope you saved money and learned from this guide. We are creating a full set of car repair guides. Please subscribe to our 2CarPros YouTube channel and check back often for new videos which are uploaded regularly.
This guide created by Ken Lavacot: 35 Year Master Mechanic and Author