Clutch pedal on my car has gone

Tiny
CHRISTOPHER SA
  • MEMBER
  • 206 POSTS
Okay.
Was this
answer
helpful?
Yes
No
Monday, April 8th, 2019 AT 6:46 PM
Tiny
CHRISTOPHER SA
  • MEMBER
  • 206 POSTS
Well, I was able to do the last step (bleeding the slave clutch cylinder) after getting my front suspension entirely replaced with new parts. Unfortunately, the same result happens - I press the clutch pedal and no resistance. It just goes down to the floor without any 'bite'. This is with the engine running.

Now this could be a problem created by me. Let me explain.....

To get the master brake fluid cylinder put under pressure (without buying expensive equipment) I made up a washer (see image) with a schrader valve (obtained for free from a place where they put new car tires onto your car) in the middle thinking that I could use a bicycle pump and put it under pressure that way. The image shows what the washer looks like beside the cap to the master brake fluid reservoir. I also put epoxy around the underside of the valve so that there would be no leaks at the point where the schrader valve goes through the washer.

The cap is removed, the central part is unplugged and removed from the cap and the washer with the valve put in place of the central bit. The washer was a snug fit and used the rubber washer under the original piece in the cap as a means of sealing the unit.

I filled the reservoir with brake fluid to about 0.75 below the valve stem's underside and used a bicycle pump to put the system under pressure.

When bleeding the new slave clutch cylinder only about two inches of fluid came through the tube before the pressure ran out. But I was able to see that there were no bubbles and I did loosen the clutch rod as stated in the instructions. I also saw that the fluid level inside the reservoir was a lot lower - around the level it should be which was about an inch lower than when I started (the MAX line on the outside of the reservoir).

It could be that I have to bleed it for much more than what I did. If so I will have to rethink how to put the reservoir under pressure.

If that doesn't work I may have to replace the master clutch cylinder which is really difficult to get to (behind the clutch pedal). Mind you, there are no leaks of brake fluid inside the vehicle.

Thoughts?
_________________

After writing the above I looked in my Bentley manual and there was information that was very different to what was posted earlier ( https://www.newtis.info/tisv2/a/en/e36-320i-lim/repair-manuals/21-clutch/21-00-clutch-check/Bx2OjOx )

I missed out on quite a few of the steps of the manual so when I am up to it I will redo the bleeding. Not really looking forward to that as going underneath the car while it is on jack stands is something I really don't like doing.

Here are the instructions from the Bentley manual (for bleeding an old unit):

1 . Remove brake fluid reservoir cap. Using a clean syringe, remove brake fluid from reservoir. Refill reservoir with clean fluid.

2. Attach pressure brake bleeder to fluid reservoir.
CAUTION - Do not exceed 2 bar (29 psi) pressure at the fluid reservoir when bleeding or flushing the hydraulic system.

3. Connect a length of hose from clutch slave cylinder bleeder valve lo a container.

4. Open bleeder valve and allow brake fluid to expel until clean fluid comes out free of air bubbles.

5. Close bleeder valve and disconnect pressure bleeding equipment from fluid reservoir. Hose on bleeder valve remains connected.

6. Slowly operate clutch pedal about 10 times. Fill reservoir with clean fluid as necessary.

7. Unbolt slave cylinder from transmission.

8. Position slave cylinder so that bleeder valve is facing up (highest point).

9. Open bleeder valve and slowly push slave cylinder push rod all the way in . Close bleeder valve and slowly release pushrod. Repeat procedure until fluid runs out clear and without bubbles.

10. Disconnect bleeder hose. Install slave cylinder to transmission. Add clean brake fluid to reservoir as necessary. Check clutch operation.

I missed out steps 7 - 9. After bleeding I attached the slave cylinder back to the transmission (and never took it off again). I pumped the pedal a few times and when nothing happened I thought that it had not worked! Now I know what to do. Hopefully the above steps will work.
Was this
answer
helpful?
Yes
No
Friday, June 21st, 2019 AT 3:59 PM
Tiny
JACOBANDNICKOLAS
  • MECHANIC
  • 108,179 POSTS
That is an ingenious design. Just don't apply too much pressure or the master cylinder can be damaged. As far as the steps missed, chances are there is a lot of air stuck in the slave. By the way, I totally agree about getting under a vehicle on jack stands. Just be careful. Let us know if that takes care of the problem.

Joe
Was this
answer
helpful?
Yes
No
Friday, June 21st, 2019 AT 9:01 PM
Tiny
CHRISTOPHER SA
  • MEMBER
  • 206 POSTS
Well, after a few weeks I was able to get this sorted out over two days (I took a break of a week or so in between the first time and the second go).

When doing the bleeding the first time I followed these steps which are slightly different from above, taking into account that I already had new brake fluid in the master cylinder:

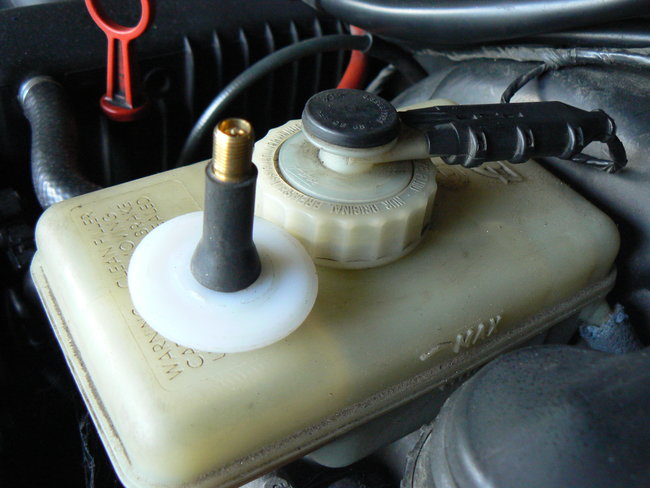
1. I attached my made up schrader valve washer and put the system under pressure with a bicycle pump that had a pressure gauge attached which I had purchased for about $15. The pressure was pumped to 29lbs psi. This schrader valve washer worked very well.

2. I connected a length of hose to the slave clutch cylinder bleeder nipple and from there to a clean, empty 2L soda pop bottle.

3. I opened the bleeder valve and allowed brake fluid to expel until clean fluid came out free of air bubbles. There was quite a lot of air and bubbles that was expelled.

4. I closed the bleeder valve and released the pressure from the master cylinder reservoir. I left the hose on the bleeder valve.

6. I slowly operated the clutch pedal about 10 times. I checked the reservoir to see if it needed more fluid - it did so I filled it with clean fluid. There was more firmness in the clutch pedal.

7. I repeated the pressurizing of the system and bleeding two more times with the clutch being operated in between with no pressure in the system. After the third time the clutch action felt much better. Took a week's break.

8. When coming back the second time I had purchased a new, more flexible vinyl hose (the one I had originally used was stiffer and it had come off a few times while bleeding which caused brake fluid to pour all over my face and mouth!) With a clip. The clip wasn't used in the end for the purpose I had purchased it for which was to make the connection on the nipple tighter. This brought up a small problem. The nipple on the OEM slave cylinder was a) made of aluminum and b) the stem did not have the same distance between the nipple ridge and the screw base. The original slave cylinder had a brass nipple and had much more of a stem between the nipple ridge and the screw base. This made it more difficult to keep in place. But I did use the clip, positioned on the hose about 0.5 inches above the end, to grip it with my fingers to hold the hose in place. Doing it this way prevented the hose from coming off.

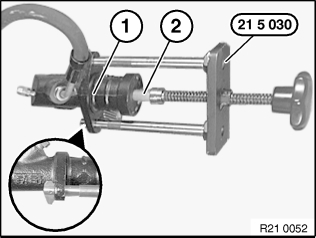
9. I removed the slave cylinder from the transmission housing and attached a home made press that is similar to the one in the image below (I made this up at the same friend's house where I made the schrader valve washer). I started to push the slave cylinder rod back into the slave cylinder housing using this press and when there was a bit of resistance I opened up the bleed valve (while the slave cylinder bleed valve was at the highest point as much as possible and the rod pointing down) and was rewarded with lots and lots of bubble being expelled. I continued pushing the rod in by screwing the center post further into the cylinder until it could go no further. I waited until clear fluid without any bubbles came out of the bleed valve. At this point I closed the bleed valve.

10. I slowly unscrewed the center post of the home-made press tool to allow the rod to extend back out from the slave cylinder until I was able to take off the press tool.

11. I re-attached the slave cylinder back to the transmission housing, tightening the nuts to about 16 ft/lbs.

12. I disconnected the bleeder hose. I then removed excess brake fluid (it was too full) from the reservoir and checked the clutch operation. The clutch was solid and felt like it did originally. Job DONE!

13. I then tightened up the tie rod nuts (I had just installed new suspension and had not done that last step), hooked up the battery and took the car out for a spin.

The first thing I noticed right away was a whine from the area of the bell housing. Testing the clutch by accelerating very hard I found that there was no clutch slip at all. As the car was driven further the whine lessened but was still noticeable when coming back to the garage.

Anyway, as far as installing a new slave clutch cylinder goes, I have done a successful job, though I may need to get new clutch plates if the whine ends up being due to fluid on the plates which I was not able to determine, even with the endoscope.

Do you have any ideas what the whine could be?

A few thoughts.

Bleeding the slave cylinder on this car is not pleasant as it means going under the car and working in a very cramped space (if on jack stands which my car was).

Working out before hand in one's head as to what needs to be done helps a lot.

Getting correct instructions is vital - buy or download a Bentley's manual. It has very good instructions.

No matter what hose you get the nipple on a non-BMW slave cylinder is not the same as the nipple on a BMW part. See of you can salvage the nipple from the original slave cylinder and swap it in place of the one on the new slave cylinder. The original one is made of brass and new ones are aluminum (on non-BMW parts), plus the stem on a new one is very short and does not give one enough room to use a clip to securely attach a hose. If you can't do this, position the clip about 0.5 inches above the end to be able to grip with your fingers to keep the hose in place.

This job can be done by one person if using the schrader valve washer system I created. One also needs to buy a hand pump with a pressure gauge. These items are quite cheap and can be purchased for less than $20. The schrader valve can be obtained for free from any tire shop. Making up the washer could be difficult depending on whether one has access to a lathe or not.

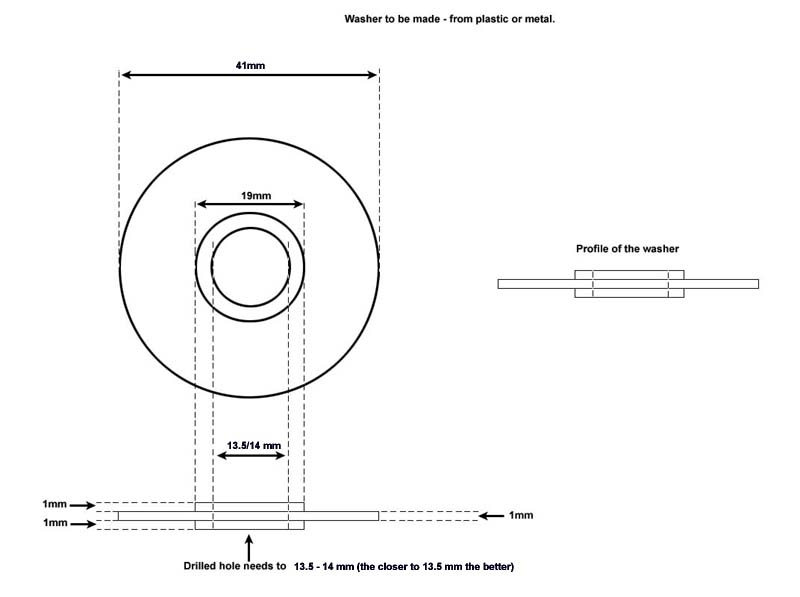
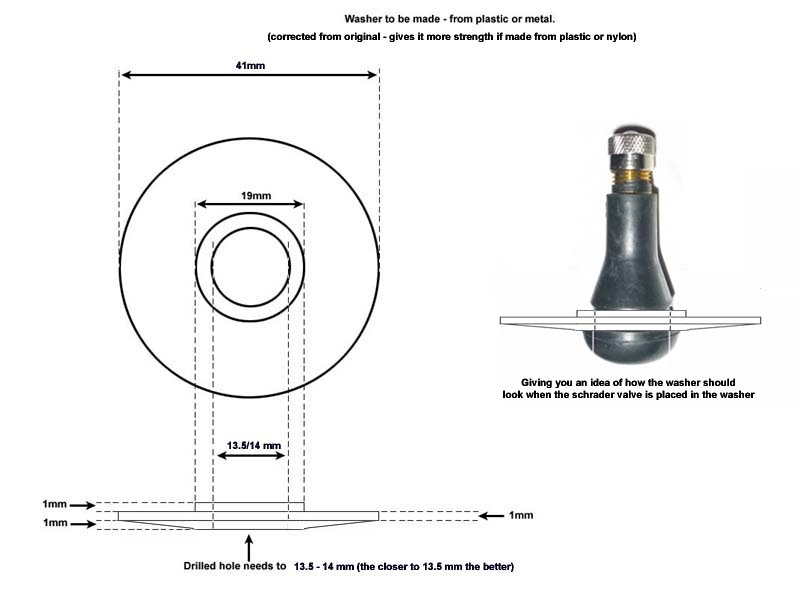
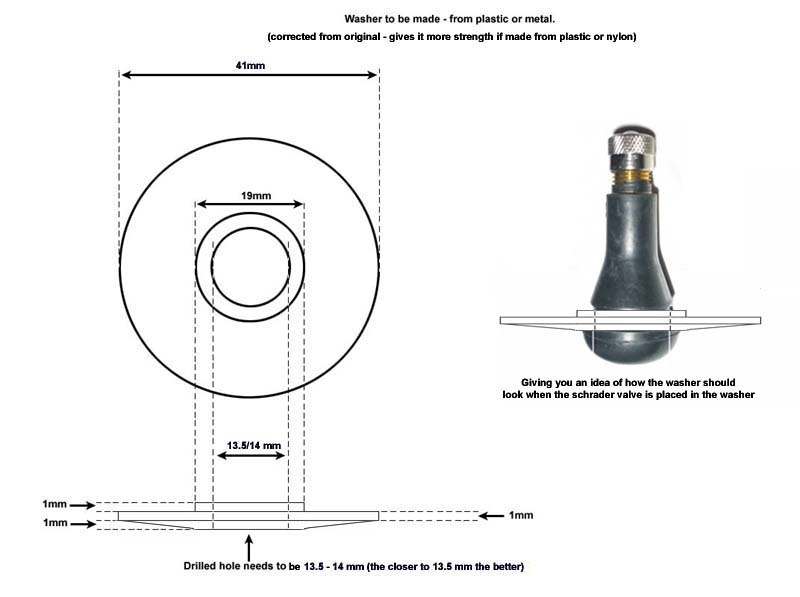
The dimensions of the washer are as follows:

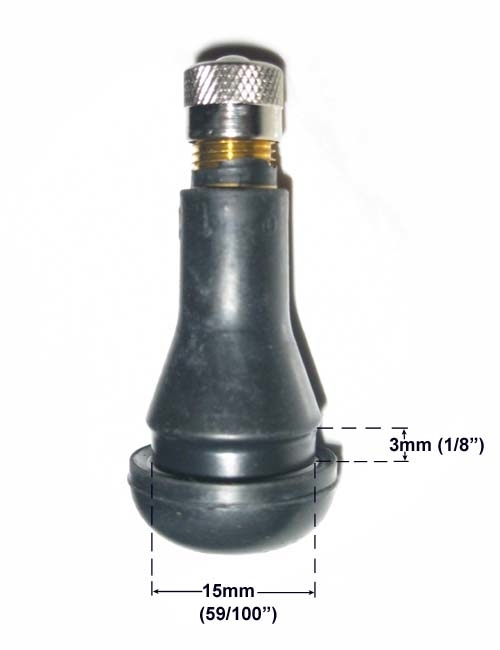
Center hole - 13.5 - 14 mm in diameter (schrader valve stem is 15mm at the point where it slots in)
Height of 'collar' around hole above is 3mm.
Collar width - 19mm
Washer diameter - BMW E36 Specific - 41mm
Washer thickness for middle - 1mm

See image below for schematic.

Use epoxy resin on the under side of the washer around the valve seat to make an air tight seal. When using the washer tighten the cap as much as possible.
Was this
answer
helpful?
Yes
No
Sunday, July 7th, 2019 AT 2:15 PM
Tiny
JACOBANDNICKOLAS
  • MECHANIC
  • 108,179 POSTS
Welcome back:

All I can say is, your directions are better than the manual. You should have been a mechanical engineer. Thank you so much for taking the time to write all of that. I know it will help someone else. Very resourceful!

As far as the while, is there anything that chances the sound?

Let me know.

Joe
Was this
answer
helpful?
Yes
No
Sunday, July 7th, 2019 AT 7:27 PM
Tiny
CHRISTOPHER SA
  • MEMBER
  • 206 POSTS
Hi Joe,

Funny you should say that about being a mechanical engineer. My favorite subject in school (when I was 14/15) was mechanical engineering (I think we called it practical engineering) and I absolutely loved working on a lathe and making things.

Anyway, the whine increases in pitch the faster the car goes. I will try and get an audio recording of it so you can hear what I hear.

I went and got an audio recording of the noise but am having trouble uploading the audio as your system does not accept MP3 files. You might want to change that. I will look at converting it to MP4 by adding a static image to the audio to make it a 'proper' video.

I suspect the noise comes from the wheel bearings but I have no clue why both wheel bearings would make this noise at the same time after being whine-free before the slave clutch cylinder popped a seal and needed changing.

Maybe its the alignment I did on the car - it was eyeballed not measured with a laser etc, like I said I would do in my other post. I needed to test the car and just quickly made sure that the wheels looked aligned by eye and took it out for a spin.

Mind you the wheels look way out of alignment (much, much worse than now) before I changed the slave clutch cylinder which is why I changed the entire front end for new parts.
Was this
answer
helpful?
Yes
No
Sunday, July 7th, 2019 AT 8:10 PM
Tiny
JACOBANDNICKOLAS
  • MECHANIC
  • 108,179 POSTS
I think you missed your calling. Hopefully you are working doing something related to design. As far as the bearings, usually they will change pitch when making turns. Does that happen?
Was this
answer
helpful?
Yes
No
Sunday, July 7th, 2019 AT 9:30 PM
Tiny
CHRISTOPHER SA
  • MEMBER
  • 206 POSTS
Hi,

Yes, this does happen especially going around a left hand turn in that the whine nearly goes away completely.
Was this
answer
helpful?
Yes
No
Sunday, July 7th, 2019 AT 9:54 PM
Tiny
CHRISTOPHER SA
  • MEMBER
  • 206 POSTS
Here is the audio of my test drive as a video file with a static image throughout the duration of the audio. It is four minutes 48 seconds long. The whine becomes the prominent noise in the audio about 62 seconds into the 'video'.

I really am puzzled why the whine has suddenly appeared in the front end when the wheels are aligned much better than before the entire front end was changed.

Anyway, I may create a new thread about this problem depending on what you come back with.

As far as I am concerned the slave clutch cylinder has been successfully changed unless you tell me otherwise. Thanks for the help.
Was this
answer
helpful?
Yes
No
Sunday, July 7th, 2019 AT 10:32 PM
Tiny
JACOBANDNICKOLAS
  • MECHANIC
  • 108,179 POSTS
Welcome back:

I certainly hear it. I honestly feel it has nothing to do with the clutch. It is speed related. Think about it. When you shift to a higher gear, the RPM's drop and so the clutch wouldn't be spinning as fast. However, this noise is not affected. I wish I was there, but honestly, it sounds like a wheel bearing or tires that are cupped. If the sound nearly goes away on a left hand turn, I suspect the left front wheel bearing is bad because when making a left turn, weight is distributed to the right side and removed from the left.

Let me know.

Joe
Was this
answer
helpful?
Yes
No
Monday, July 8th, 2019 AT 10:16 PM
Tiny
CHRISTOPHER SA
  • MEMBER
  • 206 POSTS
Hi Joe,

I suspected as much. What I am puzzled about is why it has appeared so suddenly. No problems before the slave clutch went bad, now both bearings are whining after the car has sat for seven months or so.

The tires are brand new, by the way. They have less than 300 miles on them. And I checked them before and after the short test drive. They do look brand new.

I will still go ahead and do the alignment properly to see of that solves the problem, but I doubt it will. Thanks again for all the help and encouragement.
Was this
answer
helpful?
Yes
No
Monday, July 8th, 2019 AT 11:00 PM
Tiny
JACOBANDNICKOLAS
  • MECHANIC
  • 108,179 POSTS
Welcome back, Chris:

You are very welcome. And quite honestly, you are the encouragement here. Not many can do what you have done.

You know, if it sat that long, maybe the bearings corroded or something. Not being there I hate to say with 100% certainty, but it sure sounds like a wheel bearing.

Take care and let me know the final results. By the way, I noted your accent in the video. Are you in England?

Joe
Was this
answer
helpful?
Yes
No
Tuesday, July 9th, 2019 AT 6:43 PM
Tiny
CHRISTOPHER SA
  • MEMBER
  • 206 POSTS
Hi Joe,

Yes, I am from England. Born in a western suburb of London called Shepherds Bush.

By the way, I have corrected the schematic of the schrader valve washer as that is the shape I actually ended up with due to the washer being distorted by the cutting tool on the lathe (even though I started out trying to cut the washer to the original shape). It turned out that this configuration was needed as the air pressure was causing the middle of the washer to bulge out slightly.

Yes, that is the conclusion I came to too (worn/corroded wheel bearings). I do find it quite interesting that things deteriorate more when they are not used!

Anyway, I find this site extremely helpful and its great that everyone involved at your end do not charge anything for the help provided by yourselves to others. That is why I give back in the way I do. This site encourages me to.

P.S. I am having trouble deleting the image on the left. I saw that there were errors in it and redid it then tried uploading the new one after deleting the old one and now the old one won't go away.
Was this
answer
helpful?
Yes
No
Tuesday, July 9th, 2019 AT 7:51 PM
Tiny
JACOBANDNICKOLAS
  • MECHANIC
  • 108,179 POSTS
Don't worry about the picture. Your directions took care of that. I've studied a lot about England and hope someday to visit. In addition to being a state certified mechanic, I teach literature in a high school. LOL Odd right?

Regardless, you take care of yourself and come back anytime. I'm going to miss having you around, but in reality, that is good for you because nothing is broken. By the way, the worst thing anyone can do to a car is allow it to sit unused for long periods of time. It's hard on everything.

Take care of yourself.
Joe
Was this
answer
helpful?
Yes
No
Tuesday, July 9th, 2019 AT 9:50 PM
Tiny
CHRISTOPHER SA
  • MEMBER
  • 206 POSTS
Hi Joe,

Please see this question for an update on the 'whining' coming from the front.

https://www.2carpros.com/questions/problems-with-brand-new-front-suspension
Was this
answer
helpful?
Yes
No
Friday, July 12th, 2019 AT 3:45 PM
Tiny
JACOBANDNICKOLAS
  • MECHANIC
  • 108,179 POSTS
Will do.
Was this
answer
helpful?
Yes
No
Friday, July 12th, 2019 AT 6:59 PM

Please login or register to post a reply.

Sponsored links