Try this bleeding process.
Roy
Manual Transmission and Clutch
Pinpoint Tests
Pinpoint Test C: Clutch Pedal Feels Spongy or Has Excessive Travel/Clutch Will Not Disengage
Normal Operation
The clutch is designed to transfer the power from the engine to the transmission, which may be either stationary (starting) or rotating at a different speed (upshifting or downshifting). The clutch is functioning correctly when both the engine and transmission are rotating at the same speed with the clutch engaged. Clutch pedal movement is transmitted by fluid pressure, which actuates the clutch release hub and bearing. The clutch release hub and bearing pushes on the spring center towards the flywheel. The diaphragm spring pivots at the fulcrum, relieving the load on the clutch pressure plate. Steel spring straps riveted in the clutch pressure plate cover pull the clutch pressure plate from the clutch disc, disengaging the engine torque from the transmission.
This pinpoint test is intended to diagnose the following:
Internal operation
Clutch pedal reserve
Clutch slave cylinder travel
Clutch disc
Clutch pressure plate
Clutch pedal free play
PINPOINT TEST C: CLUTCH PEDAL FEELS SPONGY OR HAS EXCESSIVE TRAVEL/CLUTCH WILL NOT DISENGAGE
C1 CHECK THE FLUID LEVEL
NOTE: Do not check the hydraulic system after the road test. Allow the vehicle to cool down before carrying out the clutch hydraulic system check.
Remove the clutch reservoir cap and clutch reservoir diaphragm.
ImageOpen In New TabZoom/Print
Check the fluid level of the clutch reservoir.
Is the fluid level at or above the step mark?
Yes
INSTALL the clutch reservoir cap and diaphragm. GO to C2.
No
ADD brake fluid to the specified level. GO to C2.
C2 INSPECT THE HYDRAULIC SYSTEM FOR LEAKAGE
Check the reservoir and reservoir tubes for leakage.
Check the clutch master cylinder and hydraulic tube for leakage.
Check the clutch slave cylinder and the hydraulic tube connection for leakage.
Are there any signs of leakage?
Yes
INSTALL new components as necessary. REFER to Clutch Controls. TEST the system for normal operation.
No
GO to C3.
C3 CHECK INTERNAL OPERATION
Remove the reservoir cap and reservoir diaphragm.
Have an assistant slowly depress and release the clutch pedal.
On the down stroke, the fluid level should not increase by more than 1 mm (0.039 in).
Does the fluid level increase more than 1 mm (0.039 in)?
Yes
INSTALL a new clutch master cylinder assembly. REFER to Clutch Controls See: Clutch Fluid Reservoir > Removal and Replacement > Clutch Master Cylinder and Reservoir.
No
GO to C4.
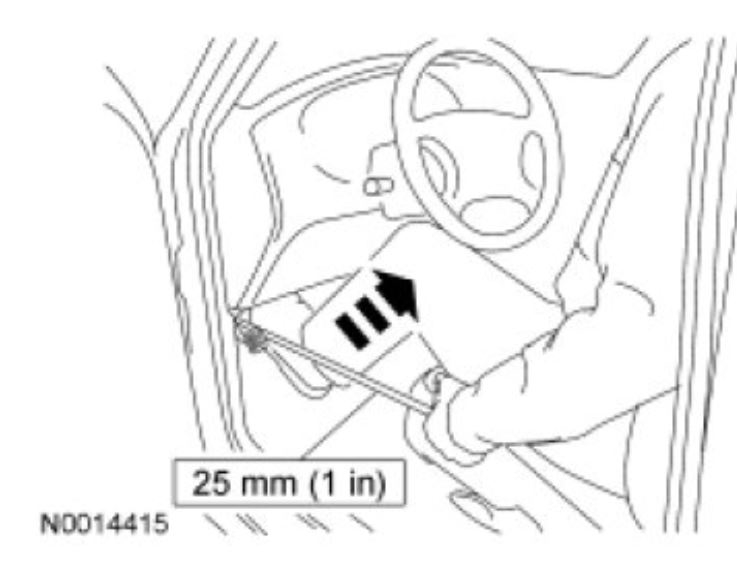
C4 CHECK THE CLUTCH PEDAL RESERVE
NOTE: The clutch reserve is the distance between the clutch pedal when fully depressed and the position when the vehicle starts to move forward.
Park the vehicle on a level surface.
Check for obstructions behind clutch pedal.
Attach a cable tie to the lower clutch pedal.
ImageOpen In New TabZoom/Print
Attach a tape measure to the cable tie.
Depress the clutch fully and start the vehicle.
Shift the transmission into 1st gear.
ImageOpen In New TabZoom/Print
While observing the tape measure, slowly engage the clutch, noting when the vehicle starts to move forward.
ImageOpen In New TabZoom/Print
Is the clutch pedal reserve greater than or equal to 25 mm (1 in)?
Yes
The clutch hydraulic system is OK. TEST the system for normal operation.
No
GO to C5.
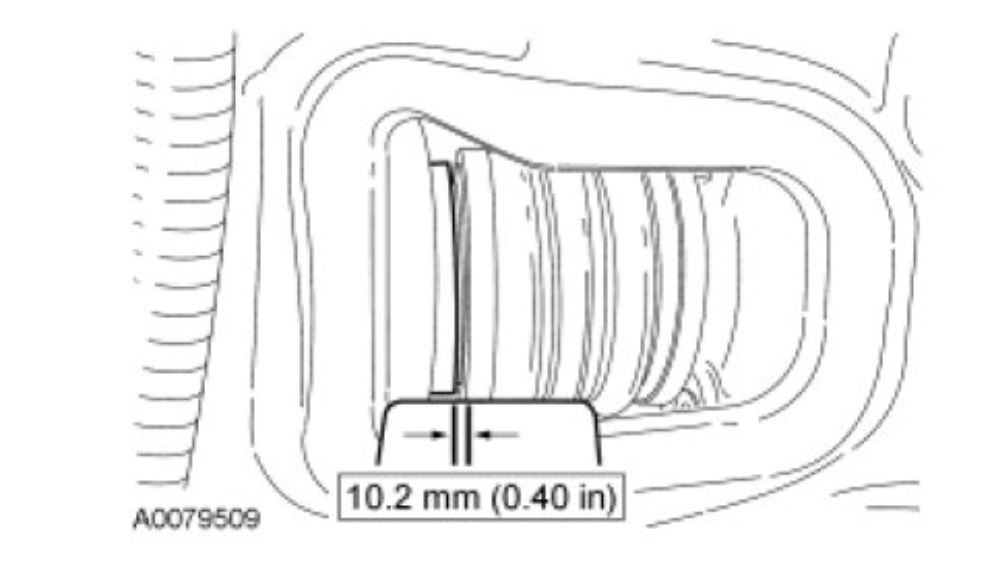
C5 CHECK THE CLUTCH SLAVE CYLINDER TRAVEL
NOTE: The clutch slave cylinder travel is the distance the bearing portion moves forward when the clutch is fully depressed.
With the vehicle in NEUTRAL, position it on a hoist. Refer to Jacking and Lifting See: Vehicle Lifting > Procedures > Jacking and Lifting.
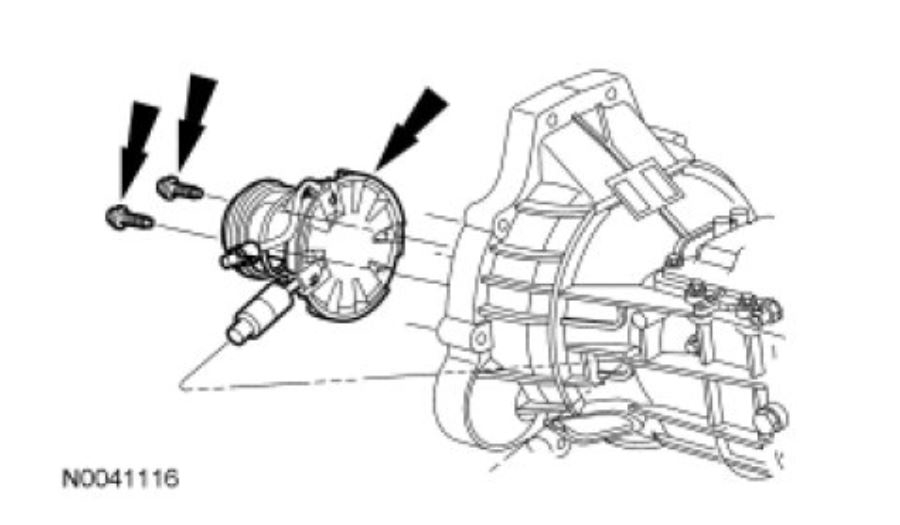
Remove the inspection plug.
ImageOpen In New TabZoom/Print
Using a wooden ruler, index-mark the rear of the bearing onto the ruler. Have an assistant fully depress the clutch pedal. Index-mark the rear of the bearing. Measure the distance between the 2 index marks.
ImageOpen In New TabZoom/Print
imageOpen In New TabZoom/Print
Is the clutch slave cylinder travel equal to 10.2 mm (0.4 in)?
Yes
GO to C6.
No
GO to C8.
C6 CHECK THE CLUTCH PRESSURE PLATE
Remove the clutch pressure plate. Refer to Clutch See: Clutch Disc, M/T > Removal and Replacement > Clutch Disc and Pressure Plate.
Inspect the clutch pressure plate for wear or runout. Refer to Clutch Pressure Plate Check See: Pressure Plate > Procedures > Clutch Pressure Plate Check.
Are there any signs of excessive wear or runout to the clutch pressure plate?
Yes
INSTALL a new clutch pressure plate. REFER to Clutch See: Clutch Disc, M/T > Removal and Replacement > Clutch Disc and Pressure Plate.
No
GO to C7.
C7 INSPECT THE CLUTCH DISC
Carry out the clutch disc inspection procedure.
Is the clutch disc OK?
Yes
GO to C8.
No
INSTALL a new clutch disc. REFER to Clutch See: Clutch Disc, M/T > Removal and Replacement > Clutch Disc and Pressure Plate. TEST the system for normal operation.
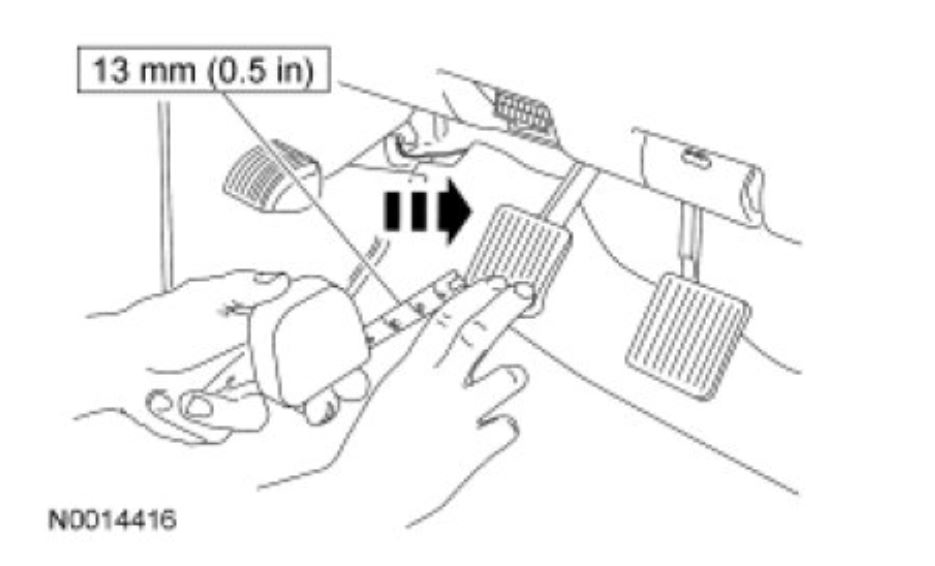
C8 CHECK CLUTCH PEDAL FREE PLAY
NOTE: The clutch pedal free play is the distance between the clutch pedal when fully released and the position when slight resistance is felt on downward motion.
Engine OFF.
Attach a tape measure to the cable tie.
While observing the tape measure, slowly push downward on the clutch pedal until a slight resistance is felt.
ImageOpen In New TabZoom/Print
Is the clutch pedal free play less than 13 mm (0.5 in)?
Yes
The clutch hydraulic system is OK. TEST the system for normal operation.
No
GO to C9.
C9 CHECK CLUTCH PEDAL FREE PLAY WITH THE CLUTCH SLAVE CYLINDER DISCONNECTED
NOTE: Do not bleed clutch hydraulic system.
With the vehicle in NEUTRAL, position it on a hoist. Refer to Jacking and Lifting See: Vehicle Lifting > Procedures > Jacking and Lifting.
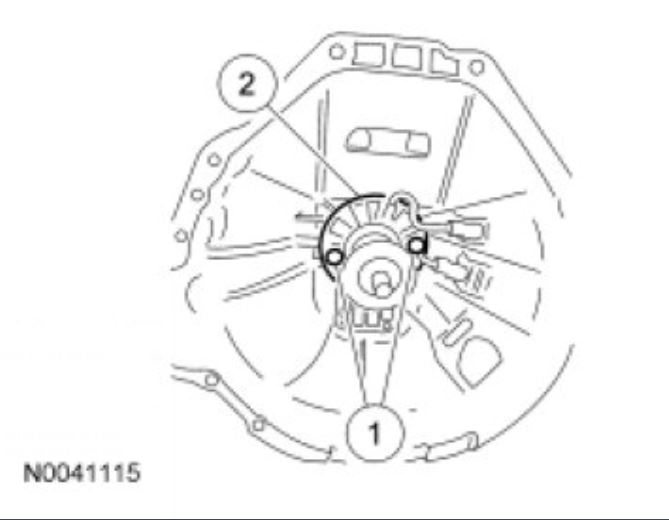
Clean the area around the connector. Using the Hydraulic Line Disconnect Tool, disconnect the hydraulic tube from the clutch slave cylinder.
ImageOpen In New TabZoom/Print
Lower the vehicle.
Check the clutch pedal free play.
ImageOpen In New TabZoom/Print
Attach a tape measure to the cable tie.
While observing the tape measure, slowly push downward on the clutch pedal until a slight resistance is felt.
Is the clutch pedal free play less than 13 mm (0.5 in)?
Yes
RECONNECT the hydraulic tube to the clutch slave cylinder. GO to C10.
No
INSTALL a new clutch master cylinder. REFER to Clutch Controls See: Clutch Fluid Reservoir Removal and Replacement > Clutch Master Cylinder and Reservoir. DEPRESS and RELEASE the clutch pedal 15 full strokes. Clutch pedal should feel firm. RECHECK clutch pedal free play. If free play is greater than 13 mm (0.5 in), GO to C10.
C10 BLEED THE CLUTCH SLAVE CYLINDER
Remove the clutch reservoir cap and diaphragm. Check the fluid level. Fill the reservoir to or above the step mark. Install the cap and diaphragm.
Depress and release the clutch pedal several times to stabilize the clutch hydraulic system.
With the vehicle in NEUTRAL, position it on a hoist. Refer to Jacking and Lifting See: Vehicle Lifting > Procedures > Jacking and Lifting.
Remove the bleeder screw cover and attach a vinyl hose to the bleeder hose. Place the other end of the vinyl hose into a clear container partially filled with brake fluid.
Have an assistant depress and release the clutch pedal 5 times, then hold the clutch pedal down. With the clutch pedal depressed, loosen the bleeder screw to let air escape the clutch system. Tighten the bleeder screw. Repeat this process until no air comes through the vinyl hose.
Tighten the bleeder screw and install the bleeder screw cover.
Slowly pump the clutch pedal several times to verify there is no fluid leakage.
ImageOpen In New TabZoom/Print
Depress and release the clutch pedal 2 short cycles and 3 full-travel cycles.
Make sure the clutch reservoir is at the correct level. Refill as necessary.
Does the clutch hydraulic system operate correctly?
Yes
The clutch system is OK. TEST the system for normal operation.
No
VERIFY customer concern. CONDUCT a diagnosis of suspect components.
Images (Click to make bigger)
Saturday, January 4th, 2020 AT 5:42 PM