Hi,
When you say you hear a clunk when trying to start, is the starter engaging but the engine not turning?
I'll wait for your reply, but if the engine is turning, we need to determine if there is spark and fuel to the engine. Here are links you may find helpful for testing:
https://www.2carpros.com/articles/car-cranks-but-wont-start
https://www.2carpros.com/articles/how-to-check-fuel-system-pressure-and-regulator
https://www.2carpros.com/articles/how-to-test-an-ignition-system
___________________________-
If the engine isn't cranking, there could be internal engine damage causing it to be locked up. I only say that because you mentioned the oil concerns. How low was it?
If you are certain the engine isn't locked, here is a link that explains how to check the starter:
https://www.2carpros.com/articles/starter-not-working-repair
___________________
Here are the directions and diagnostics specific to your vehicle for testing fuel pressure. The attached pics correlate with the directions.
__________________
2012 Hyundai Sonata L4-2.4L
Component Tests and General Diagnostics
Vehicle Powertrain Management Fuel Delivery and Air Induction Fuel Pump Fuel Pressure Testing and Inspection Component Tests and General Diagnostics
COMPONENT TESTS AND GENERAL DIAGNOSTICS
Fuel Pressure Test
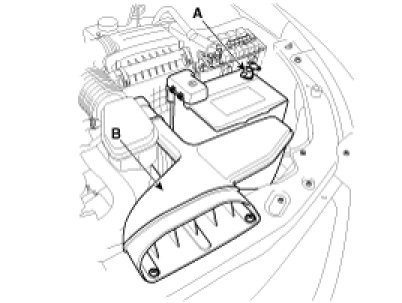
1. Release the residual pressure in fuel line .
CAUTION:
When removing the fuel pump relay, a Diagnostic Trouble Code (DTC) may occur. Delete the code with the GDS after completion of "Release Residual Pressure in Fuel Line" work.
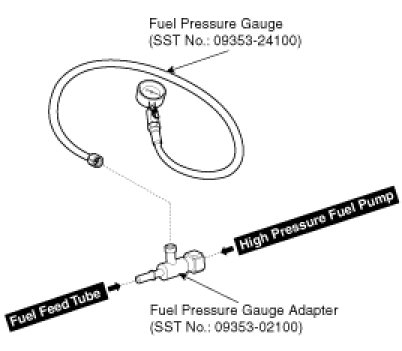
2. Install the Special Service Tool (SST).
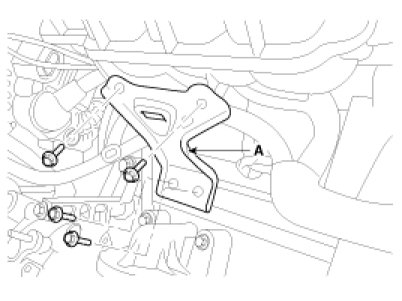
(1)Disconnect the fuel feed tube from the high pressure fuel pump.
CAUTION:
There may be some residual pressure even after "Release Residual Pressure in Fuel Line" work, so cover the hose connection with a shop towel to prevent residual fuel from spilling out before disconnecting any fuel connection.
(2)Install the special service tool for measuring the fuel pressure in between the fuel feed tube and the high pressure fuel pump .
pic 1
3. Inspect fuel leakage on connections among the fuel feed tube, the high pressure fuel pump, and the SST components with IG ON.
4. Measure Fuel Pressure.
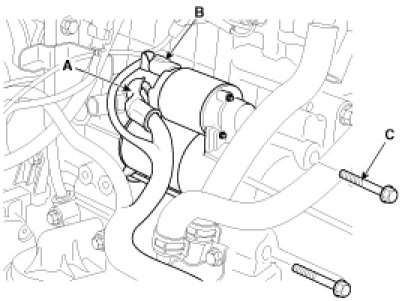
(1)Start the engine and measure the fuel pressure at idle.
Fuel Pressure:445 - 455 kPa (4.5 - 4.6 kgf/cm2, 64.5 - 66.0 psi)
NOTE:
If the fuel pressure differs from the standard value, repair or replace the related part .
pic 2
(2)Stop the engine, and then check for the change in the fuel pressure gauge reading.
Standard Value:The gauge reading should hold for about 5 minutes after the engine stops
NOTE:
If the gauge reading should not be held, repair or replace the related part .
pic 3
(3)Turn the ignition switch OFF.
5. Release the residual pressure in fuel line .
CAUTION:
When removing the fuel pump relay, a Diagnostic Trouble Code (DTC) may occur. Delete the code with the GDS after completion of "Release Residual Pressure in Fuel Line" work.
6. Test End
(1)Remove the Special Service Tool (SST) from the fuel feed tube and the high pressure fuel pump.
(2)Connect the fuel feed tube and the high pressure fuel pump.
Fuel Pressure Test
1. Release the residual pressure in fuel line .
CAUTION:
When removing the fuel pump relay, a Diagnostic Trouble Code (DTC) may occur. Delete the code with the GDS after completion of "Release Residual Pressure in Fuel Line" work.
2. Install the Special Service Tool (SST).
(1)Disconnect the fuel feed tube from the high pressure fuel pump.
CAUTION:
There may be some residual pressure even after "Release Residual Pressure in Fuel Line" work, so cover the hose connection with a shop towel to prevent residual fuel from spilling out before disconnecting any fuel connection.
(2)Install the special service tool for measuring the fuel pressure in between the fuel feed tube and the high pressure fuel pump .
pic 4
3. Inspect fuel leakage on connections among the fuel feed tube, the high pressure fuel pump, and the SST components with IG ON.
4. Measure Fuel Pressure.
(1)Start the engine and measure the fuel pressure at idle.
Fuel Pressure:480 - 520 kPa (4.9 - 5.3 kgf/cm2, 69.6 - 75.4 psi)
NOTE:
If the fuel pressure differs from the standard value, repair or replace the related part .
pic 5
(2)Stop the engine, and then check for the change in the fuel pressure gauge reading.
Standard Value:The gauge reading should hold for about 5 minutes after the engine stops
NOTE:
If the gauge reading should not be held, repair or replace the related part .
pic 6
(3)Turn the ignition switch OFF.
5. Release the residual pressure in fuel line .
CAUTION:
When removing the fuel pump relay, a Diagnostic Trouble Code (DTC) may occur. Delete the code with the GDS after completion of "Release Residual Pressure in Fuel Line" work.
6. Test End
(1)Remove the Special Service Tool (SST) from the fuel feed tube and the high pressure fuel pump.
(2)Connect the fuel feed tube and the high pressure fuel pump.
__________________
Let me know if this helps or if you have other questions.
Take care,
Joe
Images (Click to make bigger)
Monday, February 17th, 2020 AT 6:12 PM