Cranks no start

Tiny
1989WILL
  • MEMBER
  • 7 POSTS
  • 1993 TOYOTA PICKUP
  • 4 CYL
  • 4WD
  • MANUAL
  • 170,000 MILES
I have a 1993 toyota pickup with the 22re engine. I have 2 problems taht might be connected. First, in the mornings it takes about 20 mins for the engine to catch and run, I have to hit the gas repeatedly until I pretty much flood the engine before it will even try to catch, when it does start if I leave it in idle and stomp the gass it stalls out, and if I try to drive it without feathering the gas it sputters and if I left off it returns to a normal idle. It misfires occasionally on idle when the engine is warmed up. If any one can help we I would love you forever.
Was this
answer
helpful?
Yes
No
Tuesday, October 16th, 2018 AT 1:19 PM (Merged)
Tiny
JACOBANDNICKOLAS
  • MECHANIC
  • 108,192 POSTS
Okay, before I answer this, I hope you're a woman because if you love me forever and your a guy, well. Lets say my door only swings one way. (LOL)

Okay, I have a couple ideas. I believe you are having trouble with either the temp sensor or the cold start valve. Before I get into how to check them, I need to make sure the truck is fuel injected and doesn't have a carb. My info talks about both.

Just so you know, the two are related. This may sound like a different language, but here is how it works. During cold engine starting, the cold start injector is used to supply additional fuel to the intake manifold to aid in initial start-up. The opening and closing of the injector is determined by the start injector time switch. When the engine coolant temperature falls below a certain point, the switch opens the cold start injector. As the engine coolant warms up, the switch will close the injector. That is why I am thinking it is one or the other or both.

Let me know about the carb or injector.
Was this
answer
helpful?
Yes
No
-1
Tuesday, October 16th, 2018 AT 1:19 PM (Merged)
Tiny
1989WILL
  • MEMBER
  • 7 POSTS
Yeah its a fuel injection, I replaced the plugs wires and battery just fyi I dunno if that would make a diff,

and im a dude it was metaphorical lol
Was this
answer
helpful?
Yes
No
+1
Tuesday, October 16th, 2018 AT 1:19 PM (Merged)
Tiny
1989WILL
  • MEMBER
  • 7 POSTS
Well it got a little warmer today around 70 and it still wouldnt catch, I tried puttin some ether through the intake and nothing, hooked up another car and tried to jump it nothing, jumped it with some ether and nothing, its a manual transmission so if I get going pretty good down a hill I can pop the clutch and it will run fine minus some few mis-fires here and there. Its my only mode of transpo and its really hindering my income so if theres a quick easy cheap trick to check the cold start valve or maybe the fuel pump fuel filter im out of ideas.
Was this
answer
helpful?
Yes
No
Tuesday, October 16th, 2018 AT 1:19 PM (Merged)
Tiny
MERLIN2021
  • MECHANIC
  • 17,250 POSTS
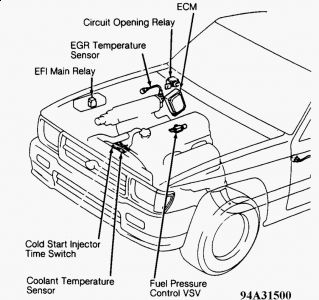
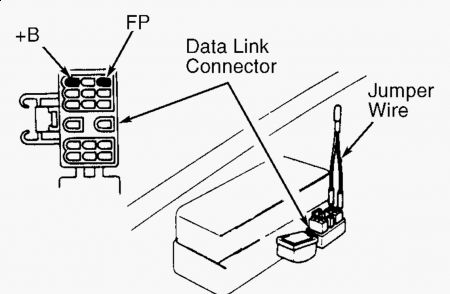
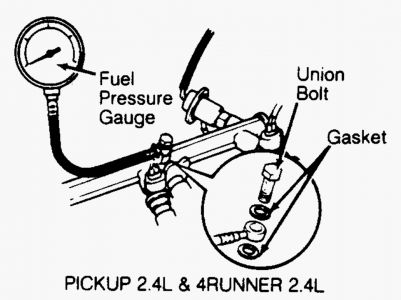
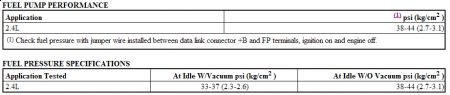
FUEL PUMP OPERATION 1. Install Jumper Wire (SST-09843-18020) between +B and FP terminals of data link connector. See Fig. 1 . The data link connector is located in engine compartment. 2. On all models, turn ignition on. Listen for fuel pump operating sound and feel for pressure in fuel line near fuel filter. Turn ignition off. Remove jumper wire. If fuel pump operates, check fuel pressure. See FUEL PRESSURE . 3. If fuel pump does not operate, connect a jumper wire from battery source to FP terminal of data link connector. If fuel pump operates, EFI main relay, EFI No. 2 relay, circuit opening relay or fuel pump relay may be defective. For explanation of relay operation, see FUEL PUMP CONTROL CIRCUIT . 4. If relays are okay, check wiring circuit and fuses. If fuel pump does not operate, check for defective fuel pump, open circuit between data link connector and fuel pump, or defective fuel pump ground or fuses. See appropriate wiring diagram in the WIRING DIAGRAMS article. Fig. 1: Installing Jumper Wire In DLC Courtesy of TOYOTA MOTOR SALES, U.S.A., INC FUEL PRESSURE 1. Ensure battery is fully charged and ignition is off. Disconnect negative battery cable. Disconnect electrical connector from cold start injector (if equipped). 2. Note location of fuel pressure gauge installation. See Fig. 2 . Place container under cold start injector pipe, deliver pipe or fuel filter. Cover union bolt with shop towel, and slowly loosen union bolt to relieve fuel pressure. 3. Remove union bolt and gaskets. Install Fuel Pressure Gauge (SST 09268-45012) using NEW gaskets. See Fig. 2 . Tighten union bolt. Reconnect negative battery cable. 4. Install jumper wire between +B and FP terminals of data link connector. See Fig. 1 . The data link connector is located in engine compartment. 5. Turn ignition on and note fuel pressure. Fuel pressure should be within specification. See FUEL PUMP PERFORMANCE table. 6. If fuel pressure exceeds specification, replace fuel pressure regulator. If fuel pressure is less than specified, check for defective fuel lines, connections, fuel pump, fuel filter or fuel pressure regulator. 7. Remove jumper wire from data link connector. Start engine and allow to idle. Disconnect and plug vacuum line at fuel pressure regulator. Note fuel pressure. 8. Reconnect vacuum hose on fuel pressure regulator, and note fuel pressure. Fuel pressure should be within specification. See the FUEL PRESSURE SPECIFICATIONS table. 9. If fuel pressure is not within specification, check for defective vacuum hose or fuel pressure regulator. Shut engine off and note fuel pressure. 10. Fuel pressure should hold at least 21 psi (1.5 kg/cm 2 ) for a minimum of 5 minutes. If fuel pressure does not hold as specified, check for defective fuel pump, fuel injector or fuel pressure NOTE: All models use in-tank fuel pump. Fuel pump contains internal relief valve and check valve.regulator. 11. Disconnect negative battery cable. Remove fuel pressure gauge. Reinstall union bolt using NEW gaskets. Tighten union bolt. Install cold start injector electrical connector (if equipped). Install negative battery cable. NOTE: For more information on checking fuel injectors and other fuel sub- systems, see SYSTEM/COMPONENT TESTS article.


https://www.2carpros.com/forum/automotive_pictures/62217_1_45.jpg


https://www.2carpros.com/forum/automotive_pictures/62217_fpg_1.jpg


https://www.2carpros.com/forum/automotive_pictures/62217_Spec_1.jpg


FUEL PUMP CONTROL CIRCUIT EFI Main Relay The EFI fuse supplies constant battery voltage to EFI main relay. The EFI main relay provides battery voltage to +B terminal of circuit opening relay (some models) and data link connector. Depending on model, EFI main relay may either be turned on directly by ignition switch or by M- REL terminal of Engine Control Module (ECM). The EFI main relay may also provide battery voltage to +B and +B1 terminals of ECM when ignition is turned on. The EFI main relay is located in engine compartment relay box. Circuit Opening Relay Circuit opening relay controls fuel pump circuit. The Engine Control Module (ECM) receives an input signal at STA terminal when engine is cranking. Starter signal is also applied to STA terminal of circuit opening relay. Starter signal energizes circuit opening relay during cranking. Circuit opening relay then provides voltage to fuel pump or fuel pump relay. The fuel pump switch in the airflow meter provides ground for circuit opening relay. NOTE: For information on testing relays and fuel system components, see the SYSTEM/COMPONENT TESTS article. Relays may be identified by appropriate illustration in the THEORY/OPERATION article. NOTE: Circuit opening relay is used on all models.
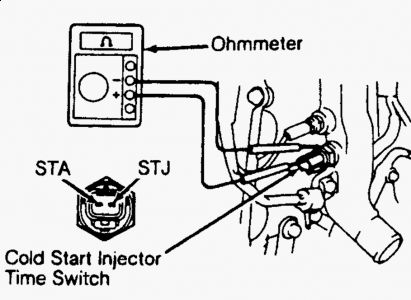
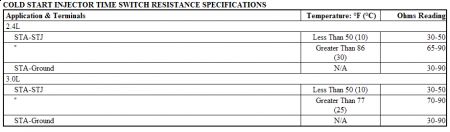
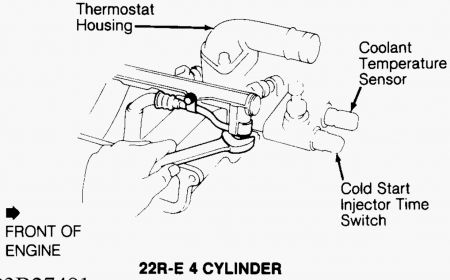
COLD START INJECTOR TIME SWITCH 1. Ensure ignition is off. Disconnect electrical connector from cold start injector time switch. 2. Cold start injector time switch is located in engine coolant passage near cylinder head or thermostat housing. To verify wire colors for proper identification, see appropriate wiring diagram in WIRING DIAGRAMS article in the ENGINE PERFORMANCE section. 3. Note cold start injector time switch terminal identification. See Fig. 3 . Using ohmmeter, measure resistance at designated switch terminals at specified temperature. See COLD START INJECTOR TIME SWITCH RESISTANCE SPECIFICATIONS table. Replace cold start injector time switch if resistance is not within specification. COLD START INJECTOR TIME SWITCH RESISTANCE SPECIFICATIONS NOTE: Cold start injector time switch may also be identified using appropriate illustration in THEORY/OPERATION article in the ENGINE PERFORMANCE section.


https://www.2carpros.com/forum/automotive_pictures/62217_Cold_Start_1.jpg


https://www.2carpros.com/forum/automotive_pictures/62217_Cold_1.jpg


https://www.2carpros.com/forum/automotive_pictures/62217_ECT_10.jpg


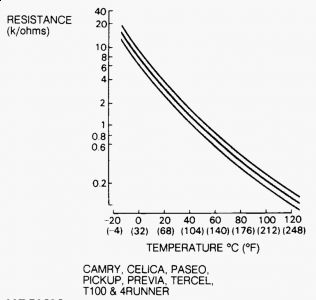
COOLANT TEMPERATURE SENSOR (CTS) 1. Ensure ignition is off. Disconnect electrical connector from CTS. CTS is located in engine coolant passage near cylinder head or thermostat housing. To verify wire colors for proper identification, see appropriate wiring diagram in WIRING DIAGRAMS article in the ENGINE PERFORMANCE section. 2. Using ohmmeter, check resistance between CTS electrical terminals. Resistance should be within specification at designated temperature. See Fig. 4 . Replace CTS if resistance is not within specification. NOTE: The CTS may be also identified using appropriate illustration in THEORY/OPERATION article in the ENGINE PERFORMANCE section.
Cold Start Injector 1. Disconnect negative battery cable. Disconnect cold start injector wiring harness connector. 2. Using ohmmeter, measure resistance between electrical terminals of cold start injector. Replace cold start injector if resistance is not 2-4 ohms. Remove cold start injector. See N - REMOVE/INSTALL/OHAUL article in the ENGINE PERFORMANCE section. 3. On all models except Pickup 3.0L, install Union Adapters (SST 09268-41045) with NEW gaskets on cold start injector and delivery pipe. Connect delivery hose to union adapters. See Fig. 24 . 4. On Pickup 3.0L, install cold start injector or delivery hose with union bolt and NEW gaskets on cold start injector. 5. On all models, reconnect negative battery cable. Connect Jumper Wire (SST 09843-18020) between terminals FP and +B of data link connector No. 1. Turn ignition on, with engine off to pressurize fuel system. 6. Place tip of cold start injector in a container. Connect cold start injector tester to cold start injector. Use Cold Start Injector Tester (SST 09842-30050). 7. Connect cold start injector tester to battery. See Fig. 24 and Fig. 25 . Ensure fuel spray pattern is an even cone shape. Disconnect cold start injector tester from battery. 8. Check for fuel leakage from cold start injector. Maximum leakage should be one drop per minute with fuel pressure applied. Replace cold start injector if defective. Disconnect negative battery cable and test equipment. NOTE: For proper location of data link connector No. 1 and terminal identification, see BASIC TESTING article in the ENGINE PERFORMANCE section. Jumper wire is installed in data link connector No. 1 when checking fuel pump operation and fuel pressure. CAUTION: Perform cold start injector test in shortest possible time to check fuel spray pattern. NOTE: Cold start injector is controlled by cold start injector time switch when ignition is turned on.


https://www.2carpros.com/forum/automotive_pictures/62217_Locations_2.jpg


https://www.2carpros.com/forum/automotive_pictures/62217_locationsb_1.jpg

Was this
answer
helpful?
Yes
No
+6
Tuesday, October 16th, 2018 AT 1:19 PM (Merged)
Tiny
1989WILL
  • MEMBER
  • 7 POSTS
Alright heres what I did, jumped the fuel pump through the check box worked fine, checked the fuel pressure, and it was within normal. Checked the cold start switch and it read fine too, replaced the cold start valve cause the old one did not spit the fuel out, checked the new one and it works, now I can get it to run barely I have to sit there and crank on it for about 10 mins hitting the gas and it will cough and start, like its running on only 2 cyl for about 30 seconds and the revs its self up and runs on all 4, this doesnt always happen some days it will jsut keep turning over but never fire up
Was this
answer
helpful?
Yes
No
Tuesday, October 16th, 2018 AT 1:19 PM (Merged)
Tiny
MERLIN2021
  • MECHANIC
  • 17,250 POSTS
Have you replaced the CTS(coolant temp switch)? It acts like a choke.
Was this
answer
helpful?
Yes
No
Tuesday, October 16th, 2018 AT 1:19 PM (Merged)
Tiny
DOUG29681
  • MEMBER
  • 14 POSTS
I have had several situations where the temp gauge inside the truck would vary wildly and removed the thermostat with no change. Very intermittant problem. Now I have all the symptoms of above.

As soon as I can get the multimeter I will check the CTS and report back.
Was this
answer
helpful?
Yes
No
Tuesday, October 16th, 2018 AT 1:19 PM (Merged)
Tiny
DENA RYON
  • MEMBER
  • 2 POSTS
  • 1993 TOYOTA PICKUP
  • 195,000 MILES
My truck was running and the hood was I was looking into engine compartment when a loud bang occurred. All of the brake fluid evacuated from the reservoir and saw fluid poring out the passenger side of engine, truck will not start and am not quite sure what happened. Will not hold any brake fluid, what is damaged?
Was this
answer
helpful?
Yes
No
Tuesday, October 16th, 2018 AT 1:19 PM (Merged)
Tiny
DOUG29681
  • MEMBER
  • 14 POSTS
I have had several situations where the temp gauge inside the truck would vary wildly and removed the thermostat with no change. Very intermittant problem. Now I have all the symptoms of above.

As soon as I can get the multimeter I will check the CTS and report back.[/Quote:50ed0c521a]

Checked temp with lazer and found @48F and 38k/ohms. Seems like sensor is checking OK if I follow your chart correctly, but I wonder if there is a short in the line to the sensor. Could you tell me where the output is so that I may check it at both locations to see if there may be a short. Also, I thought of remove the CTS and check it variable water temps to check reaction to variance. Thanks Doug
Was this
answer
helpful?
Yes
No
Tuesday, October 16th, 2018 AT 1:19 PM (Merged)
Tiny
ASEMASTER6371
  • MECHANIC
  • 52,797 POSTS
It sounds like the brake booster has failed. Remove the hose from the booster and see if there is any fluid there.

Roy
Was this
answer
helpful?
Yes
No
Tuesday, October 16th, 2018 AT 1:19 PM (Merged)
Tiny
MERLIN2021
  • MECHANIC
  • 17,250 POSTS
The sensor wires into the computer ECM/PCM. Is the check engine light on for either of you guys? ECM is behind right kick panel.


https://www.2carpros.com/forum/automotive_pictures/62217_ECM_2.jpg


As for the gauge fluctuation, that's caused by the temp sending unit, different that the coolant temp sensor(CTS). Sender is between injectors 2 & 3.
Was this
answer
helpful?
Yes
No
+1
Tuesday, October 16th, 2018 AT 1:19 PM (Merged)
Tiny
DENA RYON
  • MEMBER
  • 2 POSTS
Thank you I will check that, if that's the problem will I need to clear codes or reset sensors to get my truck running
Was this
answer
helpful?
Yes
No
Tuesday, October 16th, 2018 AT 1:19 PM (Merged)
Tiny
1989WILL
  • MEMBER
  • 7 POSTS
Now should I replace the coolant temp sensor (which I can get right down the street) or the coolant temp switch (which I have been unable to locate) and the engine light is on while its turning over but when it fires (which seldomly does) it will go out
Was this
answer
helpful?
Yes
No
Tuesday, October 16th, 2018 AT 1:19 PM (Merged)
Tiny
ASEMASTER6371
  • MECHANIC
  • 52,797 POSTS
No, once the issue is resolved, the ecm clears itself.

Roy
Was this
answer
helpful?
Yes
No
Tuesday, October 16th, 2018 AT 1:19 PM (Merged)
Tiny
MERLIN2021
  • MECHANIC
  • 17,250 POSTS
Measure the resistance of CTS, this will tell you if it's out of range. The sender between injectors is just for the dash gauge! CTS act like the choke.
Was this
answer
helpful?
Yes
No
Tuesday, October 16th, 2018 AT 1:19 PM (Merged)
Tiny
1989WILL
  • MEMBER
  • 7 POSTS
Ok I replaced my coolant temperature sensor and still nothing it keeps turning over but does not "catch" and run.
Was this
answer
helpful?
Yes
No
Tuesday, October 16th, 2018 AT 1:20 PM (Merged)
Tiny
MERLIN2021
  • MECHANIC
  • 17,250 POSTS
When it's running is the check engine light on, and your last complete tune up was? Check for a stuck open EGR and perform a compression test.
https://www.2carpros.com/dia/how_to_check_compression.htm
Was this
answer
helpful?
Yes
No
Tuesday, October 16th, 2018 AT 1:20 PM (Merged)
Tiny
DOUG29681
  • MEMBER
  • 14 POSTS
Yes my light is on. I have removed the cover on my ECU and also the fuse box under the hood and fuse box at the drivers kick panel. I have yet to find any indictator light to count the "Flashes". Pulled the carpet back on both sids some. Looked under the dash well on both sides.
Do you think I have a bad LED fault code light?

Again today the truck starts and runs but as soon as the engine is warm it cuts off and will not start back.
I will check for a clogged fuel canister and check the Start Timer in the morning.
Was this
answer
helpful?
Yes
No
Tuesday, October 16th, 2018 AT 1:20 PM (Merged)
Tiny
DOUG29681
  • MEMBER
  • 14 POSTS
I have just discovered that once I jump out the two connectors, then the check engine light will flash out the fault code.
Was this
answer
helpful?
Yes
No
Tuesday, October 16th, 2018 AT 1:20 PM (Merged)

Please login or register to post a reply.

Sponsored links