Wiring diagram to starter

Tiny
GUSS101
  • MEMBER
  • 4 POSTS
Alright, thank you for your assistance, I will get it to a mechainc.
Was this
answer
helpful?
Yes
No
Wednesday, January 23rd, 2019 AT 1:47 PM (Merged)
Tiny
DEWEYSCAR
  • MEMBER
  • 3 POSTS
  • 1996 CHEVROLET CAVALIER
  • 4 CYL
  • FWD
  • MANUAL
  • 88 MILES
I put in a starter and now my vehicle wants to keep starting itself, even without the key, I need some guidance on the wiring
Was this
answer
helpful?
Yes
No
Wednesday, January 23rd, 2019 AT 1:47 PM (Merged)
Tiny
RASMATAZ
  • MECHANIC
  • 75,992 POSTS
Check the starter motor solenoid-could be shorting out internally
Was this
answer
helpful?
Yes
No
Wednesday, January 23rd, 2019 AT 1:47 PM (Merged)
Tiny
DEWEYSCAR
  • MEMBER
  • 3 POSTS
The shop where I bought the starter tested it to see if it was faulty, it tested fine.
Was this
answer
helpful?
Yes
No
Wednesday, January 23rd, 2019 AT 1:47 PM (Merged)
Tiny
RASMATAZ
  • MECHANIC
  • 75,992 POSTS
Okay-time to check the ignition switch
Was this
answer
helpful?
Yes
No
Wednesday, January 23rd, 2019 AT 1:47 PM (Merged)
Tiny
DEWEYSCAR
  • MEMBER
  • 3 POSTS
Thanks, I'll get on that tomorrow. Thanks for your help!
Was this
answer
helpful?
Yes
No
Wednesday, January 23rd, 2019 AT 1:47 PM (Merged)
Tiny
REBECCA47
  • MEMBER
  • 1 POST
  • 1997 CHEVROLET CAVALIER
  • 4 CYL
  • FWD
  • AUTOMATIC
  • 12,900 MILES
I am a single Mom, with no money. My car wouldn't start today. My neighbor said it was something with the starter, maybe a short in the wiring. I can start it by turning the key to On and using a screwdriver between two bolts on the selinoid. From what I can see there isn't a short, but alot of the wiring is covered. I know if I take it somewhere they will tell me I need a starter. Do you have any ideas I can do? I am kinda good fixing stuff. I have done alot of research today online.
Was this
answer
helpful?
Yes
No
Wednesday, January 23rd, 2019 AT 1:47 PM (Merged)
Tiny
RASMATAZ
  • MECHANIC
  • 75,992 POSTS
Next step is to inspect and test the park and neutral switch and ignition switch
Was this
answer
helpful?
Yes
No
Wednesday, January 23rd, 2019 AT 1:47 PM (Merged)
Tiny
KENTHEWOOD1021
  • MEMBER
  • 3 POSTS
  • 1997 CHEVROLET CAVALIER
Electrical problem
1997 Chevy Cavalier 4 cyl Front Wheel Drive Automatic

ok my g/fs dad replaced the starter in her car and somewhere I guess he forgot what wire goes were and hooked it up wrong so if there is anyone who could tell me directions on how to figure out how to hook it up or has a diagram I would apriceate it thanks
Was this
answer
helpful?
Yes
No
+1
Wednesday, January 23rd, 2019 AT 1:47 PM (Merged)
Tiny
RHALL77
  • MECHANIC
  • 3,361 POSTS
What wire does he have a question on. The small terminal goes to the small post.
Was this
answer
helpful?
Yes
No
Wednesday, January 23rd, 2019 AT 1:47 PM (Merged)
Tiny
NORBERT BOND
  • MEMBER
  • 1 POST
  • 2001 CHEVROLET CAVALIER
  • 4 CYL
  • FWD
  • AUTOMATIC
  • 160,000 MILES
How to change a starter on a 2000 cavelier
Was this
answer
helpful?
Yes
No
-1
Monday, June 24th, 2019 AT 6:39 PM (Merged)
Tiny
RASMATAZ
  • MECHANIC
  • 75,992 POSTS
REMOVAL PROCEDURE

Disconnect the negative battery cable.
Remove wiring harness bracket nut from starter bolt.
Raise the vehicle. Refer to Lifting and Jacking the Vehicle.
Remove flywheel inspection shield.
Remove the electrical connections from starter.
Remove the starter bolts and starter.
Was this
answer
helpful?
Yes
No
-1
Monday, June 24th, 2019 AT 6:39 PM (Merged)
Tiny
DAVBOZ7
  • MEMBER
  • 1 POST
  • 1996 CHEVROLET CAVALIER
  • 2.2L
  • 4 CYL
  • FWD
  • AUTOMATIC
  • 200,000 MILES
Hi. Maybe you can help. Have a starting issue with 1996 Chev Cavalier. Charging/battery are fine. Had initial clinking clunking, jiggled connections, got it started once to get home, now nothing. Full power, but no activity to starter(solenoid?)
So, went back to hand-checking connections. One supplemental(?) Wire to main solenoid terminal bent and snapped at it's connecting ring.
There are FIVE wires in total connecting to solenoid.
THREE go to main post which includes POS battery connection, a black one coming from a very large fat bundle, and a mystery wire which broke at the eyelet.
The broken "mystery wire" comes out of a smaller bundle, as do the remaining TWO wires to the solenoid - each of those TWO going to the other two individual terminals on the solenoid.
The "mystery wire" seems not to be easily spliced or reconnected.
I had hoped maybe this was the cause of not getting a signal to the starter. Now, I'm wondering, is it an essential component, and how might I establish a connection here. It seems like something like fiber-optic, although I doubt that. It just isn't your common wire.
Any ideas?
Thanks for being available!
Was this
answer
helpful?
Yes
No
+1
Monday, June 24th, 2019 AT 6:39 PM (Merged)
Tiny
CARADIODOC
  • MECHANIC
  • 33,741 POSTS
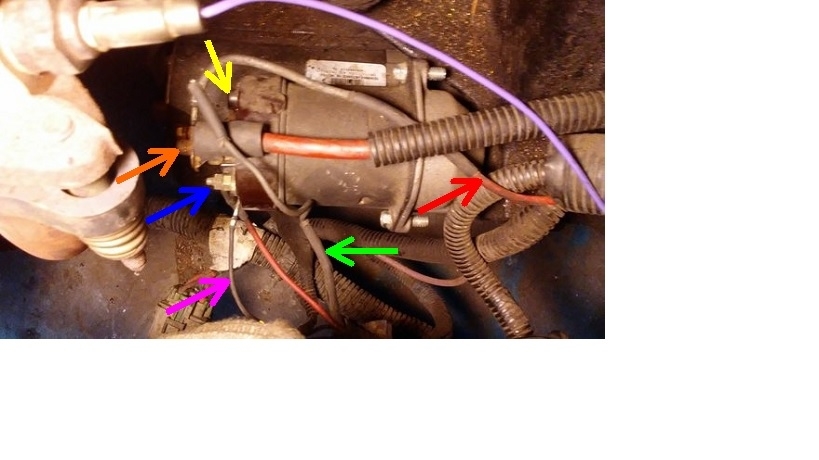
The purple wire, (purple arrow), goes to the smaller "S" terminal on the solenoid, (blue arrow). That is always the only wire that goes there. That is the one that activates the solenoid when it gets 12 volts from the starter relay, or in some cases, directly from the ignition switch.

The other small terminal "R", (yellow arrow), when used, is as a relay terminal. It gets 12 volts put on it during cranking, to bypass the ignition resistor for stronger spark and easier starting. That terminal is used on older cars and may not even exist on newer solenoids.

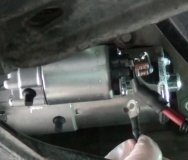
The red arrow is pointing to the generator's output wire. The red part of the wire is a spliced-in fuse link wire. It is slightly smaller in diameter so it's the weak link in the chain. Also, its insulation is designed to not melt or burn when the wire burns open. This wire goes directly back to the battery's positive post, but GM likes to use the larger stud on the solenoid, (orange arrow), as a convenient tie point since the battery cable also goes right back to the battery. No point in running two wires when they both go to the same place.

I suspect you're referring to the black wire by the green arrow. That is not shown as part of the starter circuit, but it is typically another circuit the uses the large terminal as a tie point, rather than running back to the battery. The arrow is pointing to a piece of heat-shrink tubing that covers a splice. That indicates it is the starting point for another piece of fuse link wire. This wire will feed multiple other circuits to potentially include exterior lights and horn, as well as the ignition / starter switch. With this wire broken off, you should find multiple systems, including the starter system, are dead.

This is a relatively simple repair, but you must be careful to never touch a metal tool to the large battery terminal, (orange arrow), and another metal part on the car, at the same time. That would create huge sparks and could weld the tool in place and cause it to become red-hot and melt. It is safer to disconnect the battery's negative cable, then continue with the repair.

Strip the end of the wire, then crimp on a new terminal, and bolt it onto the stud. You'll probably have to buy a small box of terminals from an auto parts store. The crimp end has to be small enough to crimp effectively around the wire, but the ring end has to be large enough in diameter to fit over the stud. That combination of sizes makes it an uncommon terminal that you may not find in a hardware store.

I prefer to solder the wire to the terminal after I crimp it. Due to the wet location, I pull the plastic cover off the crimp end, slide a piece of heat-shrink tubing onto the wire, crimp, then solder the terminal to the wire, then slide the tubing down and warm it to seal the connection. You can buy heat-shrink tubing with hot-melt glue inside. That will form a moisture-proof seal. The tubing and the glue strengthen the wire to reduce the chance of it breaking again.

You'll need to remove the large nut, then remove and discard the old terminal. Place the new terminal on the stud, then reinstall the nut.
Was this
answer
helpful?
Yes
No
+3
Monday, June 24th, 2019 AT 6:39 PM (Merged)
Tiny
DAVBOZ7
  • MEMBER
  • 1 POST
Okay, that is helpful. Now, I still wonder about the extra insulation covering an inch or so at the connecting end as well. When I snipped off a 1/16in. Piece to see what it consisted of inside I saw strange stuff that looked like wood, paper, I guess part of the insulation, but could hardly even recognize that there was any wire in there. Do you think I can trust that is a thin wire, that I can successfully expose enough to crimp in a new eyelet, and just try as carefully as possible to strip it?
Was this
answer
helpful?
Yes
No
Monday, June 24th, 2019 AT 6:39 PM (Merged)
Tiny
CARADIODOC
  • MECHANIC
  • 33,741 POSTS
I'm not sure what you're seeing. That has to be a normal wire. Its going to carry a good 8 to 10 amps. The extra insulation you referred to is an old piece of heat-shrink tubing. Cut that all off with a razor blade. It will have that hot-melt glue on it too, so it's going to take some work to peel it off. If you have an extra inch or two of wire, just cut the last part off with the heat-shrink tubing. There's nothing special about it. You just need to be sure when you're done the wire will be long enough to reach to the stud.
Was this
answer
helpful?
Yes
No
Monday, June 24th, 2019 AT 6:39 PM (Merged)

Please login or register to post a reply.

Sponsored links