Engine cranks over but will not start up?

Tiny
MBCAPS
  • MEMBER
  • 1991 HONDA ACCORD
  • 2.2L
  • 4 CYL
  • 2WD
  • AUTOMATIC
  • 400,000 MILES
In the morning or after the car has set for 5 hours or so after running it just cranks over but does not start. After continuing to try to start eventually it does. What it does it just instantly starts right up and I could drive to town which is 50 miles shut it off and it starts right up. It seems that warmer temperature is enabling it to start. It's not cold here 60 to 70 degrees.
Tuesday, September 24th, 2019 AT 5:02 AM

7 Replies

Tiny
JACOBANDNICKOLAS
  • MECHANIC
  • 108,320 POSTS
Welcome to 2CarPros.

My first suspect is that it is taking too long for fuel pressure to reach the engine. Once the fuel is there, it starts easily. After sitting, it takes time for it to prime again. It could be a plugged filter or the pump itself is allowing fuel to back feed into the tank.

With this issue, the first thing I would do is check fuel pressure. Do this when it is cold and watch the gauge to see if pressure builds right away.

Here is a link that shows in general how to check pressure:

https://www.2carpros.com/articles/how-to-check-fuel-system-pressure-and-regulator

Here are the directions specific to your vehicle for testing. The attached pics correlate with the directions.

Component Tests and General Diagnostics
Vehicle Powertrain Management Fuel Delivery and Air Induction Fuel Pump Fuel Pressure Testing and Inspection Component Tests and General Diagnostics
COMPONENT TESTS AND GENERAL DIAGNOSTICS
WARNING:
- Do not smoke while working on the fuel system. Keep open flames or sparks away from the work area.
- Be sure to relieve fuel pressure while the engine is OFF.

1. Relieve fuel pressure.
a. Disconnect the battery negative cable from the battery.
b. Remove fuel filler cap.
c. Use a box end wrench on the 6mm service bolt at the fuel rail, while holding the special banjo bolt with another wrench.

Fuel System Service Bolt

Pic 1

d. Place a rag or shop towel over the 6mm service bolt.
e. SLOWLY loosen the 6mm service bolt one complete turn.
2. Remove the service bolt on the fuel rail while holding the banjo bolt with another wrench and attach the fuel pressure gauge.
3. Start the engine. Measure the fuel pressure with the engine idling and the vacuum hose of the pressure regulator disconnected.

Fuel Pressure Gauge

pic 2

Unregulated pressure at idle should be:

SE (USA),SE and Ex-R(Canada):
265 - 314 kPa (38-46 PSI)
All other models:
235 - 284 kPa (34-41 PSI)

4. Reconnect the vacuum hose to the pressure regulator.

Regulated pressure at idle should be:

SE (USA),SE and Ex-R (Canada):
196 - 245 kPa (28 - 36 PSI)
All other models:
176 - 225 kPa (26 - 33 PSI)

5. If the fuel pressure is not as specified, first check the fuel pump. If the pump is okay, check the following:
a. If pressure is higher than specified:
- Pinched, collapsed, or clogged fuel return hose or piping
- Faulty pressure regulator
b. If pressure is lower than specified:
- Clogged fuel filter
- Pressure regulator failure
- Leakage in the fuel system

___________________________________

Do this first and let me know what you find. Also, here is a link that shows how to pull diagnostic trouble codes from and OBD1 Honda system. Do this also.

https://www.2carpros.com/articles/honda-car-1990-1995-obd1-code-retrieval-procedure-and-definition-table

Joe
Was this
answer
helpful?
Yes
No
-1
Tuesday, September 24th, 2019 AT 6:39 PM
Tiny
MBCAPS
  • MEMBER
  • 5 POSTS
Fuel system seems to be working properly it seems to be no spark as the problem. The other day I went out to try to start it and it did start immediately. Just like it does after it has started and I drive it throughout the day stopping multiple time shutting it off coming back after hour or two and it starts right up immediately. After coming home and parking it I can go back out 5 hours later or so and it does it start. It has started on occasion after cranking it over for an hour or more using a 50 amp jumper start battery charger.
Was this
answer
helpful?
Yes
No
Friday, September 27th, 2019 AT 2:17 AM
Tiny
MBCAPS
  • MEMBER
  • 5 POSTS
Correction on last message. I can go out and try to start it five hours or so later and it does not start. A few days ago I tried for 2 hours with no start. The next day I went out and it started immediately.
Was this
answer
helpful?
Yes
No
Friday, September 27th, 2019 AT 2:20 AM
Tiny
JACOBANDNICKOLAS
  • MECHANIC
  • 108,320 POSTS
Welcome back:

Do me a favor, check to see if it has spark when it doesn't start. Here is a link that shows how to do it:

https://www.2carpros.com/articles/how-to-test-an-ignition-system

When you turn the key to the on position without cranking the engine over can you hear the fuel pump run in the tank for 5 seconds?

https://www.2carpros.com/articles/car-cranks-but-wont-start

Please run down these guides and report back. Let me know the results.

Joe
Was this
answer
helpful?
Yes
No
-1
Friday, September 27th, 2019 AT 4:46 PM
Tiny
MBCAPS
  • MEMBER
  • 5 POSTS
It does not have spark when it doesn't start.
Was this
answer
helpful?
Yes
No
Sunday, October 6th, 2019 AT 6:29 PM
Tiny
MBCAPS
  • MEMBER
  • 5 POSTS
It has also developed another issue when it's running. While driving it sometimes loses power. When pressing the gas pedal down more, it does not help unless I almost floor it and it kicks down to lower gear raising rpm's up past 3,500 then it usually clears up. However, I discovered by turning the key off and back on real fast, clears it up immediately. It might do this once or sometimes 2 to 5 times within 5 or ten minutes. But always runs perfect immediately when turning off and back on. Only does this when driving it.
Was this
answer
helpful?
Yes
No
Sunday, October 6th, 2019 AT 6:39 PM
Tiny
JACOBANDNICKOLAS
  • MECHANIC
  • 108,320 POSTS
Welcome back:

If there is no spark, either we have an issue in the ignition switch or the crank angle sensor is bad in the distributor.

The crank angle sensor is in the distributor. I attached the directions for replacing it. I'm not saying for sure it is bad, but I suggest taking things apart and inspect for corrosion or damage.

+++++++++++++++++++++++++++++++++++++++++

1991 Honda Accord L4-2156cc 2.2L SOHC
Procedures
Vehicle Powertrain Management Sensors and Switches - Powertrain Management Sensors and Switches - Computers and Control Systems Crankshaft Position Sensor Service and Repair Procedures
PROCEDURES
DISTRIBUTOR REMOVAL

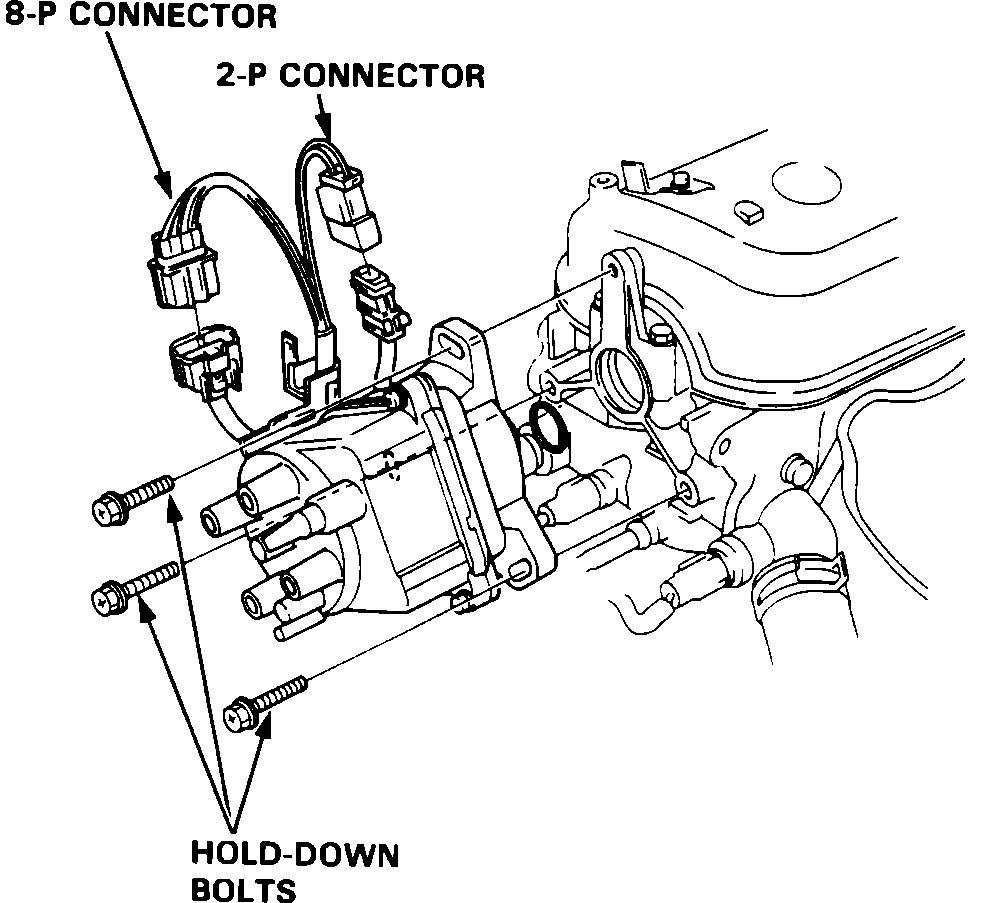
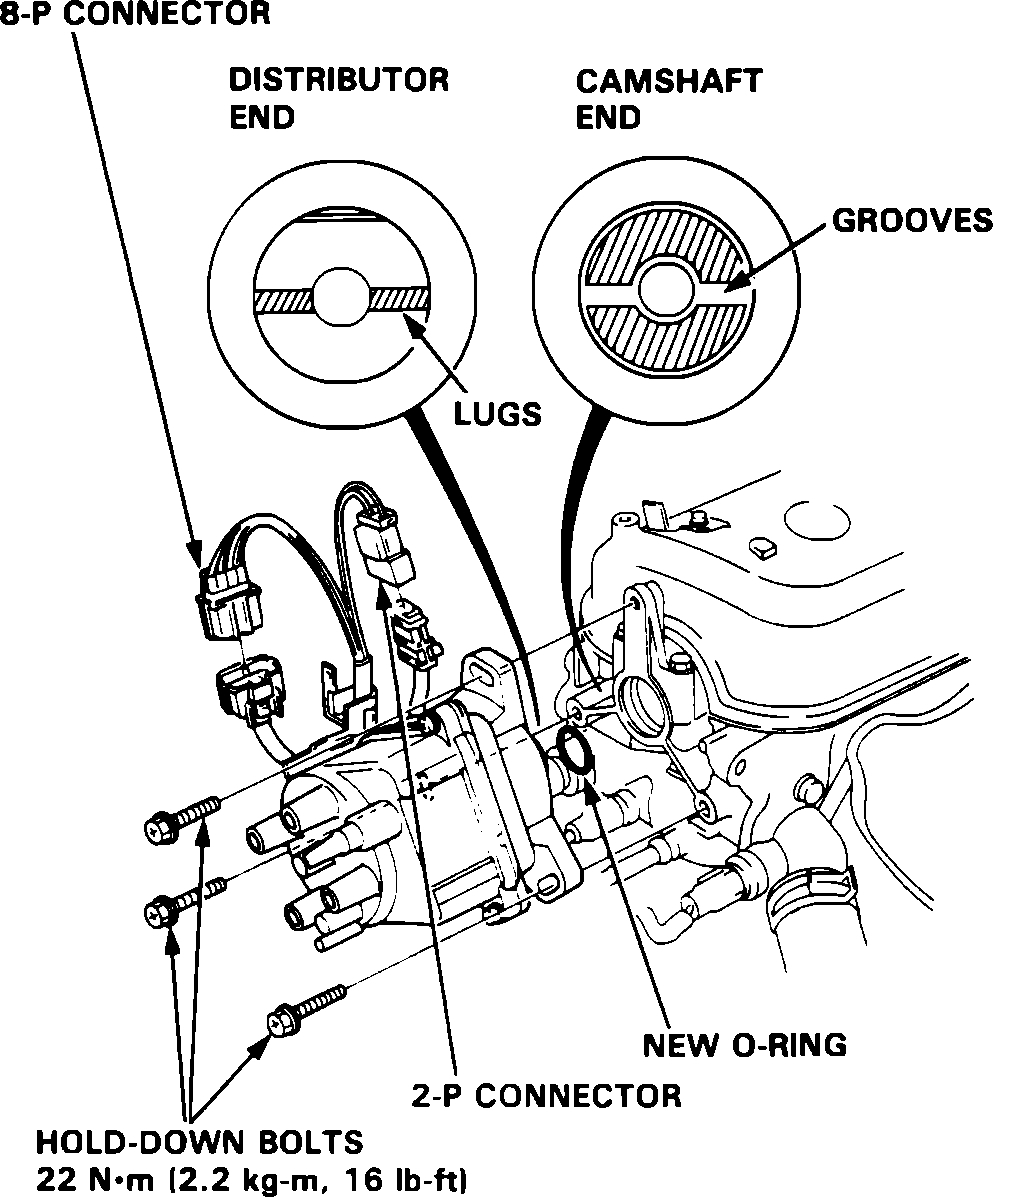
1. Disconnect the 2-P and 8-P connectors from the distributor.
2. Disconnect the spark plug wires from the distributor cap.

Distributor Connectors

Pic 1

3. Remove the distributor hold-down bolts, then remove the distributor from the cylinder head.
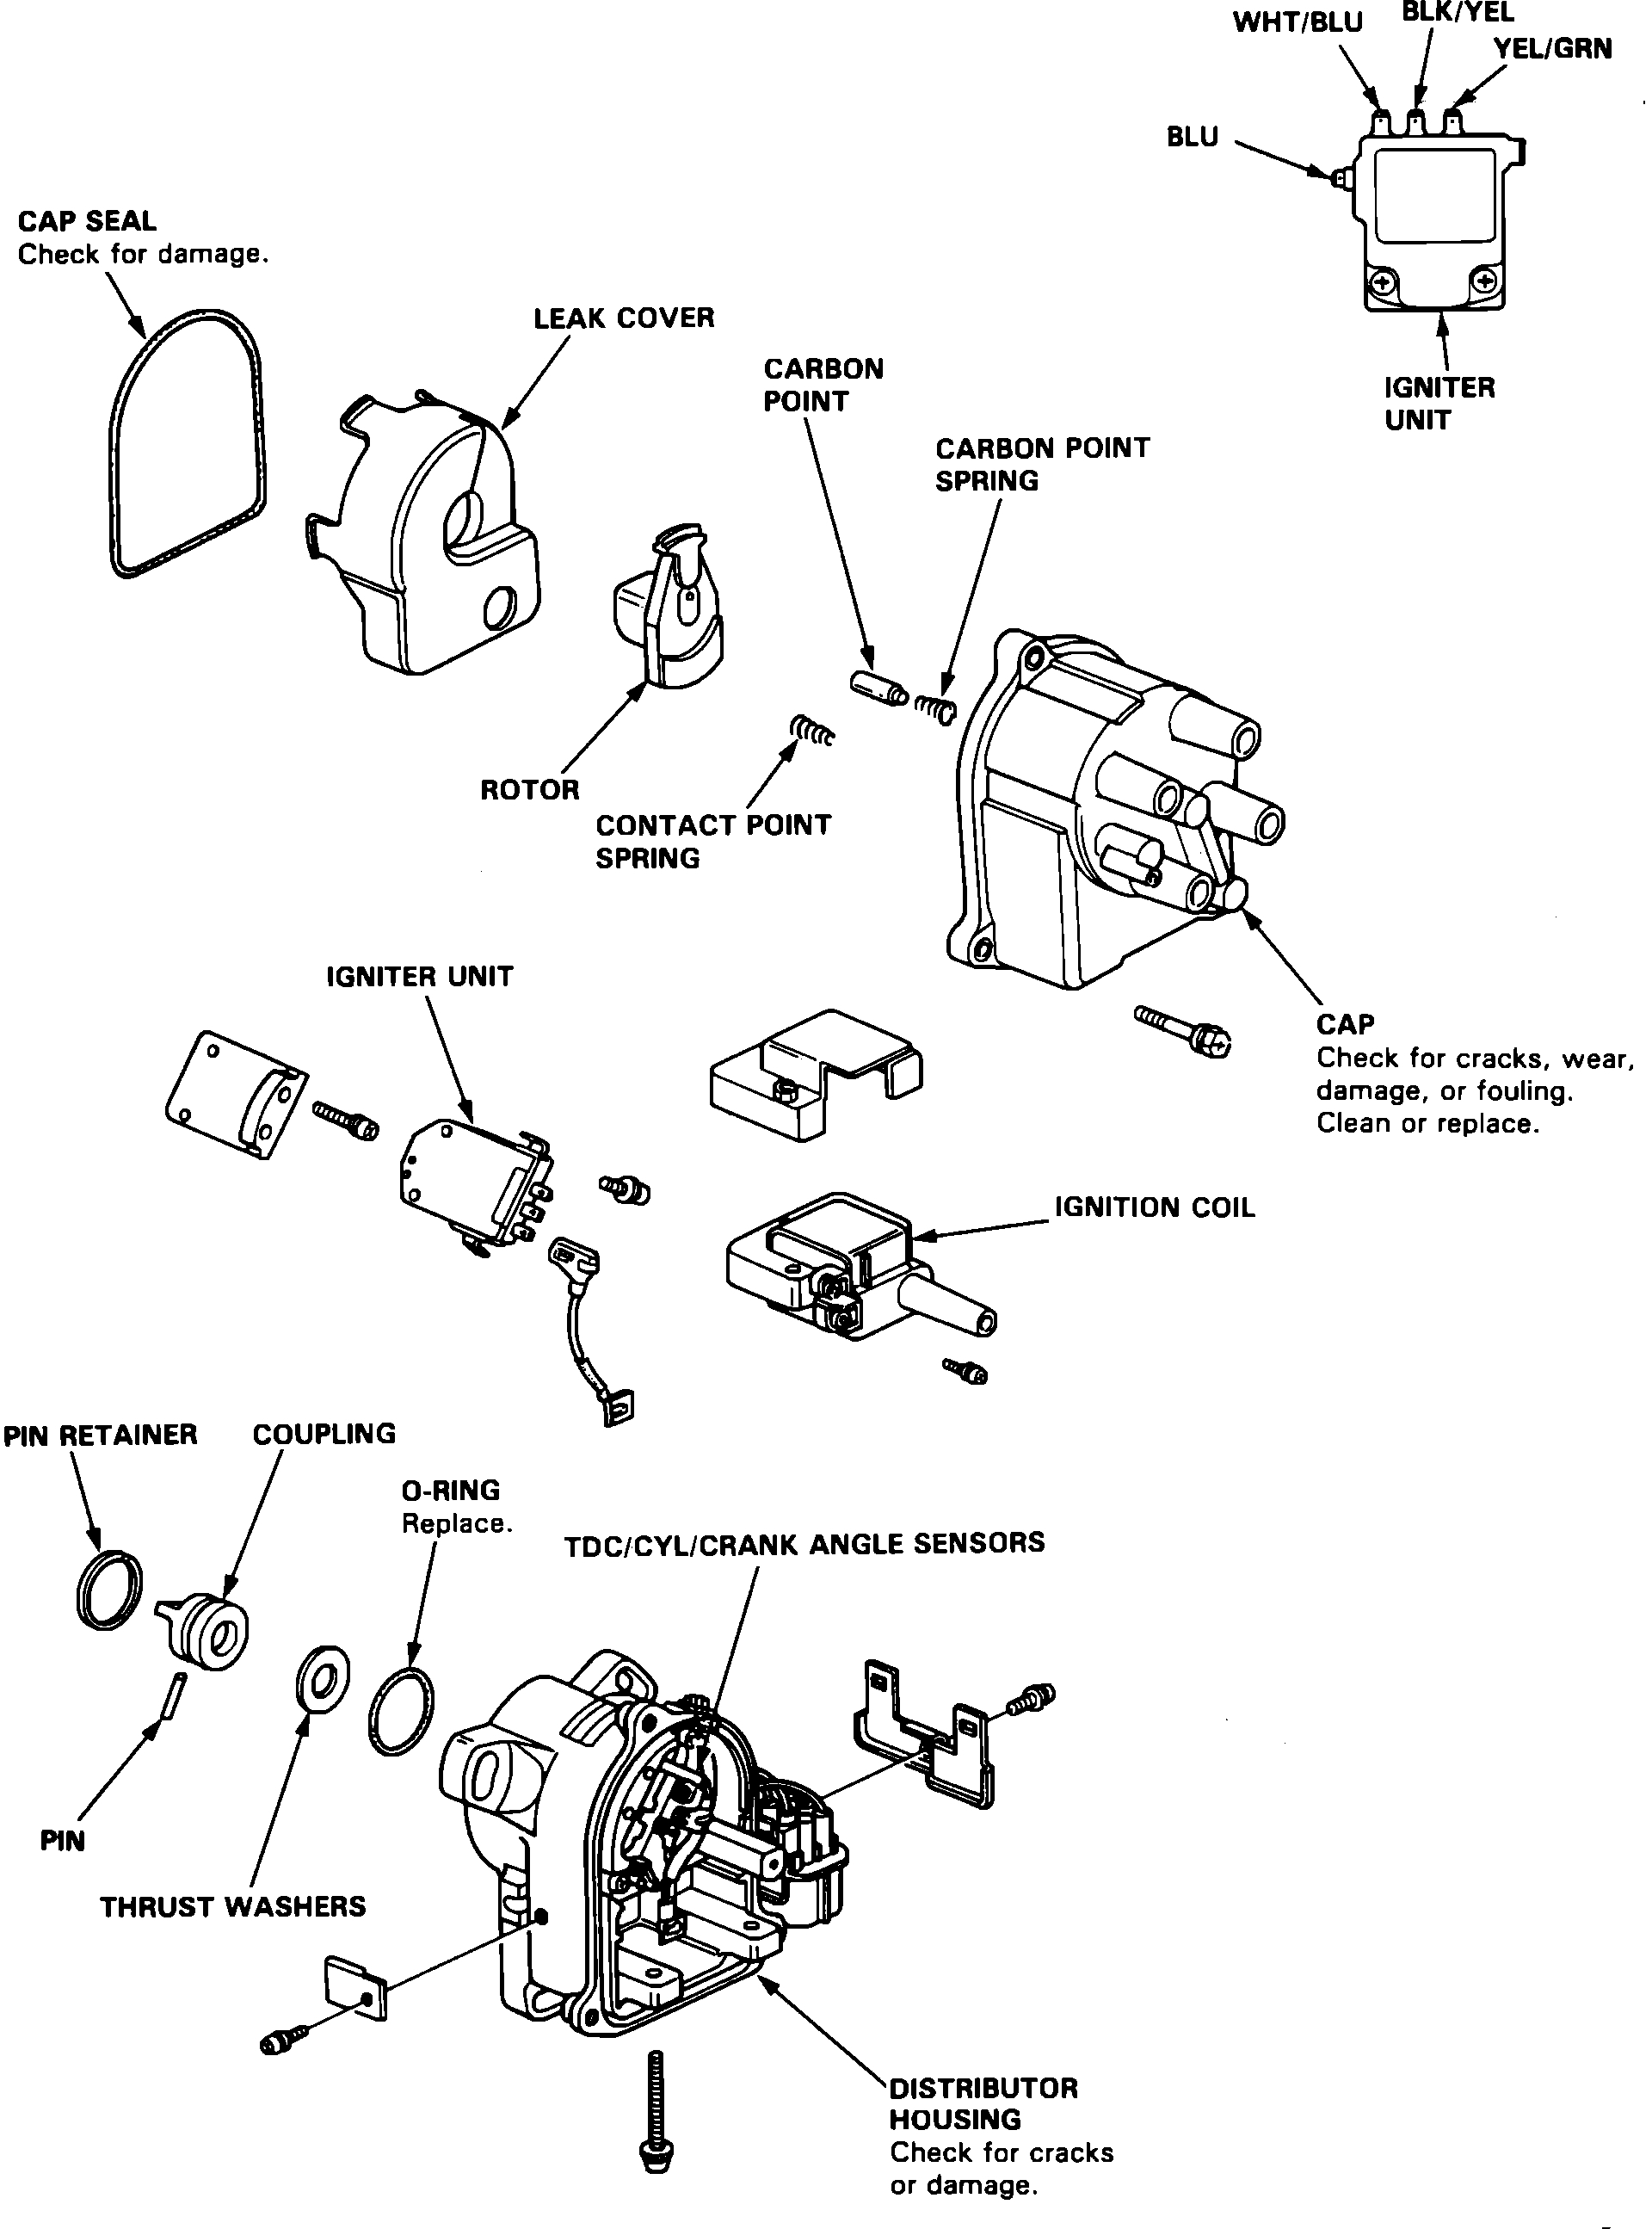
DISASSEMBLY

Distributor Explosion

pic 2

4. Use the exploded view image for distributor disassembly.

REASSEMBLY

pic 3

Reassemble the distributor in the reverse order of disassembly.
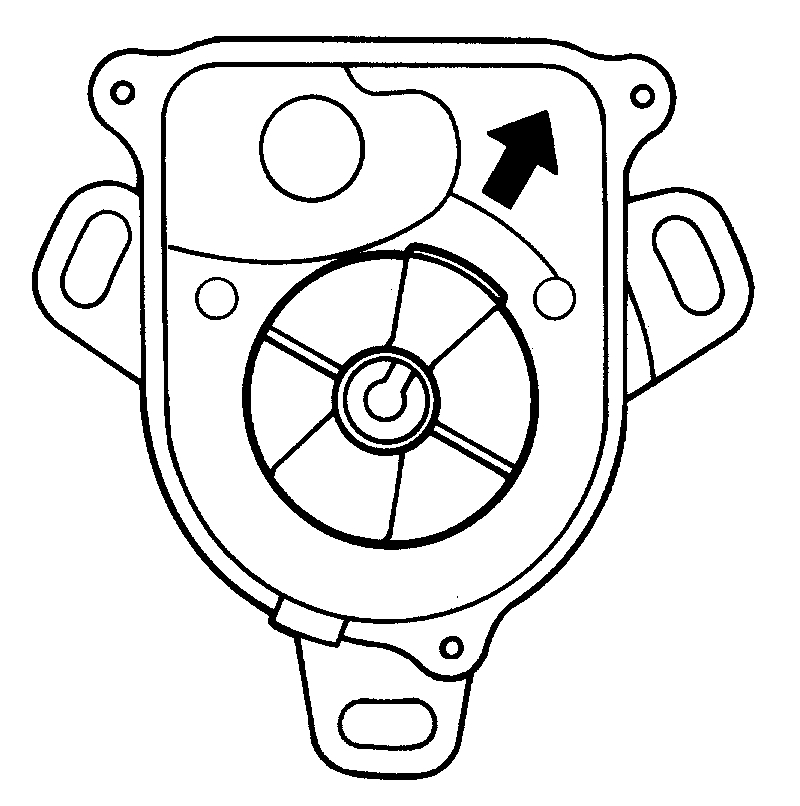
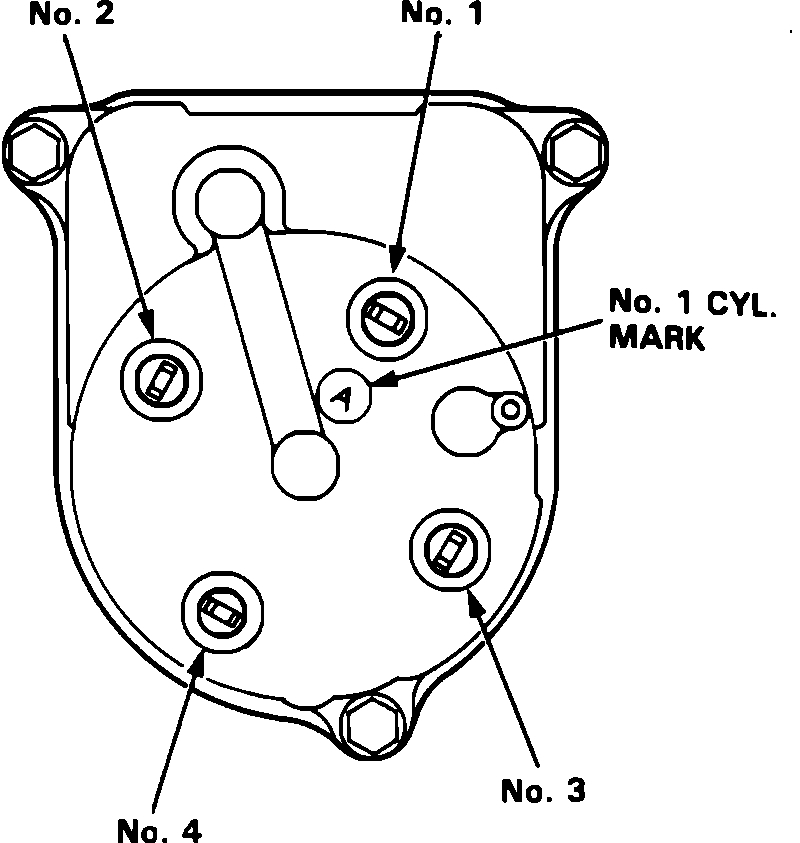
1. Install the rotor, then turn it so that it faces in the direction shown (toward the No.1 cylinder).
2. Set the thrust washer and coupling on the shaft.

Pic 4

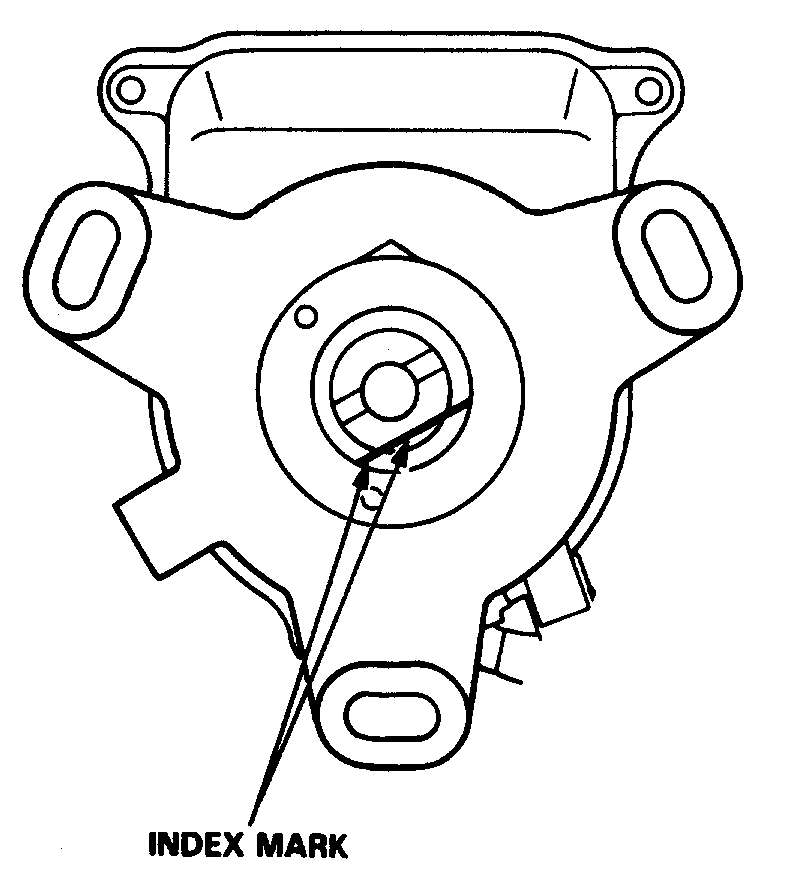
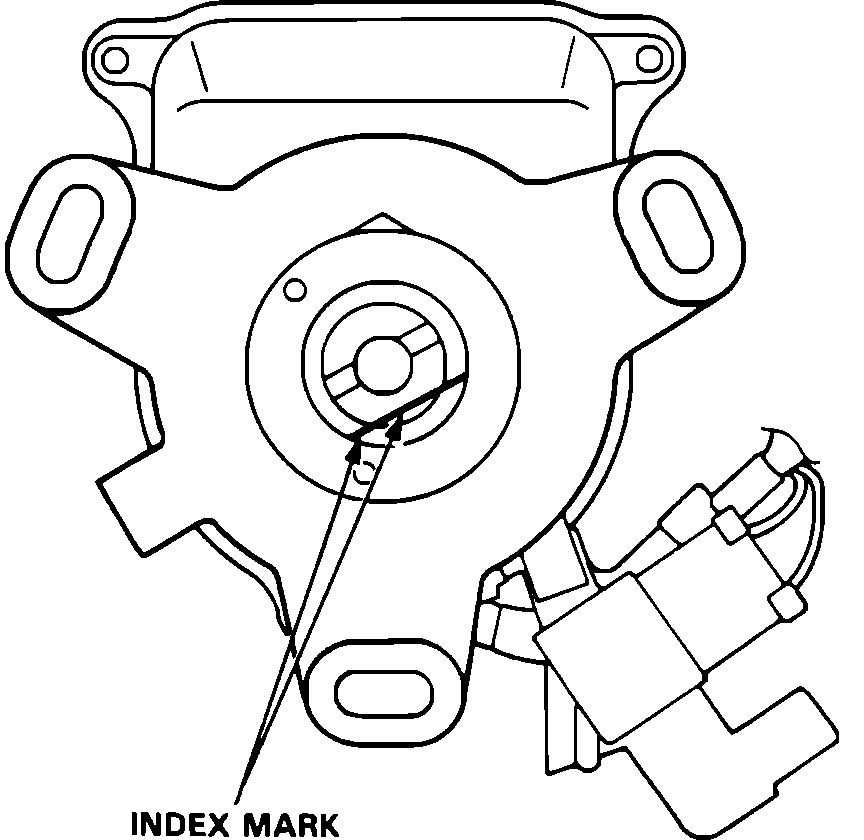
3. Check that the rotor is still pointing toward the No.1 cylinder, then align the index mark on the housing with the index mark on the coupling.
4. Drive in the pin and secure it with the pin retainer.

INSPECTION

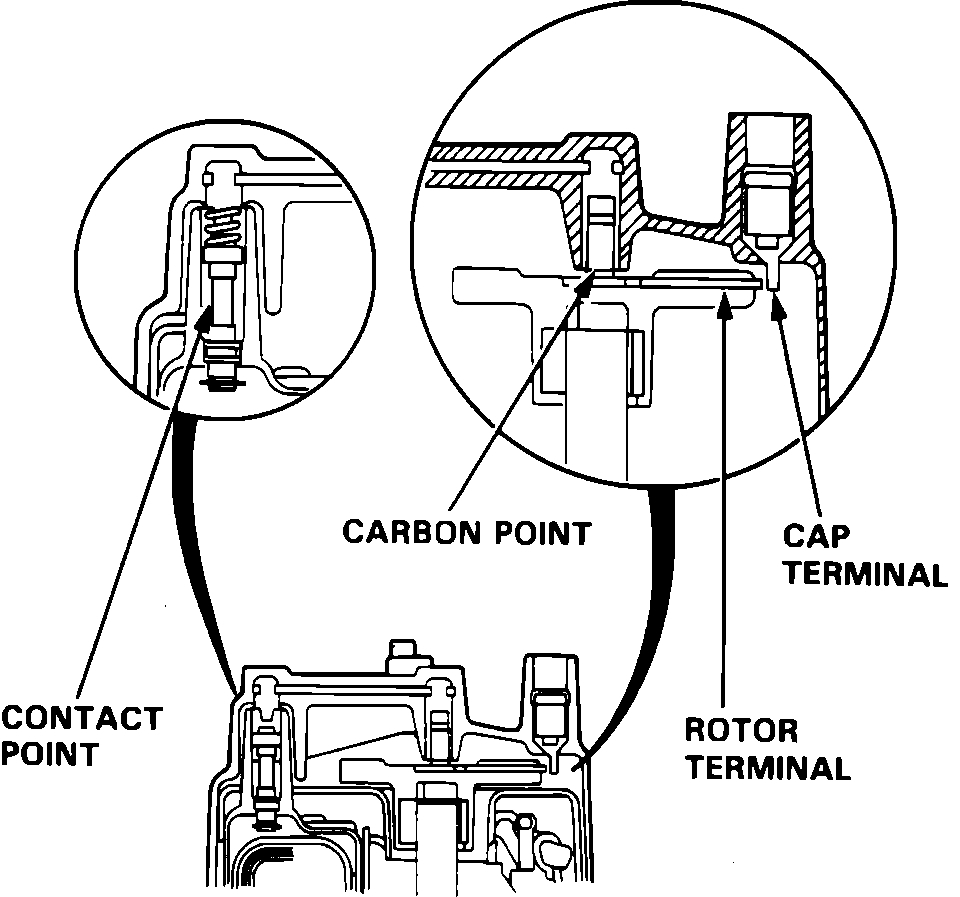
Cross Section Of Distributor

pic 5

5. Check for rough or pitted rotor and cap terminals.
6. Scrape or file off the carbon deposits. Smooth the rotor terminal with an oil stone or #600 sandpaper if rough.
7. Check the distributor cap for cracks, wear and damages. If necessary, clean or replace it.

REASSEMBLY

Rotor Position
pic 6

8. Install the rotor, then turn it so that it faces in the direction shown (toward the No. 1 cylinder).
9. Set the thrust washer and coupling on the shaft.

Distributor Index

pic7

10. Check that the rotor is still pointing toward the No. 1 cylinder, then align the index mark on the housing with the index mark on the coupling.
11. Drive in the pin and secure it with the pin retainer.

INSTALLATION

12. Coat a new 0-ring with engine oil then install it.
13. Slip the distributor into position.

NOTE: The lugs on the end of the distributor and its mating grooves in the camshaft end are both offset to eliminate the possibility of installing the distributor 180° out of time.

Distributor Installation
pic 8

14. Install the hold-down bolts and tighten temporarily.
15. Connect the 2-P and 8-P connectors to the distributor.

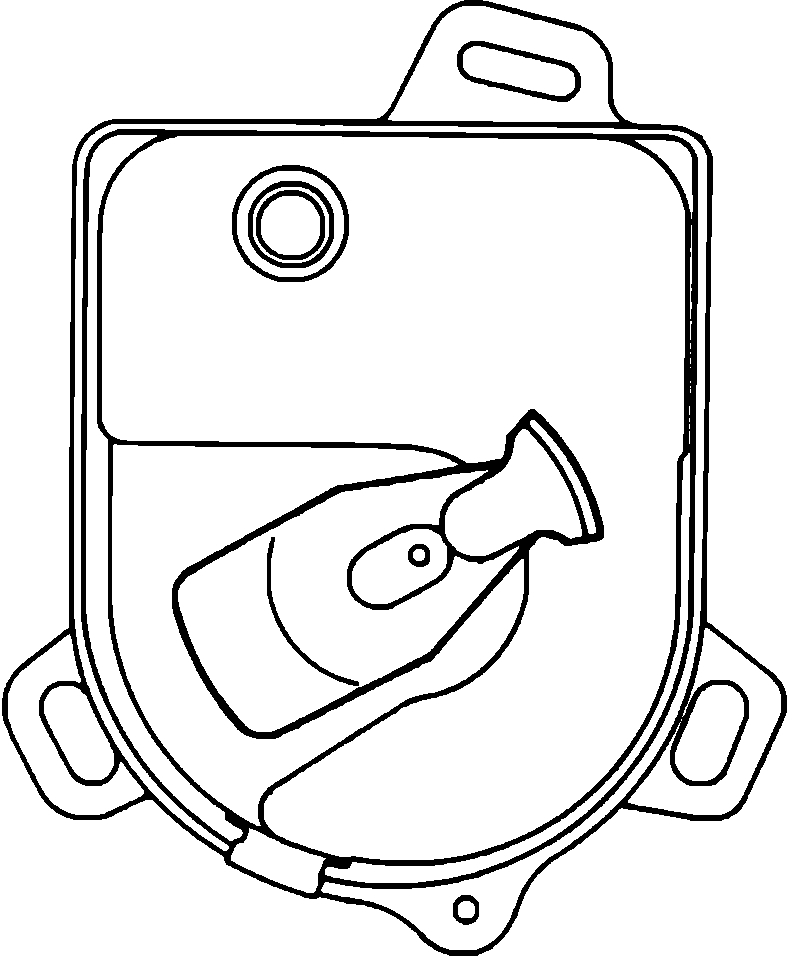
Distributor Cap Typical

pic 9

16. Connect the spark plug wires as shown.
17. Set the timing with a timing light as shown in ADJUSTMENT PROCEDURES.
18. After adjusting, torque the hold-down bolts, then install the cap on the bolt.

Torque: 16 ft. Lbs (22 Nm)

Let me know what you find.

Joe
Was this
answer
helpful?
Yes
No
Sunday, October 6th, 2019 AT 8:09 PM

Please login or register to post a reply.

Sponsored links