Hi and welcome back:
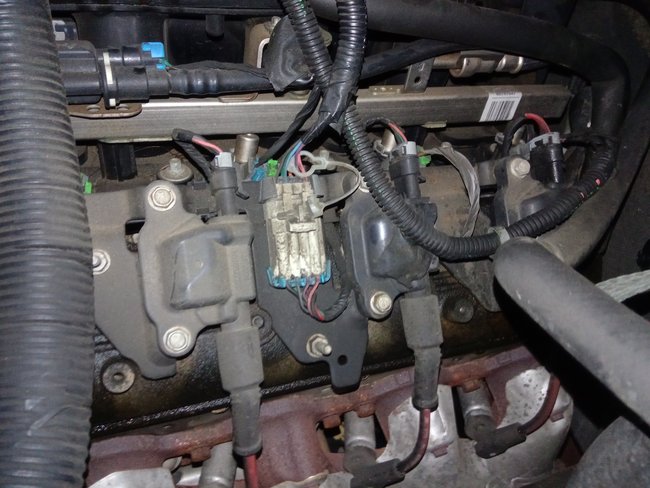
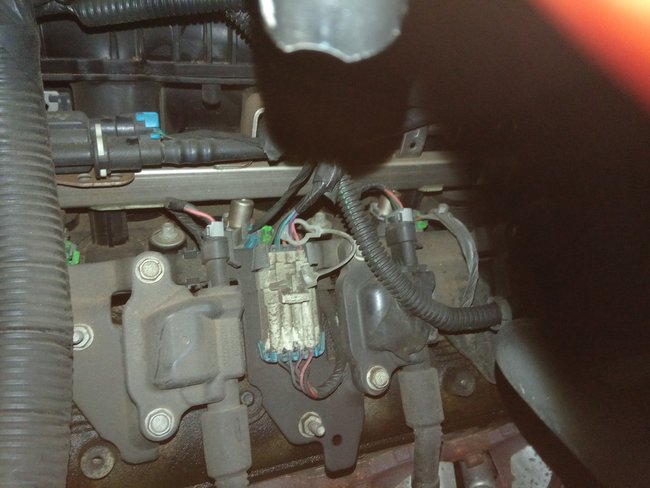
If it started with starting fluid, the ignition spark isn't the problem, but rather, it is a fuel related issue. First, check and make sure fuse number 21 in the under hood fuse box is good and not blown. If it is good, you could check fuel pump pressure to see if it is working.
https://www.2carpros.com/articles/how-to-check-fuel-system-pressure-and-regulator
I have to be honest, chances are it is the pump.
Here is a link that shows in general how to replace the pump:
https://www.2carpros.com/articles/how-to-replace-an-electric-fuel-pump
___________________________________________
Here are the directions specific to a regular cab 4wd with a V8. If you have an extended or crew cab, let me know. All attached pictures correlate with these directions.
___________________________________________
Fuel Tank Fuel Pump Module Replacement (15 Reg Cab w/26 gal Tank)
Tools Required
J 45722 Fuel Sender Lock Ring Wrench
Removal Procedure
imageOpen In New TabZoom/Print
1. Remove the fuel tank.
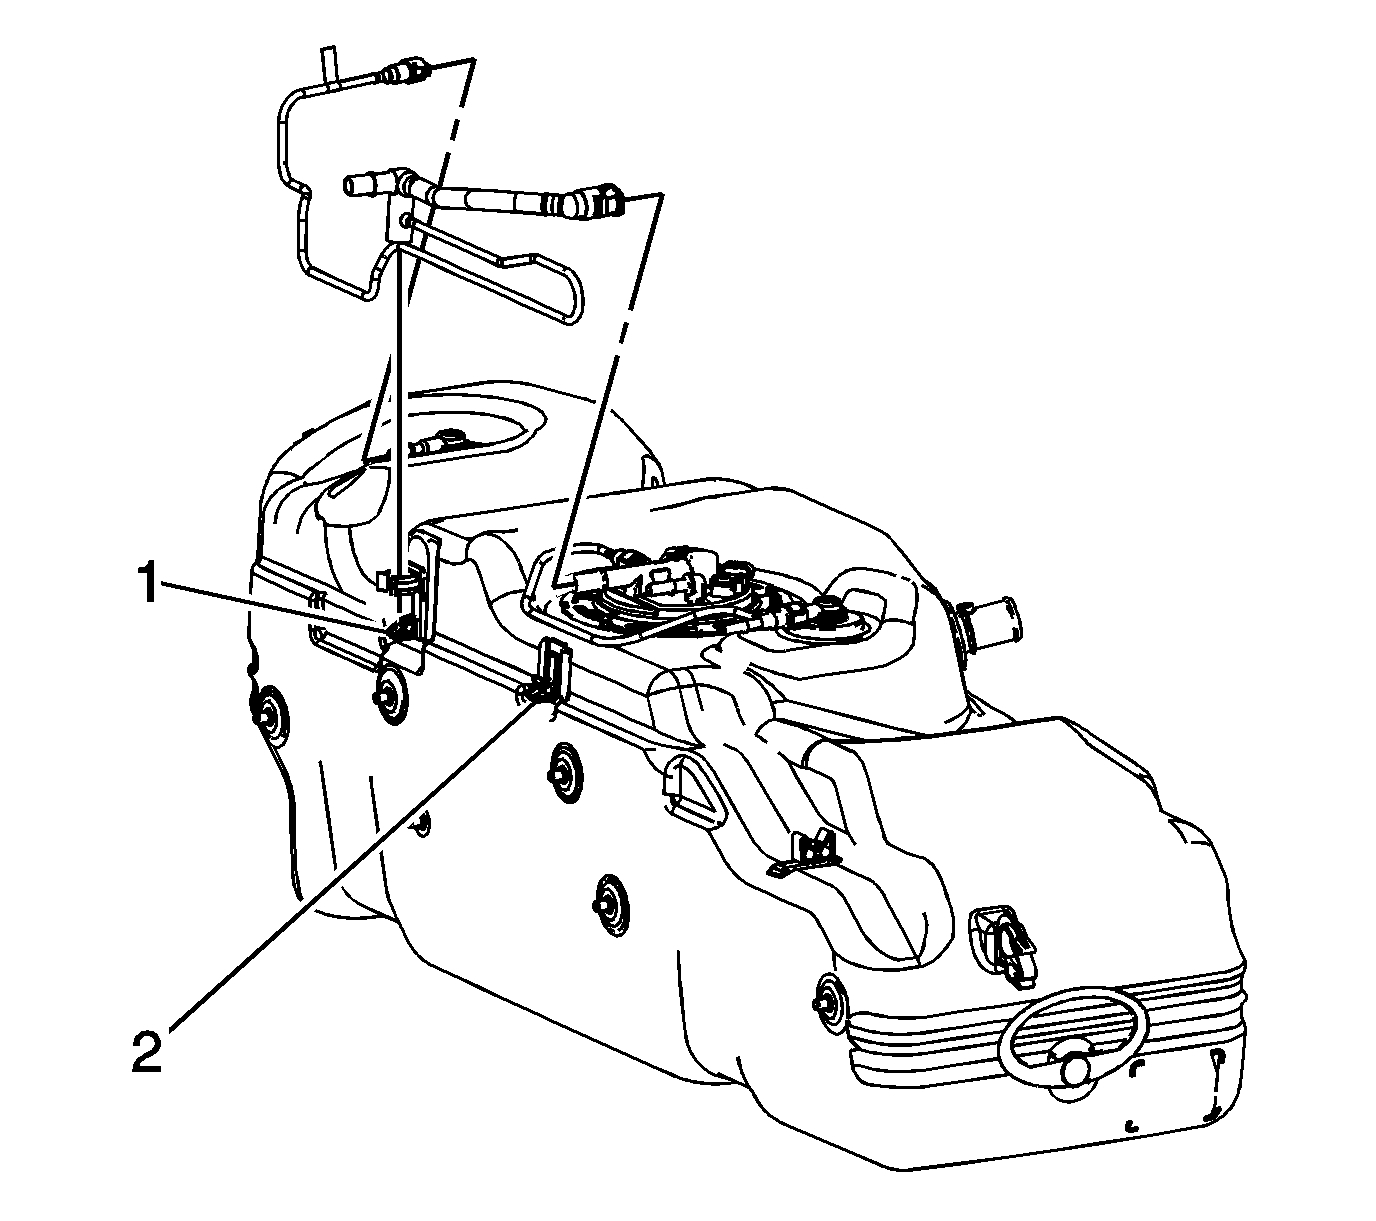
2. Disconnect the fuel tank fuel feed pipe quick connect fitting from the fuel tank module.
3. Disconnect the fuel tank evaporative emission (EVAP) pipe quick connect fittings from the fuel tank module.
4. Reposition the fuel and EVAP pipes out of the way.
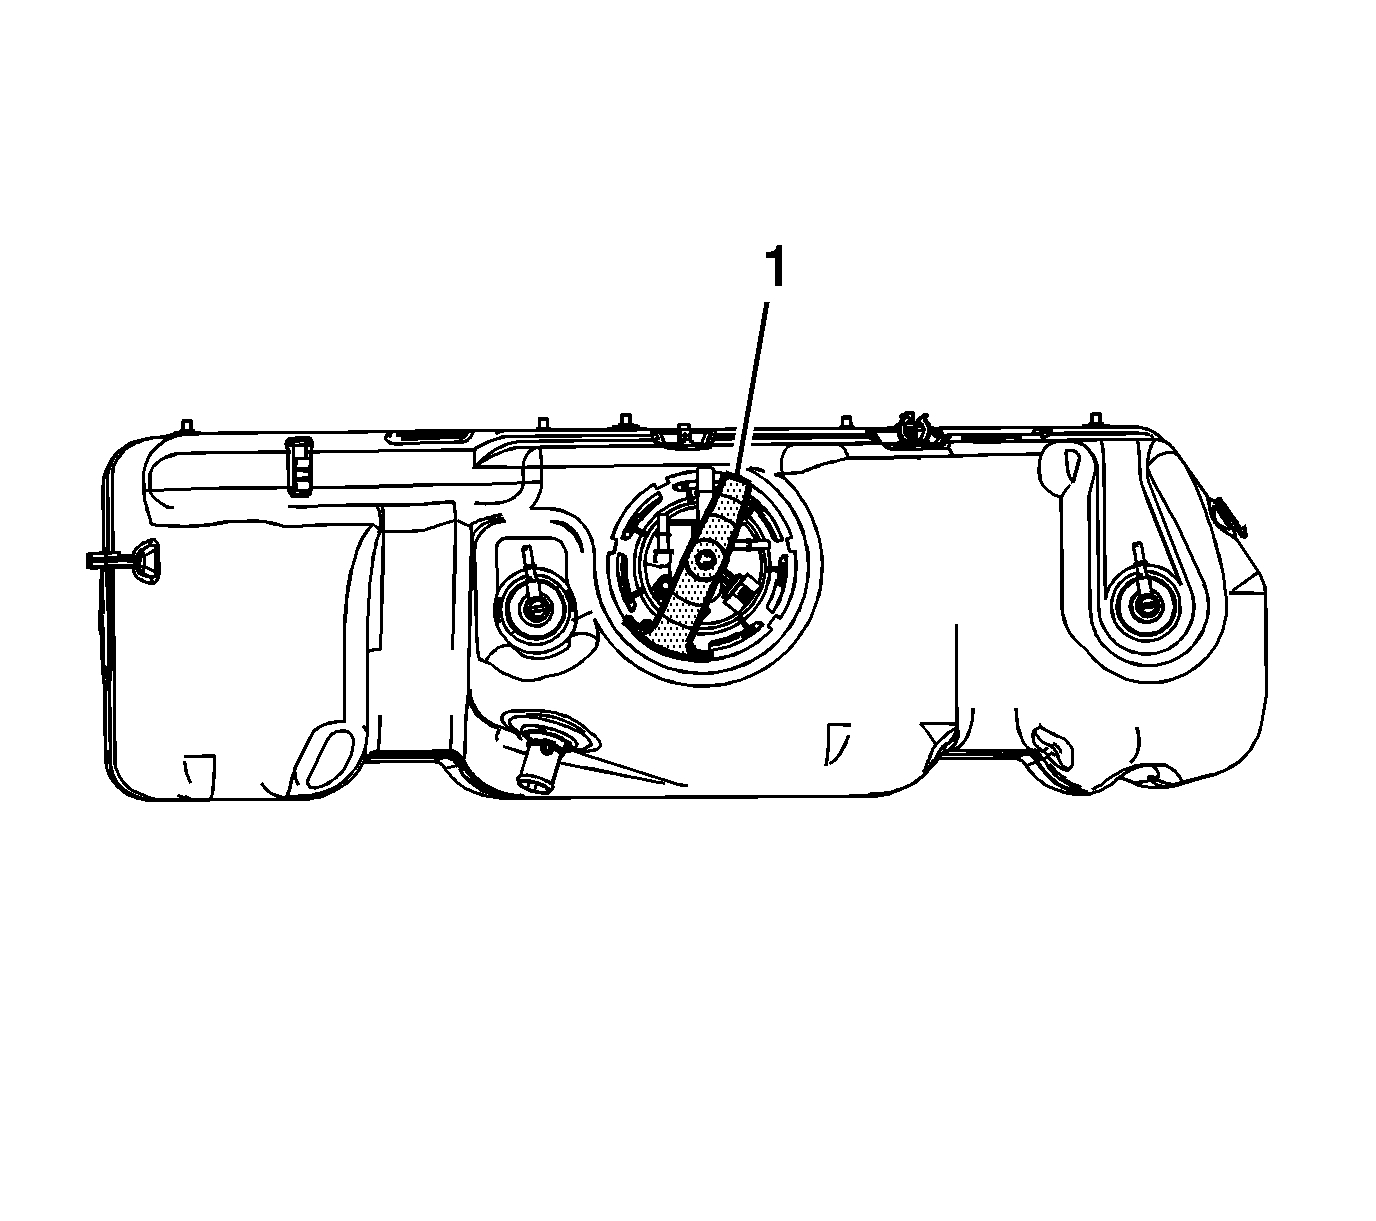
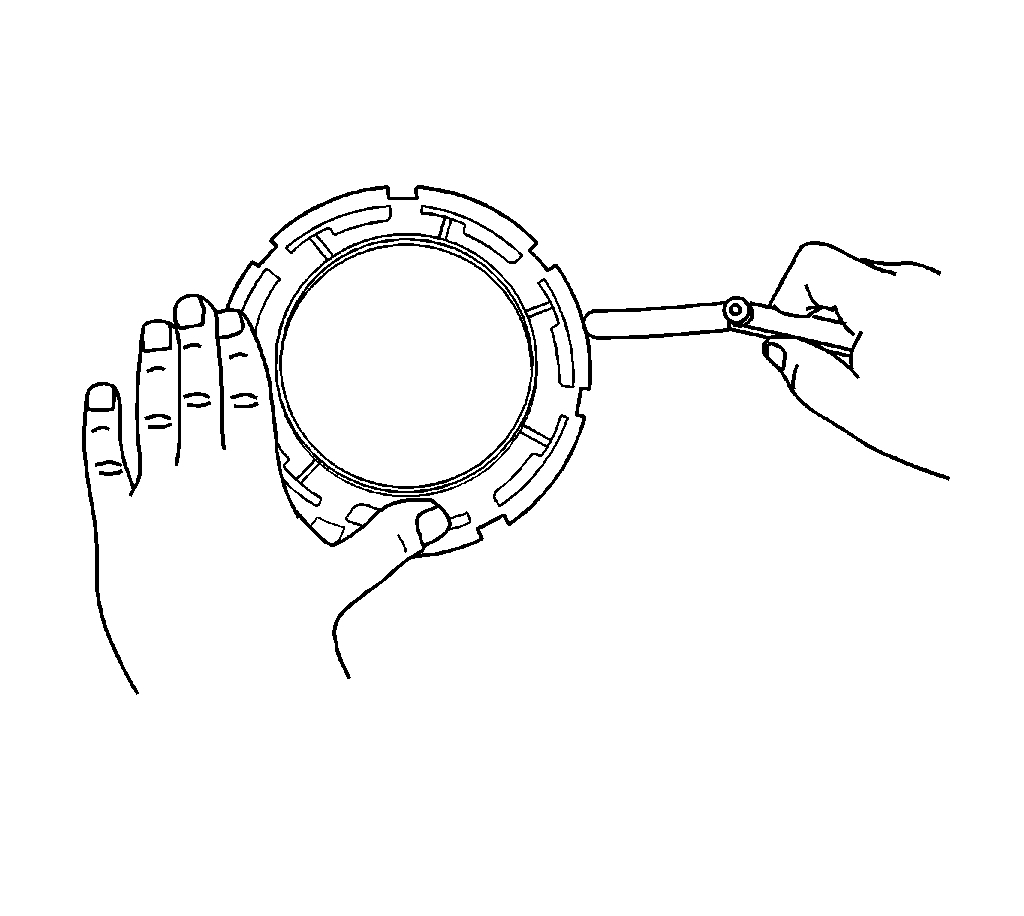
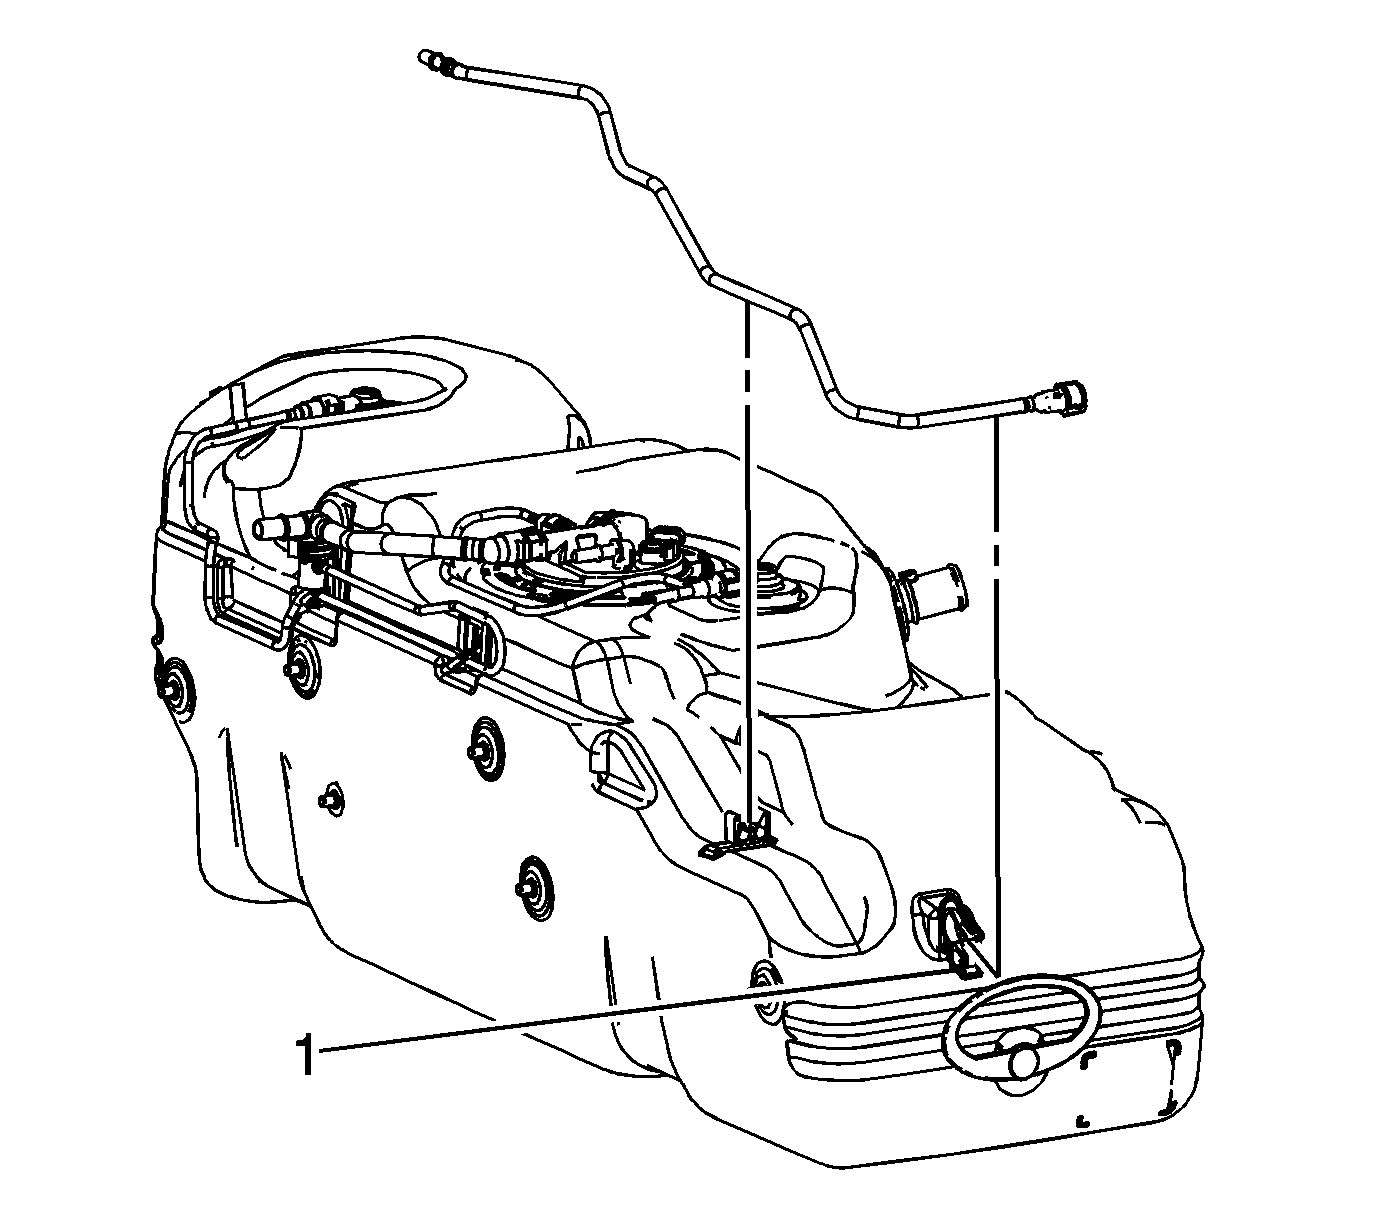
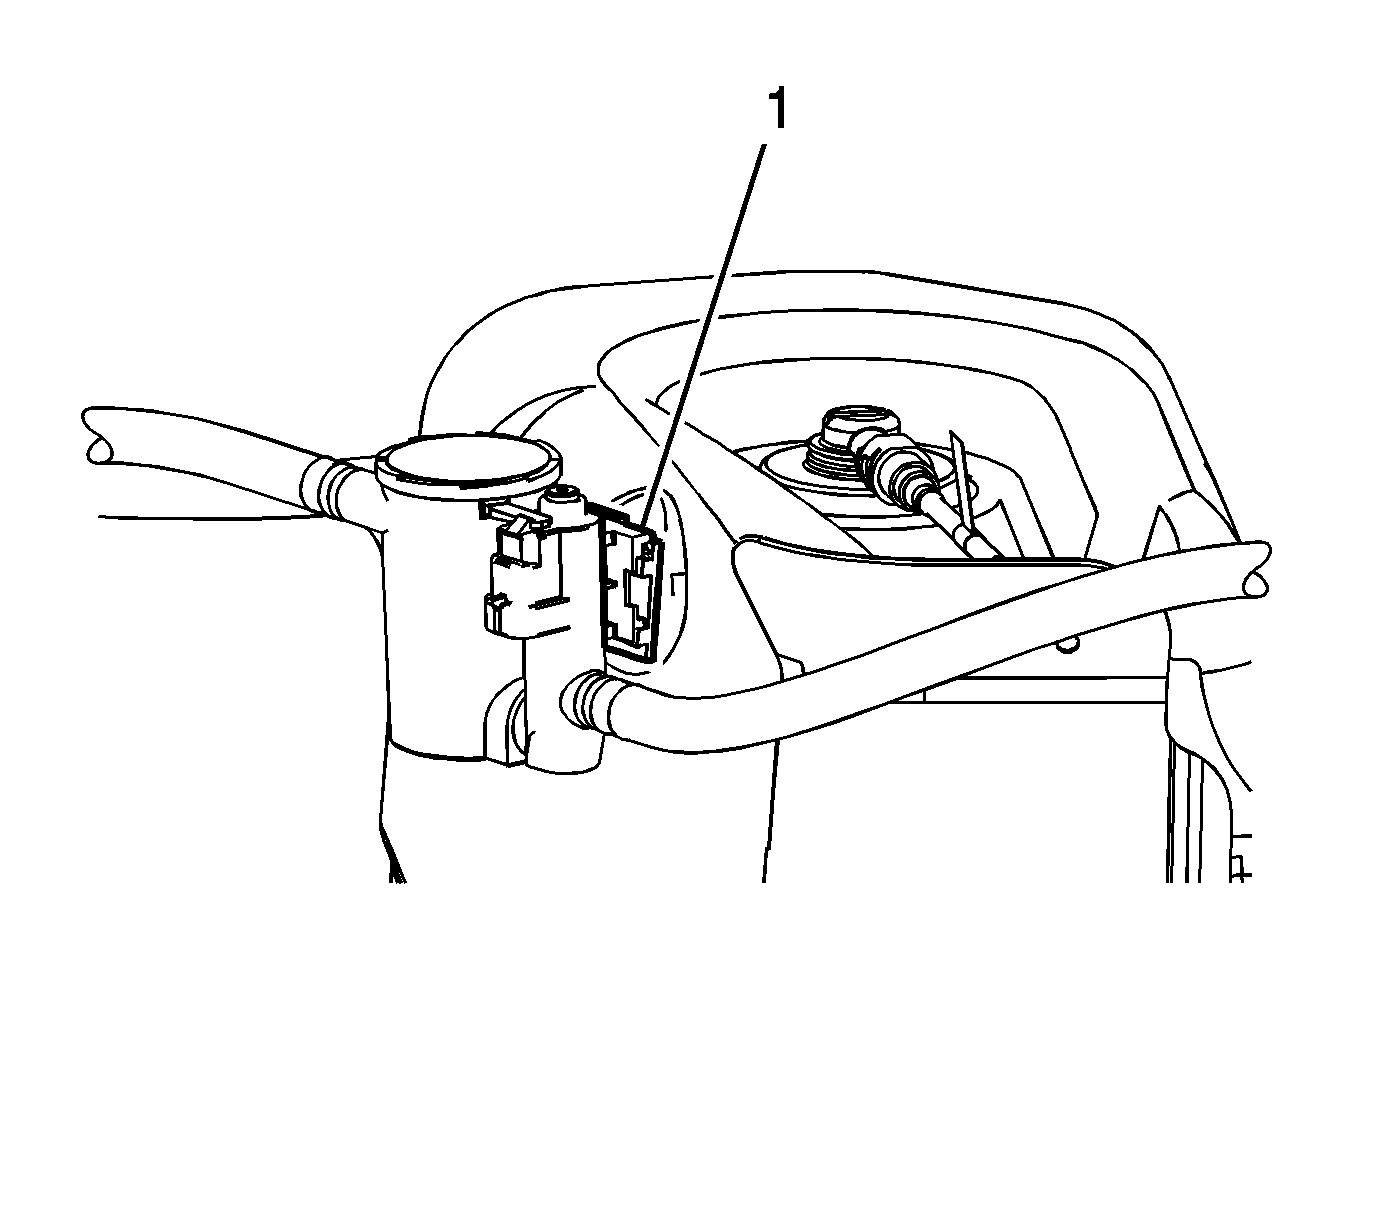
5. Install the J 45722 (1) to the fuel tank module lock ring.
Notice: Avoid damaging the lock ring. Use only J-45722 to prevent damage to the lock ring.
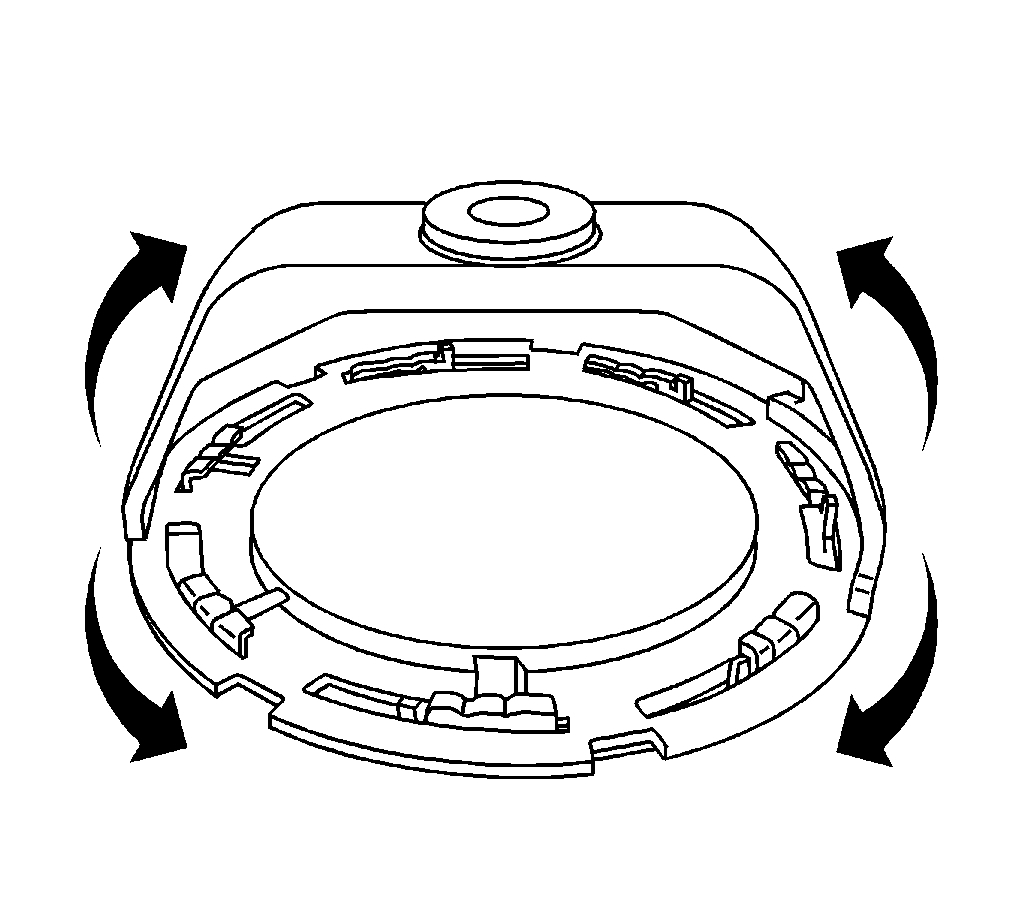
Important: Do NOT use impact tools. Significant force will be required to release the lock ring. The use of a hammer and screwdriver is not recommended. Secure the fuel tank in order to prevent fuel tank rotation.
6. Using the J 45722 and a long breaker bar, rotate the lock ring clockwise unlocking the fuel tank module lock ring.
7. Remove the J 45722.
8. Remove the fuel tank module lock ring.
Notice: Do Not handle the fuel sender assembly by the fuel pipes. The amount of leverage generated by handling the fuel pipes could damage the joints.
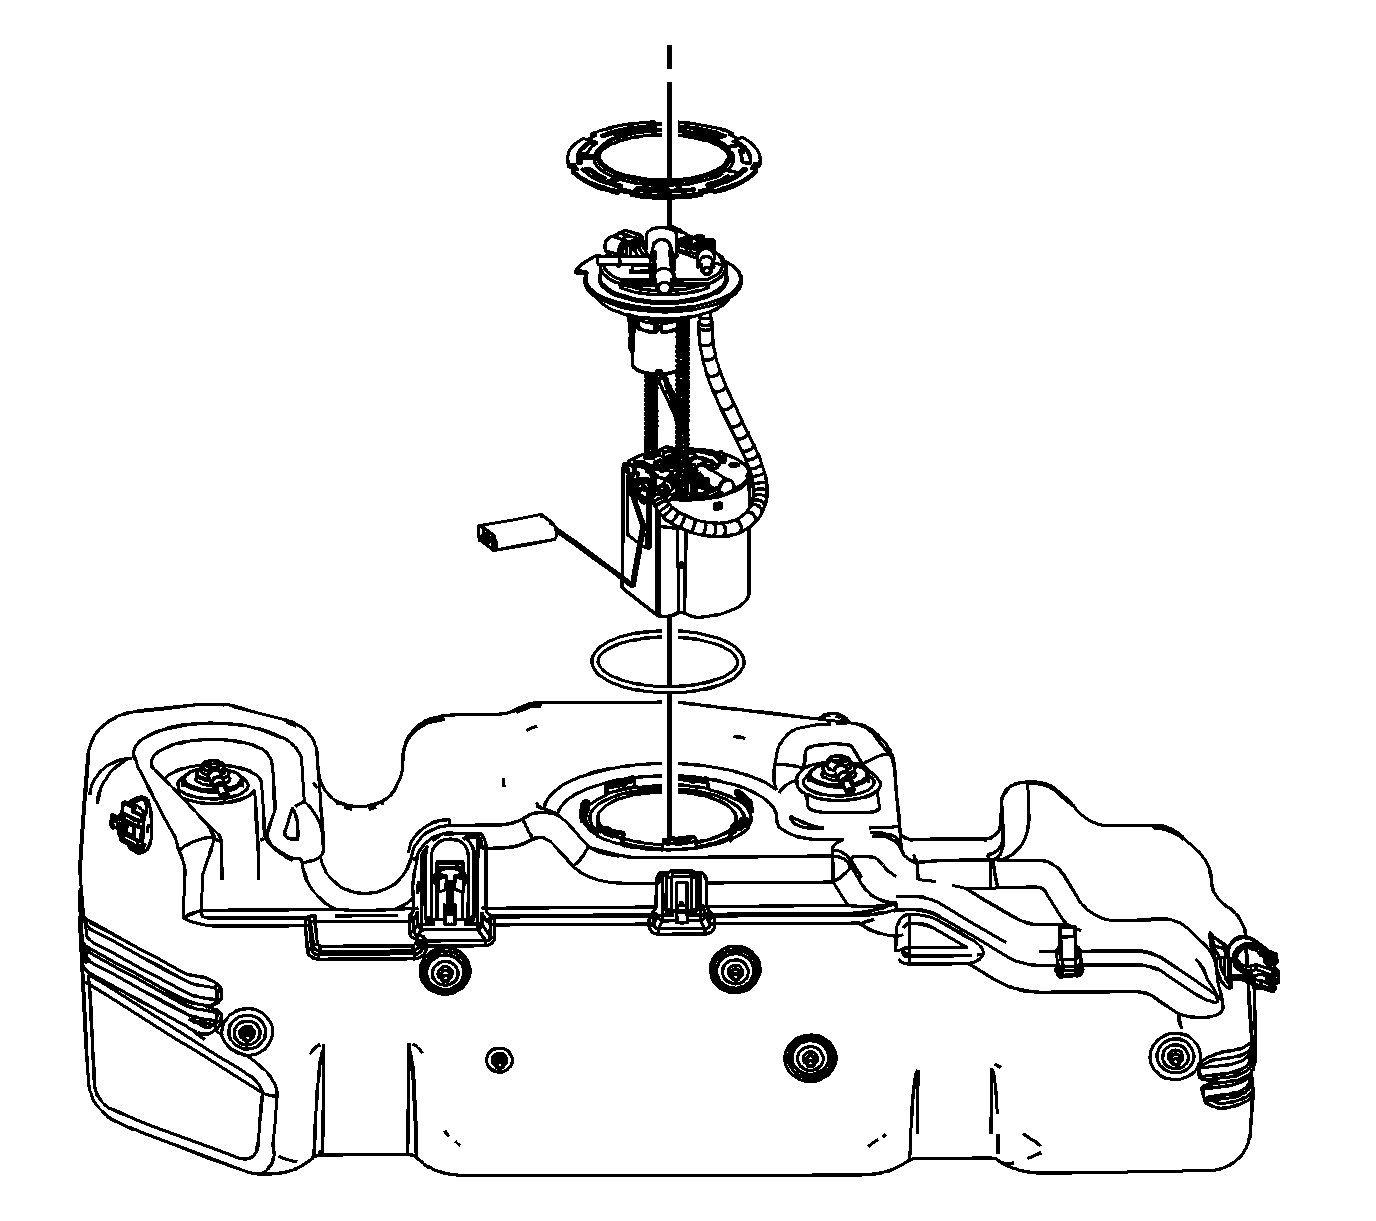
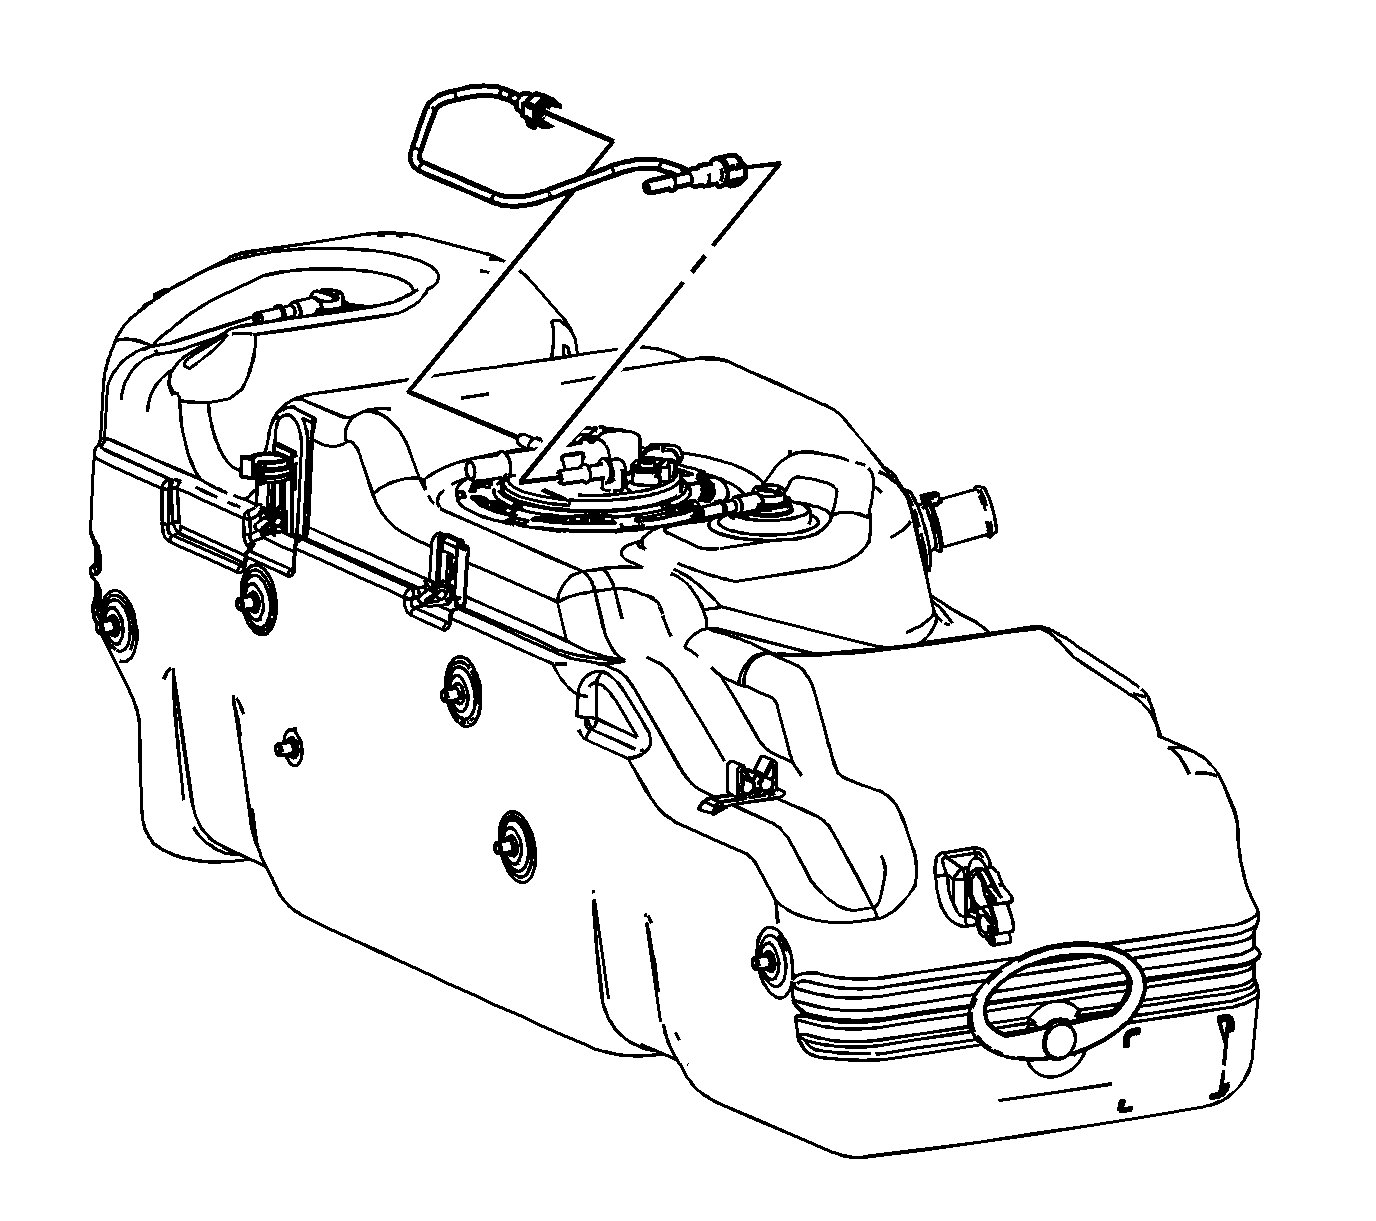
9. Slowly raise the module until the fuel level sensor float arm is just visible.
Important: When removing the module from the fuel tank, be aware that the module reservoir bucket is full of fuel. The module must be tipped slightly during removal to avoid bending the fuel level sensor float arm.
10. Tilt the module toward the rear of the fuel tank to allow the level sensor float arm to clear the tank opening. Remove the module from the tank.
11. Carefully discard the fuel in the module reservoir bucket into an approved fuel container.
Important: DO NOT reuse the old fuel tank module O-ring seal.
12. Remove and discard the fuel tank module O-ring seal.
Important:
* Some lock rings were manufactured with "DO NOT REUSE" stamped into them. These lock rings may be reused if they are not damaged or warped.
* Inspect the lock ring for damage due to improper removal or installation procedures. If damage is found, install a NEW lock ring.
* Check the lock ring for flatness.
Place the lock ring on a flat surface. Measure the clearance between the lock ring and the flat surface using a feeler gage at 7 points.
13. If warpage is less than 0.41 mm (0.016 in), the lock ring does not require replacement.
14. If warpage is greater than 0.41 mm (0.016 in), the lock ring must be replaced.
Installation Procedure
1. Install a NEW fuel tank module O-ring seal onto the fuel tank.
Important: The bucket must be tipped slightly during installation to avoid bending the fuel level sensor float arm.
2. Tilt the module toward the rear of the fuel tank to allow the fuel level sensor float arm to clear the tank opening. Install the module into the fuel tank.
3. Lower the module assembly into the tank.
4. Position and install the fuel tank module lock ring.
5. Ensure that the module sealing surface is clean and free of contamination.
6. Install the J 45722 to the fuel tank module lock ring.
Important: Always replace the fuel tank module seal when installing the fuel tank module. Replace the lock ring if necessary. DO NOT apply any type of lubrication in the seal groove.
Ensure the lock ring is installed with the correct side facing upward. A correctly installed lock ring will only turn in a clockwise direction.
7. Using the J 45722 and a long breaker bar, rotate the lock ring counterclockwise locking the fuel tank module lock ring.
8. Remove the J 45722 (1) from the fuel tank module lock ring.
9. Position the fuel and EVAP pipes to the module.
10. Connect the fuel tank EVAP pipe quick connect fittings to the fuel tank module.
11. Connect the fuel tank fuel feed pipe quick connect fitting to the fuel tank module.
12. Install the fuel tank.
____________________________________
Here are the directions for removing the fuel tank. The only directions I have are for replacing the tank. You won't have to do that, so some of these directions don't apply. However, it explains how to remove / replace which you will need. Starting with picture 7, the remaining pictures apply to these directions.
FUEL TANK REPLACEMENT (15 REG CAB W/26 GAL TANK)
Fuel Tank Replacement (15 Reg Cab w/26 Gal Tank)
Removal Procedure
Important: Clean the fuel and evaporative emission (EVAP) connections and surrounding areas prior to disconnecting the lines in order to avoid possible system contamination.
1. Relieve the fuel system pressure. Refer to Fuel Pressure Relief (With CH 48027) Fuel Pressure Relief (Without CH 48027).
2. Drain the fuel tank. Refer to Fuel Tank Draining.
3. Remove the fuel tank fill pipe.
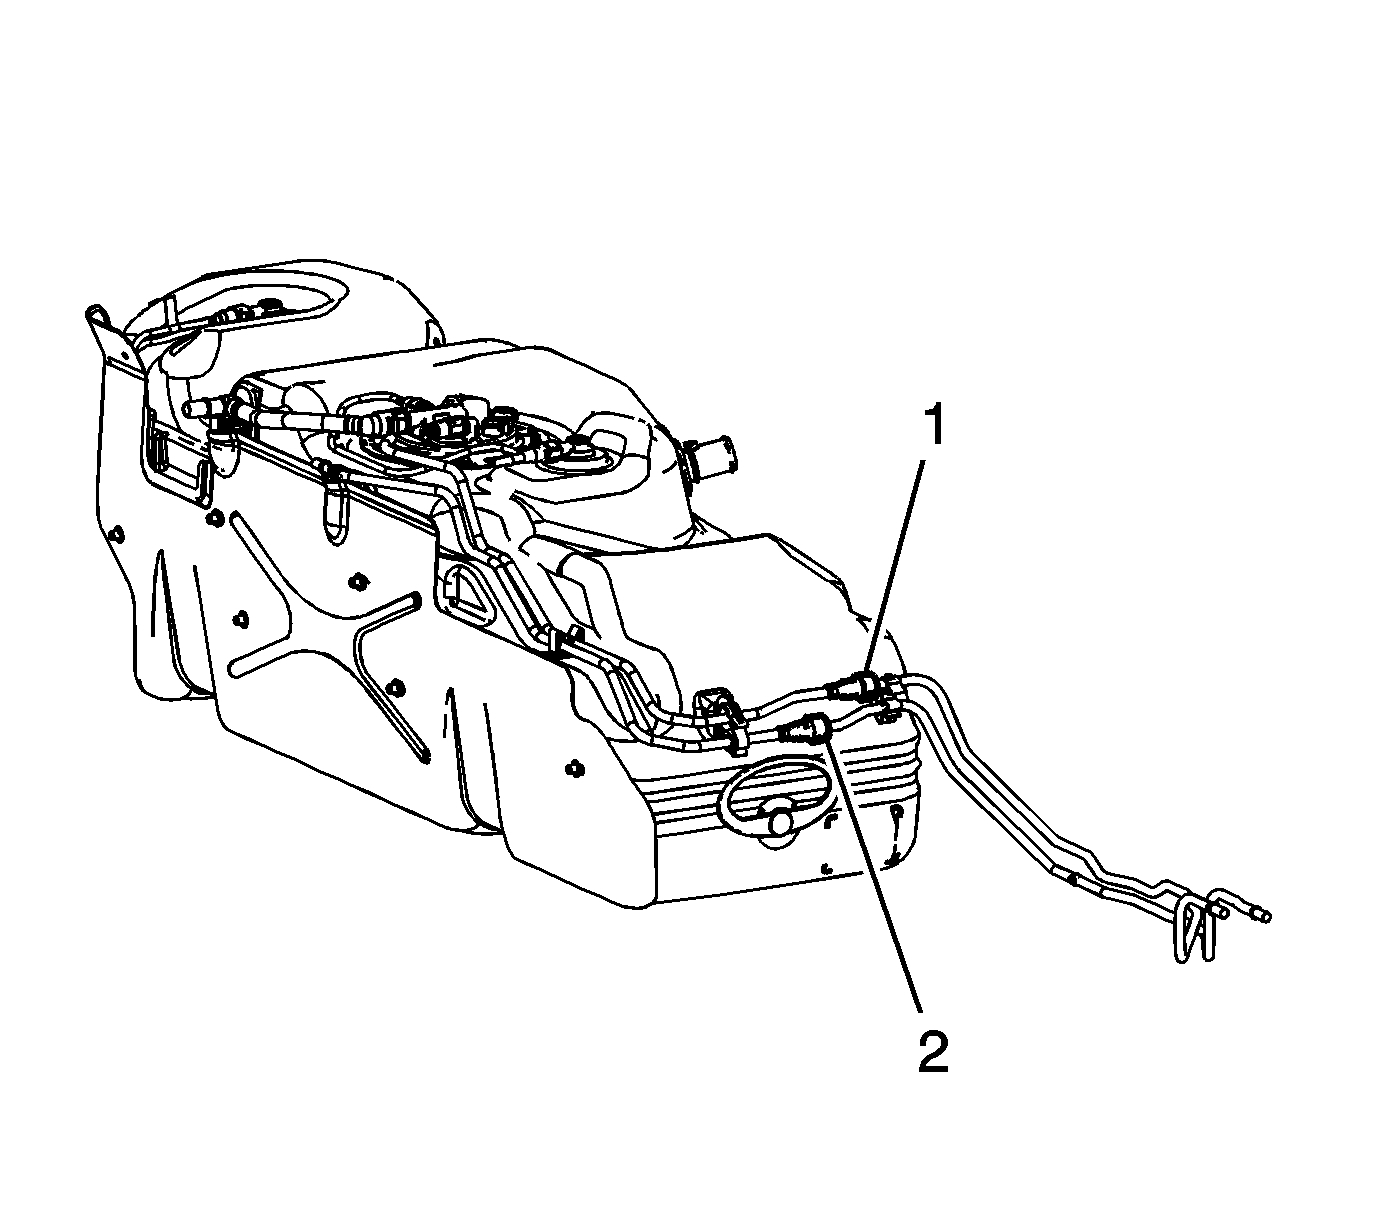
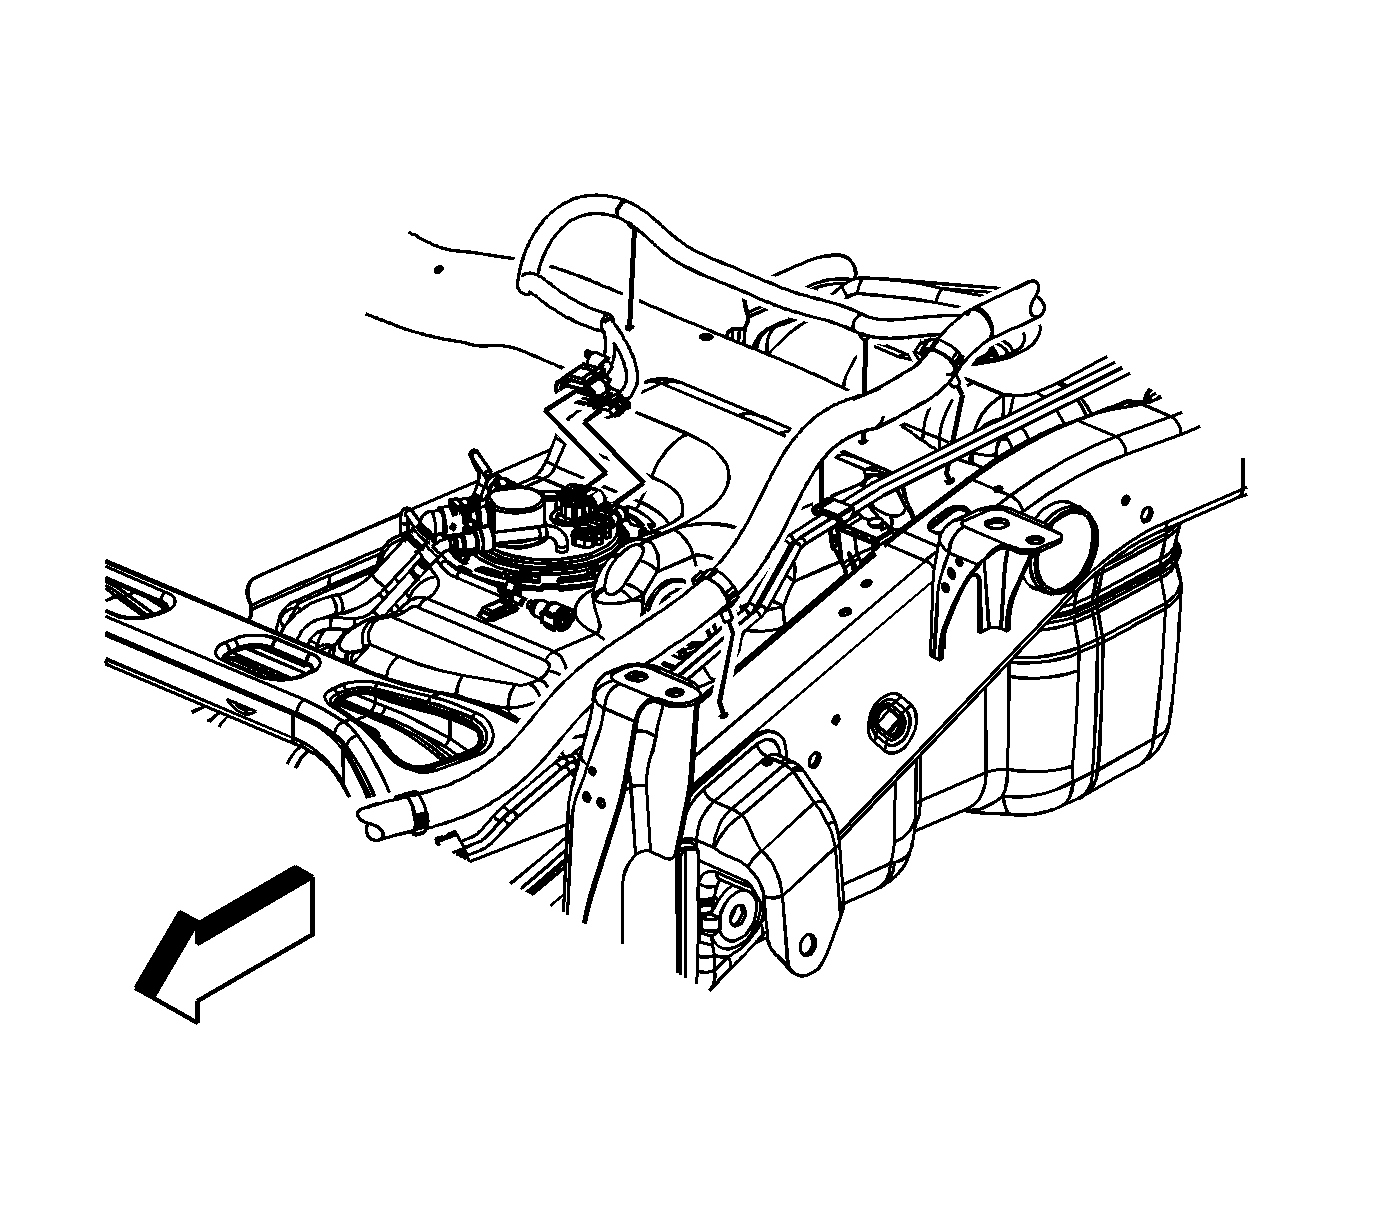
4. Disconnect the fuel tank fuel feed (1) and EVAP (2) line quick connect fittings from the chassis lines.
5. Cap the fuel and EVAP lines in order to prevent possible system contamination.
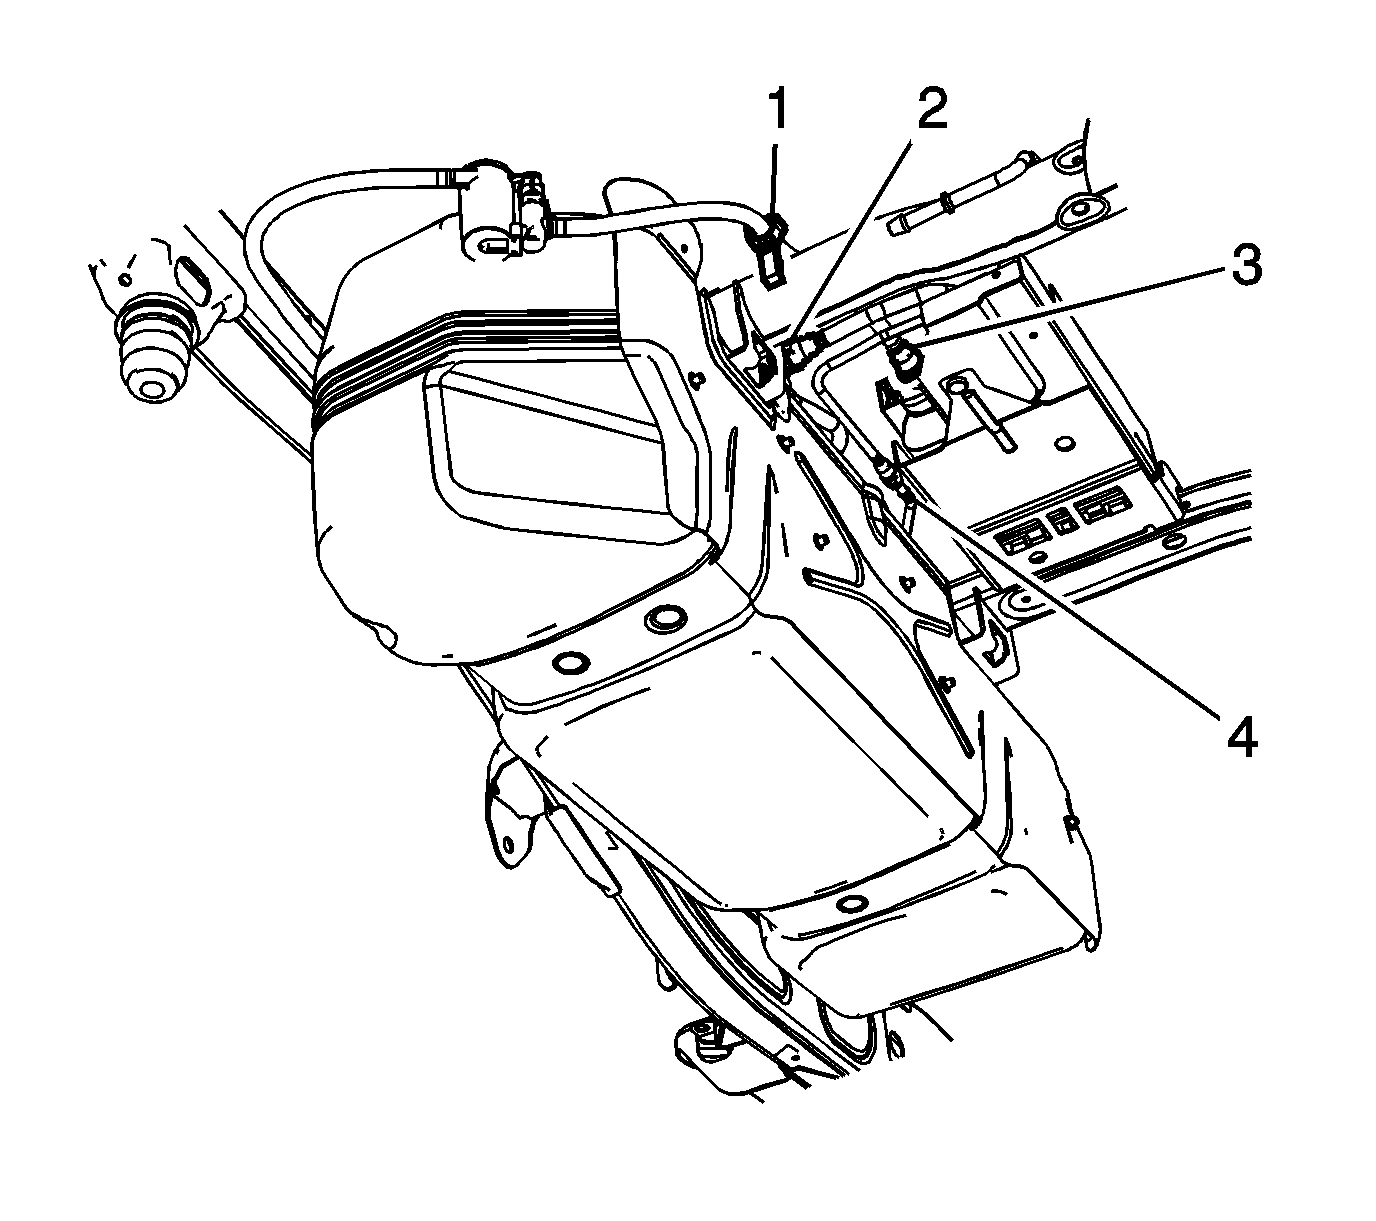
6. Remove the EVAP canister vent solenoid pipe clip (1) from the frame crossmember.
7. Disconnect the EVAP canister pipe quick connect fitting (2) from the fuel tank EVAP pipe.
8. Disconnect the EVAP canister vent solenoid pipe quick connect fitting (3) from the EVAP canister.
9. Disconnect the chassis wiring harness electrical connector from the EVAP canister vent solenoid.
10. Remove the chassis wiring harness clip from the fuel tank shield.
11. Insert a small flat bladed tool between the EVAP canister vent solenoid and the fuel tank bracket, disengaging the retainer (1).
12. Slide the EVAP canister vent solenoid off the bracket towards the passenger side of the vehicle.
13. Position and secure the EVAP canister vent solenoid out of the way.
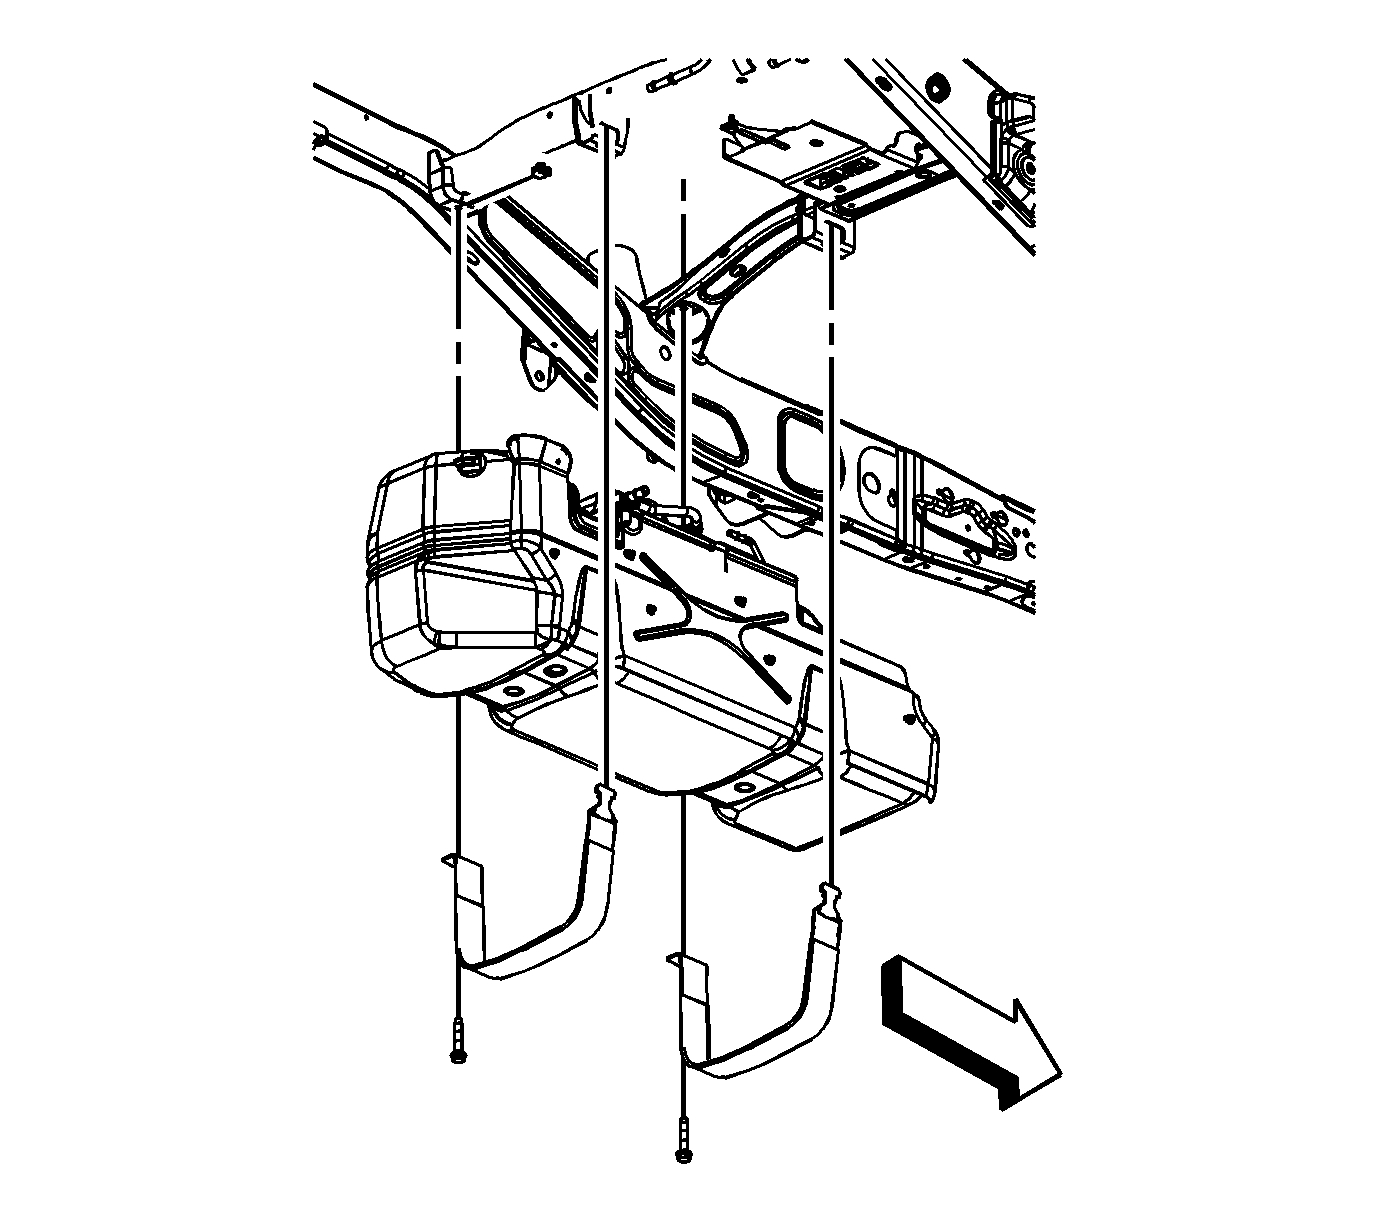
14. Place a suitable adjustable jack under the fuel tank.
15. Remove the fuel tank strap bolts.
16. Remove the fuel tank straps.
Important: When lowering the tank, ensure that the fill neck on the tank does not get hung up on the chassis wiring harness.
17. Lower the fuel tank half way.
18. Disconnect the chassis wiring harness clip at the frame crossmember.
19. Lower the fuel tank until the electrical connections are accessible.
20. Disconnect the chassis wiring harness electrical connector from the fuel tank pressure sensor.
21. Disconnect the chassis wiring harness electrical connector from the fuel tank module.
22. Completely lower the fuel tank.
23. With the aid of an assistant, place the fuel tank in a suitable work area.
24. If replacing the fuel tank proceed to the next step, otherwise proceed to step 10 in the installation procedure.
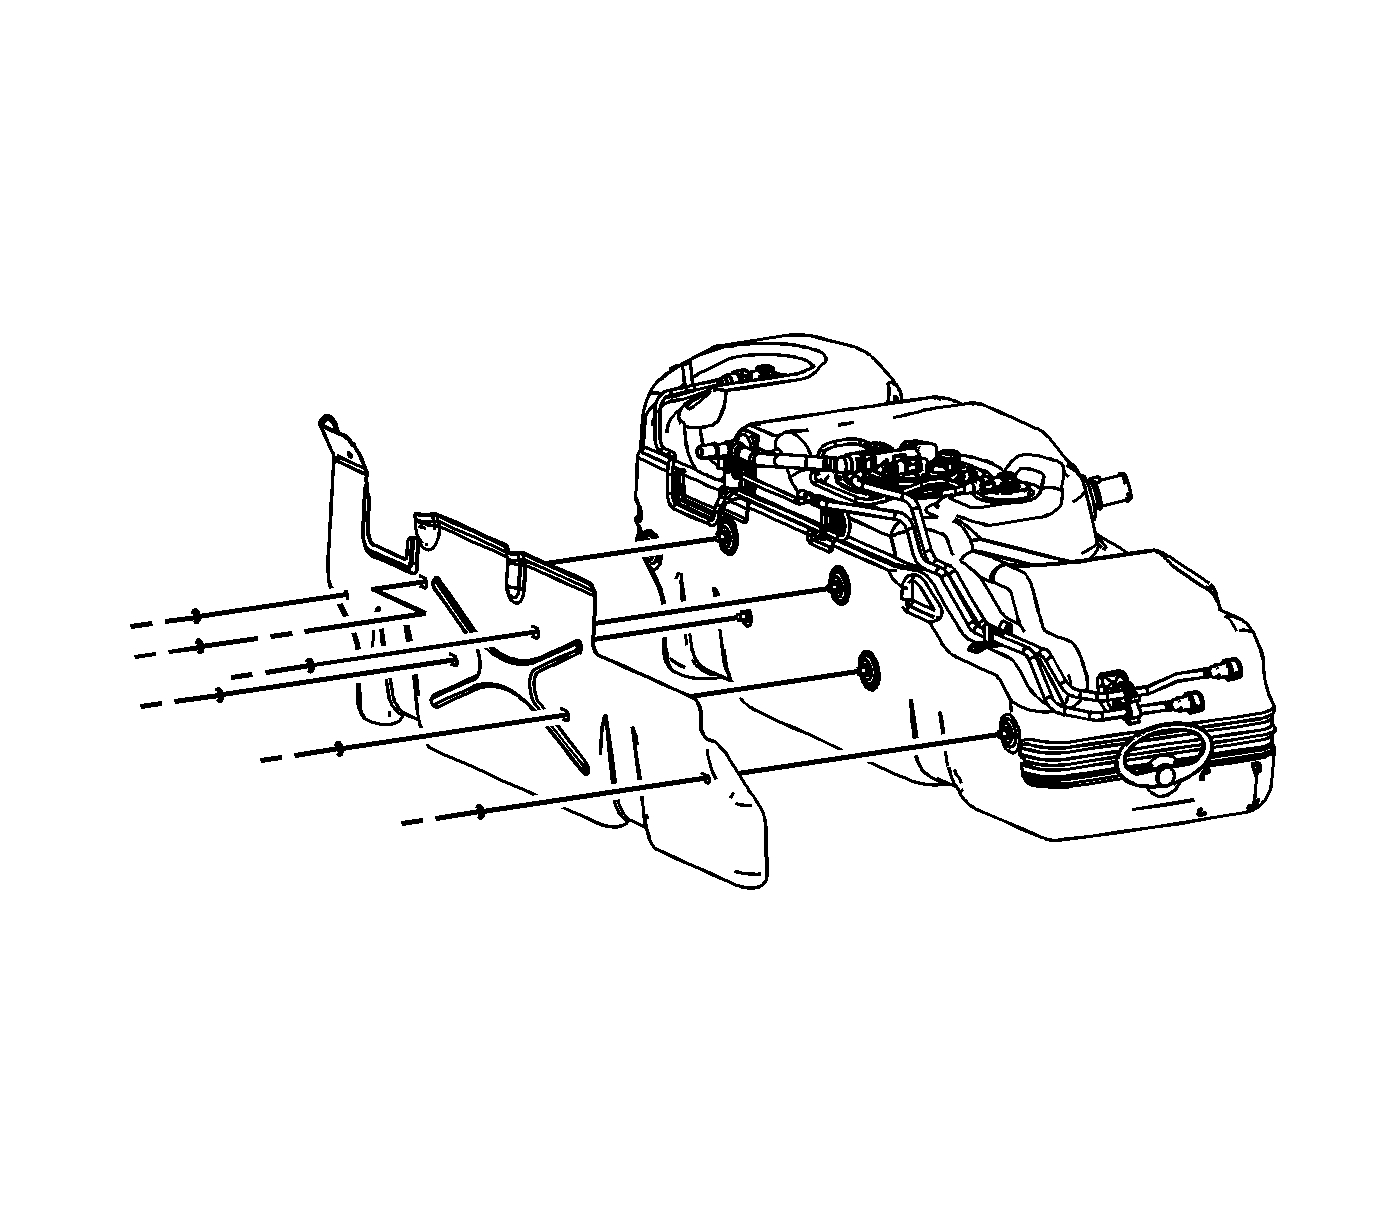
25. Remove the fuel tank shield push on retainers.
26. Remove the fuel tank shield.
27. Disconnect the fuel feed pipe quick connect fitting from the fuel tank module.
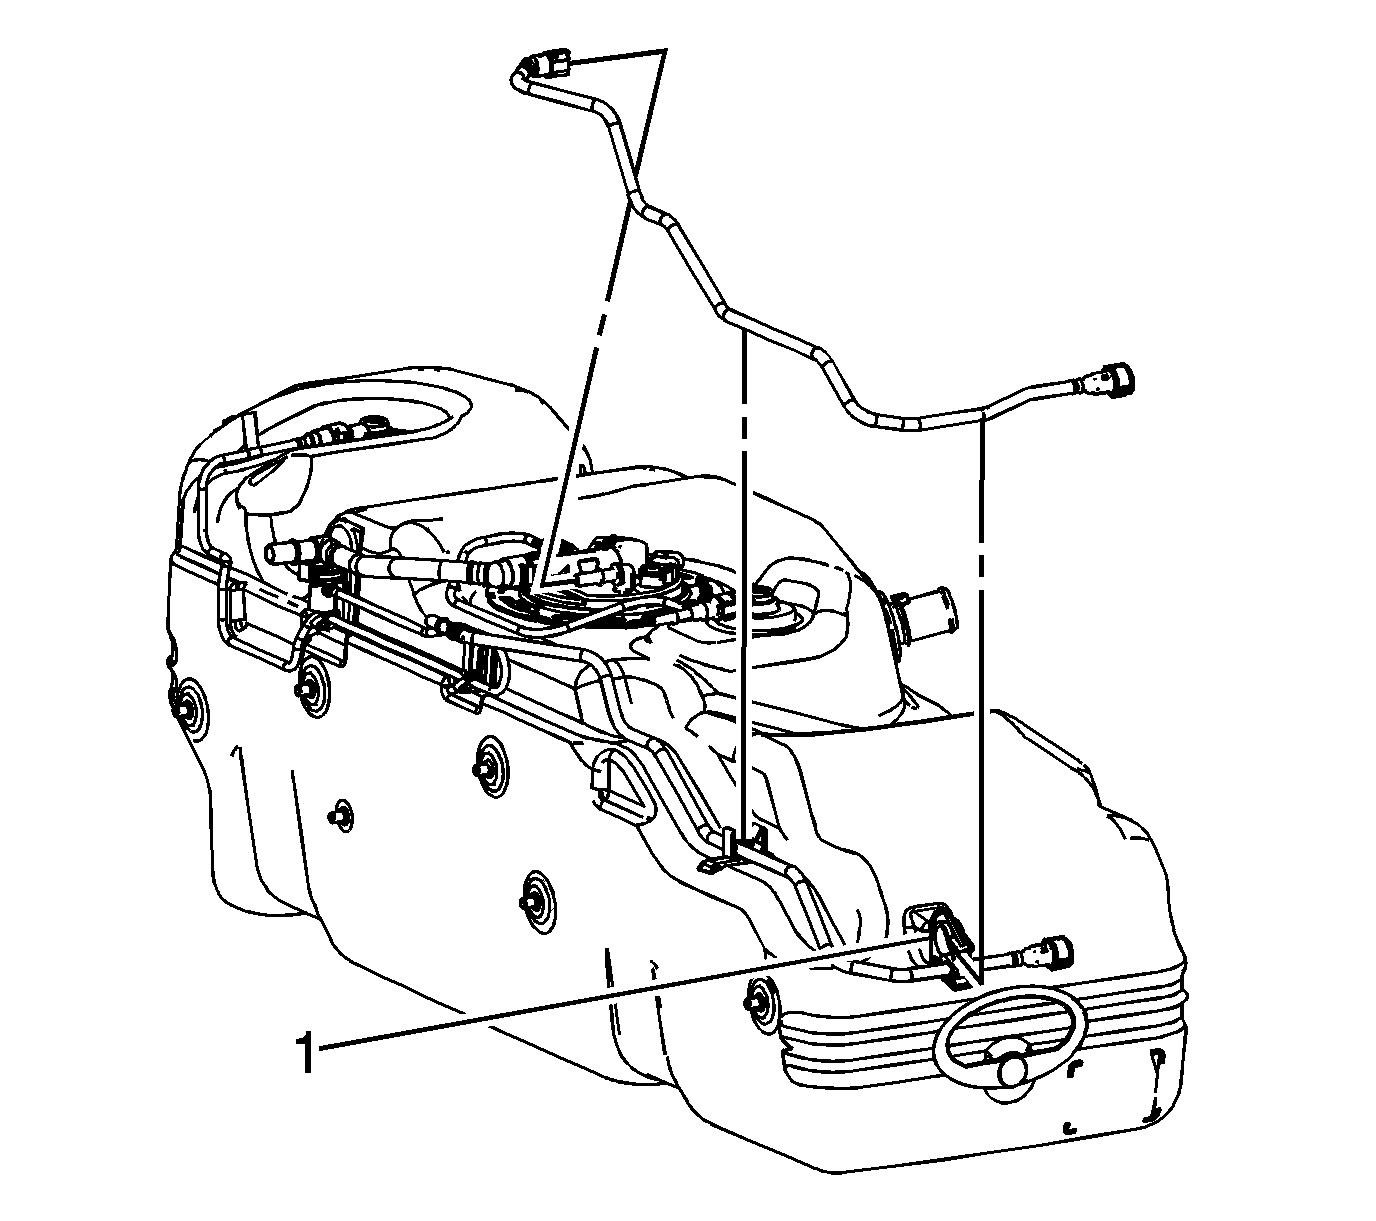
28. Remove the fuel feed pipe from the fuel tank clip (1).
29. Remove the EVAP canister purge pipe from the fuel tank clip (1).
30. Disconnect the EVAP rear pipe quick connect fittings from the rollover valve and the fuel tank module.
31. Remove the EVAP rear pipe from the fuel tank clips (1 and 2).
32. Disconnect the small EVAP rear pipe quick connect fittings from the rollover valve and the fuel tank module..
33. Remove the fuel tank module.
Installation Procedure
1. Install the fuel tank module.
2. Position and connect the small EVAP rear pipe quick connect fittings to the rollover valve and the fuel tank module. Refer to Plastic Collar Quick Connect Fitting Service.
3. Position and connect the EVAP rear pipe quick connect fittings to the rollover valve and the fuel tank module. Refer to Plastic Collar Quick Connect Fitting Service.
4. Install the EVAP rear pipe to the fuel tank clips (1 and 2).
5. Install the EVAP canister purge pipe to the fuel tank clip (1).
6. Position and connect the fuel feed pipe quick connect fitting to the fuel tank module. Refer to Plastic Collar Quick Connect Fitting Service.
7. Install the fuel feed pipe to the fuel tank clip (1).
8. Position and install the fuel tank shield.
9. Install the fuel tank shield push on retainers.
10. With the aid of an assistant, place the fuel tank in a the adjustable jack.
11. Raise the fuel tank until the electrical connections can be made.
12. Connect the chassis wiring harness electrical connector to the fuel tank module.
13. Connect the chassis wiring harness electrical connector from the fuel pressure sensor.
14. Completely raise the fuel tank into position.
15. Install the fuel tank straps.
Notice: Refer to Fastener Notice.
16. Install the fuel tank strap bolts.
Tighten the bolts to 40 N.m (30 lb ft).
17. Remove the adjustable jack from under the fuel tank.
18. Unsecure and position the EVAP canister vent solenoid to the fuel tank.
19. Slide the EVAP canister vent solenoid onto the bracket towards the driver side of the vehicle.
20. Ensure that the EVAP canister vent solenoid engages the fuel tank bracket retainer (1).
21. Connect the EVAP canister vent solenoid pipe quick connect fitting (3) to the EVAP canister.
22. Connect the EVAP canister pipe quick connect fitting (2) to the fuel tank EVAP pipe.
23. Install the EVAP canister vent solenoid pipe clip (1) to the frame crossmember.
24. Connect the chassis wiring harness electrical connector to the EVAP canister vent solenoid.
25. Install the chassis wiring harness clip to the fuel tank shield.
26. Remove the caps from the fuel and EVAP lines.
27. Connect the fuel tank fuel feed (1) and EVAP (2) line quick connect fittings to the chassis lines.
28. Install the fuel tank fill pipe.
29. Refill the fuel tank.
30. Install the fuel cap.
31. Connect the negative battery cable.
32. Perform the following procedure in order to inspect for leaks:
1. Turn the ignition ON, with the engine OFF, for 2 seconds.
2. Turn the ignition OFF for 10 seconds.
3. Turn the ignition ON, with the engine OFF.
4. Inspect for fuel leaks.
____________________________________________
Let me know if you have questions or need help.
Take care,
Joe
Images (Click to make bigger)
Monday, January 25th, 2021 AT 10:08 AM