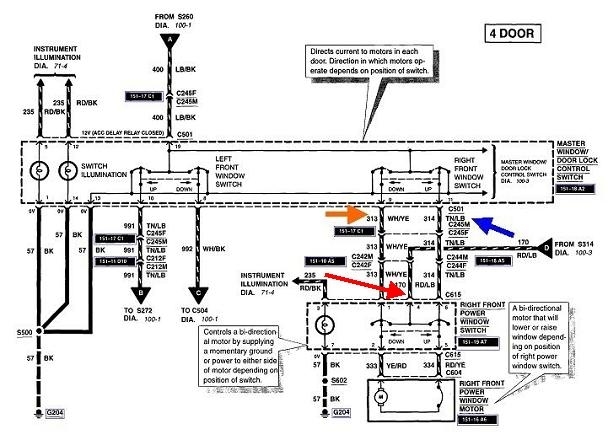
When all switches are released, all the "traveler" wires between the switches should have 0 volts and they should read continuity to ground. Basically, both motor wires are grounded through both switches, then, when you want to activate a direction, that one switch contact moves away from its ground connection, then gets 12 volts applied to it as the switch continues to move. That's how they change the polarity from either switch to change the direction the motor runs.
So, the white / yellow and the tan / light blue will have 0 volts with both switches released, as you found. The red / light blue is a different story. That is the 12-volt feed only for when the passenger switch is pressed. It is not used when the driver's switch is pressed. This is why I suspect you have two problems, since the window doesn't work from either switch.
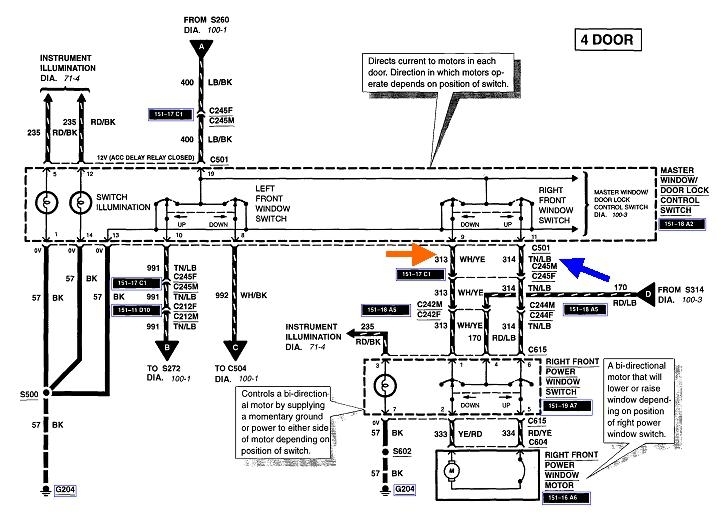
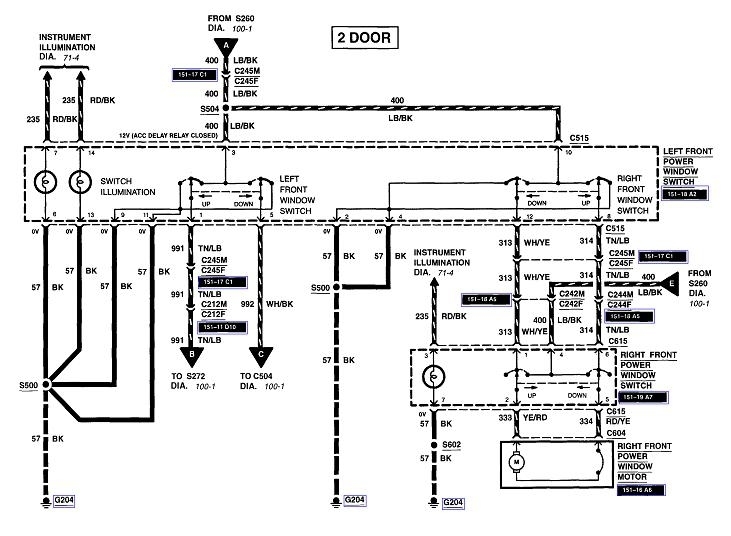
If you look at diagram number three, the first one below, everything following my red line has to be good because the rear windows work. That includes the master lock-out switch in the driver's door switch assembly, up to the splice # S314. That leads to point "D", and that is where you're missing the 12 volts at the passenger's switch. That's the lower red arrow in diagram number two, the second one below. You have 12 volts at the splice but not at the next test point, the switch. The only thing of importance between those two points is that wire runs between both front door hinges. The flexing from opening the doors repeatedly is what causes those wires to fray and break.
Splice S314 is inside the "A"-pillar, so that red / light blue has to be broken between the right front door hinges. At least one of the other two wires has to be broken between the hinges for either front door.
When you find a broken wire, it is not acceptable to solder it or use butt connectors. It has been flexing and it's going to break again very soon. Butt connectors don't seal out moisture. I did a lot of these repairs on minivans, and those could have up to 22 wires depending if it had power mirrors, courtesy lights and speakers in the doors, power locks, and power windows. In some models you may also find two or three pairs of wires of the same color. Repair one of those at a time so you don't mix them up. If you switch two of the same color, you will trip an auto-resetting thermal circuit breaker if both you and your passenger push a switch in different directions at the same time, but the circuit will resume working properly after the circuit breaker resets in about 15 seconds.
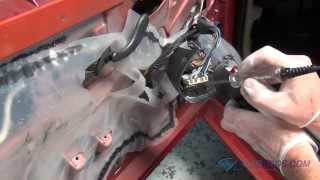
The first step is to pull as much of the harness as possible out of the "A"-pillar. You want to cut each wire in a spot that hasn't been flexing. Do the same on the front of the door. While it takes more time, you'll do a higher-quality repair if you take the door panel off, unplug everything, then pull the harness out of the door at least a few inches so you can find good spots on that end too.
Cut the first wire in the two good spots, then measure its length. For the vans I did, that was 11 inches. Cut a piece of wire the same gauge, 22" long, slide on two pieces of heat-shrink tubing with hot-melt glue inside, then splice that wire at both ends. I strip off only about 1/2" of insulation, slide the strands into each other, press down any sharp ends sticking up, then solder them. Once soldered, check once more for any sharp points and press them down with a needle-nose pliers. Seal the splices with the heat-shrink tubing. All auto parts stores have the moisture-proof heat-shrink tubing. If you can't find it there, the dealer's parts department has it too, but they charge a lot more for it.
Do the same for every other wire, but only cut one wire out at a time so you don't become confused. To do a professional repair, wrap all the wires with the plastic wrap you can get at auto parts stores. It looks exactly like electrical tape, but it's not sticky. Never use electrical tape in a car as it will unravel into a gooey mess on a hot day. On some cars the wires simply run through a rubber accordion boot. That is sufficient, but I still like to bundle them with the plastic wrap. Don't wrap the wires too tightly. They need to slide back and forth as the door is opened and closed. If they aren't free to do that, each wire gets more stress as the harness flexes, and you'll have the same problem next time, sooner.
Once the wires are bundled, push half of the harness into the "A"-pillar where it won't get caught on the parking brake pedal or anything else. The other half is what will be between the door hinges like before. The reason for making this twice as long is when this happens next time, you'll be half done as soon as you pull that extra 11" out of the "A"-pillar.
Some vehicles, like Jeeps, use a harness between the door hinges that has a connector at each end that bolts to the door and the "A"-pillar. You can just unbolt those, unplug them, then work on the wires at a workbench. Make those wires the same length as the originals, not twice as long because there is no way to stuff the extra into the "A"-pillar or door. Those connectors will have some type of locking wedge that must be pried out to allow you to lift the retention fingers that hold the terminals in. You can buy replacement terminals from the dealer if necessary, but that is a last resort if you really destroy one. You can also find a harness at a salvage yard, then pull out as many terminals as you need. You'll never get the crimps open, so I cut the wire leaving about 1/4" on the terminal, then I cut that insulation off. Solder the new wire to that terminal and wire. There's no need to seal them with anything because they sit in the connector bodies exposed anyway. The solder joint will be sufficient to prevent the splice from breaking. Normally solder is only for a good electrical connection after you have a good mechanical connection. In this case, however, there is very little stress in the areas of the splices.
Images (Click to make bigger)
Thursday, July 18th, 2019 AT 8:08 PM