Good afternoon,
This could be either a heater core or a blend door actuator. Make sure the cable is moving the blend door when you change from heat and cold and back.
I would remove the hoses from the firewall and use a garden hose to flush the core. Flush it back and forth several times until you get a clean even flow.
https://www.2carpros.com/articles/replace-heater-core
https://www.2carpros.com/articles/car-heater-not-working
https://www.2carpros.com/articles/replace-heater-hoses
If this does not work, the heater core may have to be replaced.
Roy
Warning: on vehicles equipped with airbags, failure to take the proper precautions could result in accidental airbag deployment and possible personal injury.
REMOVAL
1. Remove the heater-A/C housing from the vehicle, and remove the housing cover. Refer to: "Housing Assembly HVAC : Service and Repair" See: Housing Assembly HVAC > Service and Repair
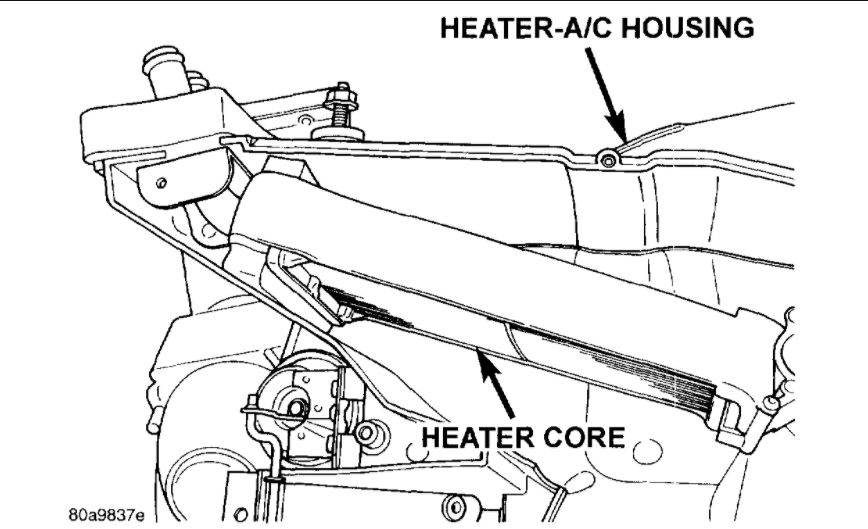
Heater Core Remove/Install
imageOpen In New TabZoom/Print
2. Lift the heater core out of the heater-A/C housing.
INSTALLATION
1. Insert the heater core into the bottom of the heater-A/C housing.
2. Reassemble and reinstall the heater-A/C housing in the vehicle.
The heater-A/C housing assembly must be removed from the vehicle and disassembled for service access of the blower motor, blower motor wheel, heater core, evaporator coil, blend-air door, and each of the various mode control doors.
Warning: on vehicles equipped with airbags, failure to take the proper precautions could result in accidental airbag deployment and possible personal injury.
REMOVAL
1. Disconnect and isolate the battery negative cable.
2. Remove the instrument panel from the vehicle. Refer to: "Body and Frame : Interior Moulding/Trim : Dashboard/Instrument Panel : Service and Repair" See: Dashboard / Instrument Panel > Procedures
3. If the vehicle is not equipped with air conditioning, go to Step 6. If the vehicle is equipped with air conditioning, recover the refrigerant from the refrigerant system. Refer to: "Heating and Air Conditioning : Service and Repair" See: Heating and Air Conditioning > Service and Repair
4. Disconnect the liquid line refrigerant line fitting from the evaporator inlet tube.
5. Disconnect the accumulator inlet tube refrigerant line fitting from the evaporator outlet tube. Install plugs in, or tape over all of the opened refrigerant line fittings.
6. Drain the engine cooling system. Refer to: "Engine, Cooling and Exhaust : Cooling System : Service and Repair" See: Cooling System > Service and Repair
7. Disconnect the heater hoses from the heater core tubes. Install plugs in, or tape over the opened heater core tubes.
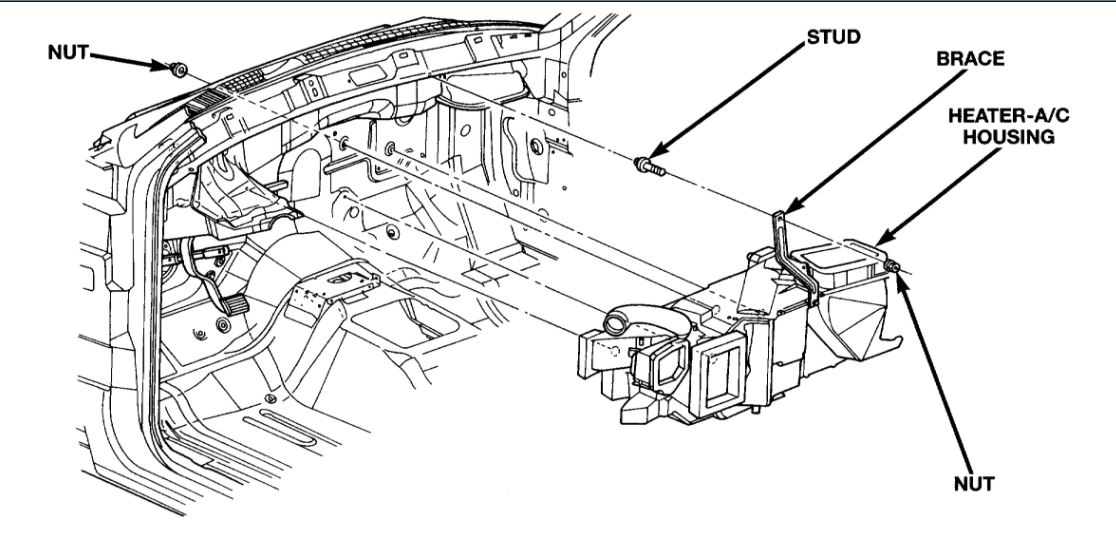
Heater - A/C Housing Remove/Install
imageOpen In New TabZoom/Print
8. Remove the four nuts from the heater-A/C housing mounting studs on the engine compartment side of the dash panel.
9. Remove the nut that secures the heater-A/C housing mounting brace to the stud on the passenger compartment side of the dash panel.
10. Pull the heater-A/C housing rearward far enough for the mounting studs and the evaporator condensate drain tube to clear the dash panel holes.
11. Remove the heater-A/C housing from the vehicle.
REMOVAL
1. Disconnect and isolate the battery negative cable.
2. Roll down the instrument panel assembly, but do not remove it from the vehicle. Refer to: "Instrument Panel, Gauges and Wiring Indicators : Instrument Panel : Service and Repair" See: Instrument Cluster / Carrier > Service and Repair
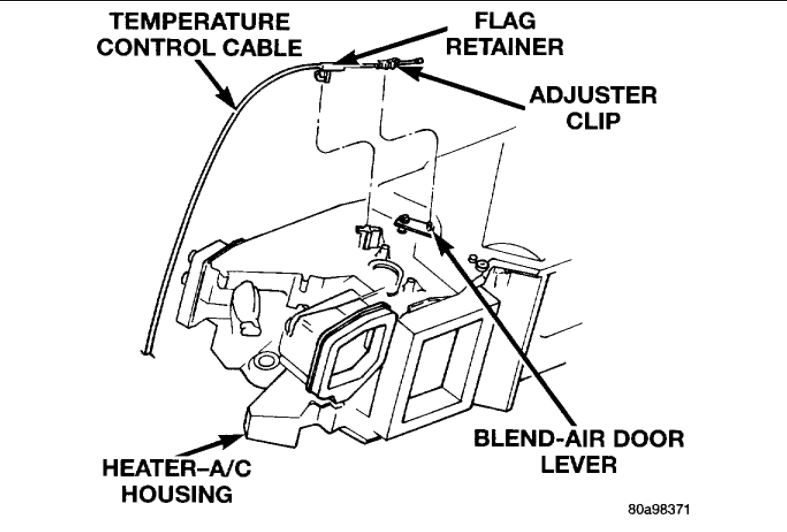
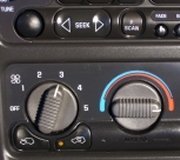
3. Disconnect the temperature control cable from the heater-A/C control.
Temperature Control Cable Remove/Install
imageOpen In New TabZoom/Print
4. Disconnect the temperature control cable housing flag retainer from the receptacle on the top of the heater-A/C housing.
5. Pull the temperature control cable core self-adjuster clip off of the pin on the end of the blend-air door lever.
6. Remove the temperature control cable from the vehicle.
INSTALLATION
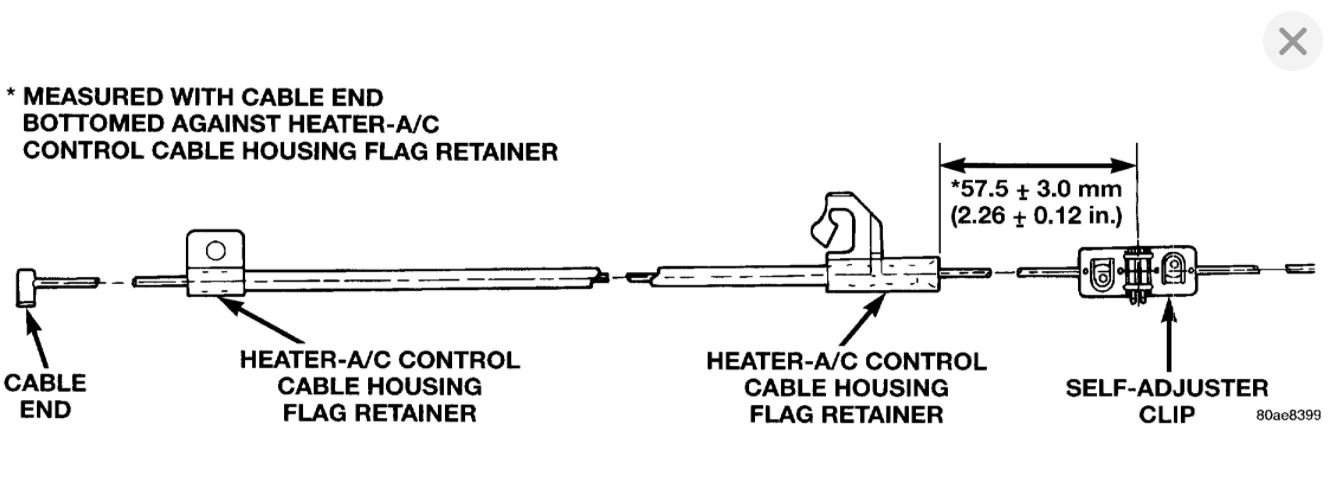
Temperature Control Cable Self-Adjuster Clip
imageOpen In New TabZoom/Print
Before installing the temperature control cable, be certain that the self-adjuster clip is properly positioned. This measurement must be made with the cable end bottomed against the flag retainer on the heater-A/C control end of the cable housing. The measurement is taken from the end of the flag retainer on the heater-A/C housing end of the cable to the center of the self-adjuster clip. If the self-adjuster clip is not properly positioned, slide the clip up or down the cable core as required to achieve the specified dimension.
1. Push the temperature control cable core self-adjuster clip onto the pin on the end of the blend-air door lever.
2. Snap the temperature control cable housing flag retainer into the receiver on the top of the heater-A/C housing.
3. Reinstall the instrument panel assembly. Refer to: "Instrument Panel, Gauges and Wiring Indicators : Instrument Panel : Service and Repair" See: Instrument Cluster / Carrier > Service and Repair
4. Connect the temperature control cable to the heater-A/C control.
5. Connect the battery negative cable.
6. Adjust the temperature control cable.
Images (Click to make bigger)
Thursday, January 28th, 2021 AT 11:34 AM