WWelcome back:
Mike, I hate to say it, but we have to do some testing to identify where the problem is coming from. The directions I will provide may seem extensive, but since we have to locate the issue and it could be caused my different things, I have to provide everything to you.
The one thing I am still concerned about is the coolant. Years ago, a company did a test. They found that 80% of people returned to shops to have work done after being told it should be considered (not that is was a necessity, but should be considered). Honestly, most times it didn't need done. However, saying the coolant is contaminated could mean anything. They may have seen a bit of dirt in it. Should it be done? Sure, but is it the cause of the misfire? No. Often times shops do that hoping they will make easy money. Now, if they told you the engine's oil is getting into the coolant, that is different, but to just say it's contaminated is really meaningless. I hope you understand what I mean and this doesn't make me sound like a jerk.
The only thing we can do is this. Since we know cylinder 1 has a misfire, the plugs are new, and you eliminated the oil leak, we have to look at three things. First, is the distributor cap in good condition, free of corrosion or cracks? Next, did you replace the number 1 spark plug wire? If all of those things are good, next we need to check for a fuel injector pulse and if there is one, we need to check engine compression. For an engine to run, it has to have those things.
So, first reconfirm there is a good hot blue snapping spark to the plug.
https://www.2carpros.com/articles/how-to-test-an-ignition-system
Okay, if you do have a good spark, then I need you to check for an fuel pressure and for an injector pulse. Basically, you are checking to make sure the fuel injector for that cylinder is getting power. Here are links showing how that is done:
https://www.2carpros.com/articles/how-to-check-fuel-system-pressure-and-regulator
https://www.2carpros.com/articles/how-to-test-a-fuel-injector
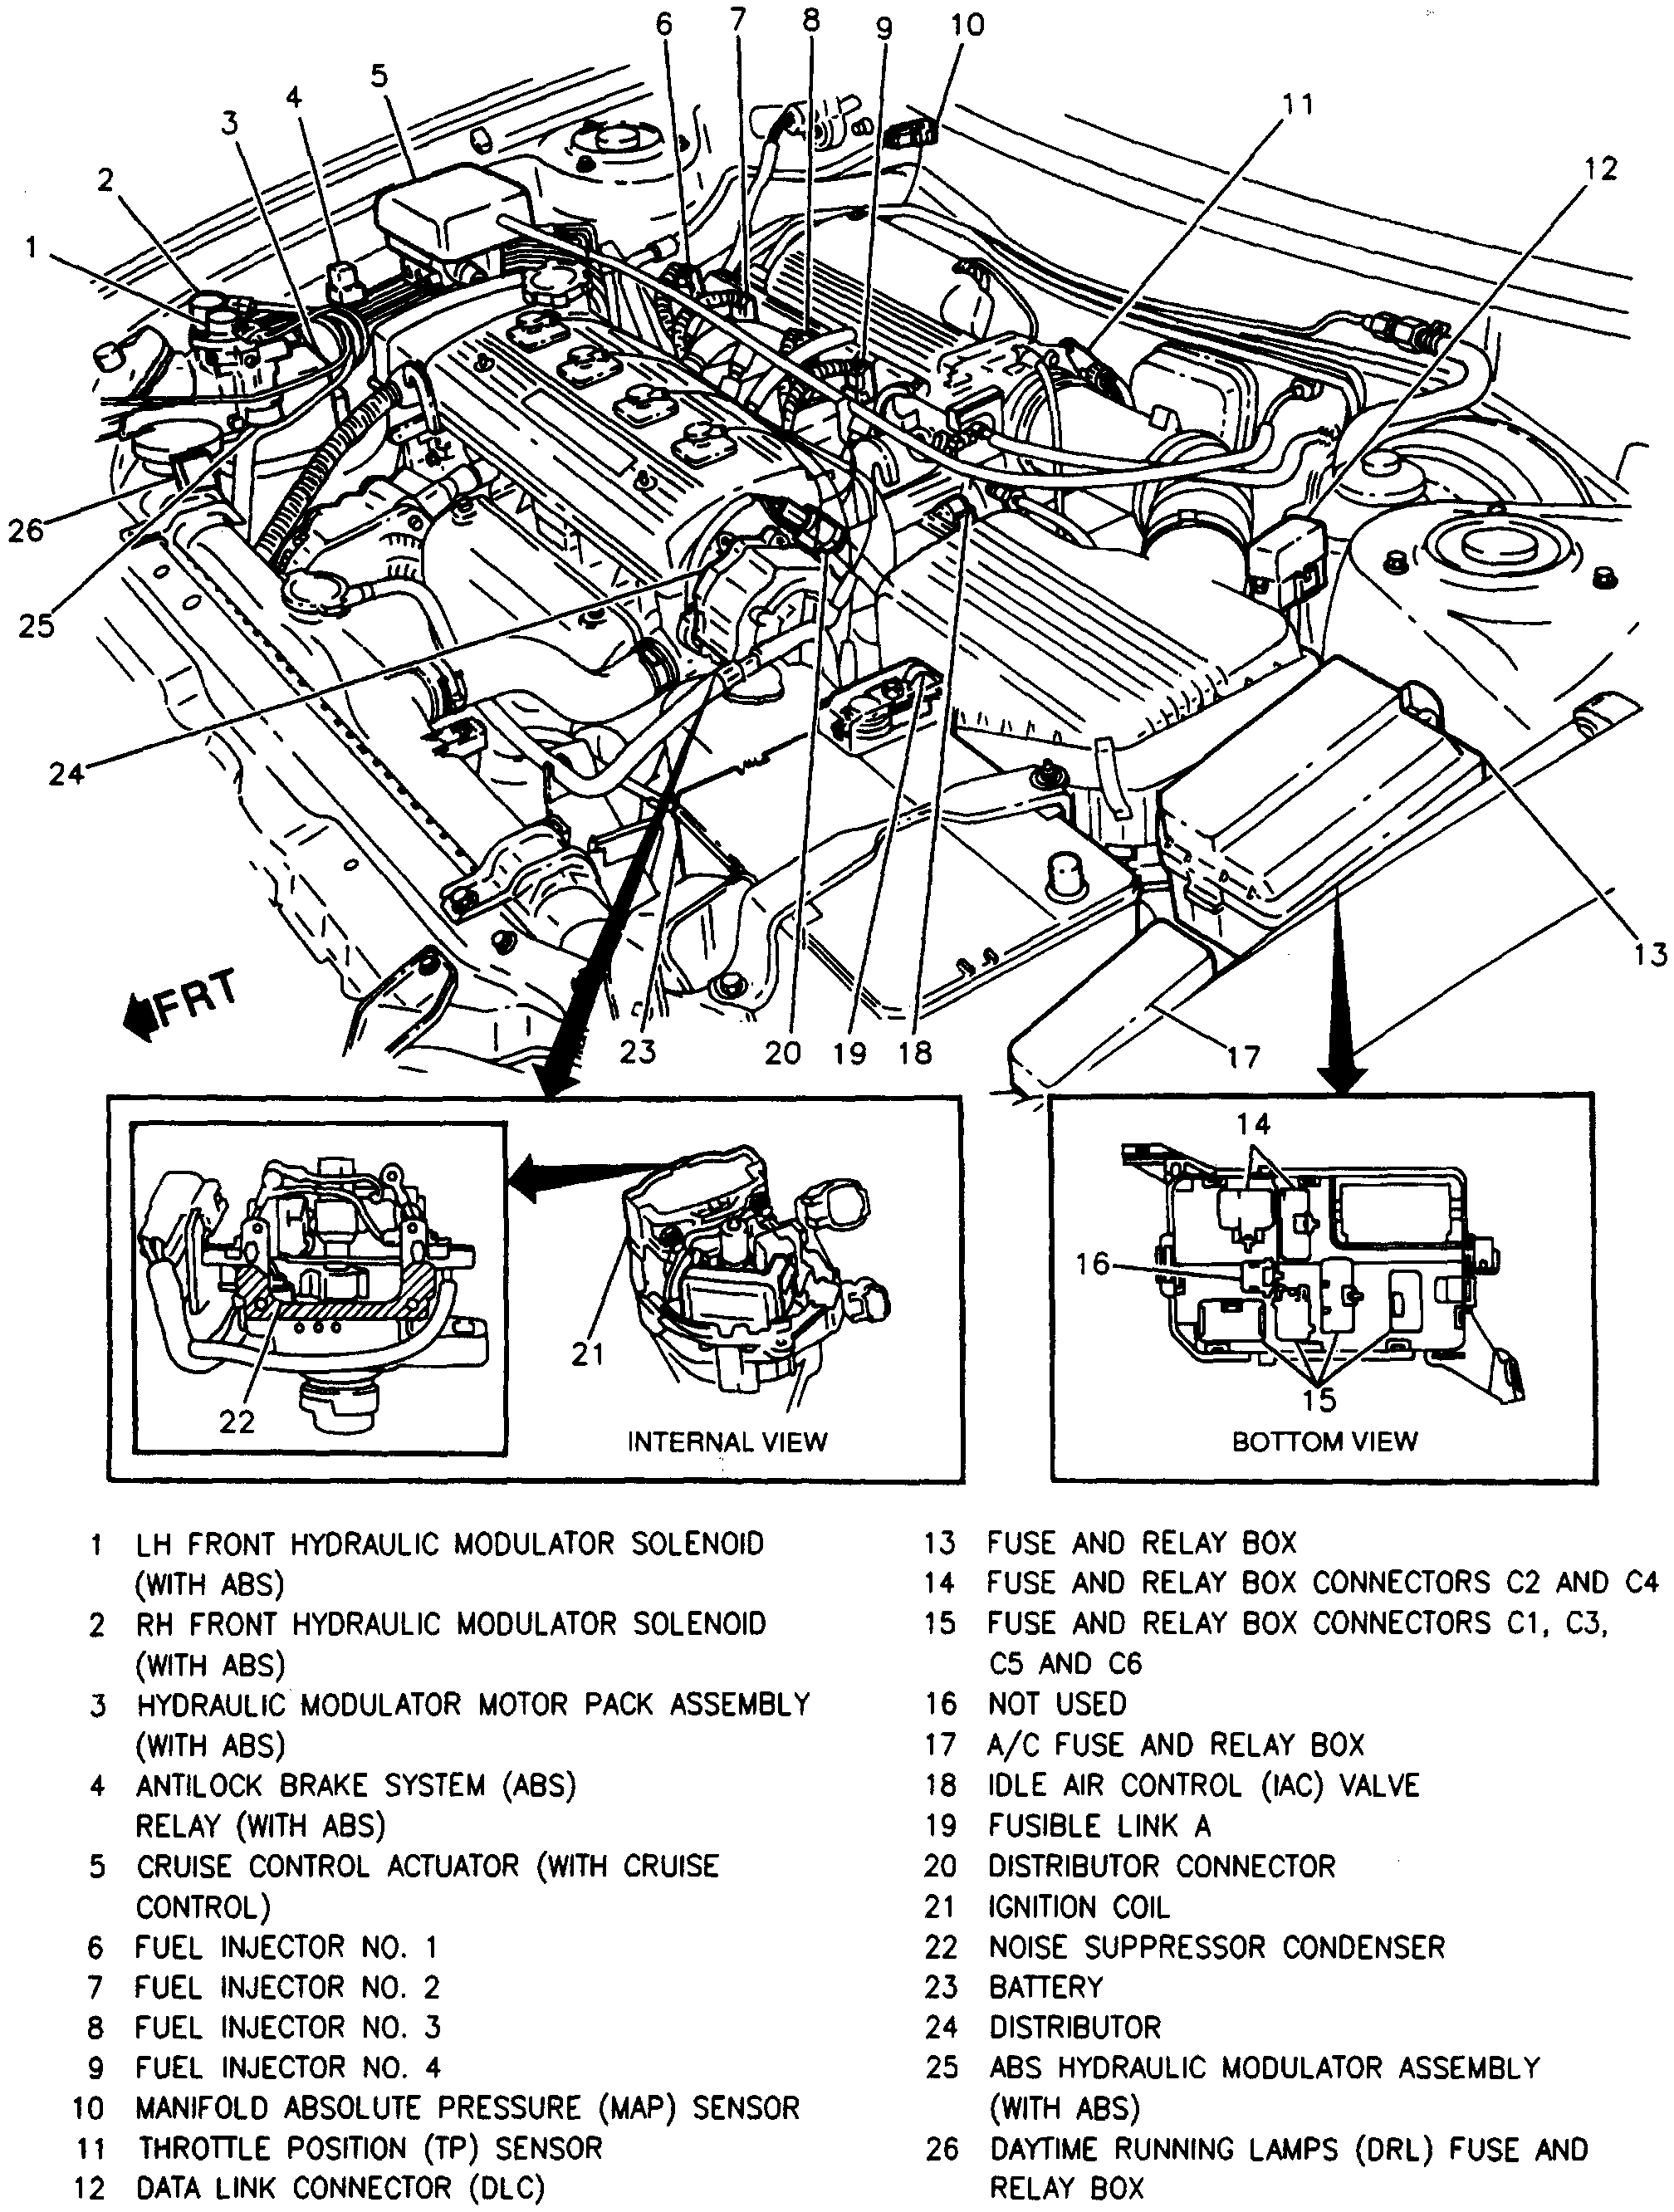
Make sure to follow the directions for the fuel injector test. I attached a picture of the engine to help you locate components. (picture 1) Number 6 in the picture is injector 1.
Now, if the fuel injector is working and you have a good spark, we need to check how much compression that cylinder is producing. If it is low, it will cause a misfire.
https://www.2carpros.com/articles/how-to-test-engine-compression
________________________
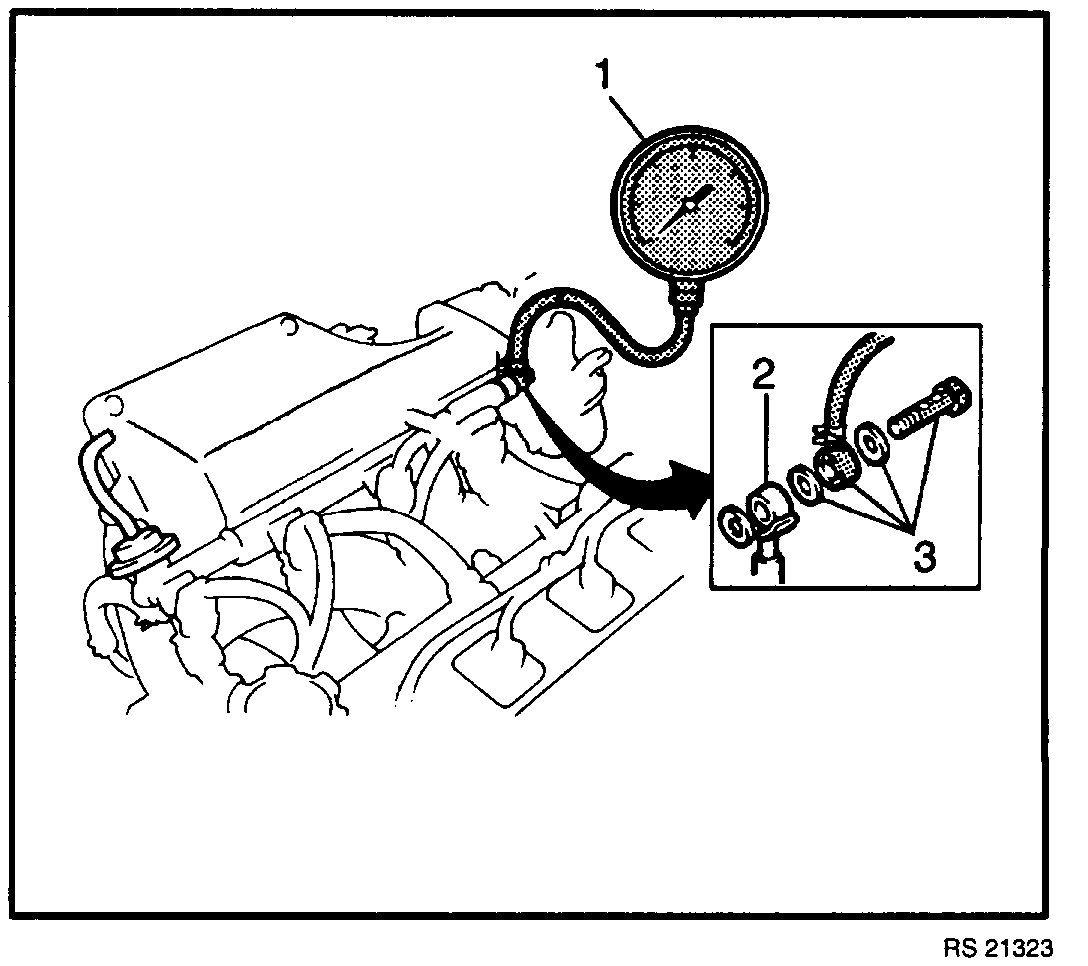
The links I attached are for general information and directions. Here are the specific directions for testing fuel pressure on your vehicle. Picture 2 correlates with these directions.
FUEL SYSTEM PRESSURE TEST
Pic 2
TOOLS REQUIRED:
^ J 34730-1 A Fuel Pressure Gauge
^ J 39802-A Fuel Pressure Gauge Adapter
A fuel system pressure test determines if the fuel delivery system is functioning correctly from a fluid (gasoline) perspective. To perform this test, follow the procedure below.
1. Relieve the fuel system pressure. Refer to Fuel System Pressure Release Procedure.
2. Remove one bolt.
3. Remove fuel feed hose bracket from bottom of intake manifold.
4. Remove one bolt.
5. Remove the fuel feed hose from the fuel rail.
6. Install the J 39802-A with the gaskets and the fuel feed hose to the fuel rail.
TIGHTEN
^ J 39802 bolt to 29 Nm (22 lb. ft.).
7. Connect the J 34730-1A to the J 39802-A.
8. Connect the negative battery cable.
TIGHTEN
^ Negative battery cable-to-negative (-) battery cable terminal retainer to 15 Nm (11 lb. ft.).
9. Using a fused jumper, jumper terminals Fp to +B on the under hood DLC.
10. Turn the ignition switch to the ON position and allow fuel pressure to build.
MEASURE
^ The fuel pressure should be 265-304 kPa (38-44 psi). If pressure is higher than the specifications, check for a plugged fuel return pipe/hose. If pipe/hose are OK, replace the fuel pressure regulator. If pressure is lower than the specifications, check for leaks at hose-to-pipe connections, a leaking fuel pump or fuel pressure regulator. Repair/replace as necessary.
11. Start the engine.
12. Remove the fuel pressure regulator vacuum hose.
13. Plug the fuel pressure regulator vacuum hose.
MEASURE
^ Fuel pressure should be 265-304 kPa (38-44 psi) at idle.
14. Reconnect the vacuum hose to the pressure regulator.
15. Monitor the fuel pressure at idle.
16. The fuel pressure should drop to 206-255 kPa (31-37 psi).
NOTE: If pressure is not within specifications for the above mentioned tests, repair/replace the vacuum hose or fuel pressure regulator as necessary.
17. Turn the ignition switch to the off position.
MEASURE
^ Fuel pressure. Should remain above 147 kPa (21 psi) for at least five minutes after the engine was stopped. If pressure is below the specification, check for a leaking fuel pump, pressure regulator and/or fuel injectors.
18. Relieve the fuel system pressure. Refer to Fuel System Pressure Release Procedure.
19. Remove one bolt and the J 39802-A and the J 34730-1A from the fuel rail.
20. Using two new gaskets, reconnect fuel feed hose to fuel rail.
21. Secure fuel feed hose with one bolt.
TIGHTEN
^ Fuel feed hose bolt to 29 Nm (22 lb. ft.).
22. Reconnect the fuel feed hose bracket to intake manifold.
23. Secure fuel feed bracket with one bolt.
TIGHTEN
^ Fuel feed hose bracket bolt to 9.3 Nm (82 lb. in.).
25. Connect the negative battery cable.
TIGHTEN
^ Negative (-) battery cable-to-negative (-) battery cable terminal retainer to 15 Nm (11 lb. ft.).
26. Turn the ignition switch to the ON position and momentarily connect a jumper between DLC terminals +B and Fp to pressurize the fuel system. Check for any fuel leaks.
____________________________________________
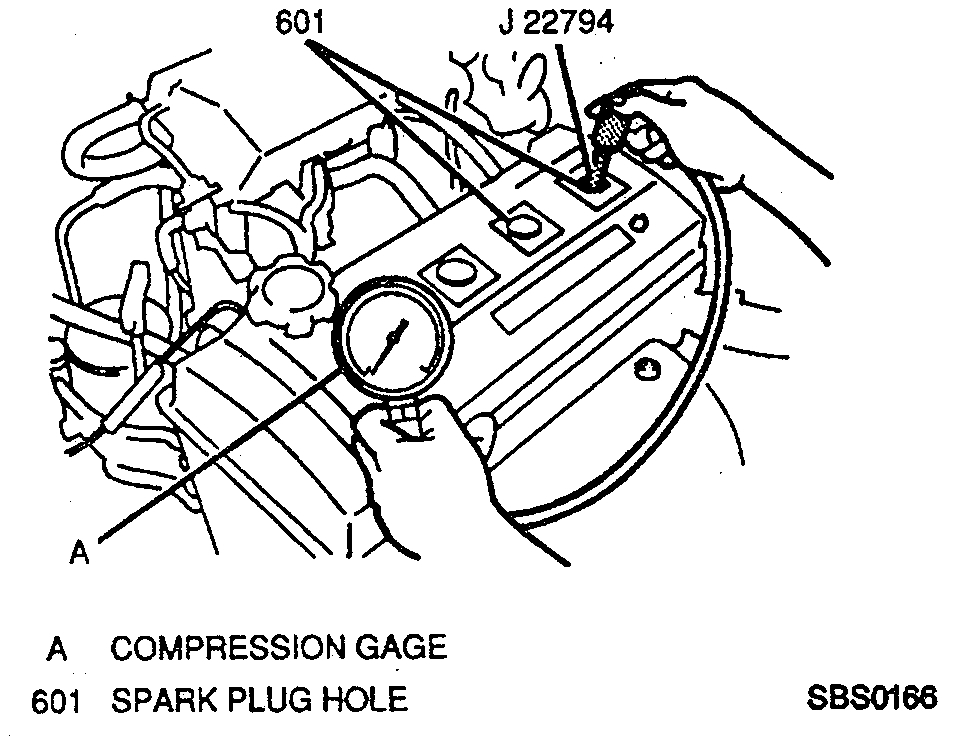
Here are the specific directions for testing engine compression. Picture 3 correlates with these directions.
COMPRESSION TEST
Pic 3
DESCRIPTION
A compression test is one of the best tools to assist a technician in properly diagnosing valve or piston faults and poor engine operation. To accurately determine the compression pressure, the throttle must be wide open, all spark plugs must be removed and the battery at or near full charge. Test each cylinder four times.
TESTING PROCEDURES
- Tool Required:
- J 22794 Spark Plug Port Adapter, Or Equivalent
NOTE: Be sure to remove any dirt and debris from around spark plug holes prior to removing spark plugs.
1. Stop engine.
2. Remove all four spark plugs and disconnect secondary (coil) wire from ignition coil. Refer to Ignition System.
3. Install a J 22794 and a compression gage into a - spark plug hole.
4. Disengage the clutch (manual transaxle equipped vehicles) to lighten starting load on the engine and depress the accelerator pedal to the floor (wide-open throttle).
5. Crank engine (with a fully charged battery) to take four pressure readings. Obtain an engine speed of at least 250 rpm or more. Record all four readings.
Measure
- The highest pressure reading on the compression gage.
- Standard compression pressure is 1,320 kPa (191 psi) at 250 rpm.
- Minimum allowable compression pressure is 981 kPa (142 psi) at 250 rpm.
6. Repeat compression test procedures for remaining three cylinders. Record all four readings for each cylinder.
NOTE: The maximum allowable compression pressure difference between any two cylinders is 98 kPa (14 psi) at 250 rpm.
7. Remove the J 22794 spark plug port adapter and compression gage from the engine.
8. Install all spark plugs and connect the secondary (coil) wire to the ignition coil. Refer to Ignition System.
EVALUATING TEST RESULTS
1. Normal operation-If the cylinder compression pressure builds up quickly and evenly to the compression specification (1,320 kPa/191 psi at 250 rpm), the pistons, pistons rings and valves are operating normally.
2. Piston rings faulty-If the cylinder compression is low on the first stroke and tends to build up on following strokes (but does not reach the compression standard), the probable cause is the piston rings are faulty. The addition of a small amount of oil through the spark plug port should improve the compression pressure considerably.
3. Valves faulty-If the cylinder compression is low on the first stroke and does not build up on following strokes, the probable cause is that the valves, valve seats or a gasket are faulty. The addition of oil does not significantly improve the compression pressure.
4. Faulty gasket-If the cylinder compression on both of any two consecutive cylinders (1-2, 2-3 or 3-4) is low and does not reach specification, the probable cause is a blown head gasket between the cylinders, allowing compression to leak between cylinders.
_______________________________________
The tools required to do these tests are very common, but I know most people don't own them However, often times a parts store will lend them to you.
The last concern I have is the coolant contamination. That is extremely vague and often times is used to persuade a customer into performing a service. I'm not saying that is what is happening, but I want you to understand. Over time, coolant does get dirty due to corrosion and other unavoidable contaminants. If they are saying the motor oil is mixing in to the coolant, then I would suspect a bad head gasket. If you think that may be the case, the compression test should indicate it. However, here is a link that shows how to check for a bad head gasket. If in fact oil is getting into the coolant, you should see evidence of the leak via foaming or bubbling. Take a look through this link. It explains how to check for a bad head gasket.
https://www.2carpros.com/articles/head-gasket-blown-test
Okay, Mike, I know this is a lot, but most likely, one of the tests I provided is going to show the problem. Since the issue is limited to cylinder 1, it isn't something like a vacuum leak. That would produce a random misfire not limited to one cylinder.
Please feel free to ask any questions you have or if you need help.
Take care and let me know the results.
Joe
Images (Click to enlarge)
Apr 20, 2019 at 4:33 PM