My window is not working can you help me?

Tiny
CARADIODOC
  • MECHANIC
  • 33,741 POSTS
Hi buschy. Welcome to the forum. How about we diagnose this puppy instead of blindly throwing parts at it? It could be the switch, but it could also be broken wires between the door hinges or a dead motor.

First of all, where are the switches, in the door or in the center console? Do the other windows work? If the other windows do not work, suspect broken wires between the driver's door hinges. If the switches are in the center console, it is possible for any one window to not work due to broken wires in that door.

A simple trick that might help narrow down the cause is to watch the dome light very closely when you press the window switch. The engine must be not running but the ignition switch must be in the run position. If you see the dome light dim just the very tiniest amount when you press the window switch, the wiring and switch are most likely ok, and the motor is drawing current and trying to run. See if the window will move when you try to help it. If it moves but slowly, there are two common possibilities. There may be a thermal cutout inside the motor that has pitted contacts. The cutouts cause more problems than they prevent. The second possibility is the rubber channels are gummed up and the window is sticking. Spray Silicone Spray Lube inside those channels and let it wash down along the edges of the glass. It will evaporate and leave a slippery film behind.

If you don't see the dome light dim at all when you press the window switch, suspect broken wires again between the hinges, or it is possible, but not common, that the switch itself is defective. GM has a lot trouble with window switches, but not most other manufacturers.

Caradiodoc
Was this
answer
helpful?
Yes
No
+1
Monday, January 4th, 2021 AT 1:01 PM (Merged)
Tiny
BUSCHY
  • MEMBER
  • 2 POSTS
Caradiodoc,
Thanks for responding so quickly. I tried turning the ignition on but keeping the car off and testing the switch. There was no flicker or dimming of the dome light.
I wanted you to clarify what you ment by a broken wire 'between the hinges.' Are you refering to the wires that travel through the grommit between the door and the car body? Would this be something I would have to buy a new wire for or could I just patch it with electrical tape or wire nuts? I am fairly competent with wiring and would like to do this myself.
Also, could you recommend where I could find a detailing of what color wire's are for what controls? I am used to setting up my own car stereos and remember most of them coming with a diagram or detailing of what color is for what purpose.
Thanks again!
Was this
answer
helpful?
Yes
No
Monday, January 4th, 2021 AT 1:01 PM (Merged)
Tiny
CARADIODOC
  • MECHANIC
  • 33,741 POSTS
Yup, those are the wires I'm talking about. Some vehicles like Jeeps use a harness that plugs in on both ends. Most vehicles have wires that do go to plugs on the body side but getting to them isn't always practical. I've done a half dozen repairs on older Caravans. I can't help you with wire colors, but if you replace just one at a time, you shouldn't have to know which one is which.

Here's a copy / paste version of a reply I sent to someone else:

Suspect broken wires between the two left door hinges. The following repair pertains to Caravans, but the procedure applies.

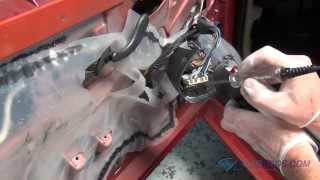
Peel the tape open on the wire harness between the two left door hinges. Remove the door trim panel, unplug all the stuff like power mirrors, windows, locks, speakers, and courtesy light so you can pull the harness part way out of the door. Pull as much harness as possible out of the "A" pillar.

There can be up to 22 wires and some of them will be the same color with the same color stripes. If you mix these up, everything will still work, but you might pop an automatic resetting circuit breaker if the right power window is operated in different directions by two different people at the same time. To avoid confusion, start with the broken wires, then move on to the wires with cracked insulation.

In 1990s Caravans, the replacement section is 11" long. Slide the rubber grommets back to expose the sections or wire that were inside the door and "A" pillar. Cut one wire in these two sections. The replacement wire must be the same gauge, stranded, and 22" long. The color is not important. Strip about 1/2" of insulation from both ends of the replacement wire, and both ends of the original wire. To splice the new wire in, slide the strands together and push down any strands that stick up. Solder the connection by heating it with a soldering iron on one side and applying the solder to the other side, never directly to the iron tip. The molten solder will flow toward the heat source. When it cools, check for any sharp points. If you can feel them, flatten them with a needle nose pliers so they don't poke through the heat-shrink tubing. Slide a 1" piece of heat-shrink tubing over the splice and warm it with a match or lighter. Don't over-do it as the tubing will melt and split open. Also, don't use electrical tape. It will come off in hot weather, and is a sign of laziness.

Slide another piece of tubing onto the wire, then splice the second end. Install the heat-shrink tubing, and the first wire is done. When all the wires are done, wrap the harness with tape. Electrical tape will crack apart in a short time. Friction tape works well, but don't make the bundle of wires real tight. The wires will want to slide over each other a little when the door is opened and closed.

Slide the grommets over the ends of the tape to help hold it in place. Slide just enough of the harness back into the door to reconnect all the plugs. All the splices on this end should be inside the door so they don't flex when the door is opened. By splicing in 22" long pieces of wire, the new section of the harness is twice as long as it should be. Slide the rubber grommet for the "A" pillar down far enough that only 11" will be between the door and "A" pillar. Push the other wire into the "A" pillar and coil it where the parking brake pedal won't interfere with it. The reason for the extra wire is to get ready for the next time this repair becomes necessary. Just pull the harness out and you will be half done! No need to make the splices on that end.

Caradiodoc
Was this
answer
helpful?
Yes
No
Monday, January 4th, 2021 AT 1:01 PM (Merged)
Tiny
JFRAYSSE
  • MEMBER
  • 3 POSTS
  • 2001 HONDA ACCORD
  • 2.2L
  • 4 CYL
  • 2WD
  • AUTOMATIC
  • 150,000 MILES
My car is the two door model. The driver's side window just started chattering at the top of its travel and will not close completely. So rain, cold air and wind noise are a problem. The window has to be manually pulled into the correct "up", and completely closed, position. Very annoying! Is there a limit switch somewhere that might be failing? If so, is this an easy fix or do a have to replace the entire power window mechanism and drive motor? Please advise and thanks!
Was this
answer
helpful?
Yes
No
Monday, January 4th, 2021 AT 1:02 PM (Merged)
Tiny
MHPAUTOS
  • MECHANIC
  • 31,938 POSTS
You will have to pull the door trim off and inspect the regulator, the teeth on the driven arm may be worn away and the chattering is the drive gear skipping, if so a replacement regulator is required.
Was this
answer
helpful?
Yes
No
Monday, January 4th, 2021 AT 1:02 PM (Merged)
Tiny
JFRAYSSE
  • MEMBER
  • 3 POSTS
Hi MHPAUTOS: Thanks, this is what I suspected as well, but I was hoping that there was a limit switch that needed re-positioning or something. :D Thank you for your time and your expertise!
Was this
answer
helpful?
Yes
No
Monday, January 4th, 2021 AT 1:02 PM (Merged)
Tiny
KEN L
  • MASTER CERTIFIED MECHANIC
  • 42,884 POSTS
Hello,

If I am add here is a guide that will give you an idea of what you are in for when doing the job.

https://www.2carpros.com/articles/how-to-check-and-replace-a-electric-power-window-motor

Here is a guide on how to remove the door panel

https://www.2carpros.com/articles/door-panel-removal

and here are some diagrams on how to do the job on your car (below)

Please let us know what happens.

Cheers, Ken
Was this
answer
helpful?
Yes
No
Monday, January 4th, 2021 AT 1:02 PM (Merged)
Tiny
JFRAYSSE
  • MEMBER
  • 3 POSTS
Thanks, Ken! I'm plan to do this tomorrow! :D
Was this
answer
helpful?
Yes
No
Monday, January 4th, 2021 AT 1:02 PM (Merged)
Tiny
KEN L
  • MASTER CERTIFIED MECHANIC
  • 42,884 POSTS
Let us know what happens and please upload pictures or videos of the problem.

Cheers, Ken
Was this
answer
helpful?
Yes
No
Monday, January 4th, 2021 AT 1:02 PM (Merged)
Tiny
PICAZO
  • MEMBER
  • 1 POST
@SOPARKLION did you ever get the problem fixed?
Was this
answer
helpful?
Yes
No
Tuesday, March 16th, 2021 AT 4:14 PM
Tiny
DANNY L
  • MECHANIC
  • 5,648 POSTS
Hello PICAZO, I'm Danny.

You've attached a response to a years old question. What we ask is for you to do is start a new question and please be sure to include all your vehicle information. Here is the new question link:

https://www.2carpros.com/questions/new

We will look forward to hearing back from you and will be willing to answer your question. Also be sure to include all problem symptoms or issues the best you can describe. Hope this helps and thanks for using 2CarPros.
Was this
answer
helpful?
Yes
No
Wednesday, March 17th, 2021 AT 9:29 PM

Please login or register to post a reply.

Sponsored links