[quote:eb7a805bb7="dieseldemon"]2000 Ford Windstar 6 cyl Front Wheel Drive Automatic
----------------------------------------------------------------
I need a little help on how to replace the front wheel bearings on a van. How do you get the bearing out of the van do you have to take apart the whole front wheel assembly[/quote:eb7a805bb7]
1999 - 2003 Windstar.
Purchase front wheel bearing assembly (note that this is an assembly and not just bearings, it comes with hub and bearings together as one piece). (Anywhere from $75-$150)(Make sure you have a socket big enough to remove the axle nut from the front drive axle you are working on)
Jack up vehicle or put on hoist (if you are jacking up the vehicle (Apply Rear Parking Brake), do it on the frame rail and install a Jack Stand for Safety)
Remove hubcap and tire.
Unbolt brake calliper assembly and put off to the side (helps if you bungee cord or wire up to the frame of the van to keep it out of the way).
Remove the 3 torx (45 torx) head bolts holding on your brake rotor, then remove the brake rotor and put off to the side.
Remove the large nut on the axle spindle (may require pneumatic impact wrench or large ratchet (I used a 3/4 drive ratchet)).
Remove lower ball joint pinch bolt.
Use a large pry bar to push down on the lower control arm assembly and pull the hub assembly out towards you.
You will have to remove the drive axle from the hub assembly but not from the transmission (unfortunately the top hub bolt is behind the CV axle head). (the book says to use a puller to push the axle out of the hub assembly and not to use a hammer, generally this is so the user does not screw up (with a hammer) the threads on the axle shaft, but if you thread your axle nut on the axle, so that it is flush with the end of the axle, you can then use a hammer and block of wood to push the axle out of the hub).
Once the axle is free of the hub assembly, bungee cord or wire it out of the way as you did with the brake calliper assembly.
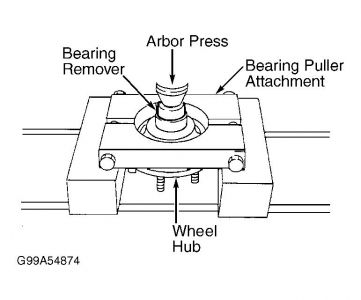
Remove the three bolts holding the hub assembly in place (note that these are locktited in place and you will not touch them with a low end impact wrench, it is easier to use a long handled 1/2 drive ratchet and socket) and push out the old hub assembly from the steering arm (it may seem like it is pressed in, but it is most likely just rust and corrosion that is holding it in place, make sure your new part is the same as your old part and hammer the old bearing hub assembly out).
Once you have removed the old bearing assembly, clean up the opening with a wire brush, install the new bearing assembly (only goes in one way) and use removable locktite on the threads of the three bolts (as i could not find any torque specs. on this, you will have to use your best judgement, but I recommend not installing any of these bolts with an impact or air ratchet, as you will not be able to feel how tight they are getting).
Unwire and push the axle assembly back through the new hub assembly, this should go through easily once the splines are lined up. Tighten axle nut with ratchet to appropriate spec. (unable to define, use best judgement)
Reinstall the lower ball joint and pinch bolt.
Reinstall rotor with three torx head bolts (note when I did this, the thread in the new hub assembly was standard (SAE) not metric and I had to chase the threads with an 8 x 1.25 metric tap before reinstalling the rotor bolts).
Reinstall the brake calliper with the two bolts (put removable locktite on these bolts and hand tighten with ratchet).
Reinstall the tire, hand tighten lug nuts and install hub cap, and complete final road test.
Biggest tip to give you, work safely and take your time, don't force anything, use a penetrating fluid on rusted fasteners before trying to remove and allow enough time to complete the task. (This is a job that can be done by a novice, I am a journeyman automotive technician, but I have been out of this trade for the past 13 years)
Note: I could not find any information on this when I needed it yesterday, the Haynes manual was sketchy at best and only had the axle removal process, so I am answering this question so that it may help someone else. The entire process took about 2 hours on the driveway, and it would have gone quicker, but I had not done one of these before.
May 30, 2008 at 8:28 AM