Good morning,
Did you check for power to the pump or can you hear the pump run when you turn on the key?
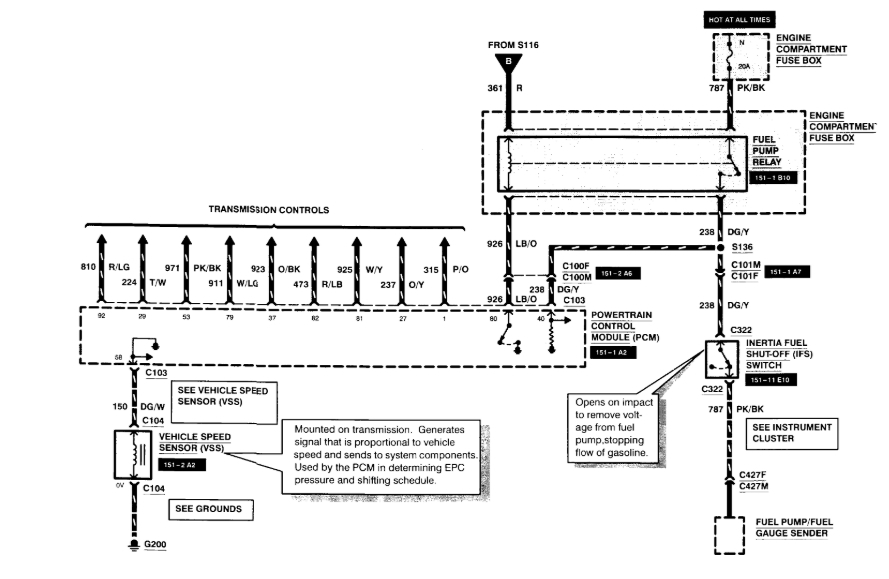
I will attach a wiring diagram for you to view to do some checks. Since you know where the inertia switch is located, can you check for voltage at the switch when you turn on the key? It will only be present for two seconds, then when cranking it will be there all the time.
I would do a fuel pressure test as well to verify the pressure.
https://www.2carpros.com/articles/how-to-check-fuel-system-pressure-and-regulator
If you have low or no pressure then you may need a fuel pump.
https://www.2carpros.com/articles/how-to-replace-an-electric-fuel-pump
Roy
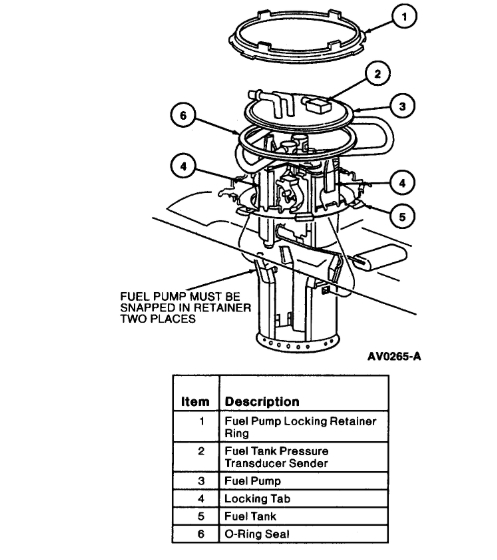
REMOVAL
1. Place vehicle on hoist; do not raise.
2. Install Multiport Fuel Injection (MFI) Fuel Pressure Gauge T80L-9974-B and perform the fuel pressure release procedure.
3. Drain fuel from fuel tank.
4. Raise vehicle on hoist.
5. Remove fuel tank.
6. Remove any dirt that has accumulated around the fuel pump module retaining flange so that it will not enter fuel tank during removal and installation.
7. Turn fuel pump locking retainer ring counterclockwise using Fuel Tank Sender Wrench T74P-9275-A and remove fuel pump locking retainer ring.
8. Remove fuel pump module. Reach in sender opening and, using thumb and index finger, depress two latching tabs toward each other to release reservoir from retainer in tank. Remove reservoir from tank, being careful not to damage filter or float rod assembly.
9. Remove fuel pump mounting gasket and discard.
INSTALLATION
1. Clean the fuel pump module retaining flange, fuel tank mounting surface and fuel pump groove.
2. Apply a light coating of Premium Long-Life Grease XG-1-C or -K or equivalent meeting Ford Specification ESA-M1C75-B on a new fuel pump mounting gasket to hold it in place during assembly and install fuel pump mounting gasket in fuel ring groove.
3. Install the fuel pump carefully into the fuel tank to make sure that the filter, hoses and float rod are not damaged or binding. Align the fuel pump and the fuel tank retainer which is located on bottom of tank. Push the fuel pump into the fuel tank retainer. When the fuel pump is engaged, a definite click will be heard and the two outside tabs on the fuel pump will be engaged on the outside of the fuel tank retainer. The fuel pump must be snapped in the retainer with both tabs. Pull on the fuel pump to make sure it is fully engaged. Install sender plate to fuel tank being careful that locating keys are in keyways and O-ring seal remains in place.
4. Hold fuel pump module in place and install fuel pump locking retainer ring finger-tight. Make sure that all locking tabs are under fuel pump module locking retaining ring tabs.
5. Secure fuel pump module with fuel pump locking retainer ring by rotating fuel pump locking retainer ring clockwise using Fuel Tank Sender Wrench T74P-9275-A until fuel pump locking retainer ring contacts stops.
6. Remove fuel tank from bench to vehicle and support fuel tank while connecting fuel supply return and vapor tube and connector to the fuel pump module and evaporative emission valve.
7. Install fuel tank in vehicle.
8. Lower vehicle.
9. Install a minimum of 38 liters (10 gallons) of fuel and check for leaks.
10. Turn ignition switch to ON position for three seconds repeatedly (5 to 10 times) until Multiport Fuel Injection Fuel Pressure Gauge T80L-9974-B shows at least 241 kPa (35 psi). Check for leaks at fittings.
11. Check fuel gauge to verify sender is operating. Remove Multiport Fuel Injection Fuel Pressure Gauge T80L-9974-B.
Images (Click to make bigger)
Wednesday, March 24th, 2021 AT 6:47 PM