Camshaft alignment

Tiny
JIS001
  • MECHANIC
  • 3,408 POSTS
The important thing is if the cams are lined up properly with the tool? If you lined the sprocket mark's to your cover marks, turned the engine over by hand and the mark fell in place then the way the mark's are lined up there is no way your engine will run. That engine would be toast. Also there is no way the intake sprocket will move the way it did if you had it lined up. As stated earlier, 3 bolt pattern so no way it will "slip"? If the cams are lined up with the tool properly you can pretty much put those sprockets any where you want. Something is not adding up here?

Install the cam lock tool and take a picture of the crank sprocket aligned to the oil pump to see if the 2 indentations line up correctly to the oil pump. Also did you address the fuel injector problem?
Was this
answer
helpful?
Yes
No
+1
Friday, September 20th, 2019 AT 12:39 AM
Tiny
RICK ESTESS
  • MEMBER
  • 52 POSTS
The picture of the cams with the pointers indicating cam sprocket position was taken with the crankshaft marks lined up. I'll go ahead and repeat the cam/crank alignment procedure.
Let's restate what I need to do to get the timing dialed in.
To achieve the correct timing on this engine, all I need to do is (omitting mention of removing non-relevant engine parts):
1. Remove timing belt.
3. Align the crankshaft sprocket mark with the raised metal alignment mark on the oil pump
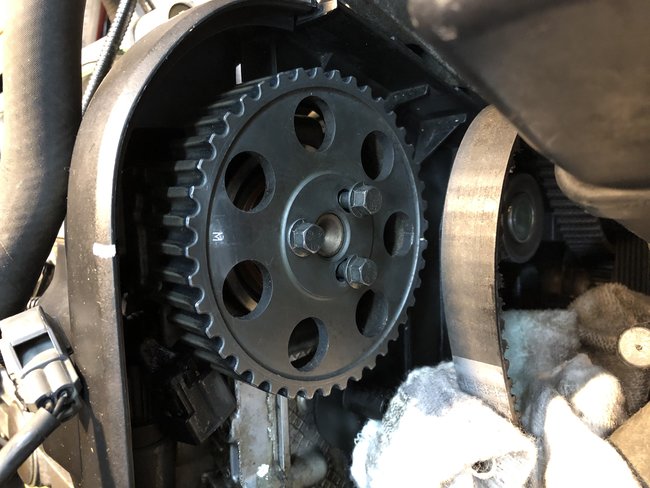
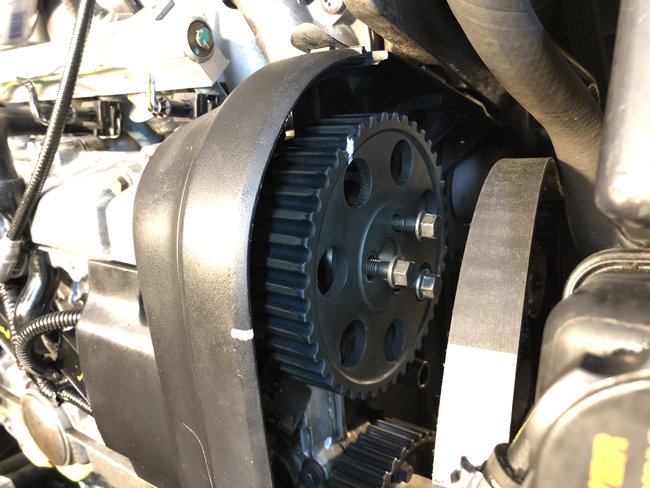
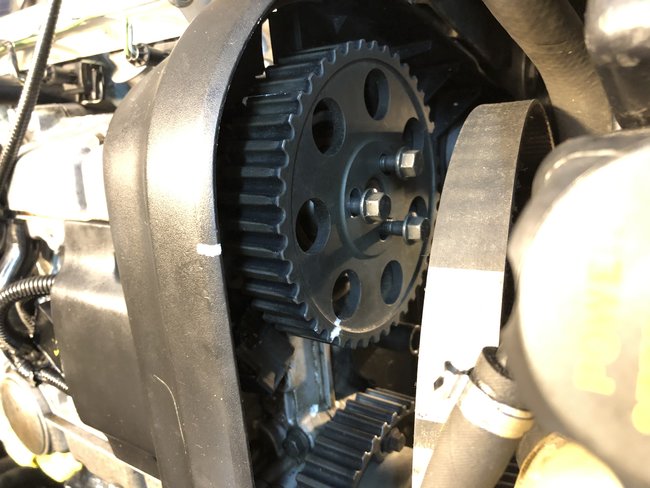
4. Rotate cams to match marks on cams to timing cover marks.
5. Lock cams in position. When the timing marks are on, the slots in the ends of the cams where the cam lock tool goes are slightly out of horizontal. The cam lock tool is made to lock the cams in a horizontal position, so the cams have to be turned slightly to horizontal, which throws the timing marks off a bit. I have to assume that this has no effect on actual engine performance.
6. Turn vvt hub clockwise, feeling spring tension, about an inch or so, until it stops. Find a way to lock it in that position.
7. Install timing belt, making sure that the vvt hub stays locked and spring-loaded.
8. Unlock the cams.
9. Turn the crankshaft slowly by hand 4-5 complete revolutions (or more if that's what you think you need to do) to confirm smooth operation. If there is resistance, stop and go back to step #1.
Please let me know if this is right or wrong. I thought this is what I did the last time, but the cam misalignment picture tells a different story. I'm heading out now to get the car prepped for the do-over. I'll check back before I get to the re-set point to look for a response.
I checked the connections on the injectors before I started the engine. The #2 connector did feel a little loose, so I unsnapped it and put it back on. It seems to have helped, but I can't be 100% sure because the timing issue sort of dominates right now.
I do appreciate the time you're investing in helping me get my baby back on the road. -Rick
Was this
answer
helpful?
Yes
No
Friday, September 20th, 2019 AT 12:53 PM
Tiny
JIS001
  • MECHANIC
  • 3,408 POSTS
Welcome back. The cam sprocket timing at this point is invalid. Align the crank. Install the cam lock tool to verify you actually have the cams timed correctly and remove the sprockets. The intake cam is easy to line with the cover because it is only a 3 bolt pattern and there is no way to misalign that. The exhaust hub loosen the center bolt and then make it snug where you can turn the sprocket clockwise. Once it is locked you will feel a slight drag when you keep manually rotating it to get the alignment mark to the cam cover housing (plastic cover on top of the housing). Once lined up torque the bolt down. Turn the engine over several times after and make sure everything lines up. Upload a picture so we can verify your lined up properly before you do anything else.
Was this
answer
helpful?
Yes
No
Friday, September 20th, 2019 AT 10:56 PM
Tiny
RICK ESTESS
  • MEMBER
  • 52 POSTS
Will do! Thanks!
Was this
answer
helpful?
Yes
No
Saturday, September 21st, 2019 AT 8:25 PM
Tiny
RICK ESTESS
  • MEMBER
  • 52 POSTS
Tried to send you an update with a photo from my phone but the email function is screwed up right now. I'll explain what the photo shows.
I took a pic of the ends of the cams with the crank set on the marks. The stamped writing on the intake end is at ABOVE the center of the cam; the writing on the end of the exhaust cam is at UNDER the center of the cam. The slots are almost perfectly horizontal. I'm going to have to rotate them slightly to install the cam lock.
In review, you wanted me to take the cam sprockets off and reinstall them with the marks lined up with the cover, correct? (Using the install method for the exhaust hub that you mentioned in the last communication). Then take a pic and send it to you for you to inspect before I fire it up. I'll do that when I'm done - if this glitch with my phone is straightened out.
Question: how does changing the sprocket position have an effect on cam alignment if the cams are locked during sprocket R and R? I'm thinking that the sprockets' purpose is to merely turn the cams - not having any effect on timing other than having a reference mark for cam position. I've been wondering about this since I started this project. Can you explain? It's going to be a couple of days before I can get back on it; can't get parts until Monday. Thanks again.
Was this
answer
helpful?
Yes
No
Saturday, September 21st, 2019 AT 10:54 PM
Tiny
JIS001
  • MECHANIC
  • 3,408 POSTS
You are correct on the the sprockets. But the mark helps simplfy the process to know you are actually lined up. The cam lock tool guarantees you are timed. If we were to get more technical you would also need the crank lock tool which requires you remove the starter to install the tool but you would need to remove the intake for this process.

As long as the dimple on the oil pump lines up in the middle of the 2 notches on the crank sprocket and the cams are locked with the cam lock tool you are time. Lining the sprockets to there Mark's and turning the engine over several times where everything lines back up guerantee you are lined up with out the tool.

And what did you find with the oil control valve? Did you remove it, turn the engine over and see if oil pumps out? As stated earlier, I hope you did not go through all these for a faulty oil control valve (solenoid) since they always fail and set timing code due to low oil level or faulty solenoid. So please let us know why you started this big project?

Also what did you find with the injector circuit? Did you have a loose connection to the fuel injector? Let us know please.
Was this
answer
helpful?
Yes
No
+1
Saturday, September 21st, 2019 AT 11:24 PM
Tiny
RICK ESTESS
  • MEMBER
  • 52 POSTS
This is a 2-part answer. I'm doing this part on my PC because I have big fingers and a low tolerance for typos - which happens a lot on my iphone. I'll send you pics on my iphone after I finish this.
About this project: It began as a cam/crank seal replacement and PVC inspection and ballooned into a bunch of side fixes "because I'm in there and don't want to come back for a while."
I have an interesting situation going on with the cam sprockets. I may have mistaken a timing mark for another mark. I discovered this when what I used as the intake sprocket timing mark didn't line up with the marks on the cam cover. The bolts would only go in with what I thought was sprocketmark either about 30 degrees to the left or about 30 degrees to the right of the cam cover timing mark. Here's the weird part: The stamped "M" on the intake cam sprocket lined up perfectly with the cam cover timing mark when I installed the 3 bolts. What's going on here? Is the "M" stamp the true timing mark?
It's a little more puzzling on the vvt hub sprocket. The pics will show all of this.

About the oil control valve: Since I've never been low on oil, and, to be quite honest, I didn't know what an oil control valve was, I set that aside until you brought it up the second time. I Googled "oil control valve" and got results for "variable timing solenoid" and "camshaft adjust solenoid." They matched the picture you sent, so I unbolted it to look for oil. It did have oil. (I took a pic of it). Actually, the noise was coming from that area so that may be the problem. Question: How can I test it for functionality? Thanks again for hanging in there with me. I'm confident that it won't be long before I'm behind the wheel again.
One more question: My turbo isn't working - at least it didn't feel like it. I'd like to talk to you about that after we get these issues resolved. Thanks again. -Rick
Pics to follow from my iphone.
Was this
answer
helpful?
Yes
No
Monday, September 23rd, 2019 AT 11:35 PM
Tiny
RICK ESTESS
  • MEMBER
  • 52 POSTS
Here are pics of the cam sprocket marks in relation to timing cover marks.
Was this
answer
helpful?
Yes
No
Tuesday, September 24th, 2019 AT 11:04 AM
Tiny
RICK ESTESS
  • MEMBER
  • 52 POSTS
The “M” mark on the sprocket lines up with bolts in; the thin mark does not.
Was this
answer
helpful?
Yes
No
Tuesday, September 24th, 2019 AT 11:08 AM
Tiny
JIS001
  • MECHANIC
  • 3,408 POSTS
That is all wrong. Lock the cam with the lock tool. The thin line lines up with the cover. How does the exhaust cam look?
Was this
answer
helpful?
Yes
No
+1
Tuesday, September 24th, 2019 AT 12:50 PM
Tiny
RICK ESTESS
  • MEMBER
  • 52 POSTS
This is a photo of the cam lock tool installed at the time that I took the cam photos. With the cam lock tool on, the intake cam sprocket mark- the thin line - will not matchup with the timing cover mark when the three bolts are installed; its either an inch or so to the left, or the same distance off to the right. Not that I think it’s right, but the “M” mark does, and perfectly This is really messing with my head.
The exhaust hub/sprocket will spin wherever I want it to go, so it’s not at issue as far as I know.
The oil control valve/variable timing solenoid was full of oil when I removed it.
Was this
answer
helpful?
Yes
No
Tuesday, September 24th, 2019 AT 3:25 PM
Tiny
RICK ESTESS
  • MEMBER
  • 52 POSTS
This is me turning the engine over by hand after getting everything dialed in. Hear the noise coming from the vvt area? Thanks again.
Was this
answer
helpful?
Yes
No
Tuesday, September 24th, 2019 AT 7:39 PM
Tiny
RICK ESTESS
  • MEMBER
  • 52 POSTS
Can get a definitive answer on whether or "oil control valve", "variable timing solenoid", and "camshaft adjust solenoid" is the same part. I need to know in case I need to buy one. Thanks.
Was this
answer
helpful?
Yes
No
Wednesday, September 25th, 2019 AT 10:03 AM
Tiny
JIS001
  • MECHANIC
  • 3,408 POSTS
They are pretty much call either one of those names.
Was this
answer
helpful?
Yes
No
+1
Wednesday, September 25th, 2019 AT 12:14 PM
Tiny
RICK ESTESS
  • MEMBER
  • 52 POSTS
Thanks.
Was this
answer
helpful?
Yes
No
Wednesday, September 25th, 2019 AT 12:22 PM
Tiny
RICK ESTESS
  • MEMBER
  • 52 POSTS
I made and posted the video in the hope you guys would play it and tell me what you think of the sound.
If you guys are burned out on helping me with this, that's cool, but it would be really helpful if you could tell me, by listening to the sound, if you think the vvt or solenoid is bad.
Was this
answer
helpful?
Yes
No
Wednesday, September 25th, 2019 AT 7:45 PM
Tiny
JIS001
  • MECHANIC
  • 3,408 POSTS
Your previous video finally loaded when you had it running with the timing cover off. How did it sound before you took it apart? Also the idle sounded like it was surging a bit? Did you clean the throttle body out?
Was this
answer
helpful?
Yes
No
+1
Wednesday, September 25th, 2019 AT 10:24 PM
Tiny
RICK ESTESS
  • MEMBER
  • 52 POSTS
It sounded like that before I took it apart.(Please also watch the last video where I turned the engine over by hand. I put the camera close to the vvt hub and solenoid). The sound came and went for months, then stayed. I assumed that it was a tensioner, idler, or another part on one of the belts - alternator bearing? But all of those parts are new now and I've isolated the sound to the vvt area.
I did clean the throttle body when I had the intake manifold off. I also cleaned the MAF sensor and double-checked all of the injector, spark plug, and other electrical connections. I'll see how this works during the second test drive.
When I first started the engine before the first test drive, it idled steady at about 1,000 RPM for about 20 seconds, then starts crapping out for another 20, then surges, then dies. When I drove it, it ran smoothly at 2,000 RPM and up, but lacked power. When I pulled into my driveway on return, it idled pretty rough. That's when I parked it back in the shop and walked away for two days.
Now I've reset the timing - making sure the vvt hub was spring-loaded against the timing belt as it should be.
I installed a new evap and PVC system because of oil leaks. Then I installed new cam and crank seals. After I can back from the recent 15-mile test drive, I noticed oil leaking from the new oil filler cap. The one thing I didn't do when I went through the PVC system was check the tube that goes into the oil sump for clogging. I'm taking the pan off tomorrow so I can clean it. Finally, I'm going to change the oil (Castrol GTX Magnatec 5w-30 full synthetic) and filter and take it for a second test drive to see how everything works. That IS unless you tell me that I shouldn't.
I know my communications are wordy; I write this way to try to be exact. Please read what I write carefully; I've noticed that a few times you've asked me questions I'd already answered. Thanks.
Was this
answer
helpful?
Yes
No
Thursday, September 26th, 2019 AT 12:30 AM
Tiny
JIS001
  • MECHANIC
  • 3,408 POSTS
Let us know how the test drive goes. Also what did you find on the injector circuit fault?
Was this
answer
helpful?
Yes
No
Thursday, September 26th, 2019 AT 8:09 AM
Tiny
RICK ESTESS
  • MEMBER
  • 52 POSTS
So that means go ahead and drive it.
On the injector: I haven't pulled any codes since I shut it down and started pulling parts off the second time. I'll pull new codes after I fire it up.
Was this
answer
helpful?
Yes
No
Thursday, September 26th, 2019 AT 2:00 PM

Please login or register to post a reply.

Sponsored links