Camshaft alignment

Tiny
JACOBANDNICKOLAS
  • MECHANIC
  • 108,348 POSTS
Happy to help, Rick. Let us know how things work out for you. Also, if you remove the oil pan, that will not help to identify ventilation issues. I just don't want you to do something and then realize it wasn't needed. Here are the directions for testing crankcase ventilation. The attached pictures correlate with the directions.

________________

CRANKCASE VENTILATION, CHECK
Crankcase ventilation, check

Note! Some variation in the illustrations may occur, but the essential information is always correct.

Special tools:
999 7226 Pressure gauge

Check

Measuring the pressure in the crankcase

pic 1

Note! Take readings at idle at operating temperature.

Warm up the engine until the thermostat opens.
Switch of the AC and other electrical equipment.
Reset the manometer using the adjuster screw.
Remove the dip stick and connect manometer 999 7226 Pressure gauge as illustrated.

Pic 2

Note! The pressure values are given for sea level. High levels can reduce the reading slightly.

Read off manometer value.
The value for a clean crankcase ventilation is -0.2 kPa or lower.
If the manometer indicates a value from -0.2 up to 0.0 kPa or a positive value, the crankcase ventilation is partially or completely blocked and must be cleaned. Refer to: Crankcase ventilation, cleaning See: Positive Crankcase Ventilation > Procedures > Crankcase Ventilation Cleaning

Let me know how thing work out for you.

Take care,
Joe
Was this
answer
helpful?
Yes
No
Thursday, August 29th, 2019 AT 7:17 PM
Tiny
RICK ESTESS
  • MEMBER
  • 52 POSTS
Thanks for getting me out of wasting time! God knows I've got a lot left that I need to do. I had to work again today at my job, but I'm back on it tomorrow to finish the engine cleaning outside, then I'll push it back into the shop to get everything dialed in and back together. Thanks also for naming the correct tool I'll need to check my crankcase ventilation. Man, I want my Volvo back. But I want it back knowing everything was done right. You guys are worth your weight in gold.
Was this
answer
helpful?
Yes
No
Friday, August 30th, 2019 AT 10:09 PM
Tiny
JACOBANDNICKOLAS
  • MECHANIC
  • 108,348 POSTS
Welcome back:

You are very welcome. Sorry to hear you're stuck at work all the time. I hold down one full time and 2 part time jobs, so I totally understand.

Let me know when you get things back together.

Take care,
Joe
Was this
answer
helpful?
Yes
No
+2
Saturday, August 31st, 2019 AT 7:16 PM
Tiny
RICK ESTESS
  • MEMBER
  • 52 POSTS
Okay. I'm ready to align the camshafts. Cam sprockets are on but loose. Crankshaft marks lined up properly and the crank lock pin is in. I want to turn the intake cam to where the writing on the end is down and the slot is flat. I want the writing on the exhaust cam to be UP and the slot is flat. (I know the slots are slightly off horizontal for perfect timing, but because the cam lock isn't designed to hold the cams that way, we'll let it go for now). With the cams locked in the position I stated, it's time to set and tighten the VVT on the exhaust cam as well as the sprocket on the intake cam. Note: The new water pump and idler pulley have been installed and torqued to spec. The new tensioner is ready to install, as are the timing and serpentine belts. If all looks good, please lead the way. I really appreciate your help!
Was this
answer
helpful?
Yes
No
Thursday, September 5th, 2019 AT 5:45 PM
Tiny
JIS001
  • MECHANIC
  • 3,408 POSTS
Send me an image of how you locked the cams? If you are not using the proper tool then we are not going to know if your timed properly or not?
Was this
answer
helpful?
Yes
No
+1
Thursday, September 5th, 2019 AT 7:35 PM
Tiny
RICK ESTESS
  • MEMBER
  • 52 POSTS
I have a Volvo 999 5452 cam locking tool on it right now. I used a homemade cam locking tool only to get the VVT bolt off after the original 999 5452 broke during the second removal attempt. That sucker was on tight - more than the 88 ft-lb torque spec. I can text and email pictures from my phone, but not from my PC, which is what I'm using to communicate with you. I'll see if I can pull up this email with my iPhone and send you the pictures if it's absolutely necessary. If you don't see them by morning it means I couldn't do it.
Was this
answer
helpful?
Yes
No
+1
Thursday, September 5th, 2019 AT 9:23 PM
Tiny
RICK ESTESS
  • MEMBER
  • 52 POSTS
Looks like I successfully sent the pictures. I’ll go back to my PC and verify it.
Was this
answer
helpful?
Yes
No
Thursday, September 5th, 2019 AT 9:30 PM
Tiny
JIS001
  • MECHANIC
  • 3,408 POSTS
There is not much you can do with the intake came sprocket since it is a 3 bolt pattern and will go on as it needs to go on. The exhaust cam you need to put the center bolt snug where you have some room to to spin it. Turn it clockwise to where you want it. But I recommend you line it with the mark on the cam cover. Once lined up torque the center bolt. Install the timing belt and turn engine over by hand several times to make sure no valves are hitting.
Was this
answer
helpful?
Yes
No
+1
Thursday, September 5th, 2019 AT 9:55 PM
Tiny
RICK ESTESS
  • MEMBER
  • 52 POSTS
Sounds like that should get me to the finish line with confidence. If I spin the crank over, say, 4 times without hitting valves, I can cross the finish line. Yeah, you want metaphors, I got 'em! Wish I didn't have a doc appt. Or I'd get out to the shop and do it now. I'll definitely get back to you tonight. Thank you very much!
Was this
answer
helpful?
Yes
No
Friday, September 6th, 2019 AT 12:17 PM
Tiny
RICK ESTESS
  • MEMBER
  • 52 POSTS
I forgot to ask: what if the valves are hitting the pistons?
Was this
answer
helpful?
Yes
No
Friday, September 6th, 2019 AT 12:21 PM
Tiny
JACOBANDNICKOLAS
  • MECHANIC
  • 108,348 POSTS
Welcome back:

Do not force them. If the valves are hitting, the timing is wrong. It will cause internal damage if you force it.

Here are the directions for removal and replacement of the timing belt. The directions show how timing is done. All attached pictures correlate with the directions.

_______________________________________

2001 Volvo V70 T5 L5-2.3L Turbo VIN 53 B5234T3
Timing Belt, Replacing
Vehicle Engine, Cooling and Exhaust Engine Timing Components Timing Belt Service and Repair Removal and Replacement Timing Belt, Replacing
TIMING BELT, REPLACING
Timing belt, replacing
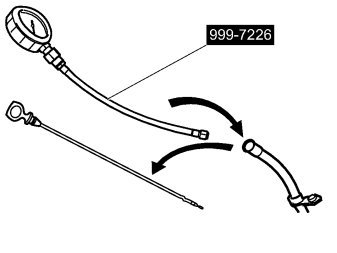
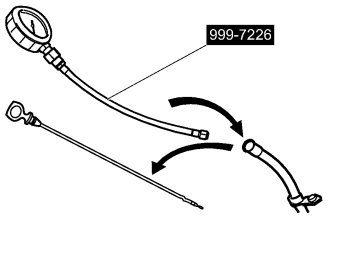
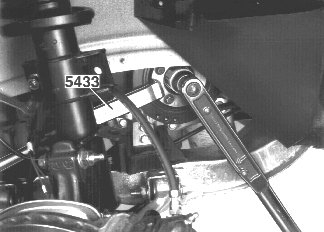
Special tools:
999 5433 COUNTERHOLD See: Vehicle > Electrical / Mechanical Repair > 999 5433 Counterhold

Note! Since the illustrations in this service information are used for different model years and/or models, some variation may occur. However, the essential information is always correct.
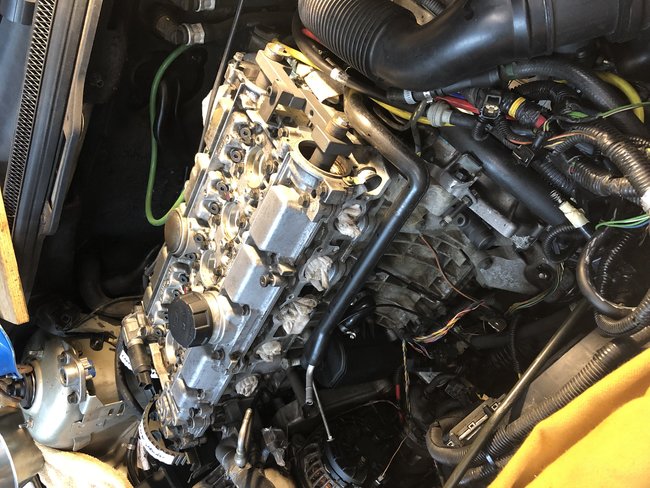
Remove components

pic 1

Caution! Remove the ignition key.

Remove:
- the cross stay between the suspension turrets
- the upper timing belt cover
- the servo reservoir and the expansion tank.
Lift up and place on top of the engine.

Warning! Make sure that no power steering fluid is spilled. Extremely flammable.

- the auxiliaries belt
- the front timing belt cover.

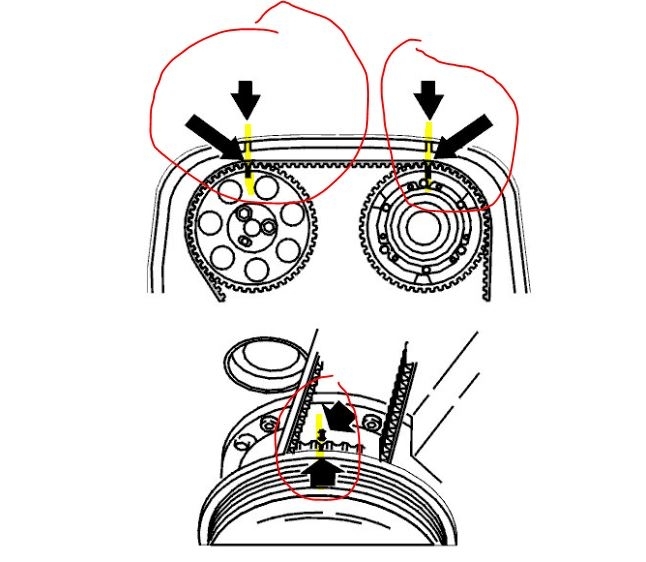
Position the engine according to the marking

pic 2

- Remove the right front wheel
- Remove the nut from the cover in the wing liner
- Install the upper timing belt cover
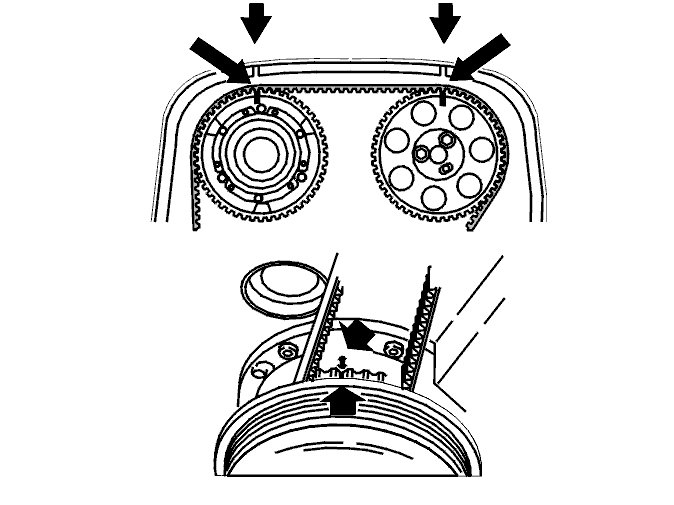
- Turn the crankshaft clockwise until the markings on the crankshaft and camshaft pulley correspond
- Turn the crankshaft a further 1/4 turn clockwise and then back again until the markings correspond.
The markings are illustrated
- Remove the upper timing belt cover.

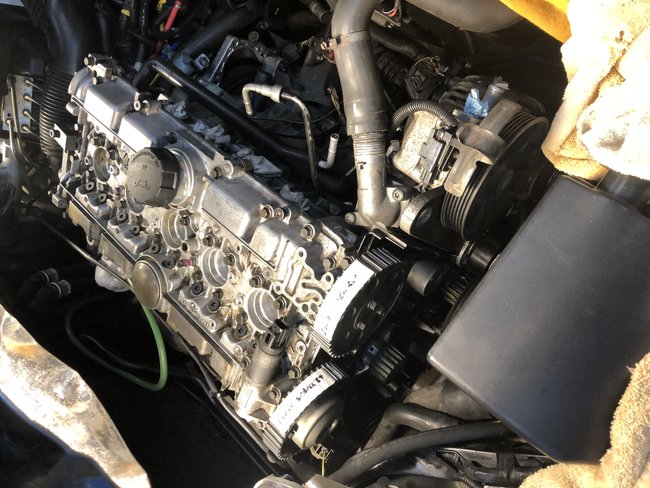
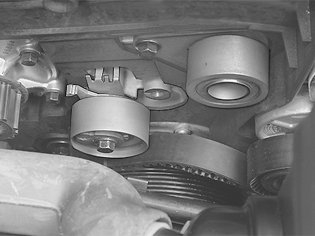
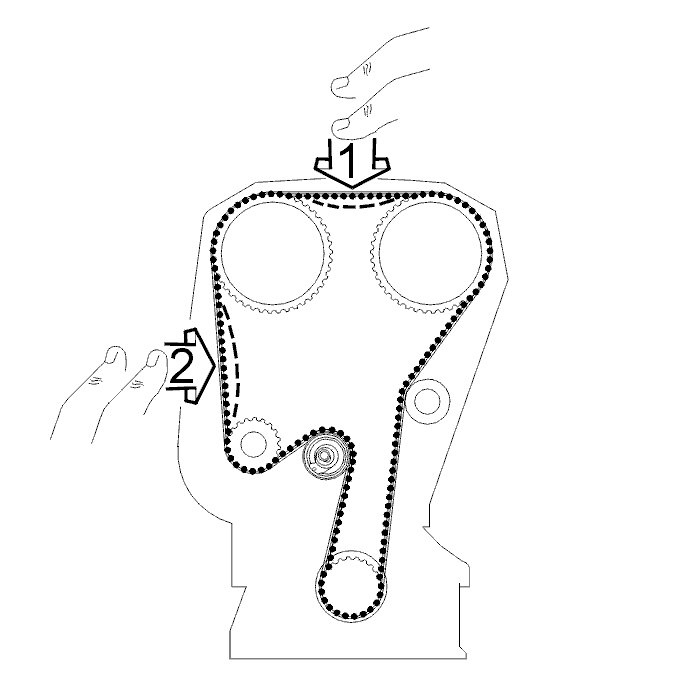
Removing the timing belt

pic 3

Slacken off the belt tensioner.
Slacken off the centre screw for the belt tensioner slightly.
Hold the centre screw still. Turn the tensioner eccentric clockwise using a 6 mm Allen key to 10 o'clock.
Remove the timing belt from the tension pulley, camshaft pulley and water pump.

Pic 4

Remove the vibration damper.
Remove the oscillation damper. Use counterhold 999 5433 COUNTERHOLD See: Vehicle > Electrical / Mechanical Repair > 999 5433 Counterhold. Work the oscillation damper loose.
Remove the timing belt

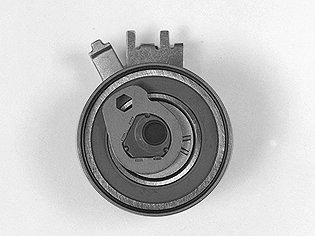
Checking the tensioner pulley and idler pulley

pic 5

Check bearing wear:
- spin the idler pulley and listen for noise.
If replacing with a new idler pulley, tighten to 24 Nm.
- spin the tension pulley and listen for noise.
When replacing, screw the tension pulley into place using the centre screw.
Screw in the centre screw by hand.
Ensure that the tensioner fork is centered over the cylinder block rib.
Ensure that the Allen hole on the eccentric is at "10 o'clock".

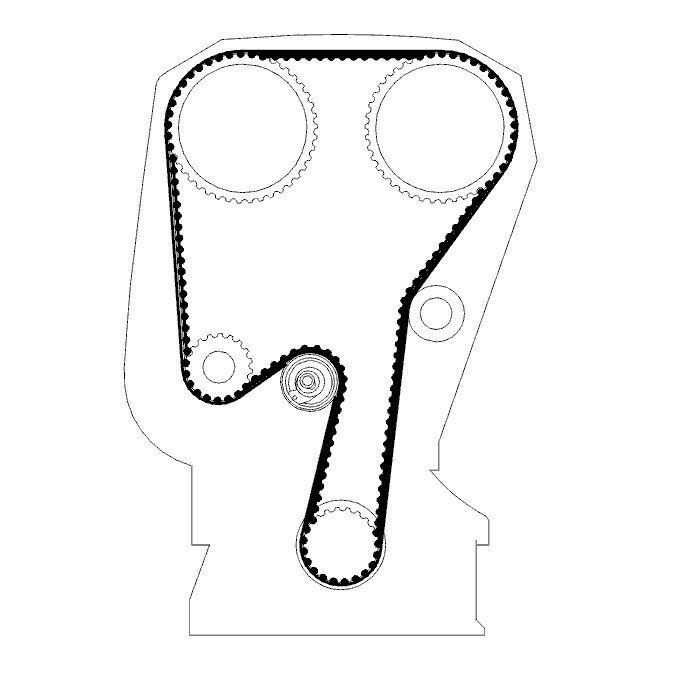
Installing the timing belt

pic 6

Note: For information regarding Variable Valve Timing see: Variable Valve Timing Actuator, Adjustments See: Variable Valve Timing Actuator > Adjustments
Also see Belt Drive, Assembly See: Timing Belt > Removal and Replacement > Belt Drive, Assembly

Install the timing belt over the pulley on the crankshaft.
Install the oscillation damper. Tighten the center nut to 180 Nm. Use counterhold 999 5433 COUNTERHOLD See: Vehicle > Electrical / Mechanical Repair > 999 5433 Counterhold.
Remove the counterhold and install new screws. Tighten the screws to 25 Nm. Angle-tighten 30°

Install the new belt in the following order:
- crankshaft
- the idler pulley
- intake camshaft pulley
- exhaust camshaft pulley
- water pump
- belt tensioner.

Tighten the timing belt
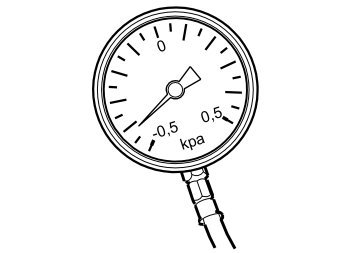
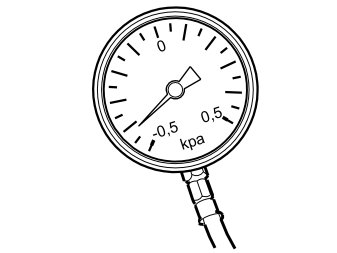
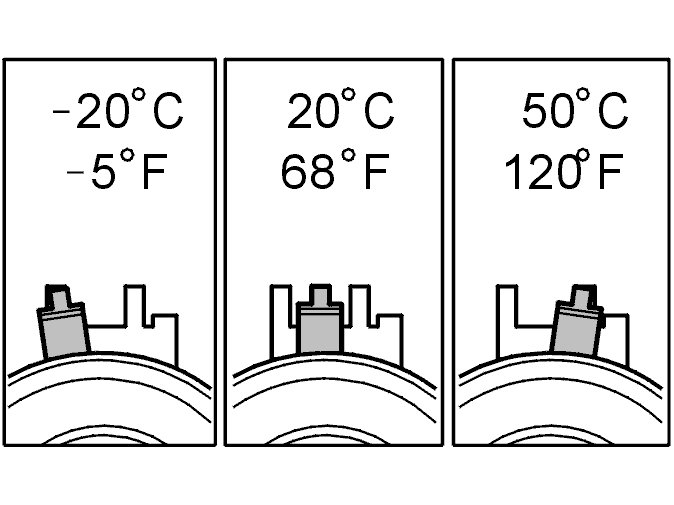
pic 7

This adjustment is carried out on a cold engine. A suitable temperature is approximately 20°C/68°F.
At higher temperatures, for example with the engine at operating temperature or at higher ambient temperature, the needle is further to the right.
The illustration shows the position of the indicator when aligning the timing belt tensioner at different temperatures.

For engine serial no. Up to 3188688

pic 8

Tension the timing belt as follows:
- turn the crankshaft clockwise carefully until the timing belt is tensioned. The belt must be tensioned between the intake camshaft pulley, the idler pulley and the crankshaft
- hold the centre screw on the belt tensioner fixed. Turn the belt tensioner eccentric counter-clockwise until the tensioner indicator passes the marked position.
Then turn the eccentric back so that the indicator reaches the marked position in the centre of the window
- Secure the eccentric and tighten the center screw to 20 Nm.
Check that the indicator is in the correct position.

For engine serial no. From 3188689

pic 9

Tension the timing belt as follows:
- turn the crankshaft clockwise carefully until the timing belt is tensioned. The belt must be tensioned between the intake camshaft pulley, the idler pulley and the crankshaft
- hold the centre screw on the belt tensioner fixed. Turn the belt tensioner eccentric clockwise until the tensioner indicator passes the marked position.
Then turn the eccentric back so that the indicator reaches the marked position in the centre of the window
- Secure the eccentric and tighten the center screw to 20 Nm.
Check that the indicator is in the correct position.

Check

pic 10

Checking markings:
- press the belt to check that the indicator on the tensioner moves easily
- install the upper timing belt cover
- turn the crankshaft 2 turns. Check that the markings on the crankshaft and camshaft pulley correspond
- check that the indicator on the belt tensioner is within the marked area.

Reinstall

pic 11

Reinstall the removed components:
- the front timing belt cover.
Tighten to 12 Nm.
- the upper timing belt cover
- install the auxiliaries belt
- the servo reservoir
- the expansion tank.

Note! Make sure that the hoses are routed positioned.

- the cross member. Tighten the screws at the suspension turret to 50 Nm and the screw for the engine bracket to 80 Nm.
Wipe clean and check the engine compartment
- the cover in the wing liner
- the front wheel according to Installing wheels See: Wheels > Removal and Replacement.

Checking work

Function test:
- Test drive the engine.

_____________________________

Let me know if this helps or if you have other questions.

Take care,
Joe
Was this
answer
helpful?
Yes
No
+1
Friday, September 6th, 2019 AT 7:05 PM
Tiny
RICK ESTESS
  • MEMBER
  • 52 POSTS
I know there will be damage if valves hit a piston. I know that the timing is wrong if that happens. What nobody has been able to tell me is, how much should I turn the cam to get it right? 1 turn? 1/2 turn? Could it take multiple tries to get it right or is it like a coin toss; if it lands on heads and you want tails, just flip it over and you get what you want - there's no half heads or half tails; it's one way or the other. This is what I've been trying to find out but nobody will give me a straight answer. It's possible that it's just too simple for you guys to believe that anyone could have difficulty with figuring it out. I'm not ashamed to say that I do. I'm definitely not stupid, I just want to be absolutely sure that I get this right because I've already invested over $6,000.00 in this car. I'm walking away from the car for the night.
Was this
answer
helpful?
Yes
No
Friday, September 6th, 2019 AT 9:24 PM
Tiny
JACOBANDNICKOLAS
  • MECHANIC
  • 108,348 POSTS
The timing marks on the cams must align with the marks indicated below as well as the crankshaft must align also at the same time as indicated below. It isn't a 50/50 shot. There is only one way it will work. If I am misunderstanding what you are asking, let me know.
Was this
answer
helpful?
Yes
No
+1
Saturday, September 7th, 2019 AT 6:33 PM
Tiny
JIS001
  • MECHANIC
  • 3,408 POSTS
Hi, as JACOBANDNICKOLAS has stated earlier. If you did not time it right you will feel the valves hitting the piston. Now if you are off 2 teeth then you will not know until you have the vehicle running and it sets off a Check Engine light. So your either way off and stop! Or your going to set the engine light on. A job like this you will need to take your time and double check your markings.
Was this
answer
helpful?
Yes
No
+1
Saturday, September 7th, 2019 AT 10:37 PM
Tiny
RICK ESTESS
  • MEMBER
  • 52 POSTS
Thanks for restating that. I get a little more comfortable with each piece of advice. To me, the more critical something is, the more I need to hear the same thing said in different ways; it solidifies it. When this is done, I'll be looking to help somebody else get out of this bind - pay it forward. The most important bit of info that I've been missing is this: the crank to cam ratio is 2:1. I'm betting that the main reason you guys were wondering why I couldn't get this is because I should have known it. (I found out last night). Knowledge crossover carries a lot of assumptions and as long as you're teaching new people, it's gonna happen. As long as there's mutual respect, this will work. There is and it does. And I appreciate it.
Was this
answer
helpful?
Yes
No
+1
Sunday, September 8th, 2019 AT 12:40 PM
Tiny
RICK ESTESS
  • MEMBER
  • 52 POSTS
While turning the engine over by hand.
Was this
answer
helpful?
Yes
No
Sunday, September 8th, 2019 AT 6:38 PM
Tiny
JACOBANDNICKOLAS
  • MECHANIC
  • 108,348 POSTS
Welcome back:

You are welcome. It's tough not being there to actually show what should happen. Thanks JIS001 for jumping in. The more the better.

Take care and let us know the results.

Joe
Was this
answer
helpful?
Yes
No
+1
Sunday, September 8th, 2019 AT 6:39 PM
Tiny
RICK ESTESS
  • MEMBER
  • 52 POSTS
I tested the cam alignment by turning the crankshaft clockwise. I'm hearing a pop coming from the cam hub area on the exhaust side. (No valve to piston contact which means the big problem has been solved!)The pop sounds after about every seventh tooth on the timing belt passes over the sprocket. I've been told that it's just the sound of the cam turning over and it's nothing to worry about. Is this true? I need your input before I put everything back together. I want to get my car back on the road tomorrow! It's been two months! Thanks for all your help!
Was this
answer
helpful?
Yes
No
Sunday, September 8th, 2019 AT 8:09 PM
Tiny
JACOBANDNICKOLAS
  • MECHANIC
  • 108,348 POSTS
I think I'm going to let JIS001 answer that one. To me, it doesn't sound right, but he is a certified Volvo tech, so he will have a better answer.
Was this
answer
helpful?
Yes
No
Monday, September 9th, 2019 AT 5:47 PM
Tiny
JIS001
  • MECHANIC
  • 3,408 POSTS
Post a video so we can see and hear the exhaust hub please. It might be normal since oil is pumping into the hub but I still want to confirm the sound.
Was this
answer
helpful?
Yes
No
+1
Monday, September 9th, 2019 AT 8:32 PM

Please login or register to post a reply.

Sponsored links