Welcome to 2CarPros.
No, once the air is in there, it needs bleed. Now the problem. You can't loosen the bleeders. You will have two choices. First, try and work on the bleeders until they come loose for bleeding, or if they brake, replace the component (brake caliper). Of, if you have drum rear brakes, the wheel cylinder.
Here are a couple links you may find helpful:
https://www.2carpros.com/articles/how-to-replace-a-wheel-cylinder
https://www.2carpros.com/articles/brake-caliper-replacement
https://www.2carpros.com/articles/how-to-bleed-or-flush-a-car-brake-system
If you are unable to loosen the bleeder and one breaks, here are directions specific to your vehicle for replacement of the calipers and wheel cylinders. The attached pictures correlate with the directions.
Front brake caliper
+++++++++++++++++++++++++
FRONT
Removal Procedure
pic 1
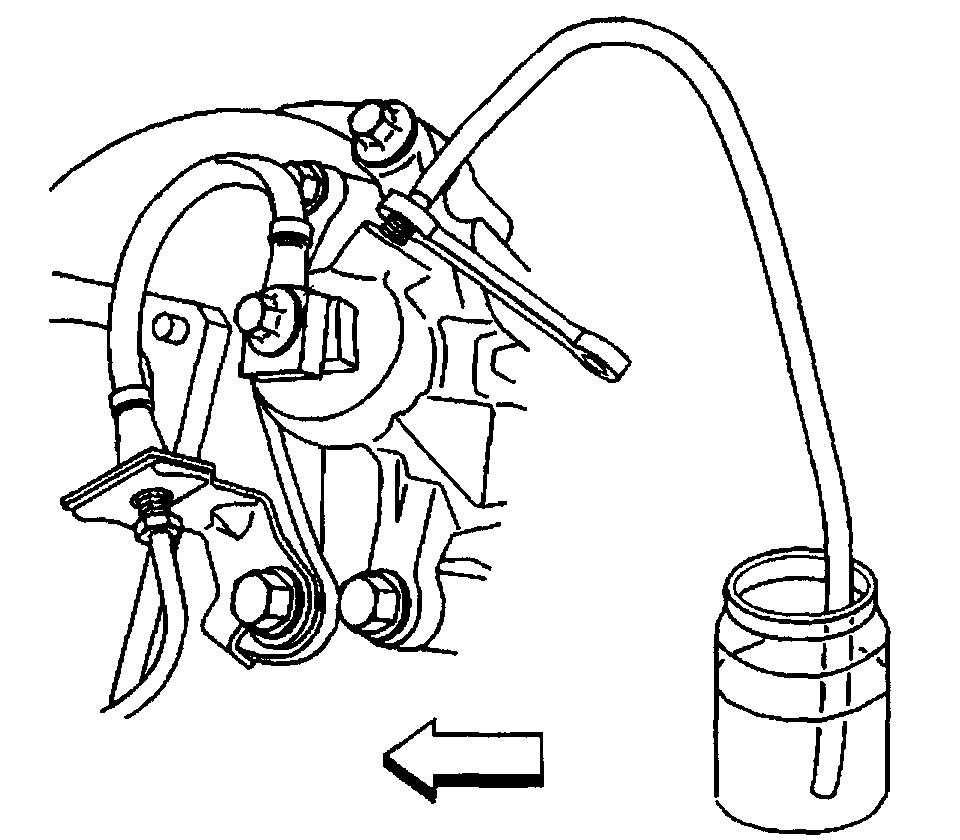
1. Use a suction gun in order to remove and DISCARD approximately 33 percent (1/3) of the brake fluid from the master cylinder.
2. Raise and support the vehicle. Refer to Vehicle Lifting.
3. Remove the tire and wheel. Refer to Tire and Wheel Removal and Installation.
4. Install two nuts to retain the rotor to the hub.
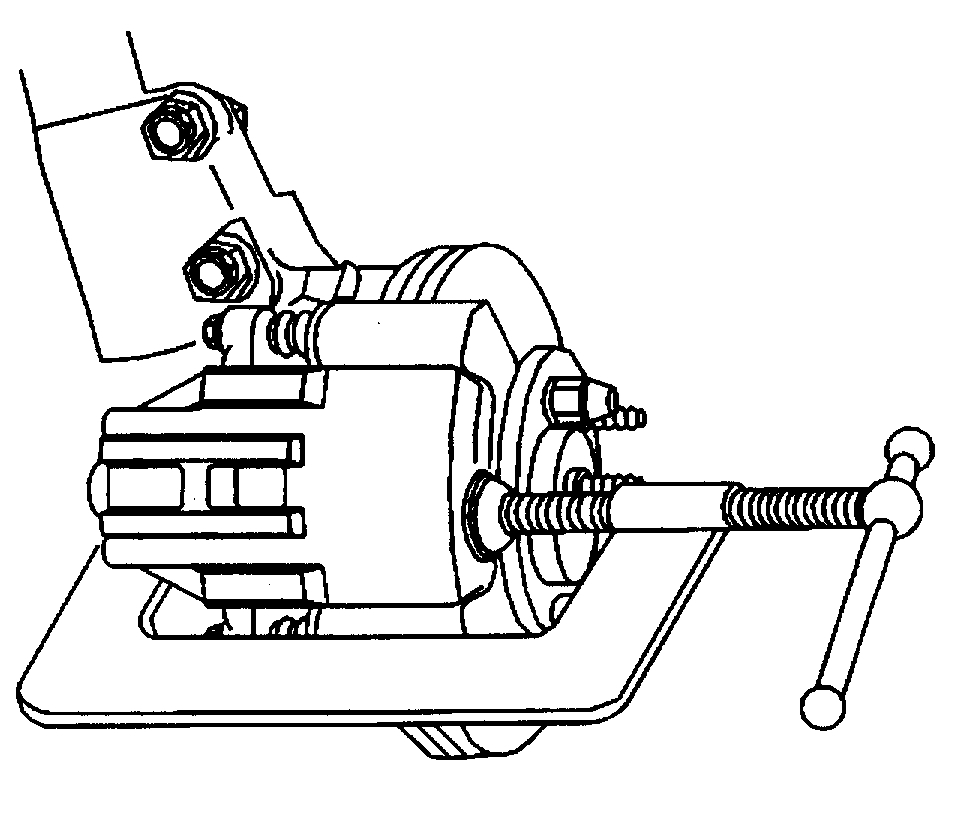
5. Install a large C-clamp (2) over the top of the brake caliper and against the back of the outboard brake pad.
6. Tighten the C-clamp until the caliper piston is pushed into the caliper bore enough to slide the caliper off the rotor.
7. If the brake caliper is going to be removed from the vehicle for unit repair (overhaul) or replacement, proceed to Step 8. If the brake caliper is not being replaced or overhauled, proceed to Step 13.
pic 2
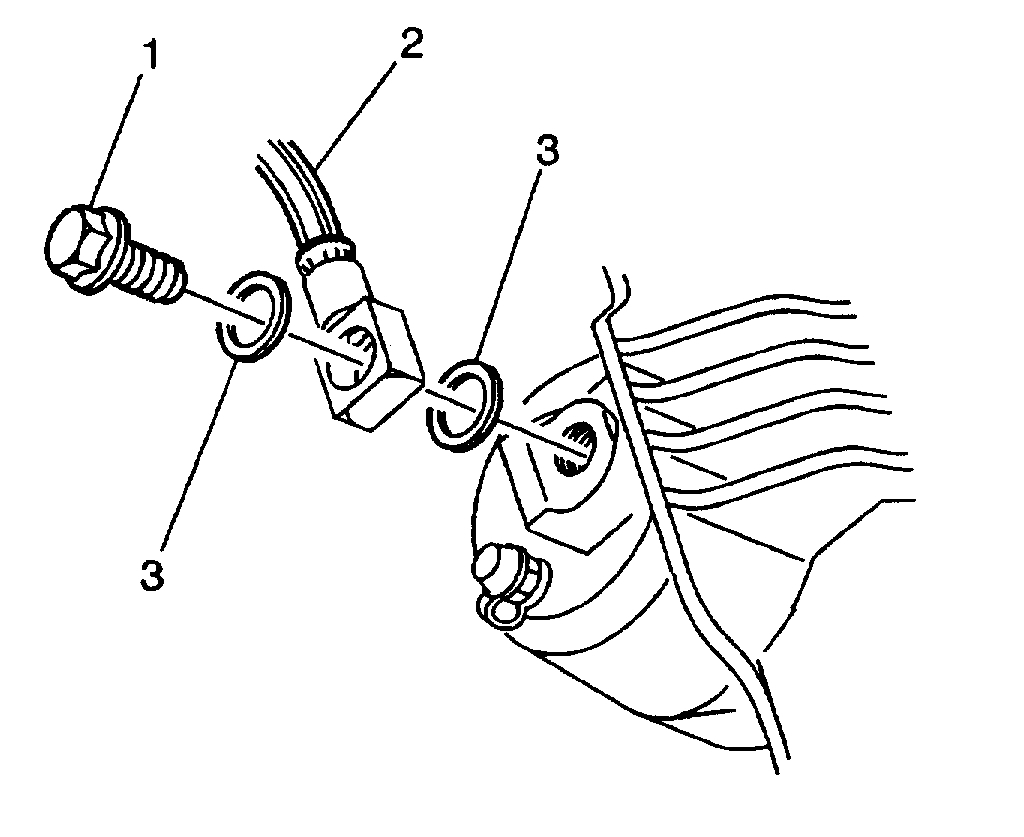
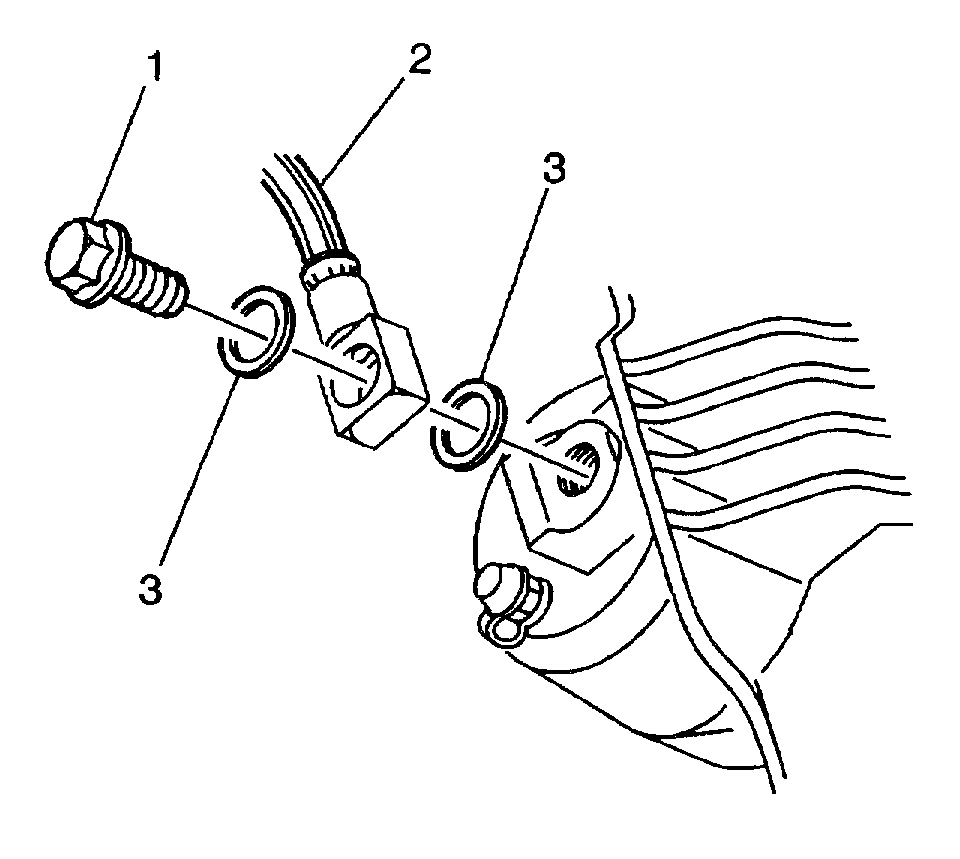
8. Remove the brake hose bolt (1).
9. Remove the brake hose (2) from the brake caliper.
10. Remove and discard the two copper brake hose gaskets (3). These gaskets may be stuck to the brake caliper and/or the brake hose end.
11. Plug the openings in the brake caliper and the brake hose in order to prevent brake fluid loss and contamination.
12. Clean off any dirt or corrosion on the brake caliper near the brake hose fitting.
pic 3
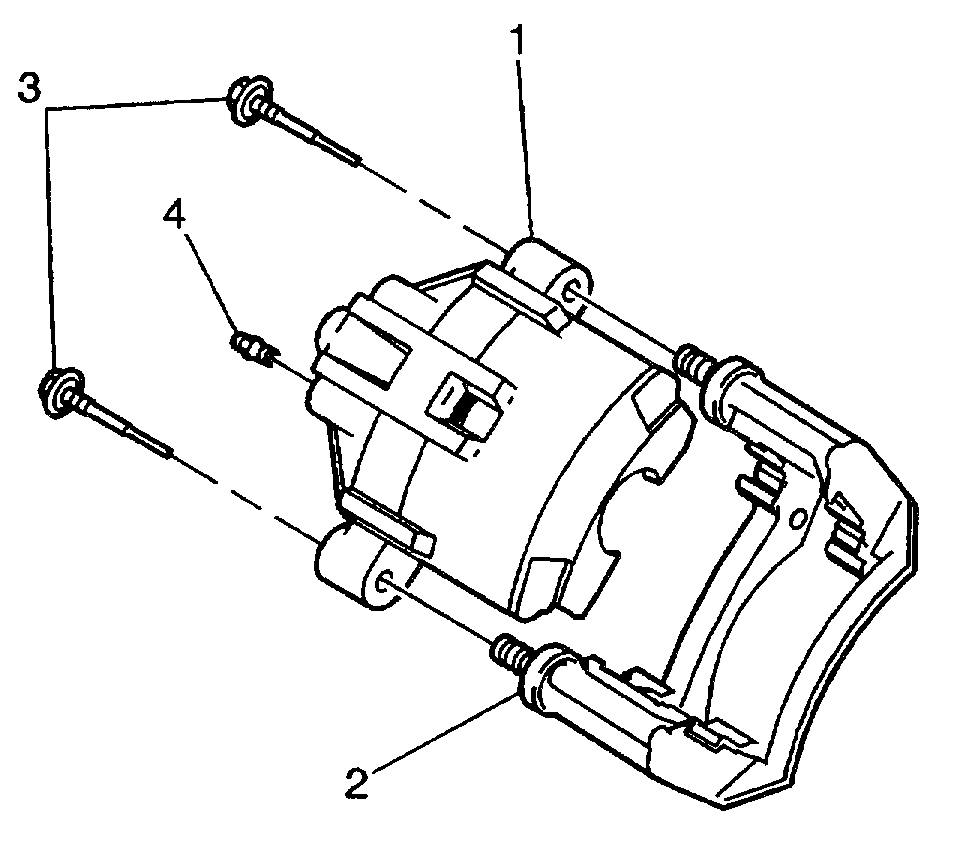
13. Remove the brake caliper bolts (3).
Notice: Do not allow calipers to hang from the flexible hoses. Doing so can damage the hoses.
14. Remove the brake caliper from the brake caliper bracket.
pic 4
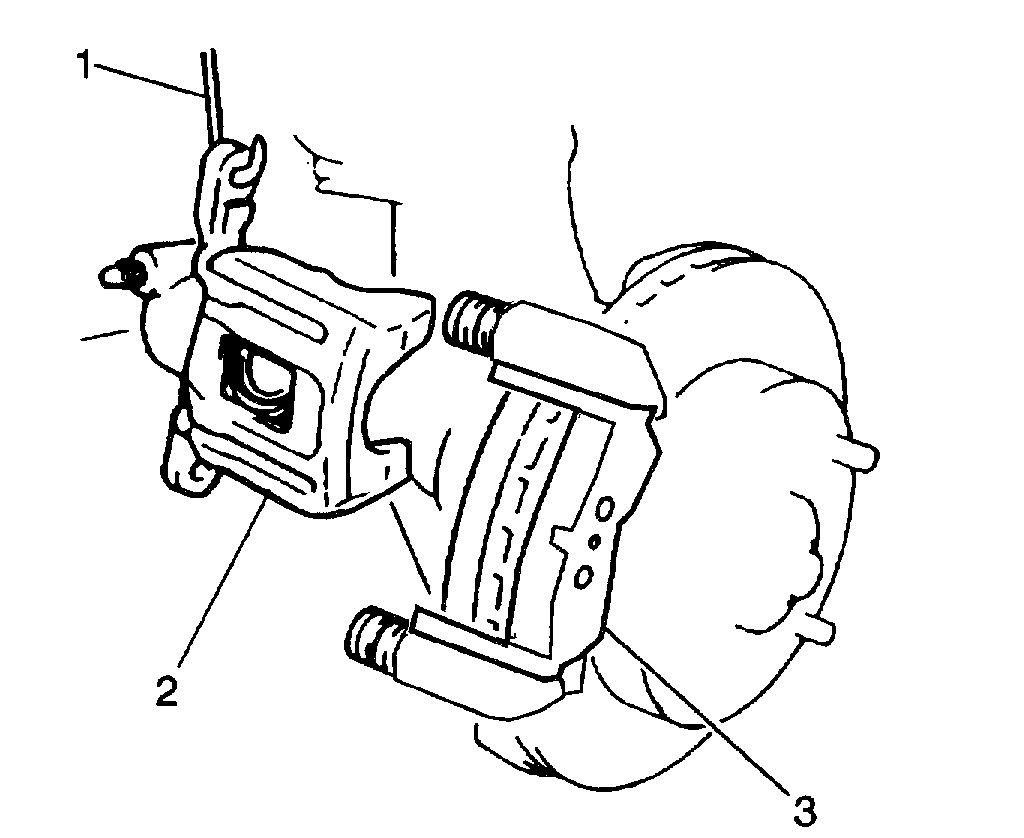
15. Use a strap (1) or heavy gage wire in order to support the brake caliper (2).
16. Inspect the piston boot for the following conditions:
^ Cuts
^ Tears
^ Deterioration
Replace the piston boot if damage exists. Refer to Brake Caliper Overhaul - Front.
pic 5
17. Inspect the brake caliper bolt boots (4) for the following conditions:
^ Cuts
^ Tears
^ Deterioration
Replace the bolt boots if damage exists. Refer to Brake Caliper Bracket Replacement - Front
18. Inspect the caliper bolts for corrosion or damage. If corrosion is found on the brake caliper bolt shaft, replace the brake caliper bolt and the brake caliper bolt boot. Do not attempt to polish away the corrosion.
Installation Procedure
pic 6
1. Ensure that the caliper bolt boots (3) are properly installed.
pic 7
2. Install the caliper (1) to the caliper bracket.
pic 8
3. Use silicone grease to lubricate the brake caliper bolt shaft. Do not lubricate the bolt threads.
4. Use silicone grease to lubricate the brake caliper bolt boots (4) in the caliper bracket (3).
Notice: Refer to Fastener Notice in Service Precautions.
5. Install the brake caliper bolts.
^ Tighten the brake caliper bolts to 85 Nm (63 lb ft).
6. Use a flat-bladed tool in order to install the caliper bracket boot over the shoulder of the caliper bolt.
7. Remove the plugs in the brake hose end.
Important: Install NEW copper brake hose gaskets (3).
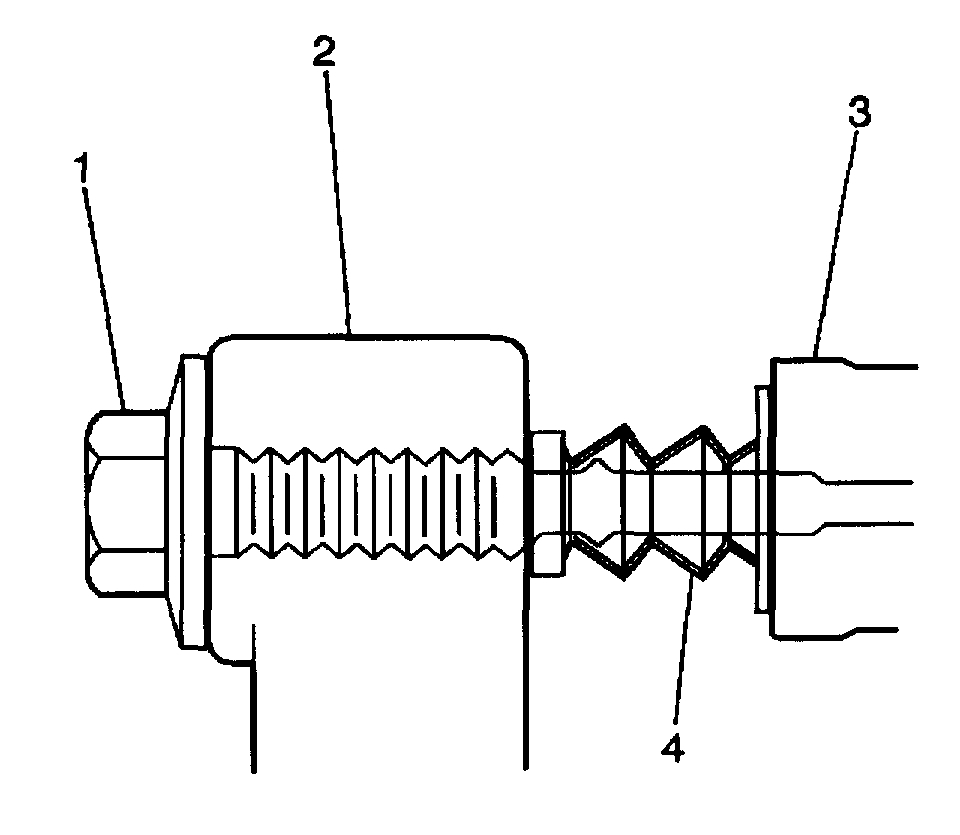
pic 9
8. Assemble the brake hose bolt (1) and the NEW copper brake hose gaskets (3) to the brake hose (2).
9. Install the brake hose bolt to the brake caliper.
^ Tighten the brake hose bolt to 54 Nm (40 lb ft).
10. Remove the nuts securing the rotor to the hub.
11. Install the tire and wheel. Refer to Tire and Wheel Removal and Installation.
12. Lower the vehicle.
13. Fill the master cylinder to the proper level with clean brake fluid. Refer to Master Cylinder Reservoir Filling.
14. Bleed the brake system if the brake hose was disconnected from the brake caliper. Refer to Hydraulic Brake System Bleeding.
15. Pump the brake pedal (3/4 of a full stroke) as many times as necessary to obtain a firm brake pedal.
16. Apply approximately 778 Nm (175 lb ft) of force to the brake pedal for ten seconds.
17. Inspect the brake caliper and hydraulic brake system for brake fluid leaks.
++++++++++++++++++++++++++++++++++++++++++++++++++++++++++++++++++++++++
Removal Procedure Rear
Pic 10
1. Use a suction gun in order to remove and DISCARD approximately 33 percent (1/3) of the brake fluid from the master cylinder.
2. Raise and support the vehicle. Refer to Vehicle Lifting.
3. Remove the tire and wheel. Refer to Tire and Wheel Removal and Installation.
4. Install two nuts to retain the rotor to the hub.
5. Install a large C-clamp (3) over the top of the brake caliper and against the back of the outboard brake pad.
6. Tighten the C-clamp until the caliper piston is pushed into the caliper bore enough to slide the caliper off the rotor.
7. If the brake caliper is going to be removed from the vehicle for unit repair (overhaul) or replacement, proceed to Step 8. If the brake caliper is not being replaced or overhauled, proceed to Step 13.
pic 11
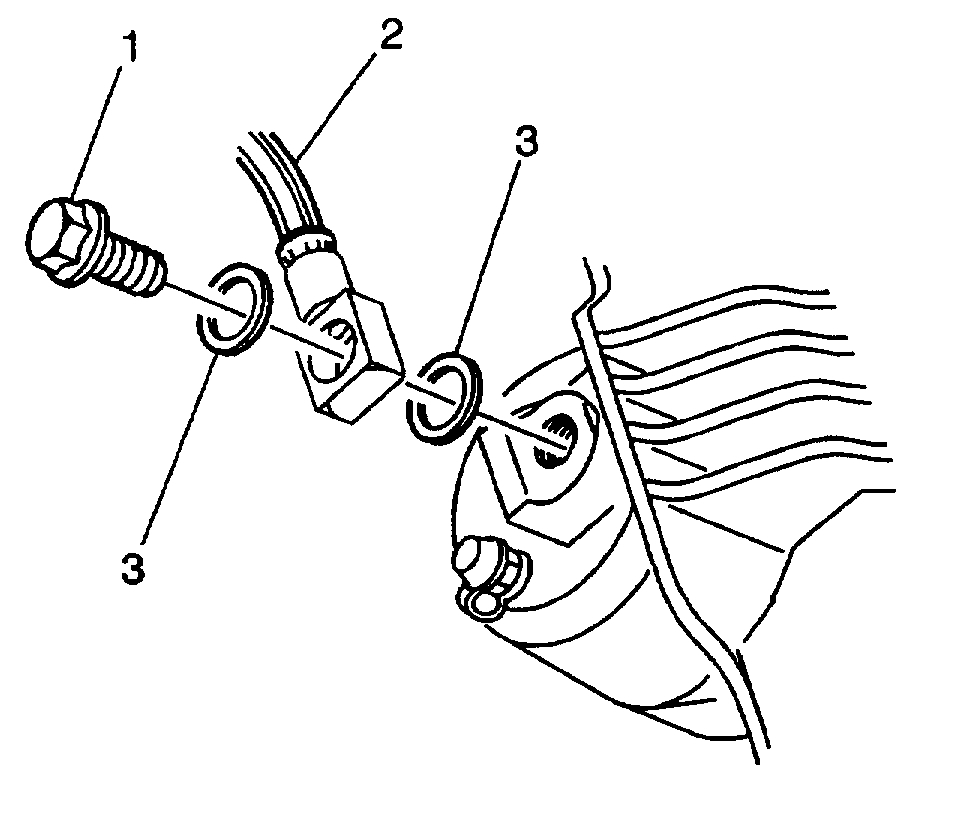
8. Remove the brake hose bolt (1).
9. Remove the brake hose (2) from the brake caliper.
10. Remove and discard the two copper brake hose gaskets (3). These gaskets may be stuck to the brake caliper and/or the brake hose end.
11. Plug the openings in the brake caliper and the brake hose in order to prevent brake fluid loss and contamination.
12. Clean off any dirt or corrosion on the brake caliper near the brake hose fitting.
pic 12
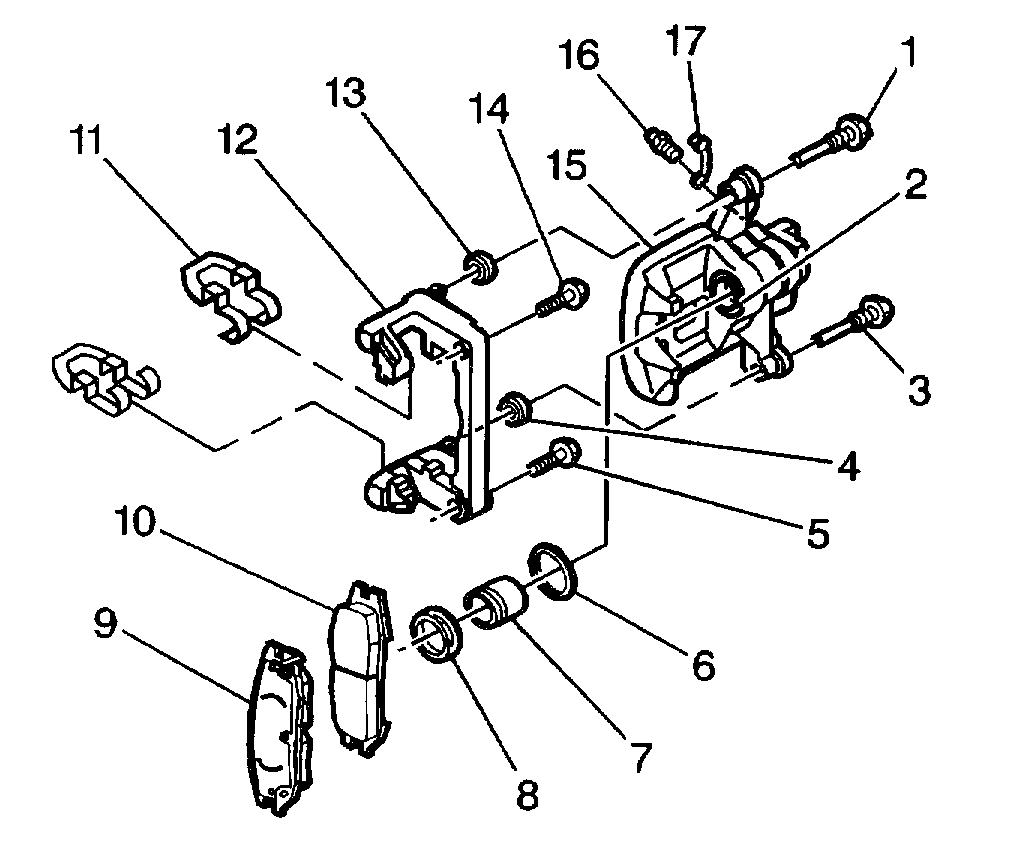
13. Remove the brake caliper bolts (1 and 3).
Notice: Do not allow calipers to hang from the flexible hoses. Doing so can damage the hoses.
14. Remove the brake caliper (15) from the brake caliper bracket (12).
15. Use a strap or heavy gage wire in order to support the brake caliper.
16. Inspect the brake caliper piston boot (8) for the following conditions:
^ Cuts
^ Tears
^ Deterioration
Replace the brake caliper piston boot if damage exists. Refer to Brake Caliper Overhaul - Rear (Export).
pic 13
17. Inspect the brake caliper bolt boots (4) for the following conditions:
^ Cuts
^ Tears
^ Deterioration
Replace the brake caliper bolt boots if damage exists. Refer to Brake Caliper Bracket Replacement - Rear (Export).
18. Inspect the caliper bolts for corrosion or damage. If corrosion is found on the brake caliper bolt shaft, replace the brake caliper bolt, replace the brake caliper bolt bushing, and replace the brake caliper bolt boot. Do not attempt to polish away the corrosion.
Installation Procedure
pic 14
1. Ensure that the caliper bolt bushings (4) and the caliper bolt boots (3) are properly installed.
pic 15
2. Install the brake caliper (1) to the brake caliper bracket (2).
pic 16
3. Use silicone grease to lubricate the brake caliper bolt shaft. Do not lubricate the threads.
4. Use silicone grease to lubricate the brake caliper bolt boots (4) in the brake caliper bracket (3).
Notice: Refer to Fastener Notice in Service Precautions.
5. Install the brake caliper bolts.
^ Tighten the brake caliper bolts to 43 Nm (32 lb ft).
6. Use a flat-bladed tool in order to install the brake caliper bracket boot over the shoulder of the brake caliper bolt.
7. Remove the plugs in the brake hose end.
Important: Install NEW copper brake hose gaskets (3).
pic 17
8. Assemble the brake hose bolt (1) and the NEW copper brake hose gaskets (3) to the brake hose (2).
9. Install the brake hose bolt to the brake caliper. Refer to Brake Hose Replacement - Rear.
10. Remove the nuts securing the rotor to the hub.
11. Install the tire and wheel. Refer to Tire and Wheel Removal and Installation.
12. Lower the vehicle.
13. Fill the master cylinder to the proper level with clean brake fluid. Refer to Master Cylinder Reservoir Filling.
pic 18
14. Bleed the brake caliper at the brake caliper bleeder screw. Refer to Hydraulic Brake System Bleeding.
15. Pump the brake pedal (3/4 of a full stroke) as many times as necessary to obtain a firm brake pedal.
16. Apply approximately 778 Nm (175 lb ft) of force to the brake pedal for ten seconds.
17. Inspect the brake caliper and hydraulic brake system for brake fluid leaks.
____________________________________
Rear Drum Brake (wheel cylinder replacement)
WHEEL CYLINDER REPLACEMENT
Removal Procedure
^ Tools Required
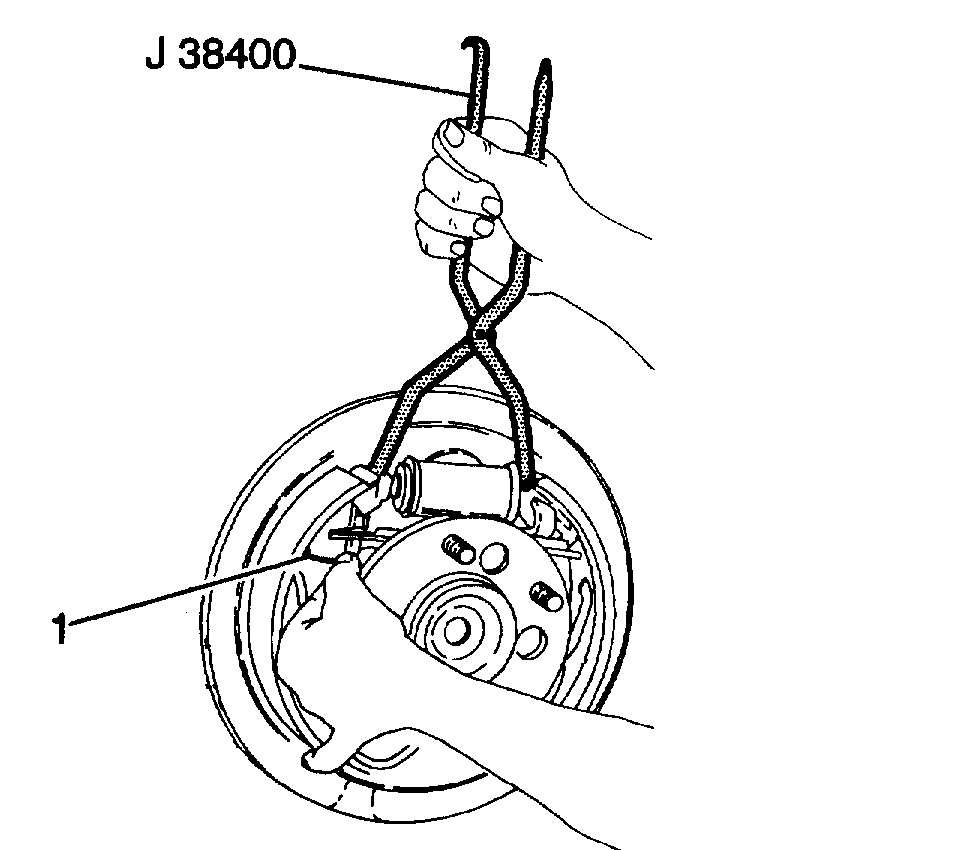
- J 38400 Brake Shoe Spanner and Spring Remover
Caution: Keep fingers away from rear brake shoe springs to prevent fingers from being pinched between spring and shoe web or spring and backing plate.
pic 19
1. Raise and support the vehicle. Refer to Vehicle Lifting.
2. Remove the tire and wheel. Refer to Tire and Wheel Removal and Installation.
3. Clean all dirt and foreign material from the wheel cylinder brake pipe fitting and the bleeder valve.
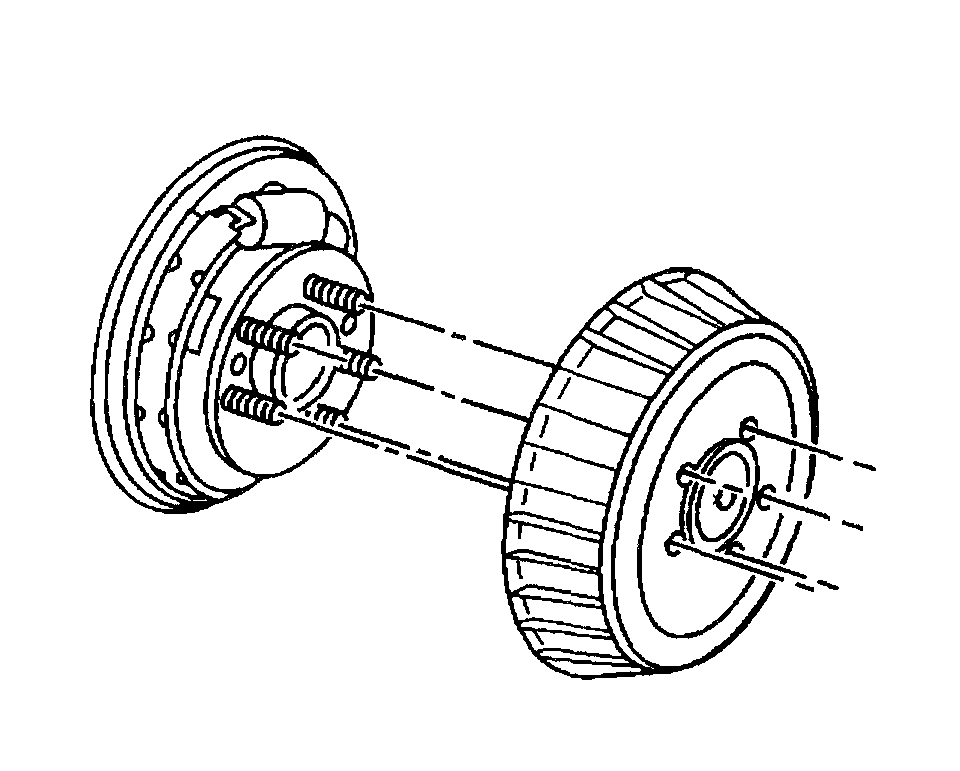
4. Remove the brake drum. Refer to Brake Drum Replacement.
5. Remove the brake pipe nut.
6. Install a cap over the end of the brake pipe in order to prevent brake fluid loss and/or brake fluid contamination.
pic 20
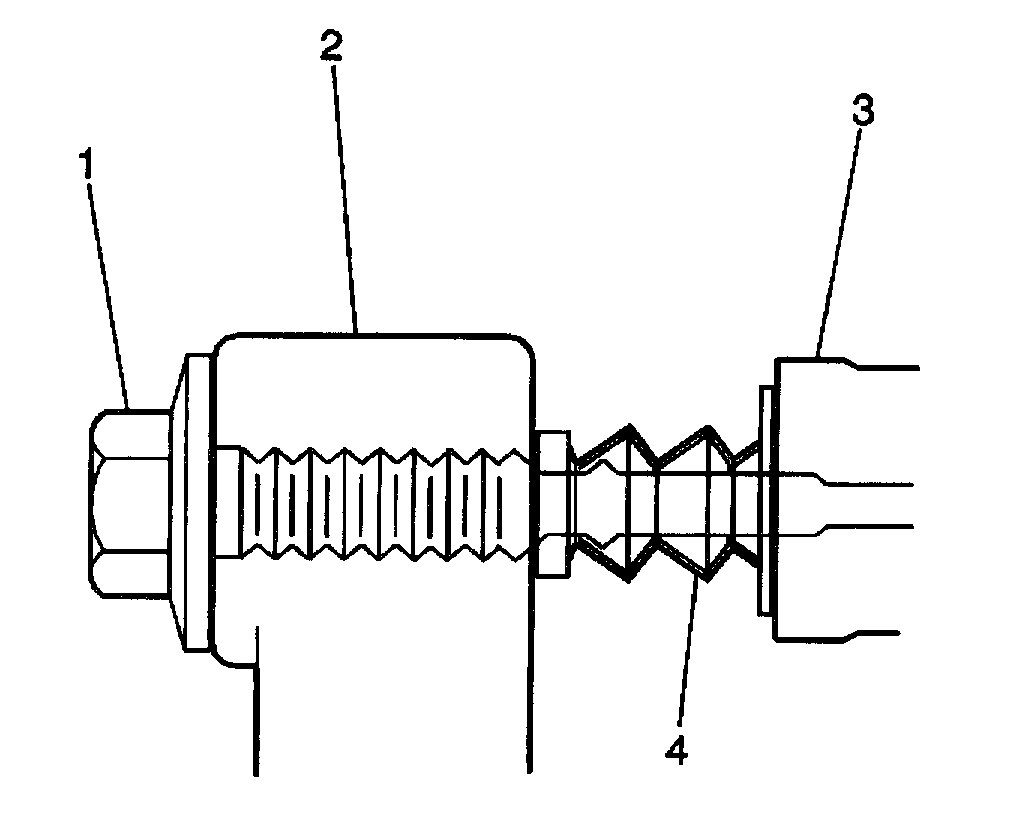
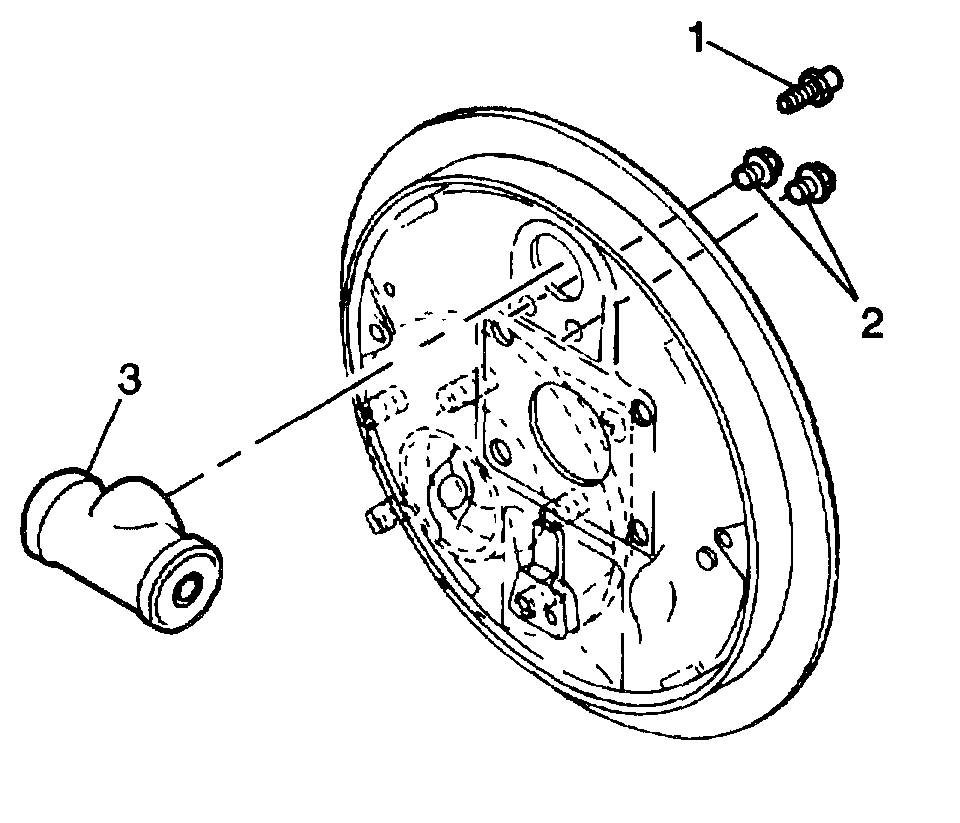
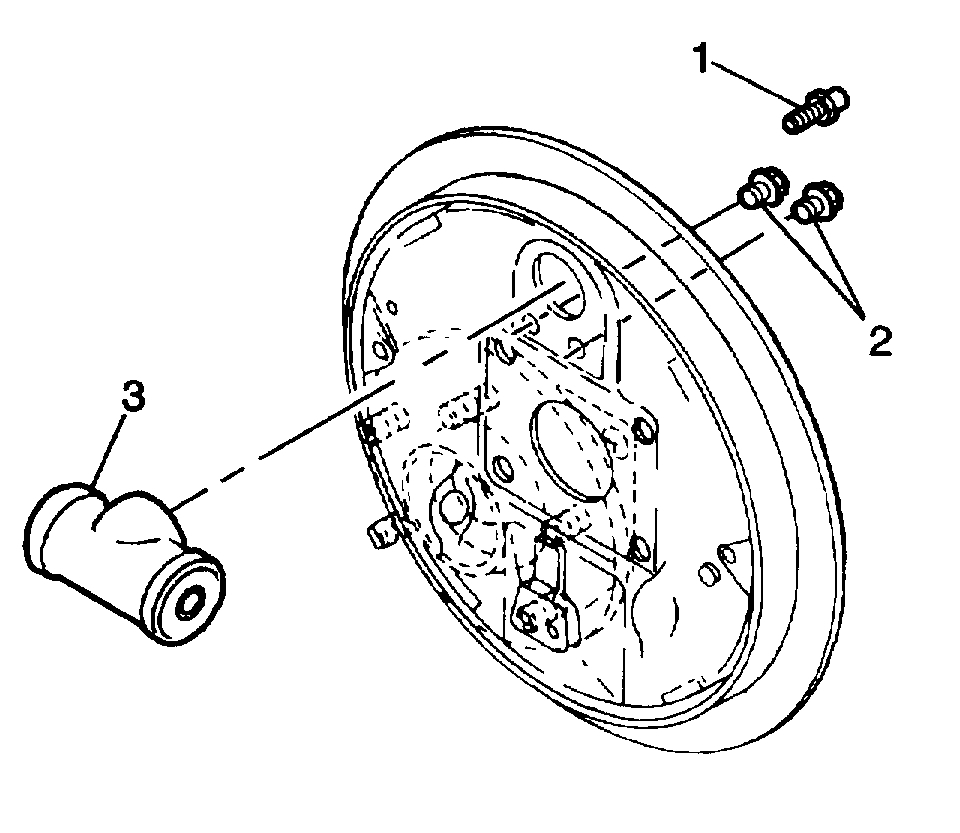
7. Remove the wheel cylinder bolts (2).
pic 21
8. Use the J 38400 in order to spread the brake shoes apart.
9. Remove the wheel cylinder (3).
10. Clean the old sealant from the backing plate where the wheel cylinder was installed. Clean the sealant from the wheel cylinder if you are reusing the wheel cylinder.
Installation Procedure
pic 22
1. Apply LOCTITE (R) GM PIN 12345382 (or equivalent) to the wheel cylinder shoulder face which contacts the backing plate.
2. Use the J 38400 in order to spread the brake shoes apart.
pic 22
3. Install the wheel cylinder (3).
Notice: Refer to Fastener Notice in Service Precautions.
4. Install the wheel cylinder bolts (2).
^ Tighten the bolts to 12 Nm (110 inch lbs.).
5. Remove the cap from the brake pipe and install the brake pipe to the wheel cylinder.
^ Tighten the nut to 17 Nm (12 ft. lbs.).
6. Bleed the hydraulic brake system at the wheel cylinder. Refer to Hydraulic Brake System Bleeding.
7. Install the brake drum. Refer to Brake Drum Replacement.
8. Install the tire and wheel. Refer to Tire and Wheel Removal and Installation.
9. Lower the vehicle.
_____________________________________
Let me know if this helps or if you have other questions.
Take care,
Joe
Images (Click to enlarge)
May 13, 2019 at 6:24 PM