Welcome to 2CarPros.
Based on your description, to me it sounds like a fuel pressure related issue. Under the load, the pump can't keep up which results in the loss of power. Once you let off the throttle, it catches back up and continues.
With that in mind, I would start by checking fuel pressure. Lets confirm that the pressure meets the manufacturer's specs. Keeping in mind, the fuel filter itself may be the issue.
________________________
First, here are a couple links that explain in general how to check fuel pressure and replace a fuel filter:
https://www.2carpros.com/articles/how-to-change-a-fuel-filter
https://www.2carpros.com/articles/how-to-check-fuel-system-pressure-and-regulator
_______________________
Here are the directions specific to testing fuel pressure on this vehicle. Picture 1 correlates with the directions. The manufacturer's specs are also included in the directions.
_______________________
Use this test in conjunction with the Fuel Pump Capacity Test, Fuel Pressure Leak Down Test and Fuel Pump Amperage Test found elsewhere in this group.
Check Valve Operation: The bottom section of the fuel pump module contains a one-way check valve to prevent fuel flow back into the tank and to maintain fuel supply line pressure (engine warm) when pump is not operational. It is also used to keep the fuel supply line full of gasoline when pump is not operational. After the vehicle has cooled down, fuel pressure may drop to 0 psi (cold fluid contracts), but liquid gasoline will remain in fuel supply line between the check valve and fuel injectors. Fuel pressure that has dropped to 0 psi on a cooled down vehicle (engine OFF) is a normal condition.
When the electric fuel pump is activated, fuel pressure should immediately (1-2 seconds) rise to specification.
The fuel system is equipped with a separate fuel pump module mounted, fuel pressure regulator. The fuel filter is remotely mounted. The fuel pressure regulator is not controlled by engine vacuum.
WARNING: THE FUEL SYSTEM IS UNDER CONSTANT FUEL PRESSURE EVEN WITH THE ENGINE OFF. BEFORE DISCONNECTING FUEL LINE AT FUEL RAIL, THIS PRESSURE MUST BE RELEASED. REFER TO THE FUEL SYSTEM PRESSURE RELEASE PROCEDURE.
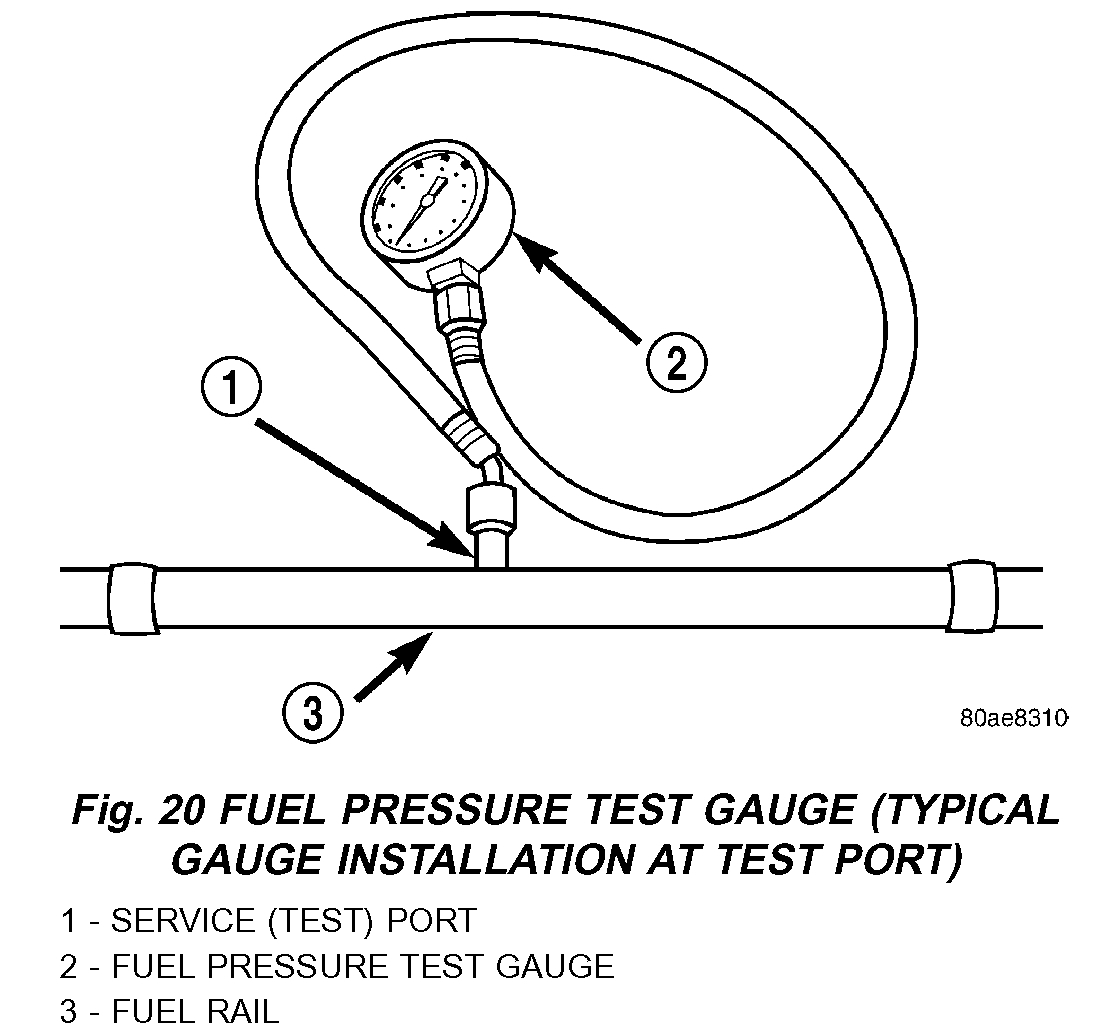
Fig.20 Fuel Pressure Test Gauge (Typical Gauge Installation At Test Port)
See pic 1
1. Remove protective cap at fuel rail test port. Connect the 0 - 414 kPa (0 - 60 psi) fuel pressure gauge (from gauge set 5069) to test port pressure fitting on fuel rail. The DRB III Scan Tool along with the PEP module, the 500 psi pressure transducer, and the transducer-to-test port adapter may also be used in place of the fuel pressure gauge.
2. Start and warm engine and note pressure gauge reading. Fuel pressure should be 339 + 34 kPa (49.2 + 5 psi) at idle.
3. If engine runs, but pressure is below 44.2 psi, check for a kinked fuel supply line somewhere between fuel rail and fuel pump module. If line is not kinked, but specifications for either the Fuel Pump Capacity, Fuel Pump Amperage or Fuel Pressure Leak Down Tests were not met, replace lower section of fuel pump module. Refer to Fuel Pump Module Removal/Installation.
4. If operating pressure is above 54.2 psi, electric fuel pump is OK, but fuel pressure regulator is defective. Replace lower section of fuel pump module. Refer to Fuel Pump Module Removal/Installation.
5. Install protective cap to fuel rail test port.
__________________________________________
Here are the directions specific to your vehicle for replacement of the fuel filter. The remaining pics correlate with these directions.
REMOVAL
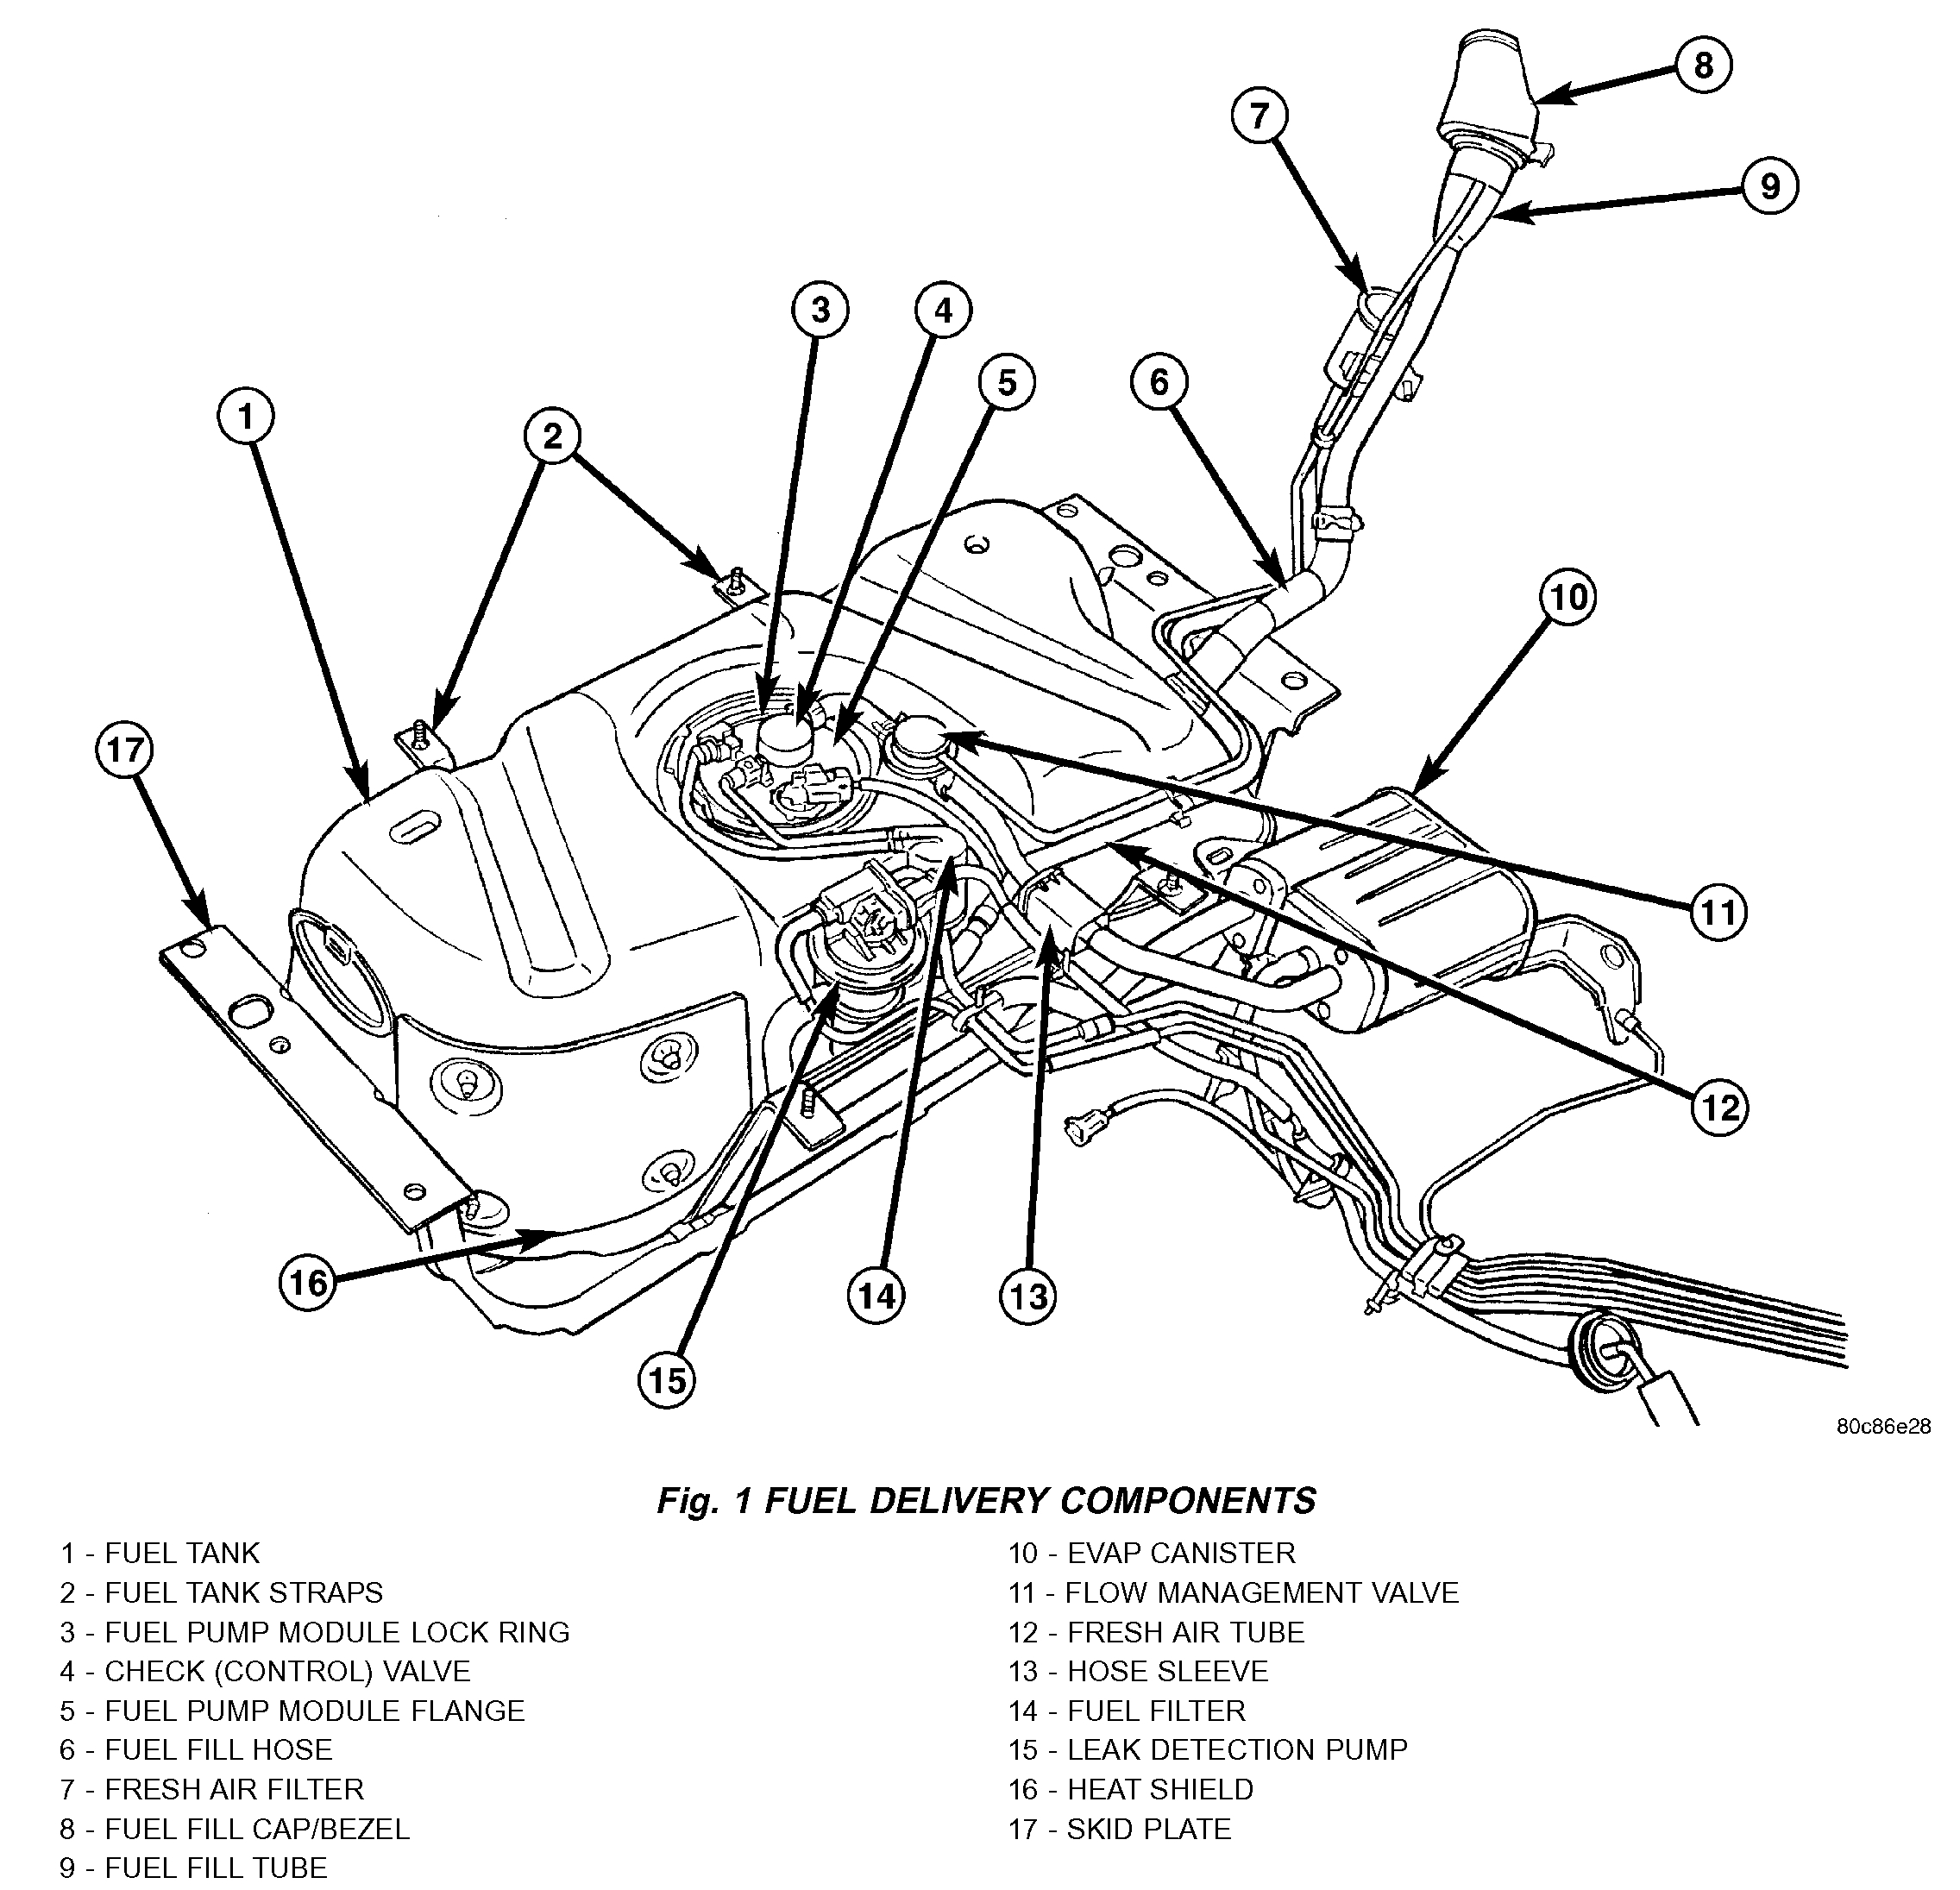
Fig.1 Fuel Delivery Components
pic 2
The main fuel filter is attached to the front of fuel tank. Three fuel lines are used at filter.
This vehicle may or may not be equipped with an access plate. This plate is located on floorpan inside vehicle at rear cargo area.
NOTE: ALLDATA users have reported that the fuel filter is integrated into the fuel pump/sender assembly on vehicles without an access plate.
If equipped with an access plate, fuel tank removal will not be necessary for fuel filter removal. Access is from rear cargo area.
WARNING: THE FUEL SYSTEM MAY BE UNDER A CONSTANT PRESSURE (EVEN WITH THE ENGINE OFF). BEFORE SERVICING MOST FUEL SYSTEM COMPONENTS, THE FUEL SYSTEM PRESSURE MUST BE RELEASED. REFER TO THE FUEL SYSTEM PRESSURE RELEASE PROCEDURE.
1. Release fuel system pressure.
2. Four cargo holdown clamps are located inside vehicle on floor of rear cargo area. Two of these four clamps must be removed. Remove 2 rearward mounted clamps by drilling out clamp rivets.
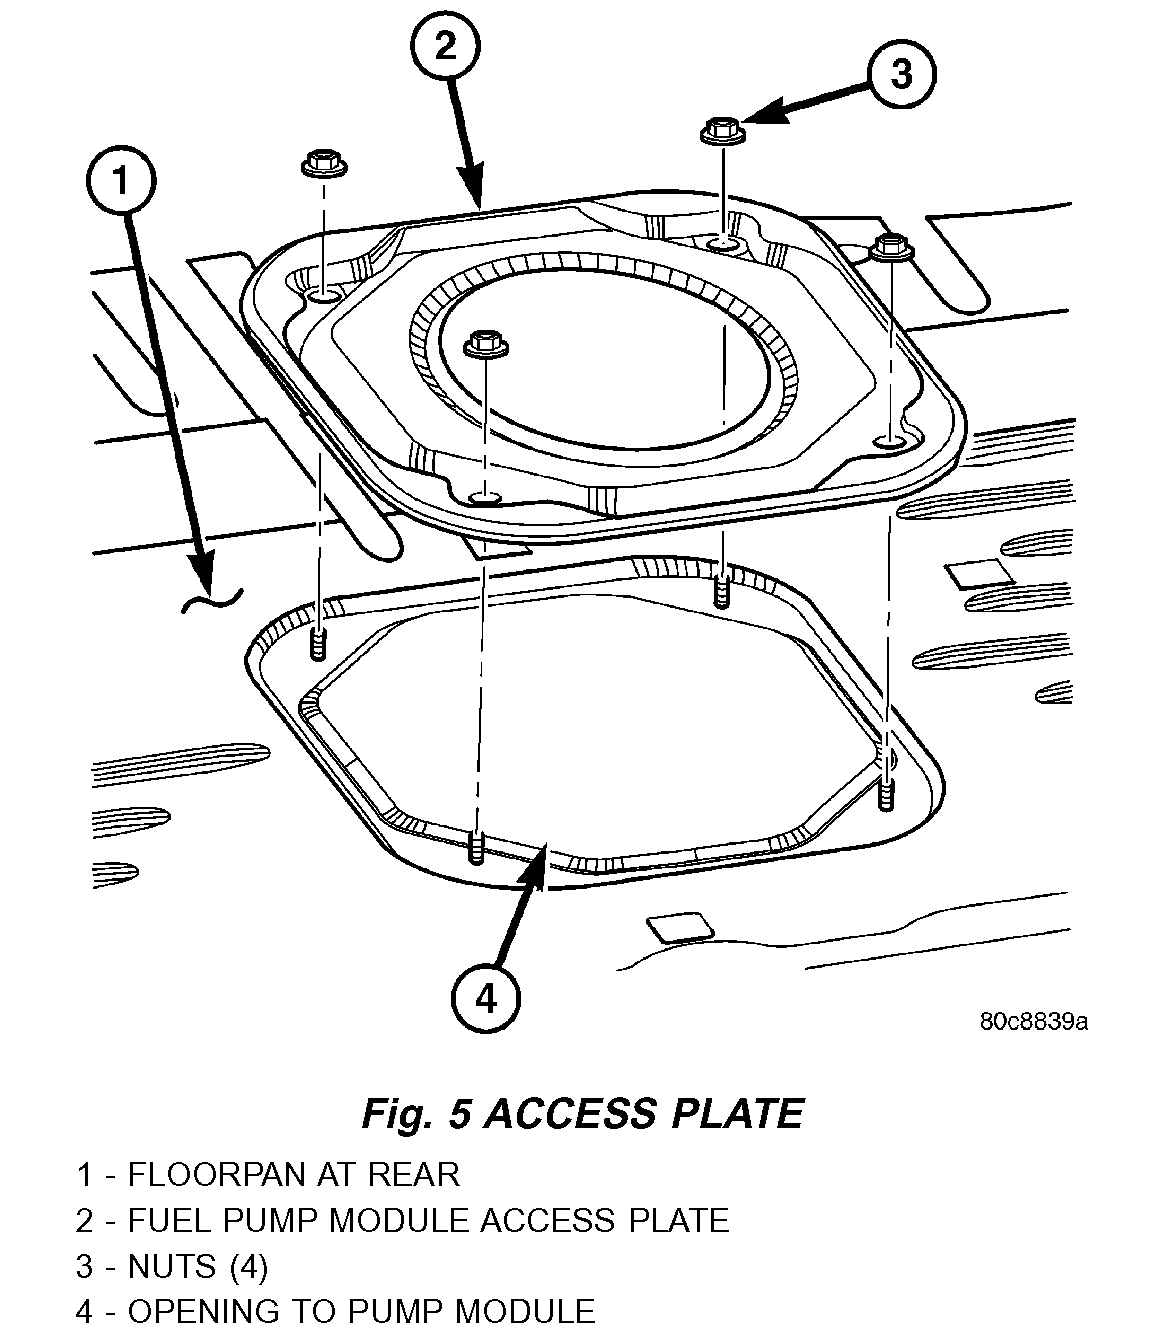
Fig.5 Access Plate
pic 3
3. Fold carpeting forward to gain access to fuel pump module access plate.
4. Remove 4 fuel pump module access plate nuts.
5. While applying heat from a heat gun, carefully pry up metal fuel pump module access plate. Take care not to bend plate.
6. Clean top of fuel pump module area around fuel line connection points.
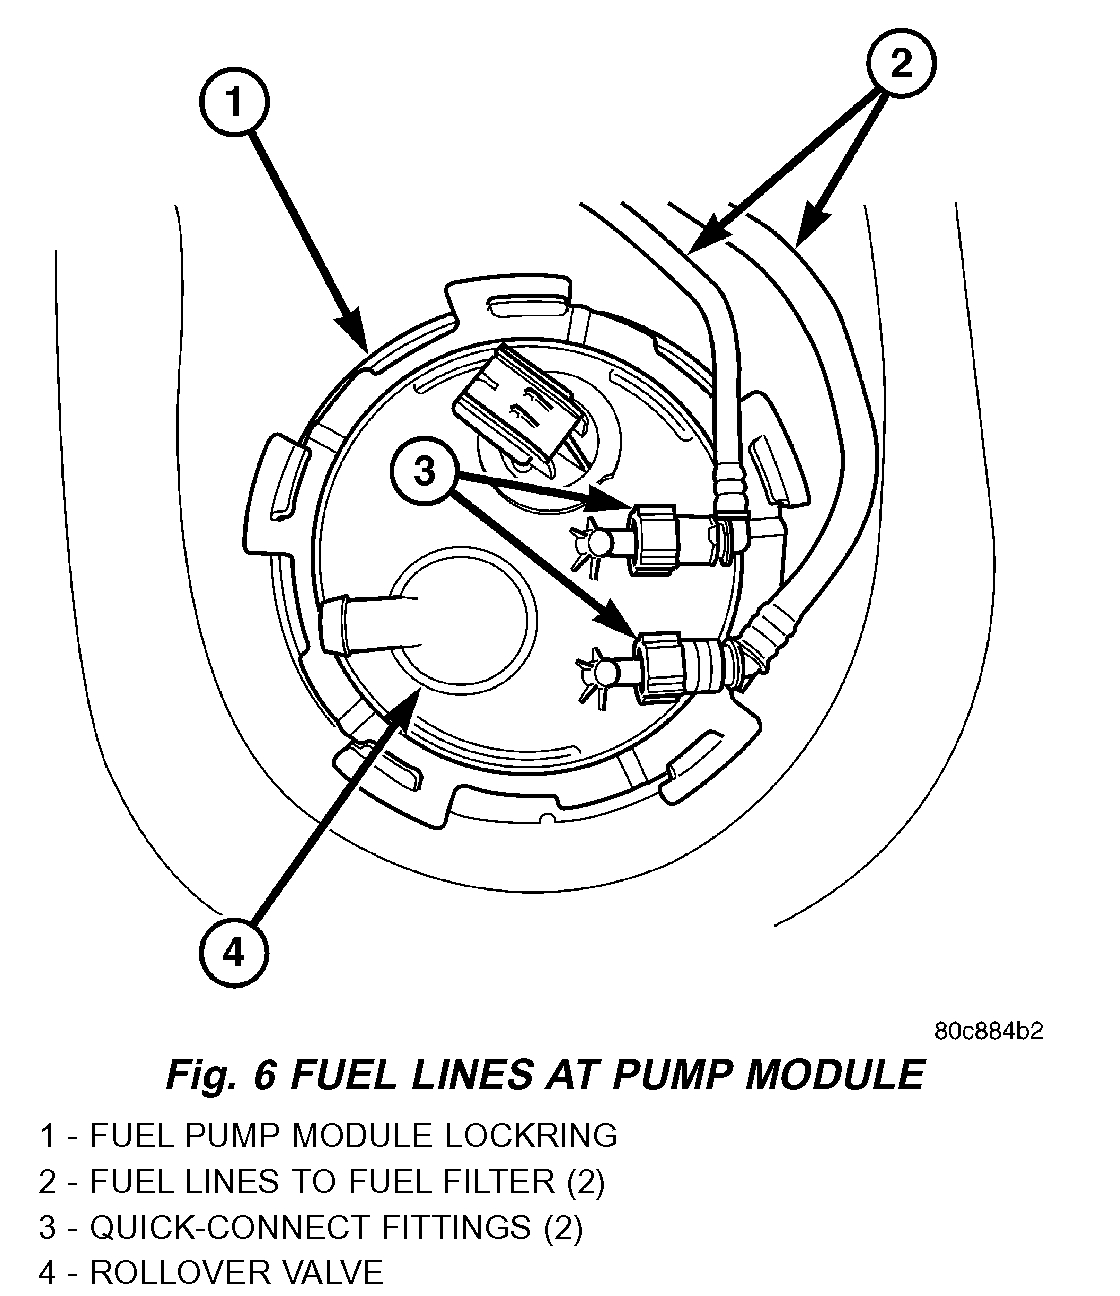
Fig.6 Fuel Lines At Pump Module
pic 4
7. Disconnect 2 fuel lines at fuel pump module by pressing on tabs at side of fitting.
8. Raise vehicle.
9. Place drain pan under fuel filter.
Fig.7 Fuel Filter Location
pic 5
10. A third fuel line is attached to bottom of filter. The disconnection point for this 3rd line is approximately 1 foot towards front of vehicle. Clean fuel line connection point before disconnection. Disconnect by pressing on tabs at side of fitting.
11. Disconnect 3rd fuel line from body retention clip. Place a small screwdriver into side of clip and twist for removal.
12. Remove filter ground strap at fuel tank mounting strap.
13. Remove 1 filter mounting nut and remove filter.
INSTALLATION
1. Raise vehicle.
2. Position fuel lines on filter towards top of fuel tank.
3. Position filter to mounting stud on front of fuel tank.
4. Install filter mounting nut and tighten. Refer to torque specifications.
5. A third fuel line is attached to bottom of filter. The connection point for this 3rd line is approximately 1 foot towards front of vehicle. Connect by snapping together.
6. Connect 3rd fuel line to body retention clip (snaps in).
7. Attach filter ground strap to tank mounting strap.
8. Lower vehicle.
9. Attach (snap on) 2 filter fuel lines at fuel pump module fittings.
10. Start engine and check fuel line fittings for leaks.
11. Apply silicone sealant to fuel pump module metal access plate.
12. Install fuel pump module metal access plate and 4 nuts. Tighten 4 nuts. Refer to torque specifications.
13. Position carpet and install 2 new cargo clamp rivets in each cargo holdown clamp.
_____________________________________________________
Let me know the results or if you have other questions.
Take care,
Joe
Images (Click to enlarge)
May 27, 2019 at 9:06 PM