Your car's EVAP system is designed to control fuel vapors which are naturally omitted from standing gasoline inside the fuel tank. These vapors are collected into the charcoal canister and then condensed so they can be returned to the fuel tank. This is a sealed system electrically controlled by vacuum and purge control solenoids. When a malfunction occurs the system pressure sensor sends feedback data to the computer to trigger the check engine light.
How Does it Work?
Engine vacuum is used to draw fumes into the charcoal canister where they condensed. When the engine is started a signal is given to open the control valve which releases the vacuum into the system. The purge solenoid is used to allow the condensed fumes back into the tank. A vacuum pressure sensor is located in the fuel tank which monitors the supply and its ability to hold vacuum for a period of time. This cycle can happen quickly or it can take a day or two to satisfy the PCM monitor.
What Goes Wrong?
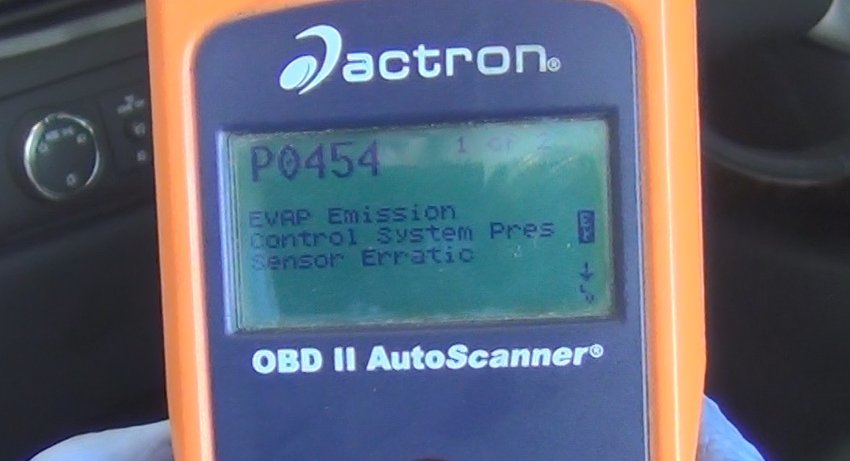
When any part of the system becomes compromised by a torn vacuum line or shorted control solenoid the PCM detects a problem and delivers a trouble code that pertains to the section or system part having the issue. A code reader scan tool is used to access the computer memory and deliver the code such as a P0454 which is the case in the video below. Gas caps have a high failure rate due to usage and can be the culprit as it completes the seal each time you fill up.
Popular Component Failures:
- Gas cap O ring breaks or is damaged and leaks
- Vacuum feed line to the vacuum control valve leaks
- Gas tank filler tube is damaged or leaking
- Vapor tube from the charcoal canister to the tank has fallen off.
- The charcoal canister has split and is leaking
- The vacuum control valve is not allowing vacuum to enter the fuel tank
Is it Dangerous?
Since the EVAP system deals with the management of gas and its fumes it can be dangerous when certain malfunctions occur. One such problem can cause the charcoal canister to fill will raw fuel and start to leak which can cause a fire hazard. So it's a good idea to identify which part of the system has failed and go from there.
EVAP Repair
Once you have determined the trouble code and what part of the system is having an issue we can start the inspection.
The Easy Stuff
Since the gas cap is the biggest leak an EVAP system can have first check to see if the cap is tight and seals against the filler neck. Next remove the cap to inspect the cap O ring seal. This O ring is large and is subject to wear due to its constant removal when the tank is filled. Next, open the hood and look for the vacuum feed line from the engine intake manifold to the EVAP system control valve. Because of engine heat and vibration it can deteriorate the rubber line causing it to fall off or collapse cutting of the vacuum system to the solenoid. Start your inspection at this feed line by checking for tears or cracks up to the vacuum control solenoid which is mounted either on the intake manifold or near the fender well.
(Tip) When ordering EVAP replacement parts make sure they match up before installing them also if the dealer has the part "in stock" it usually means there is a high failure rate upon the part.
Little More Difficult
Remove the vacuum control solenoid which is controlled by the computer. This electrically controlled valve acts as a simple port that opens and closes with each command. When there is no signal (no power) the valve should be closed (cant blow through it). When you apply a 12 volt power source and ground the valve should open with a discernible click. If the valve does no perform this way it is bad and needs to be replaced.
The remainder of the EVAP system is under the vehicle near the fuel tank. You will need to use a floor jack and jack stands to lift the vehicle safely to inspect. The main component of the system is the charcoal canister (on some older vehicles this can be located under the hood). This is where the purge solenoid is located along with the vapor and vacuum lines. These lines are not as prone to engine heat but still suffer from the elements and can have the same kind of problems rubber products have under the hood. On or near the canister is the purge solenoid which is also prone to failure and be tested the same way as the vacuum control valve under the hood.
The vapor canister is made of molded plastic generally using two halves vulcanized together. This unit must hold vacuum and as it ages can develop leaks. If you have tested the entire system and gas cap this is the last place to look. Remove the canister and fashion plugs or caps over the various ports and connections accept of one. On the inlet to the canister fashion a 3 foot long rubber hose that is clean on one end. Now submerge the canister under water and use the rubber hose as a mouth piece and blow into the canister to create pressure. While still under pressure observe the outside the unit looking for bubbles indicating the unit has failed and needs to be replaced.
Some EVAP lines are sealed using simple clips and O ring seals which can fail to seal due to looseness. Check to see if there is resistance when you move the tube on its connection. If the line easily moves remove it see if the O ring has been flattened in which case the line or O ring will need to be replaced. Dirt and grime can also cause the new O ring seals to leak so use a shop towel to clean the connections before reinstalling. This is the case in the video below.
EVAP Repair Video
Once the job is completed clear the trouble codes and allow several cycles of the vehicle running to clear the monitor to see if any codes return.
Questions?
If you have a car repair question, you can ask the 2CarPros community for help. We hope this guide helped you understand the repair. Please visit our 2CarPros YouTube channel for more helpful repair videos.