Hi and thanks for using 2CarPros.
In most cases, either you lost spark to the ignition or fuel to the engine. Here is a link that helps explain it:
https://www.2carpros.com/articles/car-cranks-but-wont-start
Now, what I suggest is this. The easiest way to determine the cause is by trying to see if it starts for a couple seconds using starting fluid. If it does, the problem is fuel related. If it doesn't, then it is ignition related.
If you don't want to use starting fluid, here is a link that shows how to check for ignition spark:
https://www.2carpros.com/articles/how-to-test-an-ignition-system
Here is a link that shows in general how to check fuel pressure.
https://www.2carpros.com/articles/how-to-check-fuel-system-pressure-and-regulator
Here are specific directions for testing fuel pressure:
PRESSURE TESTING PROCEDURES
Hold Pressure
Do this inspection if the pump operation inspection is not as specified.
1. Disconnect the negative battery terminal.
2. Release fuel system pressure. Refer to "Releasing Fuel System Pressure".
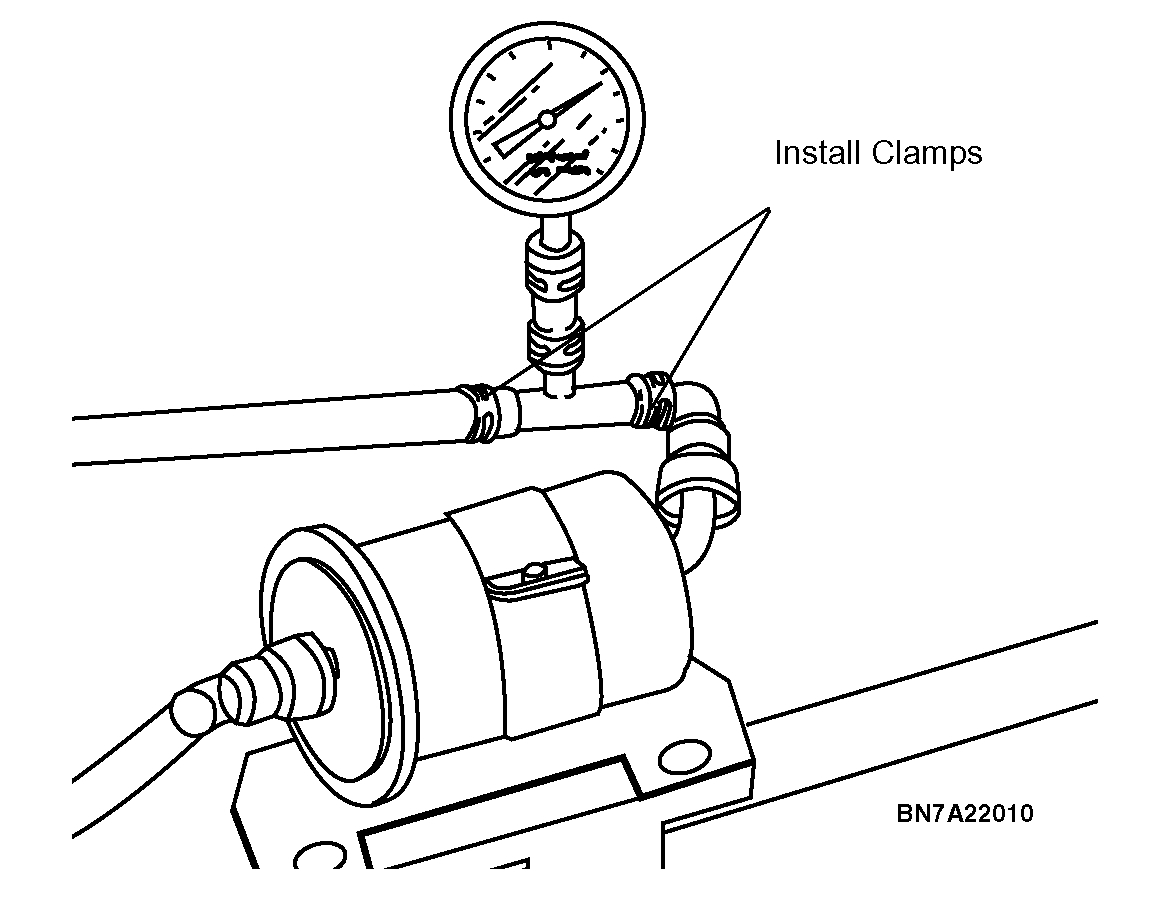
3. Connect a fuel pressure gauge to the fuel filter and plug the outlet of the gauge as shown. (Install clamps as shown.)
see picture 1
4. Connect the negative battery terminal.
WARNING: THE FUEL SYSTEM REMAINS UNDER PRESSURE WHEN THE ENGINE IS NOT RUNNING. RELEASE FUEL SYSTEM PRESSURE BEFORE DISCONNECTING ANY FUEL LINE TO REDUCE THE CHANCE OF PERSONAL INJURY OR FIRE DAMAGE TO VEHICLE COMPONENTS.
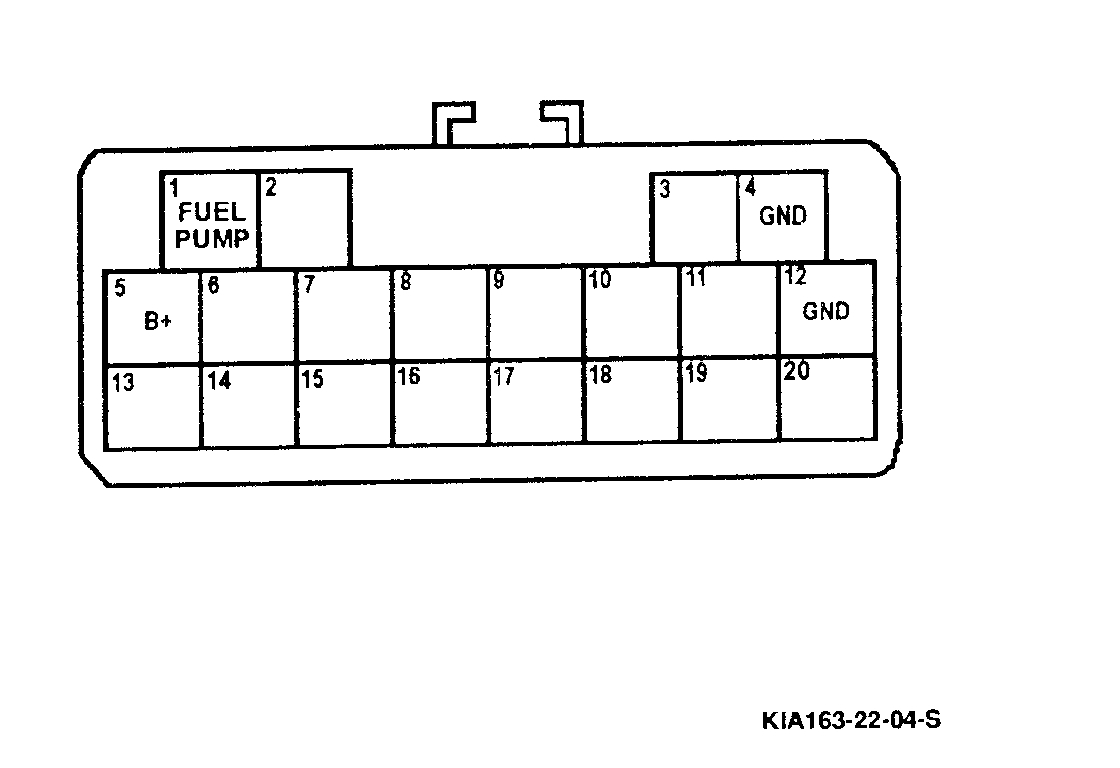
5. Connect the data link connector terminals FUEL PUMP and B+ with a jumper wire.
see picture 2
6. Turn the ignition switch on for 10 seconds to run the fuel pump.
7. Turn the ignition switch off and remove the jumper wire.
8. Observe the fuel pressure after 5 minutes.
Fuel pressure: More than 50 psi (340 kPa)
9. If not as noted, replace the fuel pump.
Fuel Pump Maximum Pressure
1. Disconnect the negative battery terminal.
2. Release fuel system pressure. Refer to "Releasing Fuel System Pressure".
3. Connect a fuel pressure gauge to the fuel filter and plug the outlet of the gauge as shown. (Install clamps as shown.)
4. Connect the negative battery terminal.
5. Connect the data link connector terminals FUEL PUMP and B+ with a jumper wire.
6. Turn the ignition switch on to run the fuel pump.
7. Measure the fuel pump maximum pressure.
Fuel pump maximum pressure: above 50 psi (340 kPa)
8. Turn the ignition switch off and remove the jumper wire.
9. If this pressure is not measured, replace the fuel pump.
_________________________________________
If you determine the fuel pump has failed, here are the directions for replacement. First, here is a link that shows in general how it is done.
https://www.2carpros.com/articles/how-to-replace-an-electric-fuel-pump
Here are the directions specific to your vehicle for replacement.
FUEL PUMP REMOVAL AND INSTALLATION
Removal
WARNING: FUEL IS EXPLOSIVE. WHEN WORKING ON FUEL SYSTEM PARTS, MAKE SURE TO SUPPLY ADEQUATE VENTILATION TO THE WORK AREA. DO NOT SMOKE AND KEEP SPARKS AND OPEN FLAMES AWAY.
1. Disconnect the negative terminal from the battery.
2. Open the rear access door of the vehicle.
3. Release the catch for the back seat and tilt it out of the way.
4. Pull back the square of carpet in the area behind the tilted seat which covers the fuel pump assembly access panel on vehicle floor.
5. Disconnect the two halves of the fuel pump assembly electrical connector.
6. Remove the screw holding the ground wire lug to ground.
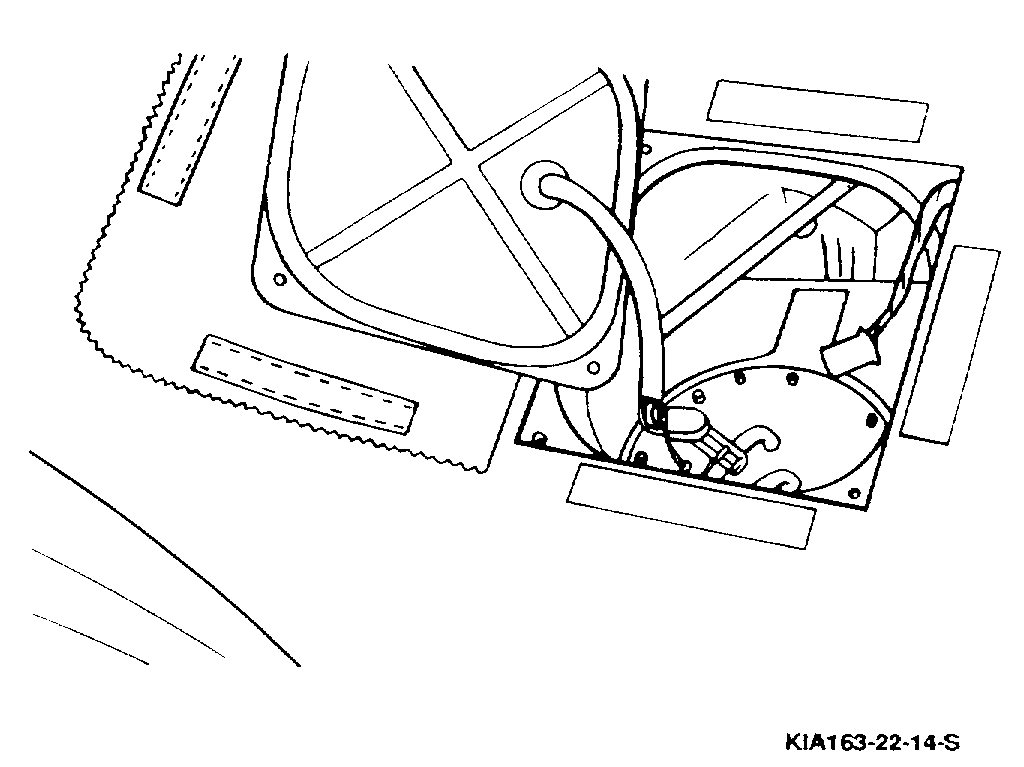
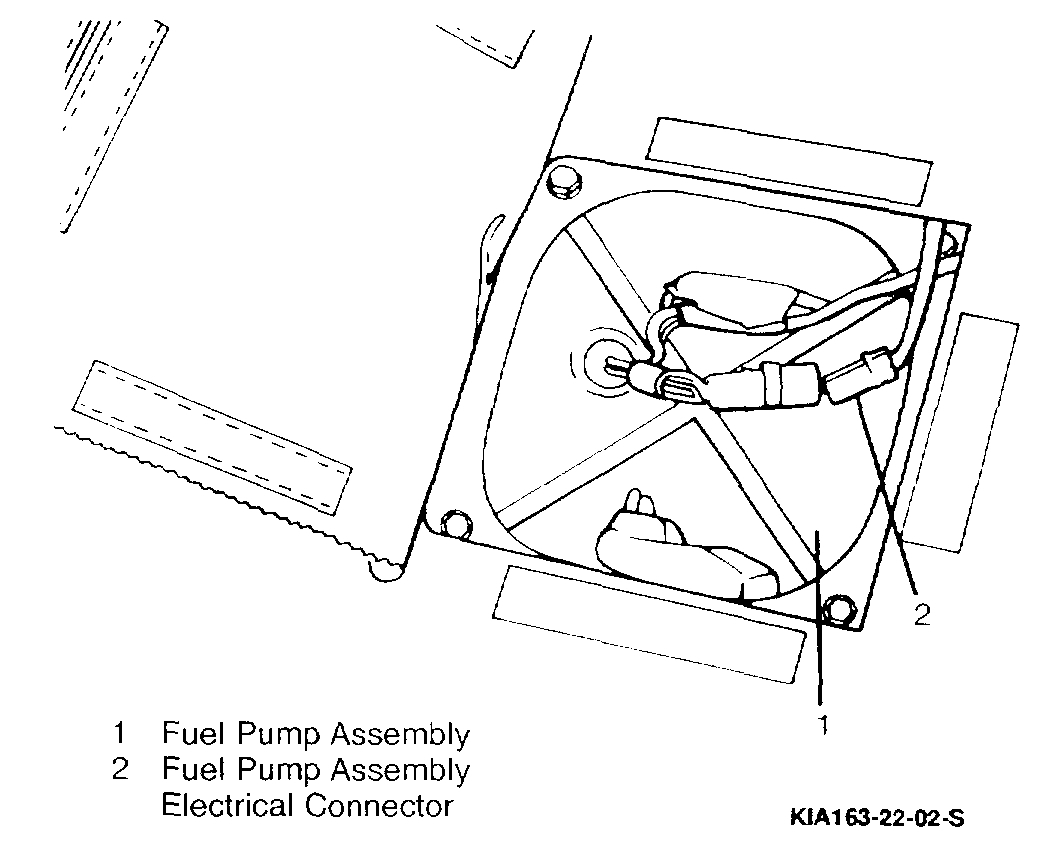
7. Remove the four screws attaching the access cover and remove the access cover, moving it out of the way.
See picture 3
8. Remove the two fuel hose clamps from the two fuel hose assemblies connected to fuel pump assembly.
NOTE: Do not use any excessive force on the fuel pump assembly The parts are delicate, such as the fuel screen which might be damaged by incorrect removal from the fuel tank.
9. Disconnect the two fuel hoses from the fuel pump assembly.
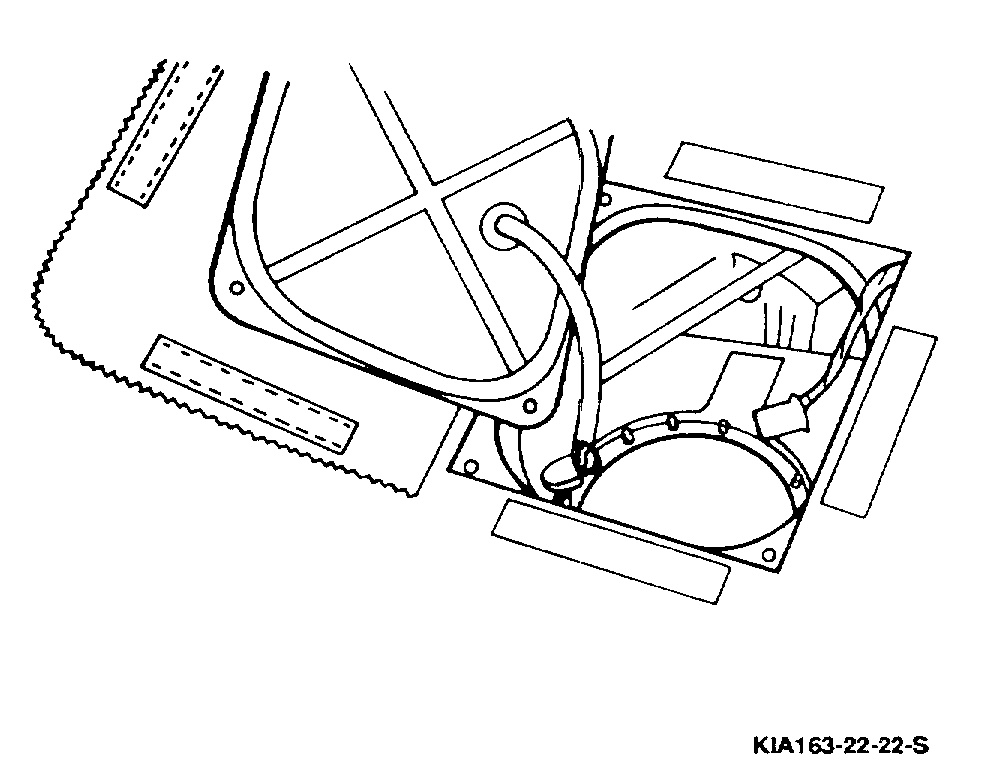
10. Remove eight retaining screws around the top surface of the fuel pump assembly.
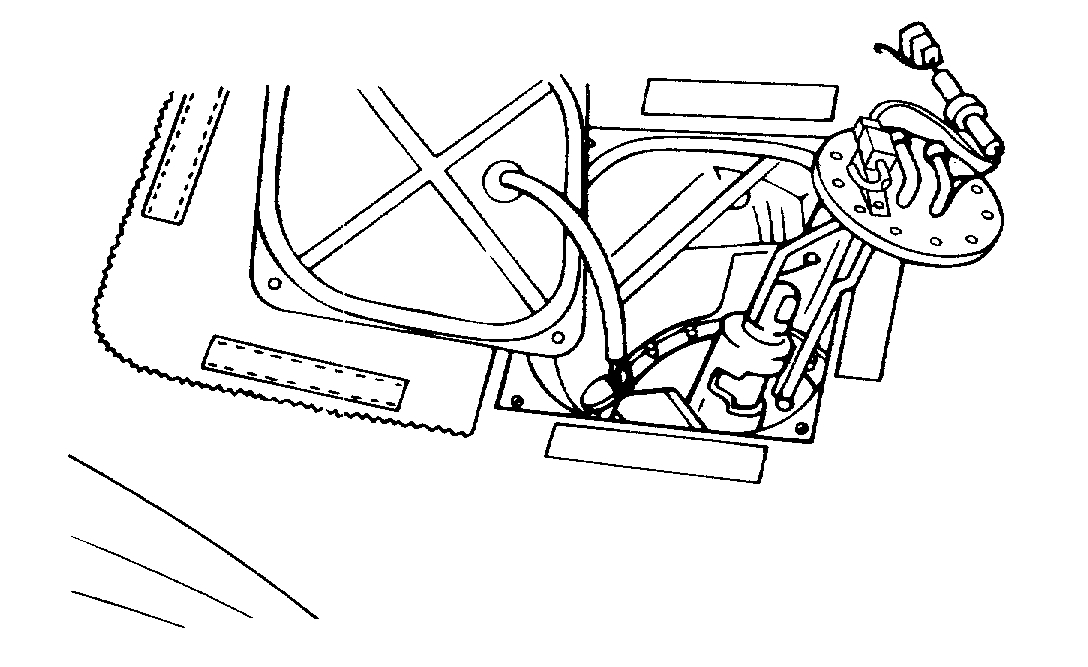
11. While twisting very carefully and tilting the fuel pump assembly, pull gradually until it comes out of the top of the fuel tank assembly.
12. When the fuel pump assembly is completely taken out of the access area, wrap it in a shop towel carefully until it reaches the maintenance area.
See Picture 4
13. Seal off the open fuel tank port with a cover or plug.
Installation
WARNING: FUEL IS EXPLOSIVE. WHEN WORKING ON FUEL SYSTEM PARTS, MAKE SURE TO SUPPLY ADEQUATE VENTILATION TO THE WORK AREA. DO NOT SMOKE AND KEEP SPARKS AND OPEN FLAMES AWAY.
NOTE: Do not force fuel pump assembly parts. The fuel screen is delicate and can be damaged by improper installation to the fuel tank
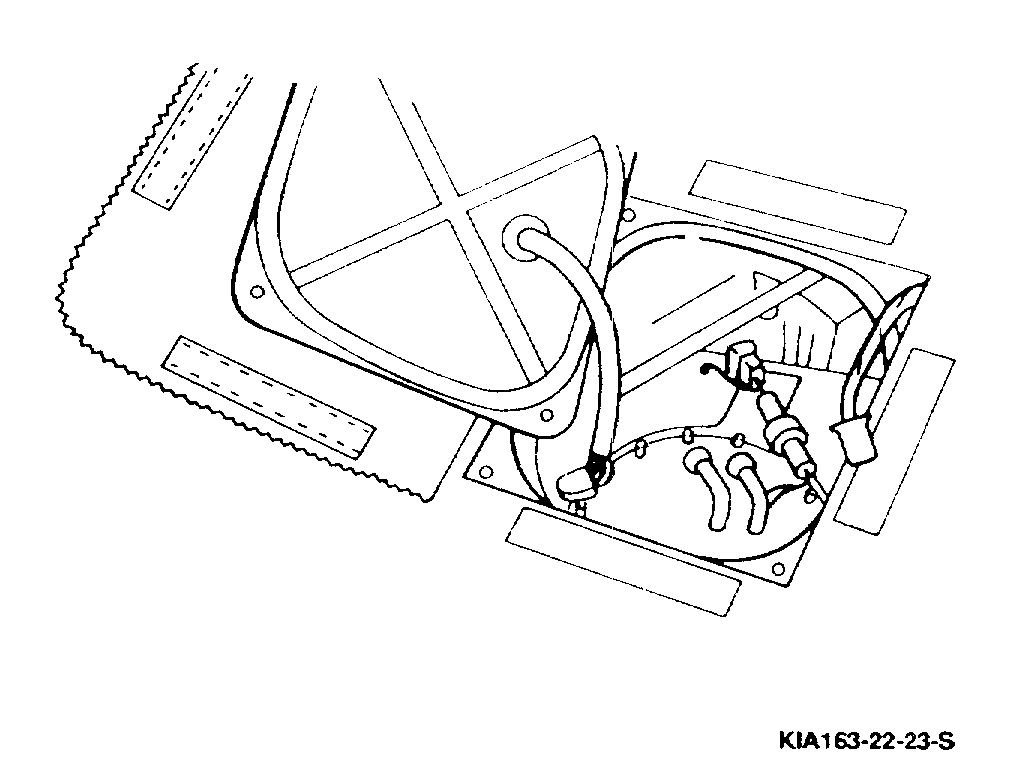
See Picture 5
1. Remove any cap or protective cover from the port on the top of the fuel tank.
2. Holding the fuel pump assembly, guide it into the access port on the top of the fuel tank as far as it will go at that point.
3. While twisting very carefully, and tilting the fuel pump assembly, push gradually until the assembly seats in the fuel tank correctly.
See picture 6
4. Install eight retaining screws around the top of the installed fuel pump assembly.
5. Connect the two fuel hoses to the fuel pump assembly.
6. Install the two fuel hose clamps to the two fuel assemblies connected to the fuel pump assembly.
7. Insert the ground wire in the fuel pump assembly connector assembly through the access hole in the access cover.
8. Install the four retaining screws attaching the access cover to the flooring of the vehicle.
9. Attach the ground wire lug to the flooring of the vehicle with the attaching screw.
10. Connect the two halves of the fuel pump assembly electrical connector.
See Picture 7
11. Place the adhesive tape over the loose wiring and put the square of carpeting back over the area of the access door behind the rear seat.
12. Release the catch for the rear seat and tilt it back into the normal position.
13. Close the rear access door of the vehicle.
14. Connect the negative terminal to the battery.
_________________________________________________
Let me know if this helps. If you have questions or need additional information, let me know.
Take care,
Joe
Images (Click to make bigger)
SPONSORED LINKS
Thursday, January 24th, 2019 AT 5:10 PM