Hi and thanks for using 2CarPros.
A crank no start can be caused by a few different reasons. First, take a look through this link to see if it helps. It discusses the most common causes, checks, and repairs.
https://www.2carpros.com/articles/car-cranks-but-wont-start
Next, if that isn't helpful, let me know exactly what is happening. Was there a problem prior to replacing the spark plugs? Have you checked to see if there is proper fuel pressure and spark to the plugs? Also, what is meant by low voltage to the pump. Did you check power at the pump and find it is weak?
Let me know. Also, here are a couple links to helps with testing fuel pressure and for spark:
https://www.2carpros.com/articles/how-to-check-fuel-system-pressure-and-regulator
https://www.2carpros.com/articles/how-to-test-an-ignition-system
__________________
Here are directions specific to your vehicle for testing fuel pressure. All attached pictures correlate with these directions.
ON-VEHICLE INSPECTION
1. CHECK FUEL PUMP OPERATION
Picture 1
a. Connect a TOYOTA hand-held tester to the DLC3.
b. Turn the ignition switch ON and TOYOTA hand-held tester main switch ON.
NOTE: Do not start the engine.
c. Select the active test mode on the TOYOTA hand-held tester.
d. Please refer to the TOYOTA hand-held tester operator's manual for further details.
e. If you have no TOYOTA hand-held tester, connect the positive (+) and negative (-) leads from the battery to the fuel pump connector (See step 7).
Picture 2
f. Check that there is pressure in the fuel inlet hose from the fuel filter.
HINT: If there is fuel pressure, you will hear the sound of fuel flowing.
If there is no pressure, check these parts:
- Fusible link
- Fuses
- EFI main relay
- Fuel pump
- ECM
- Wiring connections
g. Turn the ignition switch to LOCK.
h. Disconnect the TOYOTA hand-held tester from the DLC3.
Picture 3
2. CHECK FUEL PRESSURE
a. Check the battery positive voltage is above 12 V.
b. Disconnect the negative (-) terminal cable from the battery.
c. Purchase the new No.1 fuel pipe and take out the fuel tube connector from its pipe.
Part No. 23801-20070
Picture 4
d. Remove the fuel hose clamp.
Picture 5
e. Disconnect the No.1 fuel pipe (fuel tube connector) from the fuel filter outlet.
CAUTION:
- Perform disconnecting operations of the fuel tube connector (quick type) after observing the precautions.
- As there is retained pressure in the fuel pipe line, prevent It from splashing Inside the engine compartment.
Picture 6
f. Install SST (pressure gauge) as shown in the illustration by using SST and fuel tube connector.
SST 09268-41047, 09268-45014
g. Wipe off any splattered gasoline.
h. Reconnect the TOYOTA hand-held tester to the DLC3 (See step 1).
i. Reconnect the negative (-) terminal cable to the battery.
1. Measure the fuel pressure.
Fuel pressure:
301 - 347 kPa (3.1-3.5 kgf/sq.cm, 44 - 50 psi)
If pressure is high, replace the fuel pressure regulator. If pressure is low, check these parts:
- Fuel hoses and connections
- Fuel pump
- Fuel filter
- Fuel pressure regulator
k. Disconnect the TOYOTA hand-held tester from the DLC3.
l. Start the engine.
m. Measure the fuel pressure at idle.
Fuel pressure:
301 - 347 kPa (3.1 - 3.5 kgf/sq.cm, 44 - 50 psi)
n. Stop the engine.
o. Check that the fuel pressure remains as specified for 5 minutes after the engine has stopped.
Fuel pressure:
147 kPa (1.5 kgf/sq.cm, 21 psi) or more
If pressure is not as specified, check the fuel pump, pressure regulator and/or injectors.
p. After checking fuel pressure, disconnect the negative (-) terminal cable from the battery and carefully remove the SST and fuel tube connector to prevent gasoline from splashing.
SST 09268-41047, 09268-45014
Picture 7
q. Reconnect the No.1 fuel pipe (fuel tube connector).
CAUTION: Perform connecting operations of the tube connector (quick type) after observing the precautions.
Picture 8
r. Surely install the hose clamp to the fuel filter with "click" sound.
s. After installing the clamp, check that the clamp is fixed by pulling up to the clamp.
t. Reconnect the negative (-) terminal cable to the battery.
u. Check for fuel leaks.
3. REMOVE REAR SEAT CUSHION
4. REMOVE FLOOR SERVICE HOLE COVER
5. DISCONNECT FUEL PUMP & SENDER GAUGE CONNECTOR
Picture 9
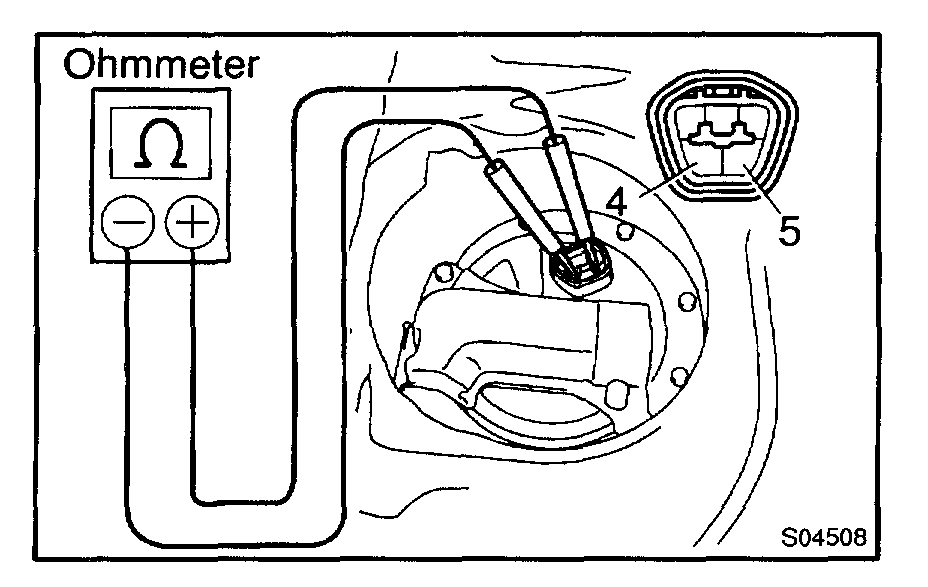
6. INSPECT FUEL PUMP RESISTANCE
Using an ohmmeter, measure the resistance between terminals 4 and 5.
Resistance: 0.2 - 3.0 ohm at 20 °C (68 °F)
If the resistance is not as specified, replace the fuel pump.
Picture 10
7. INSPECT FUEL PUMP OPERATION
Connect the positive (+) lead from the battery to terminal 4 of the connector, and the negative (-) lead to terminal 5. Check that the fuel pump operates.
NOTE:
- These tests must be done quickly (within 10 seconds) to prevent the coil burning out.
- Keep the fuel pump as far away from the battery as possible.
- Always do the switching at the battery side.
If operation is not as specified, replace the fuel pump or lead wire.
8. Reconnect fuel pump and sender gauge connector.
9. Reinstall floor service hole cover.
10. Reinstall rear seat cushion.
______________________________________
Do this and let me know what you find. Either you lost spark or fuel. Once that is determined, it will make the next step of diagnosing easier.
Take care,
Joe
Images (Click to make bigger)
SPONSORED LINKS
Wednesday, January 30th, 2019 AT 7:38 PM