Hi and thanks for using 2CarPros.
I need you to check a couple things. First, are you getting spark to the plugs?
https://www.2carpros.com/articles/how-to-test-an-ignition-system
Are you getting fuel?
https://www.2carpros.com/articles/how-to-check-fuel-system-pressure-and-regulator
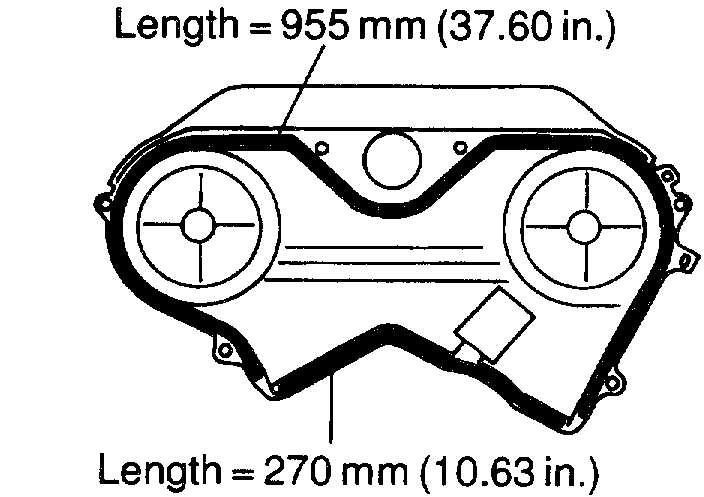
Since you replaced the timing belt, you may have an issue with the crankshaft position sensor or the timing itself. So, I am attaching the directions for belt installation for you to review and make sure everything went together as indicated. The attached pictures correlate with the directions.
___________________________
TIMING BELT INSTALLATION
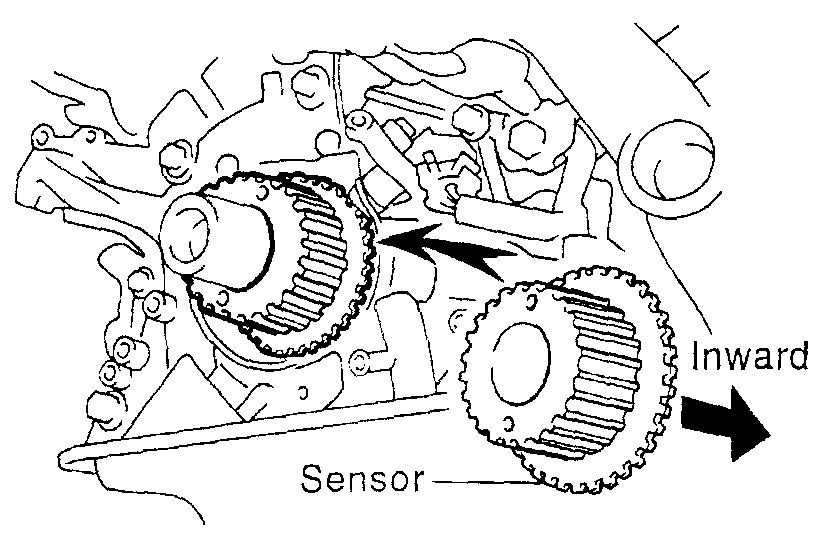
1. Install crankshaft timing pulley.
(a) Align the pulley set key with the key groove of the timing pulley and slide on the timing pulley.
(b) Slide on the timing pulley, facing the flange side inward.
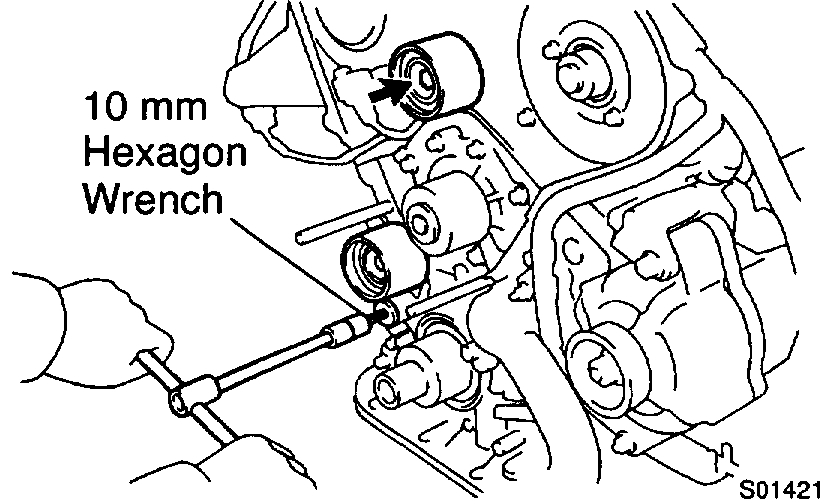
2. Install No. 1 idler pulley.
(a) Using a 10 mm hexagon wrench, install the No. 1 idler pulley with the plate washer and bolt.
Torque: 35 Nm (26 ft. lbs.)
(b) Check that the pulley bracket moves smoothly.
3. Install No. 2 idler pulley.
(a) Install the No. 2 idler pulley with the bolt.
Torque: 40 Nm (30 ft. lbs.)
(b) Check that the No. 2 idler pulley moves smoothly.
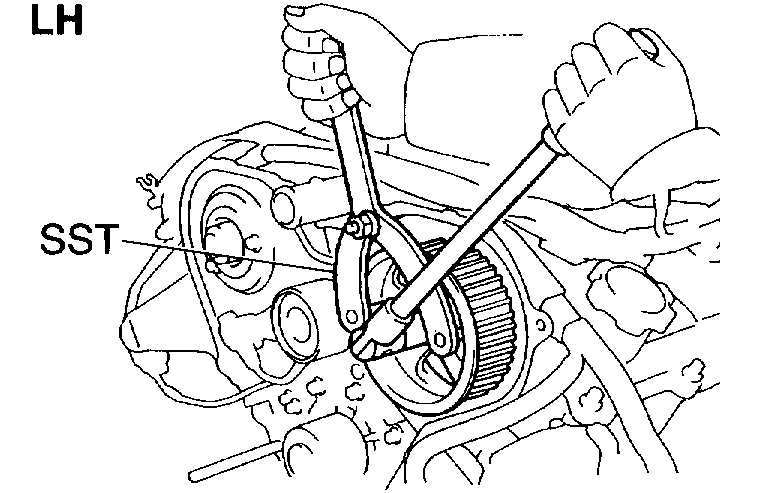
4. Install LH camshaft timing pulley.
(a) Face the flange side of the timing pulley outward.
(b) Align the knock pin on the camshaft with the knock pin groove of the timing pulley, and slide on the timing pulley.
(c) Using Special Service Tool (SST) Variable Pin Wrench Set # 09960 - 10010 (Variable Pin Wrench Arm Assy. # 09962 - 01000, Pin 10 # 09963 - 01000) or equivalents, install the pulley bolt.
Torque: 110 Nm (81 ft. lbs.)
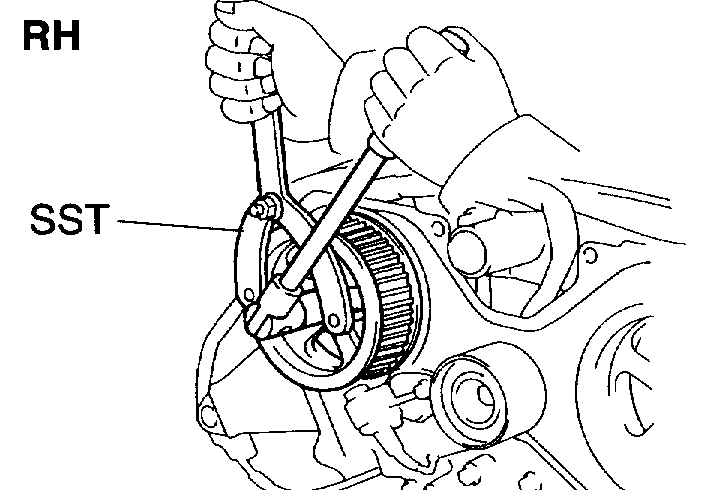
5. Install RH camshaft timing pulley.
(a) Face the flange side of the timing pulley outward.
(b) Align the knock pin on the camshaft with the knock pin groove of the timing pulley, and slide on the timing pulley.
(c) Using SST Variable Pin Wrench Set # 09960 - 10010 (Variable Pin Wrench Arm Assy. # 09962 - 01000, Pin 10 # 09963 - 01000) or equivalents, install the pulley bolt.
Torque: 110 Nm (81 ft. lbs.)
6. Set No. 1 cylinder to Top Dead Center (TDC)/compression.
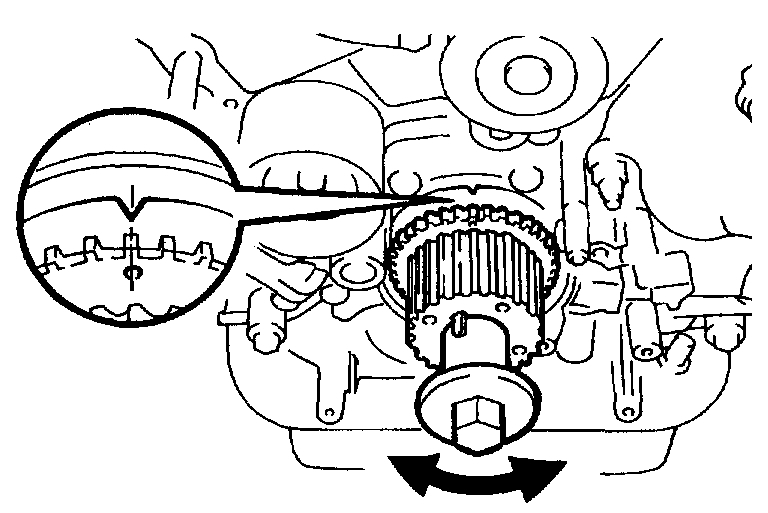
(a) Crankshaft Timing Pulley Position:
^ Temporarily install the crankshaft pulley bolt to the crankshaft.
^ Turn the crankshaft, and align the timing marks of the crankshaft timing pulley and oil pump body.
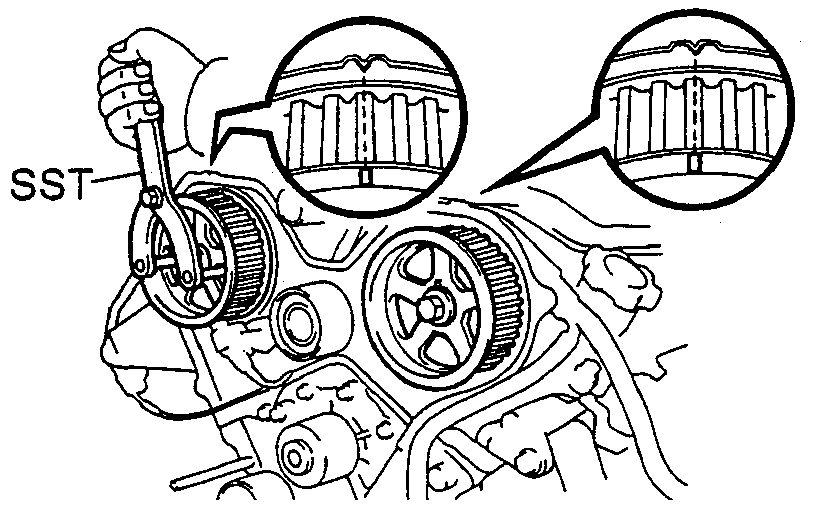
(b) Camshaft Timing Pulley Positions:
Using SST Variable Pin Wrench Set # 09960 - 10010 (Variable Pin Wrench Arm Assy. # 09962 - 01000, Pin 10 # 09963 - 01000) or equivalents, turn the camshaft pulley, align the timing marks of the timing pulley and No. 3 timing belt cover.
7. Install timing belt.
CAUTION: The engine should be cold.
(a) Remove any oil or water on the pulleys, and keep them clean.
CAUTION: Only wipe the pulleys; do not use any cleansing agent.
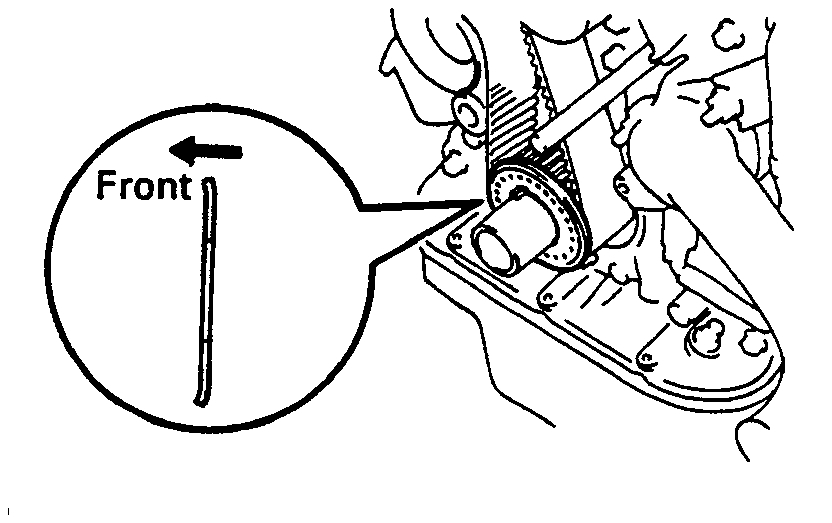
(b) Face the front mark on the timing belt forward.
(c) Align the installation mark on the timing belt with the timing mark of the crankshaft timing pulley.
(d) Align the installation marks on the timing belt with the timing marks of the camshaft timing pulleys.
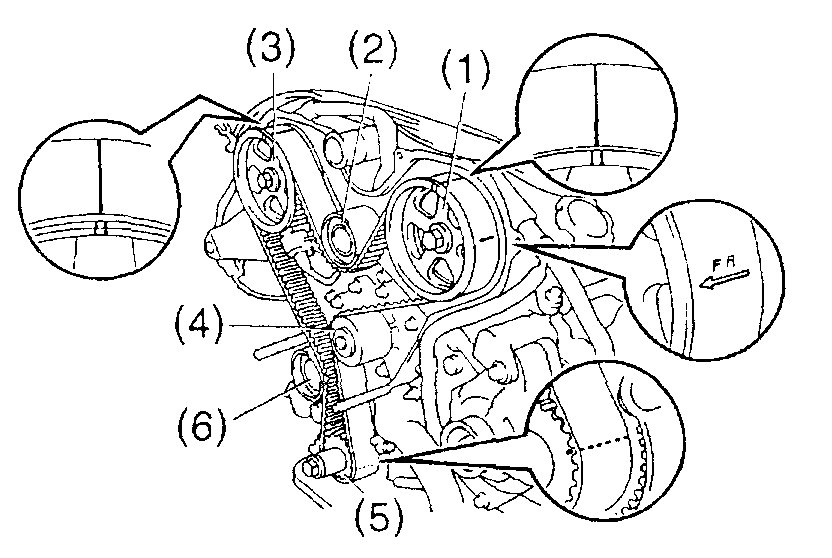
(e) Install the timing belt in this order:
(1) LH camshaft timing pulley.
(2) No. 2 idler pulley.
(3) RH camshaft timing pulley.
(4) Water pump pulley.
(5) Crankshaft timing pulley.
(6) No. 1 idler pulley.
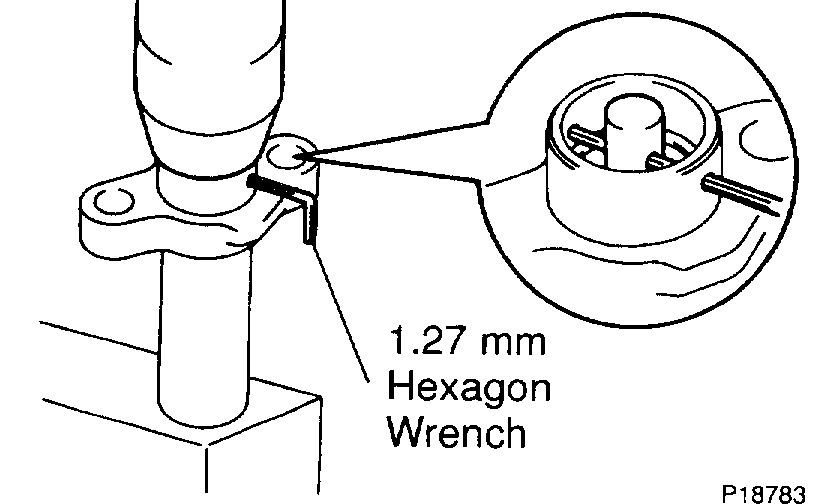
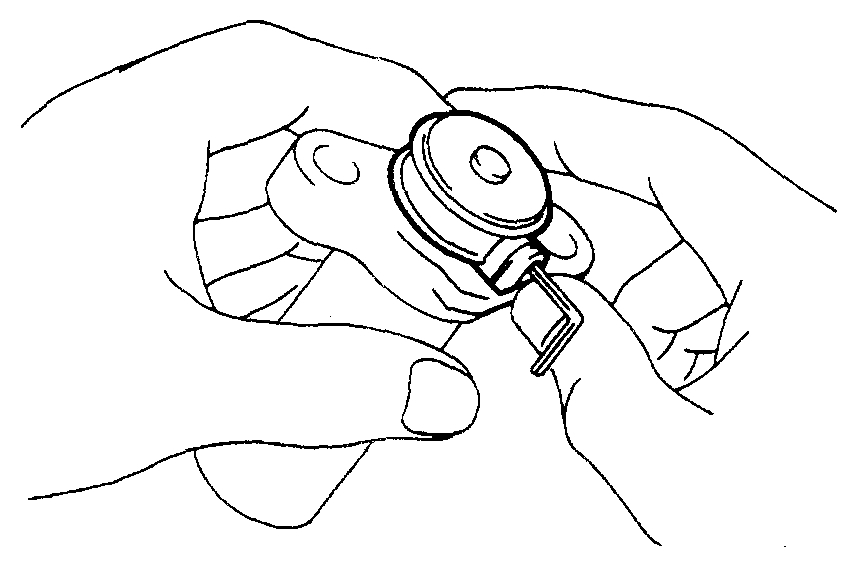
8. Set timing belt tensioner.
(a) Using a press, slowly press in the push rod using 981 - 9,807 N (200 - 2,205 lbs.) of pressure.
(b) Align the holes of the push rod and housing, pass a 1.27 mm hexagon wrench through the holes to keep the setting position of the push rod.
(c) Release the press.
(d) Install the dust boot to the tensioner.
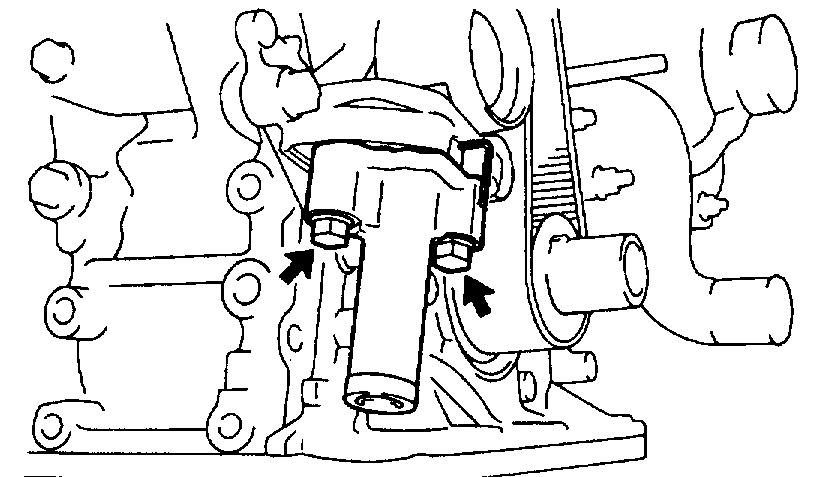
9. Install timing belt tensioner.
(a) Temporarily install the tensioner with the 2 bolts.
(b) Alternately tighten the 2 bolts.
Torque: 27 Nm (20 ft. lbs.)
Remove the 1.27 mm hexagon wrench from the tensioner.
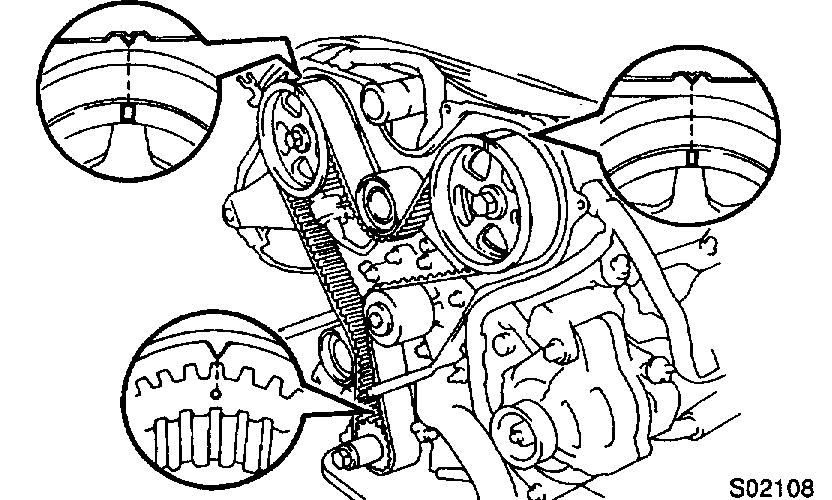
10. Check valve timing.
(a) Turn the crankshaft, and align the timing marks of the crankshaft timing pulley and oil pump body.
CAUTION: Always turn the crankshaft clockwise.
(b) Check that the timing marks of the RH and LH timing pulleys with the timing marks of the No. 3 timing belt cover as shown in the illustration.
If the marks do not align, remove the timing belt and reinstall it.
(c) Remove the crankshaft pulley bolt.
11. Install timing belt guide.
Install the guide, facing the cup side outward.
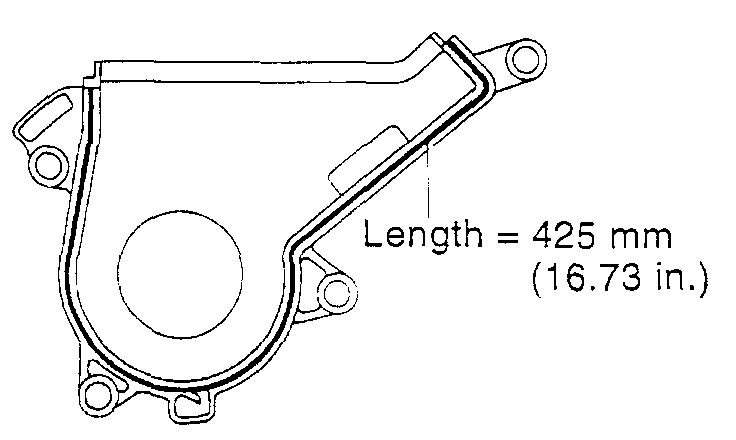
12. Install No. 1 timing belt cover and starter wire bracket.
(a) Check that the timing belt cover gaskets has no cracks or peeling, etc.
If the gasket has cracks or peeling, etc., replace it using these steps:
^ Using a screwdriver and gasket scraper, remove all the old gasket material.
^ Thoroughly clean all components to remove all the loose material.
No. 1 Cover (Back)
No. 1 Cover (Front)
^ Remove the backing paper from a new gasket and install the gasket evenly to the part of the timing belt cover shaded black in the illustration.
(b) Install the timing belt cover with the 4 bolts.
Torque: 9 Nm (80 inch lbs.)
(c) Install the starter wire bracket with the 2 bolts.
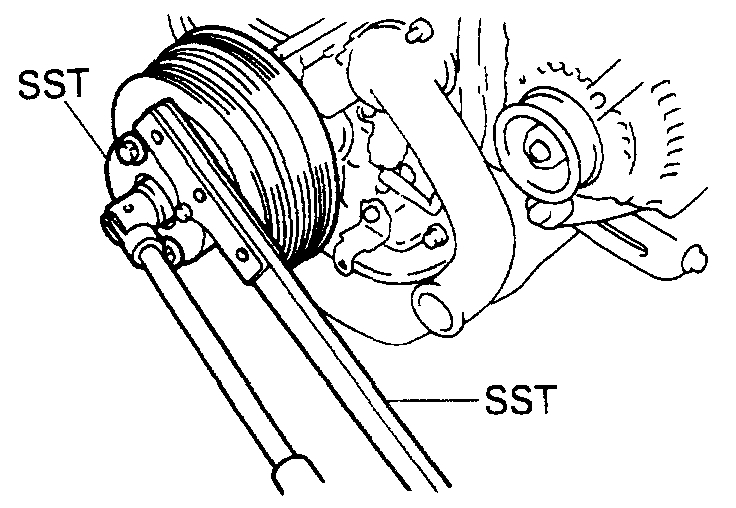
13. Install crankshaft pulley.
(a) Align the pulley set key with the key groove of the pulley, and slide the pulley.
(b) Using SST Crankshaft Pulley Holding Tool # 09213 - 54015, Companion Flange Holding Tool # 09330 - 00021 or equivalents, install and torque the bolt.
Torque: 250 Nm (184 ft. lbs.)
14. Install fan bracket.
(a) Install the fan bracket with the bolt and nut.
(b) Install the PS pump adjusting strut with the nut.
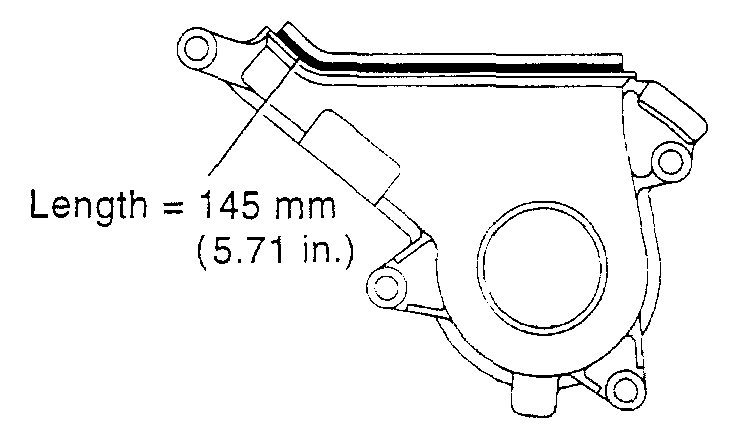
15. Install No. 2 timing belt cover.
(a) Check that the timing belt cover gasket has no cracks or peeling, etc.
If the gasket has cracks or peeling, etc., replace it using these steps:
^ Using a screwdriver and gasket scraper, remove all the old gasket material.
^ Thoroughly clean all components to remove all the loose material.
^ Remove the backing paper from a new gasket and install the gasket evenly to the part of the timing belt cover shaded black in the illustration.
(b) Install the timing belt cover with the 6 bolts.
Torque: 9 Nm (80 inch lbs.)
(c) Connect the 4 high-tension cord clamps and camshaft position sensor connector to the No. 2 timing belt cover.
16. Install oil dipstick and guide.
(a) Install a new O-ring to the dipstick guide.
(b) Apply soapy water to the O-ring.
(c) Install the oil dipstick and guide to the cylinder block.
(d) Install the bolt to the generator bracket.
Torque: 8 Nm (71 inch lbs.)
17. w/ A/C: Install A/C compressor bracket.
Torque: 47 Nm (35 ft. lbs.)
18. Temporarily install fan with fluid coupling and fan pulleys.
19. Install No. 2 fan shroud.
20. Install and adjust drive belt for generator.
21. Tighten fan with fluid coupling and fan pulleys.
Torque: 5.4 Nm (48 inch lbs.)
22. w/ A/C: Connect A/C compressor to engine.
(a) Install the A/C compressor with the 4 bolts.
Torque: 25 Nm (18 ft. lbs.)
(b) Install the drive belt.
(c) Connect the A/C compressor connector.
23. Connect PS pump to engine.
(a) Temporarily install the PS pump with the bolt and nut.
(b) Install the drive belt.
(c) Tighten the bolt and nut.
Torque: 43 Nm (31 ft. lbs.)
(d) Install the PS pressure tube clamp with the bolt.
(e) Connect the 2 PS air hoses to the air intake chamber and resonator.
24. Connect upper radiator hose.
25. Fill engine with coolant.
26. Start engine check for leaks.
27. Install engine under cover.
28. Perform road test.
Check for abnormal noise, shock, slippage, correct shift points and smooth operation.
29. Recheck engine coolant level.
_______________
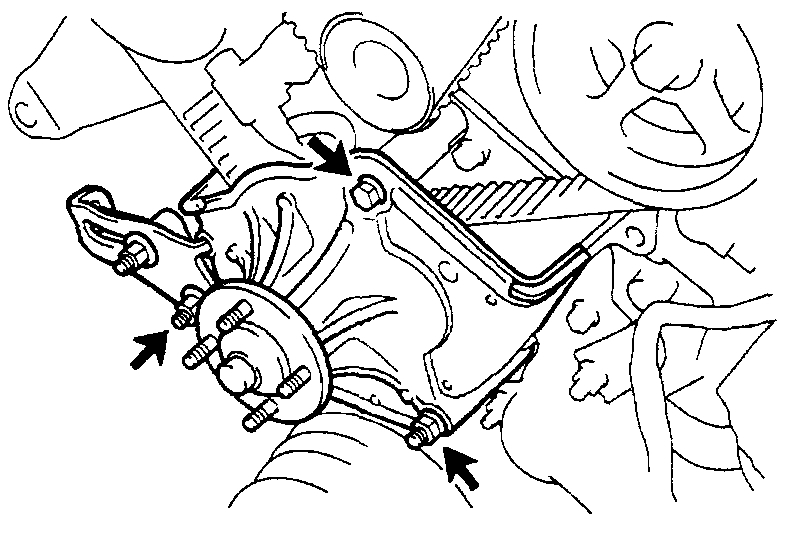
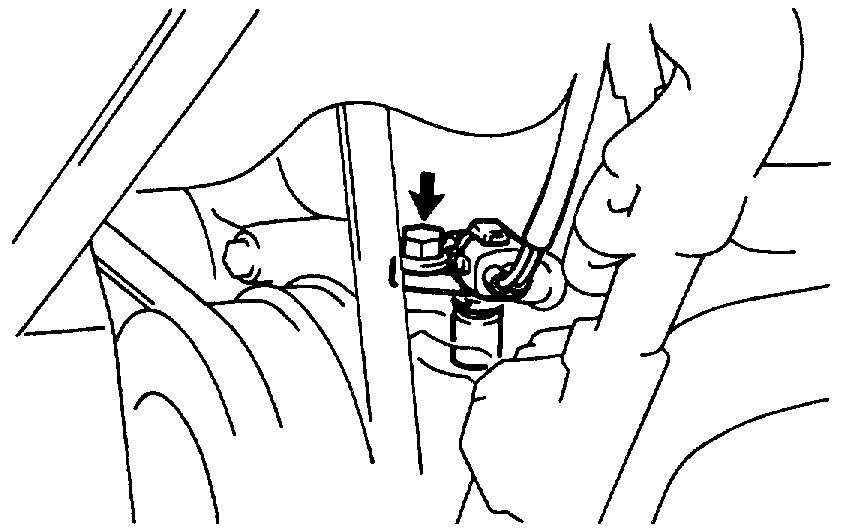
My first suspect is the crankshaft position sensor. I attached a picture of it so you can locate it. It is the last picture. Let me know if this helps or if you have other questions.
Take care,
Joe
Images (Click to enlarge)
Dec 22, 2018 at 8:17 PM