Warning lights, brake system

Tiny
BOB JEFFRIES
  • MEMBER
  • 2006 DODGE CARAVAN
  • 3.3L
  • 6 CYL
  • 2WD
  • AUTOMATIC
  • 51,000 MILES
Left rear brake line was replaced due too a leak. Bled brakes in proper order, red brake light goes off, drive it 50 feet light comes back on. The ABS light stays on.
Sunday, April 21st, 2019 AT 12:19 PM

5 Replies

Tiny
JACOBANDNICKOLAS
  • MECHANIC
  • 108,355 POSTS
Welcome to 2CarPros.

Chances are the level sensor has failed. Take a look at the picture I attached and locate the sensor. Make sure the wiring is good. If it is, remove it and inspect it to make sure it is moving properly. If it is, then I would replace that switch. Since the fluid most likely got really low, that switch may have malfunctioned. Also, if the ABS system thinks the fluid is low, it will turn the ABS light on.

Take a look at picture 1

__________________________________

Here are directions for replacing the sensor. I'm adding them because it shows how to remove.

BRAKE FLUID LEVEL SWITCH

REMOVAL

Fig. 3 MASTER CYLINDER AND BOOSTER

Picture 2

1. Remove wiring harness connector from brake fluid reservoir level switch (Fig. 3).
2. Using fingers, compress the retaining tabs on the opposite end of brake fluid level switch.
3. With retaining tabs compressed, grasp the connector end of brake fluid level switch and pull it out of master cylinder brake fluid reservoir.

INSTALLATION
1. Insert brake fluid level switch into left side of brake fluid reservoir. Be sure switch is pushed in until retaining tabs lock it to brake fluid reservoir.
2. Connect vehicle wiring harness connector to brake fluid level switch (Fig. 3).

_____________________________

Let me know if this helps. Also, confirm there are no leaks.

Take care,
Joe
Was this
answer
helpful?
Yes
No
Sunday, April 21st, 2019 AT 6:36 PM
Tiny
BOB JEFFRIES
  • MEMBER
  • 3 POSTS
I bled all four brakes again to have fresh fluid. Red brake light is off, but I have not driven it to see if it comes back on. The ABS light is still on. A friend brought over his Snap On scanner and we drove it around the block. The rear wheel speed sensors showed correct speed But 0 speed on the front wheels, this all started after the rear brake line leaked almost all the fluid out of the reservoir.
Was this
answer
helpful?
Yes
No
Tuesday, April 23rd, 2019 AT 8:41 AM
Tiny
JACOBANDNICKOLAS
  • MECHANIC
  • 108,355 POSTS
Welcome back:

I'm not sure how the brake line issue would cause that. However, I want you to check the sensors themselves. Here is a link that shows how it is done:

https://www.2carpros.com/articles/abs-wheel-speed-sensor-test

I don't know if you need this, but here are a few links showing how to test wiring and use the testing equipment needed for this:

https://www.2carpros.com/articles/how-to-use-a-test-light-circuit-tester

https://www.2carpros.com/articles/how-to-use-a-voltmeter

https://www.2carpros.com/articles/how-to-check-wiring

____________________________

If you determine they have failed, here is a link that shows in general how to replace one:

https://www.2carpros.com/articles/how-to-replace-an-abs-wheel-speed-sensor

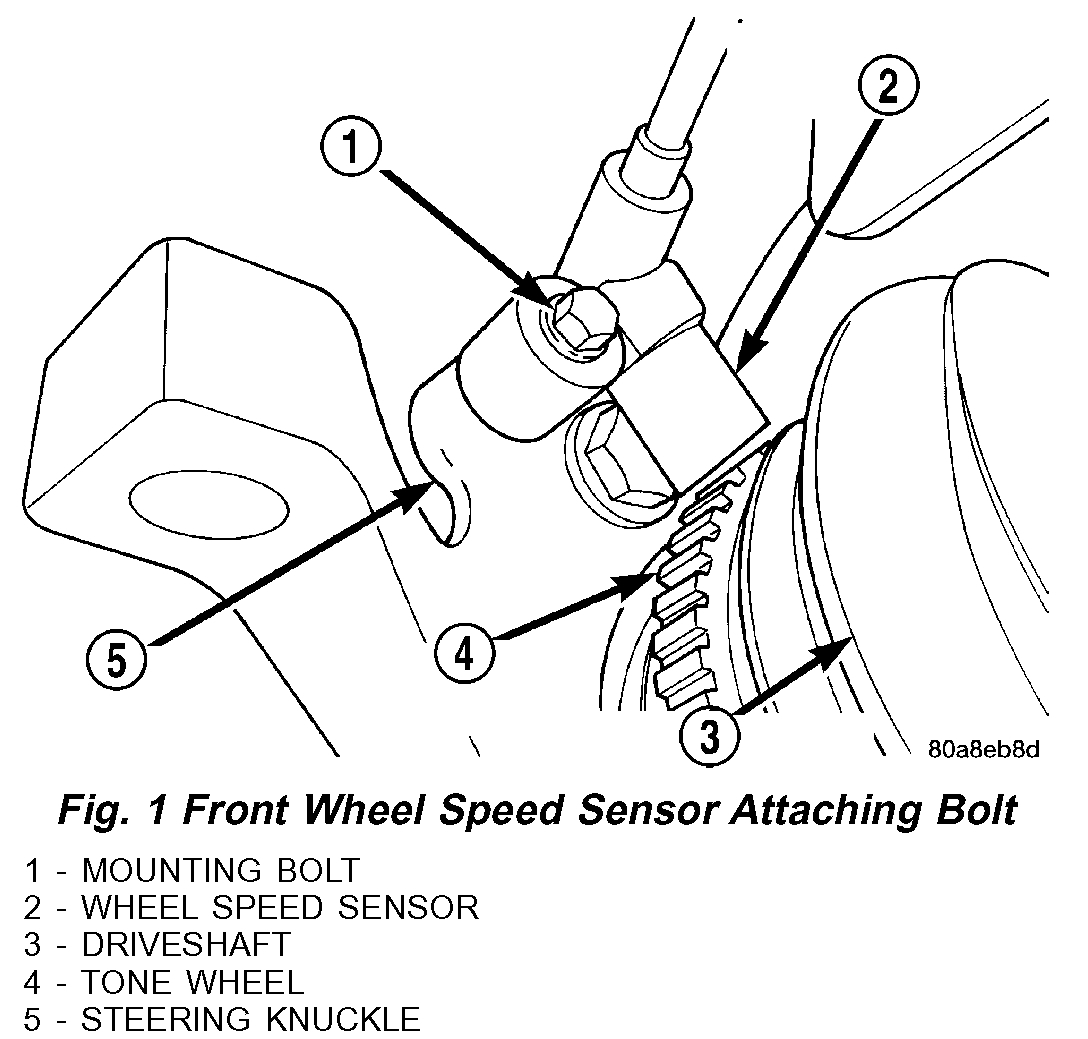
Here are the directions specific to your vehicle for replacement. The attached picture correlates with these directions.

FRONT
FRONT WHEEL SPEED SENSOR

REMOVAL
1. Raise vehicle.
2. Remove the tire and wheel assembly.
3. Remove the sensor cable routing clamp screws.

CAUTION: When disconnecting the wheel speed sensor from vehicle wiring harness, be careful not to damage pins on connector

4. Remove speed sensor cable grommets from intermediate bracket on strut.
5. Disconnect speed sensor cable from vehicle wiring harness behind fender well shield.

Fig. 1 Front Wheel Speed Sensor Attaching Bolt

Picture 1

6. Remove the wheel speed sensor head mounting bolt (Fig. 1).
7. Remove sensor head from steering knuckle. If sensor has seized due to corrosion, DO NOT USE PLIERS ON SENSOR HEAD. Use a hammer and a punch and tap edge of sensor ear, rocking the sensor side-to-side until free.
8. Remove front wheel speed sensor from vehicle.

INSTALLATION

CAUTION: Proper installation of wheel speed sensor cables is critical to continued system operation. Be sure that cables are installed in retainers. Failure to install cables in retainers as shown may result in contact with moving parts and over extension of cables, resulting in an open circuit.

1. Connect the front wheel speed sensor cable to the vehicle wiring harness connector. Be sure speed sensor cable connector is fully seated and locked into vehicle wiring harness connector.
2. Install the bolts attaching the routing clamps to the body of the vehicle. Tighten the bolts to a torque of 14 Nm (125 inch lbs.).
3. Insert speed sensor cable grommets into intermediate bracket on strut.
4. Install the wheel speed sensor head mounting bolt (Fig. 1). Tighten the bolt to a torque of 13 Nm (115 inch lbs.)
5. Install the wheel and tire assembly on vehicle.
6. Lower vehicle.
7. Road test vehicle to ensure proper operation of the base and ABS brake systems.

___________________________

Make sure you didn't accidentally disconnect or damage the wiring to it when you were working on it.

Let me know what you find.

Joe
Was this
answer
helpful?
Yes
No
Tuesday, April 23rd, 2019 AT 7:10 PM
Tiny
BOB JEFFRIES
  • MEMBER
  • 3 POSTS
Thanks for the easy to read and see information. I now have an idea to follow this through, Bob
Was this
answer
helpful?
Yes
No
Wednesday, April 24th, 2019 AT 7:21 AM
Tiny
JACOBANDNICKOLAS
  • MECHANIC
  • 108,355 POSTS
Happy to help. Let me know what you find and if you need anything.

Take care,
Joe
Was this
answer
helpful?
Yes
No
Wednesday, April 24th, 2019 AT 6:48 PM

Please login or register to post a reply.

Sponsored links