Good afternoon,
This sounds like the cable itself is bad and is seized internally. This most likely is the reason the shifter broke.
https://www.2carpros.com/articles/automatic-transmission-problems
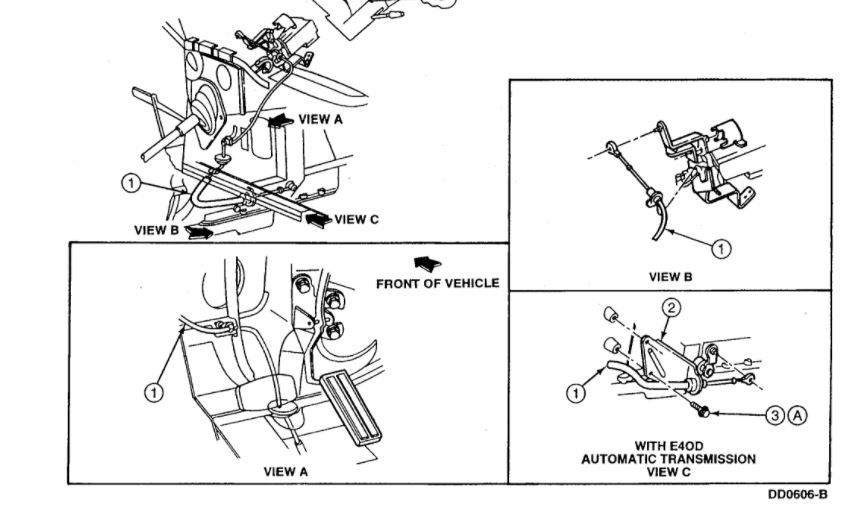
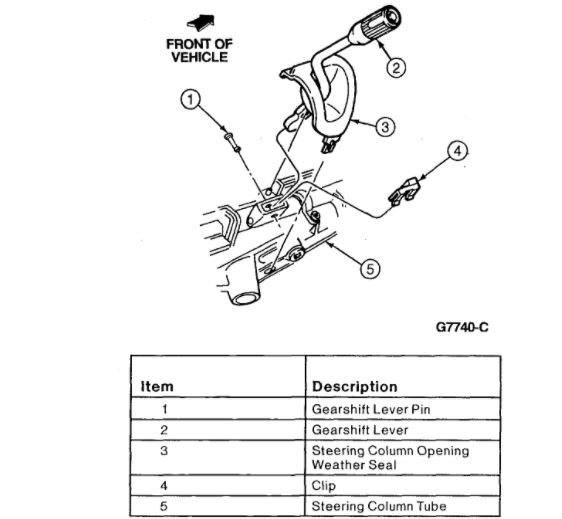
I attached the cable and shifter procedure for you to view.
Roy
REMOVAL
1. From under instrument panel, disconnect shift cable from steering column.
2. Remove cable plastic terminal from gear shift lever pivot ball by prying with a screwdriver between cable plastic terminal and gearshift lever.
3. From engine compartment, pry cable grommet from dash panel.
4. Remove the plastic slide adjuster from manual lever pivot ball, prying with a screwdriver between the slide adjuster and manual control lever.
5. Remove transmission shift cable from transmission shift cable bracket by carefully lifting on the locking tab while pulling up on the fitting.
6. From engine compartment, pull cable through the instrument panel opening.
INSTALLATION
1. From instrument panel, feed plastic terminal end of cable through opening in dash panel to engine compartment.
2. Press cable grommet on transmission shift cable into dash panel.
3. From engine compartment, install transmission shift cable into transmission shift cable bracket and make sure locking ears are properly located and seated into bracket.
4. Remove the control cable retainer and replace with a new control cable retainer.
5. Place transmission shift cable on manual lever pivot ball and press into place.
6. Push on the locking tab and make sure it is fully seated and locked into place.
7. From the passenger compartment, install cable to steering column bracket. Make sure it is fully seated.
8. Snap cable plastic terminal to shift control selector lever pivot ball on steering column.
9. Adjust transmission shift cable.
Shifter
REMOVAL
1. Remove steering column release lever by unscrewing from the steering column.
2. Turn ignition switch lock cylinder to RUN position. Using a 1/8-inch drift, depress ignition switch lock cylinder retaining pin through access hole and remove ignition switch lock cylinder.
3. Remove retaining screws of the instrument cluster mask and remove instrument cluster mask.
4. Remove four retaining screws from lower steering column shroud. Remove upper and lower steering column shrouds.
5. Using a small screwdriver, pry steering column opening weather seal from pedestal on ignition switch lock cylinder. Slide instrument cluster mask toward handle of shift control selector lever and housing to expose shift lever pin.
6. Disconnect Transmission Control Switch (TCS).
7. Using a small drift, tap shift lever pin from bottom for removal. Discard shift lever pin. Remove gearshift lever.
INSTALLATION
1. Insert gearshift lever through hole in steering column opening weather seal. Position cover on gearshift lever.
2. Verify that the anti-rattle clip of the gearshift lever is correctly positioned in the shift tube shift lever socket. Replace if required.
3. Insert gearshift lever.
4. Install a new shift lever pin into position and tap in place until the head seats against gearshift lever.
5. Connect transmission control switch.
6. Position steering column opening weather seal on the steering column. Insert lower attachment into the slot on side of steering column.
7. Position upper attachment on shift lever pin.
8. Install upper and lower steering column shrouds and install screws. Tighten screws.
9. Install instrument cluster mask and retaining screws.
10. Install ignition switch lock cylinder into steering column flange.
11. Install steering column release lever onto steering column.
12. Check for proper start in PARK and NEUTRAL. Make sure start circuit cannot be actuated in DRIVE or REVERSE positions and the steering column is locked in the LOCK position.
Images (Click to make bigger)
Tuesday, January 19th, 2021 AT 11:36 AM
