2. Disconnect the negative battery cable from the battery. On vehicles equipped with an air bag, wait at least 90 seconds before proceeding.
3. Raise and support the vehicle safely. Remove the front wheels.
4. Remove the cotter pin from the axle nut cap, then remove the cap.
5. Depress the brake pedal and loosen the axle nut.
6. Remove the brake caliper attaching hardware, position the caliper aside with the hydraulic line still attached and suspend it with a wire.
7. Remove the ABS speed sensor, if equipped.
8. Remove the brake rotor.
9. Loosen the nuts on the lower side of the strut assembly. Do not remove at this time.
10. Remove the cotter pin and nut from the tie rod end. Using a tie rod end removal tool, separate the tie rod end from the steering knuckle.
11. Place matchmarks on the strut assembly lower mounting bracket and the camber adjustment cam.
12. Remove the ball joint bolt and 2 nuts and disconnect the steering knuckle from the lower control arm.
13. Remove the 2 nuts and bolts on the lower side of the strut mount and separate the knuckle from the strut assembly.
14. Remove the axle nut and grasp the hub and knuckle assembly. With a plastic hammer tap the axle shaft to remove knuckle and hub.
NOTE
Cover the halfshaft boot with a shop rag to protect it from any damage.
15. Clamp the steering knuckle in a vise and remove the dust deflector. Remove the nut holding the steering knuckle to the ball joint. Press the ball joint out of the steering knuckle.
16. Remove the inner axle seal.
17. Using a Torx wrench, remove the bolts securing the dust cover.
18. Using hub puller, remove the hub and backing plate from the steering knuckle.
19. Using a proper sized driver and a press, remove the inner hub race from the axle hub.
20. Using seal removal tool, remove the outer axle seal.
21. Using snapring pliers, remove the snapring from the inner side of the steering knuckle.
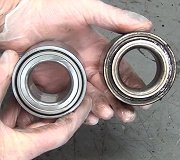
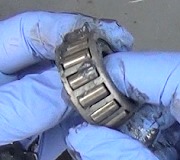
22. Using a proper sized driver and a press, remove the bearing from the steering knuckle. The bearing is pressed from the front of the steering knuckle and is removed through the back of the steering knuckle.
To install:
23. Using a proper sized driver and a press, install a new bearing to the steering knuckle.
24. Install the snapring to the steering knuckle using snapring pliers.
25. Using a seal driver and a hammer, install a new outer oil seal. Apply multipurpose grease to the oil seal lip.
26. Place the dust cover on the steering knuckle and tighten the bolts to 78 inch lbs. (9 Nm).
27. Using a press and a proper sized driver, install the axle hub to the steering knuckle.
28. Attach the ball joint to the steering knuckle. Install a new cotter pin.
29. Using a seal driver and a hammer, install a new inner oil seal. Apply multipurpose grease to the oil seal lip.
30. Install the knuckle and hub assembly to the axle and temporarily tighten the axle nut.
31. Connect the knuckle assembly to the lower strut bracket. Temporarily insert the mounting bolts from the rear and install the nuts making sure the matchmarks made earlier are in alignment.
32. Connect the lower ball joint to lower arm.
33. Connect the tie rod end to the knuckle.
34. Tighten on the lower side of the strut assembly.
35. If equipped, install the ABS speed sensor.
36. Install the brake disc and the caliper.
37. Tighten the axle nut while someone depresses the brake pedal. Install the adjusting nut cap and insert a new cotter pin.
38. Install the wheels to the vehicle. Verify that the wheel turns freely.
39. Lower the vehicle. Connect the negative battery cable to the battery.
40. Have the wheel alignment checked.
Monday, March 1st, 2010 AT 5:56 PM