Here is the way I see it. If you install a new chain, you can do a compression test to see if everything is good. If it isn't, at that time you can remove the chain and remove the head. All Nissan engines are interference engines, so there is a good chance something happened.
You don't need to put everything together to check compression because you're not starting the engine. Get the new chain on and then check compression.
Here is a link that shows how to perform a compression test:
https://www.2carpros.com/articles/how-to-test-engine-compression
___________________________
Here are the directions for timing chain replacement. Use this to make sure you have it installed correctly. The pics below correlate with the directions.
__________________________
2001 Nissan-Datsun Truck Frontier XE 2WD L4-2.4L (KA24DE)
Removal and Installation
Vehicle Engine, Cooling and Exhaust Engine Timing Components Timing Chain Service and Repair Removal and Replacement Removal and Installation
REMOVAL AND INSTALLATION
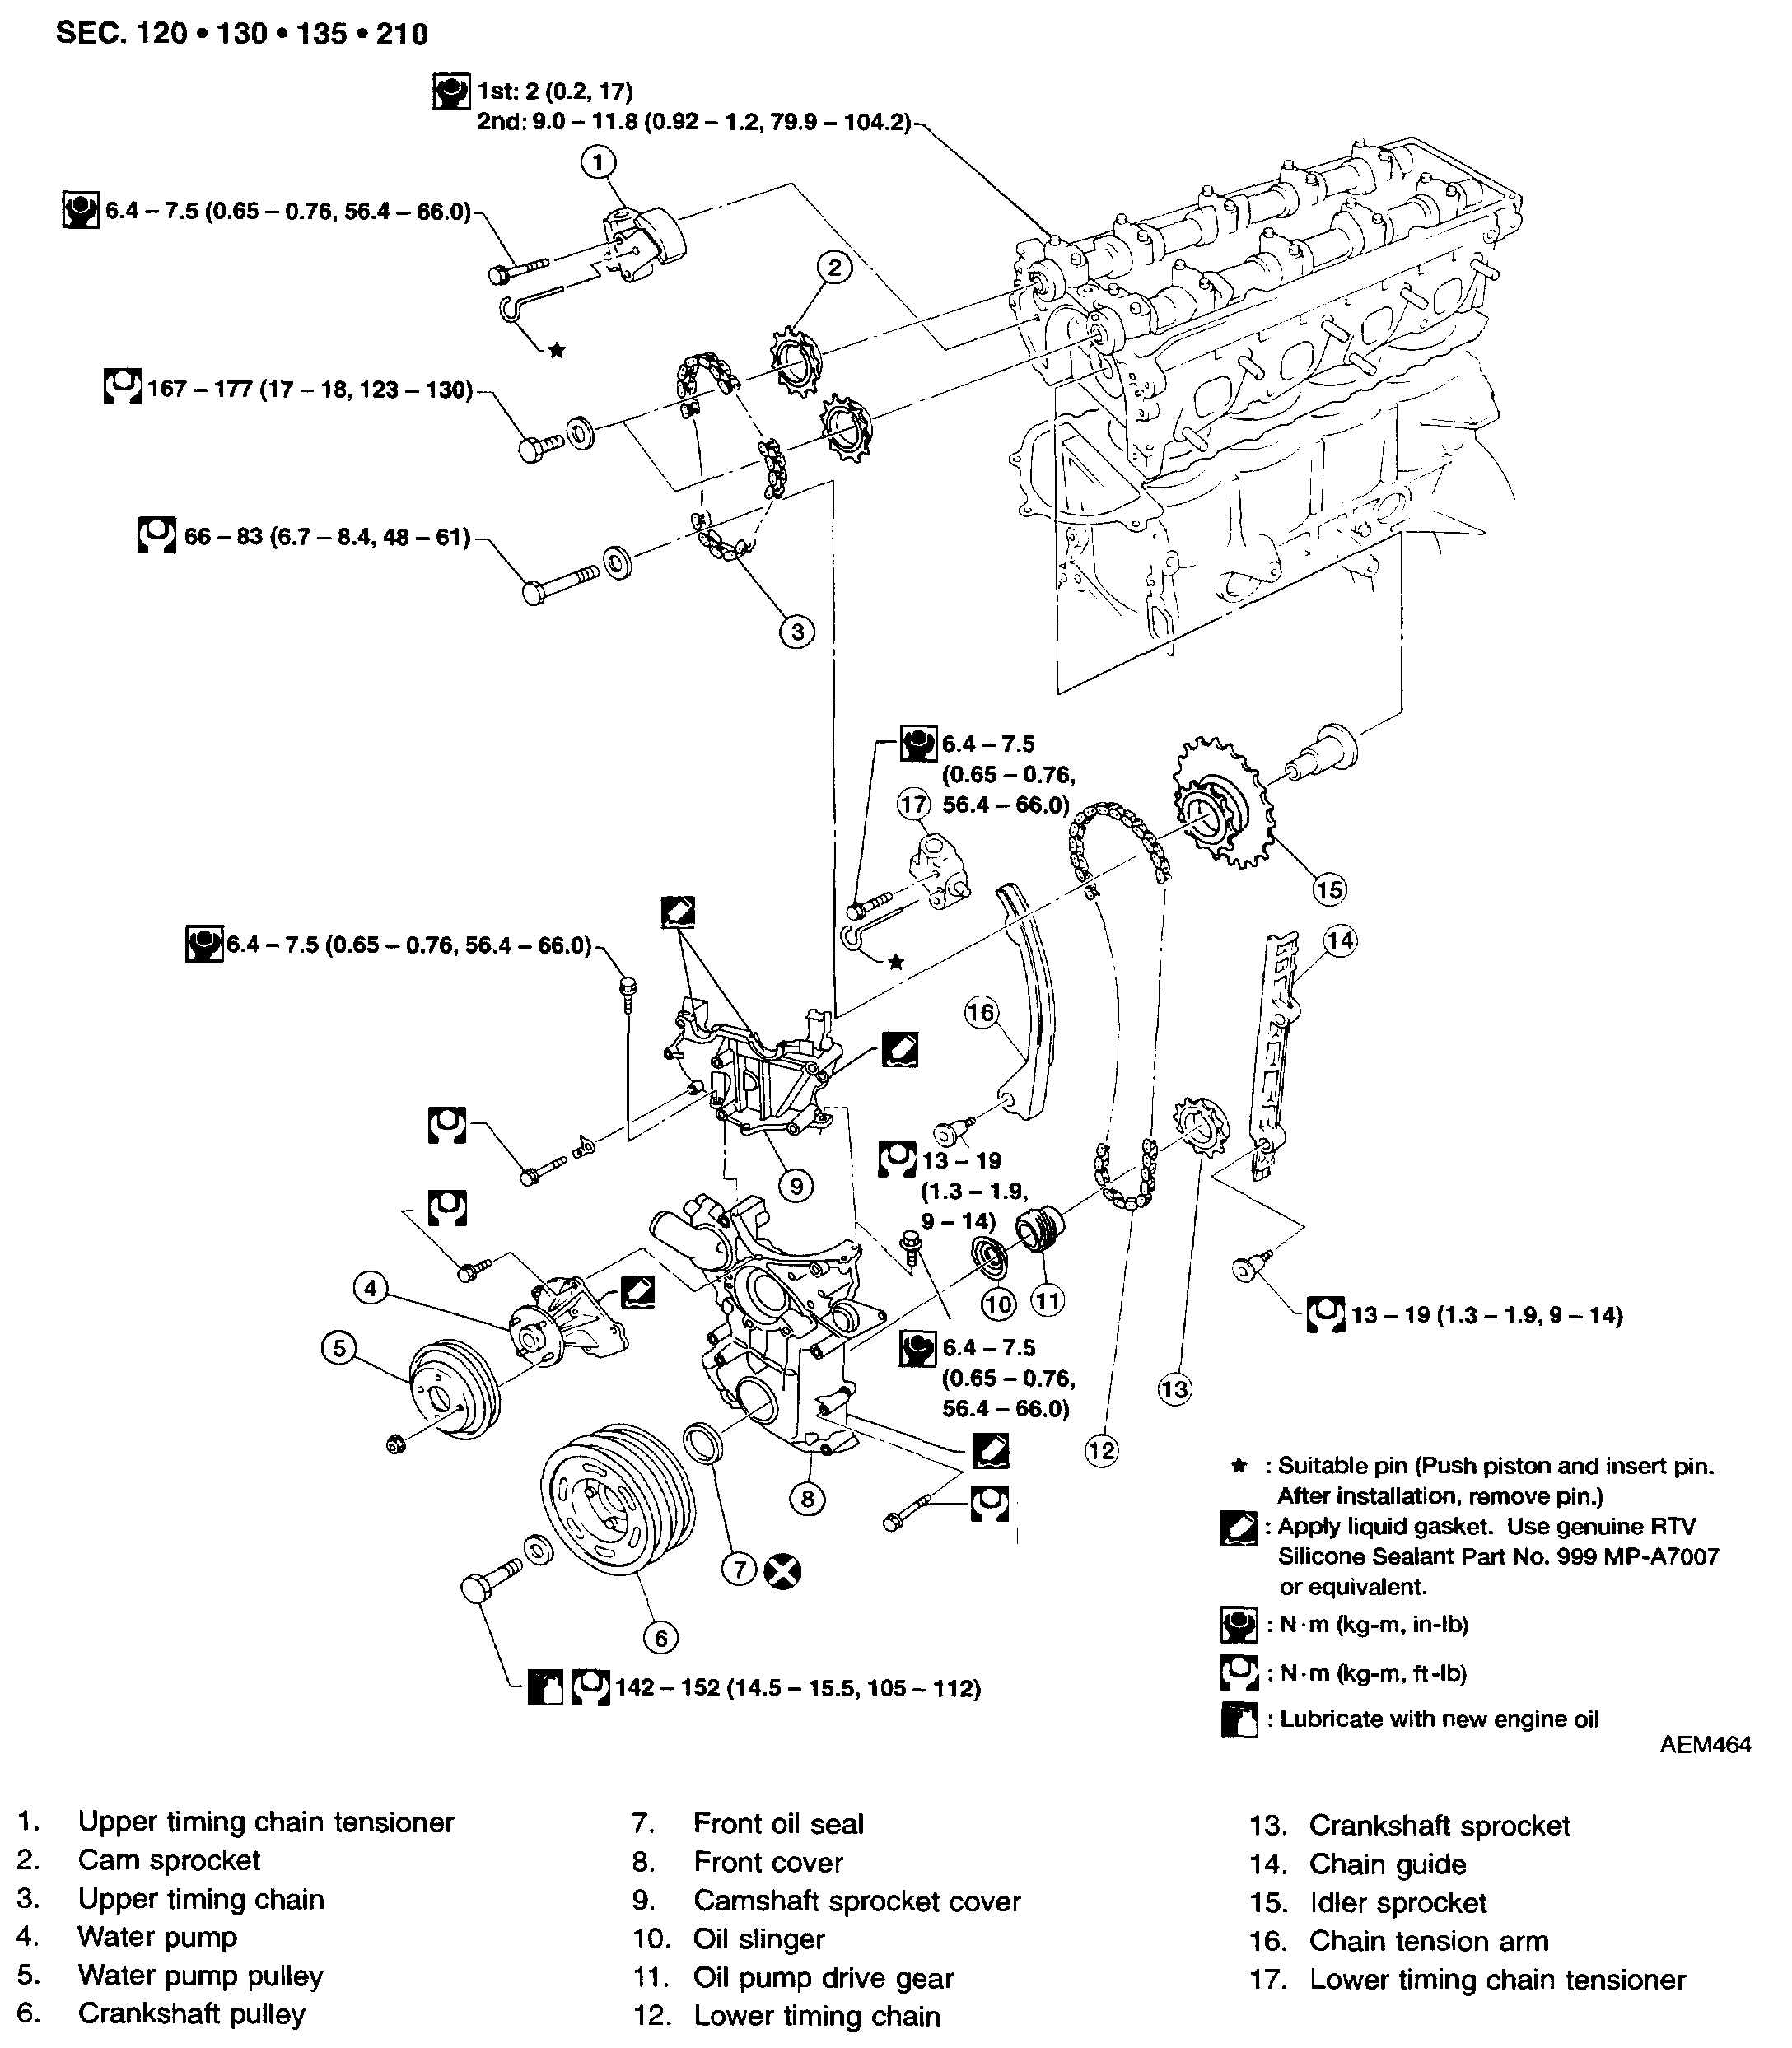
TIMING CHAIN COMPONENTS
pic 1
1 of 2
pic 2
2 of 2
pic 3
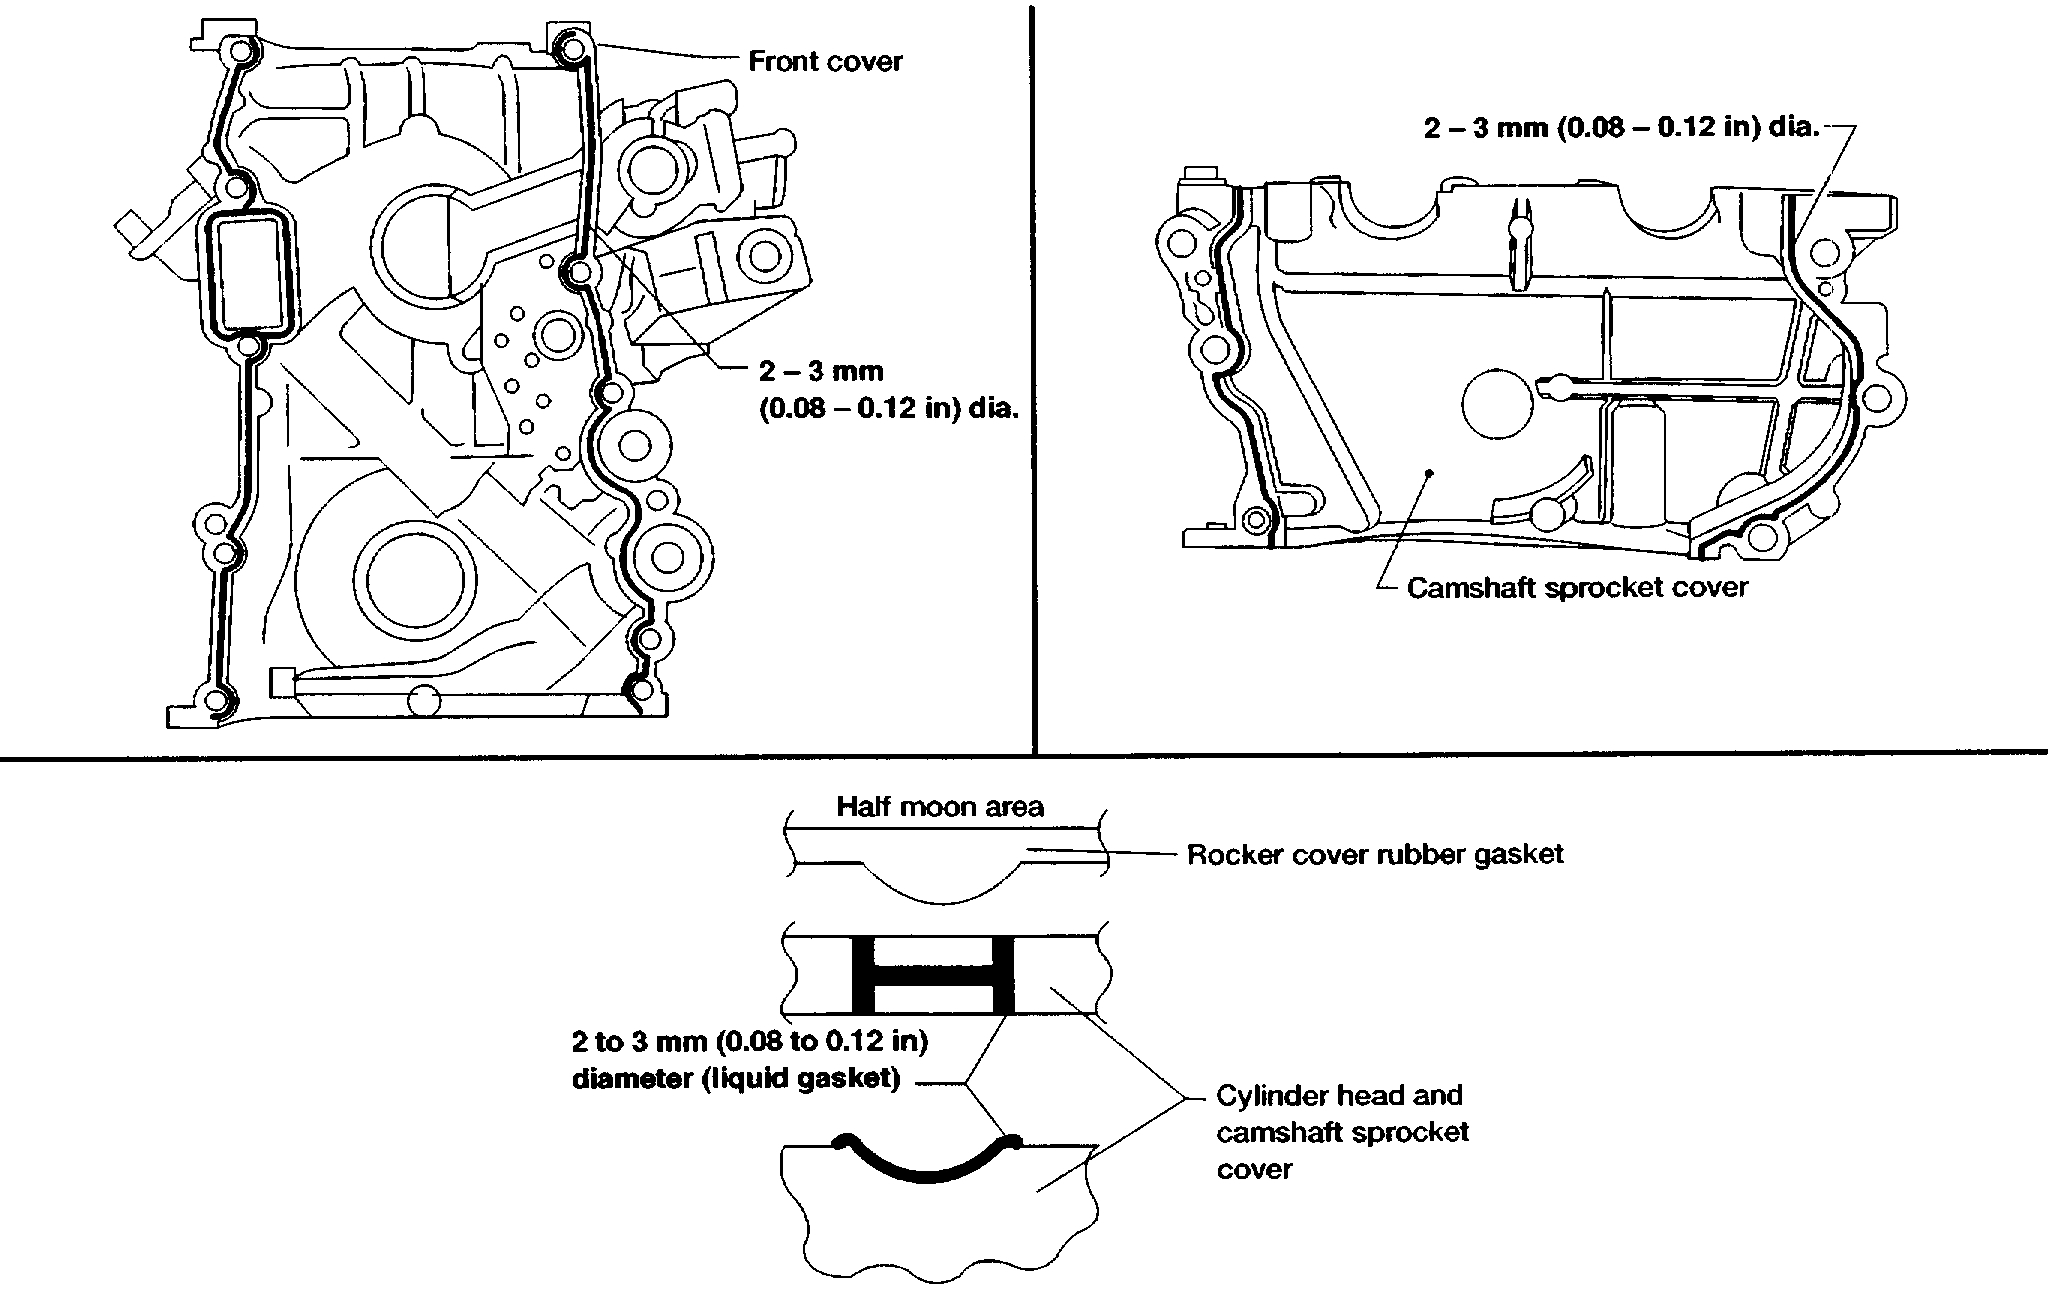
LIQUID GASKET APPLICATION PLACES
Removal
CAUTION:
- After removing timing chain, do not turn crankshaft and camshaft separately, or valves will strike piston heads.
- When installing chain tensioners or other sliding parts, lubricate contacting surfaces with new engine oil.
- Apply new engine oil to bolt threads and seat surfaces when installing camshaft sprockets and crankshaft pulley.
- Do not spill engine coolant on drive belts.
UPPER TIMING CHAIN
1. Remove the air cleaner assembly.
2. Remove the spark plug wires.
pic 4
3. Set No.1 piston at TDC on its compression stroke.
4. Remove vacuum hoses, electrical harness connectors, and harness clamps.
5. Remove the power steering belt.
6. Remove the power steering pump and position it to one side. Remove the idler pulley and bracket as well.
pic 5
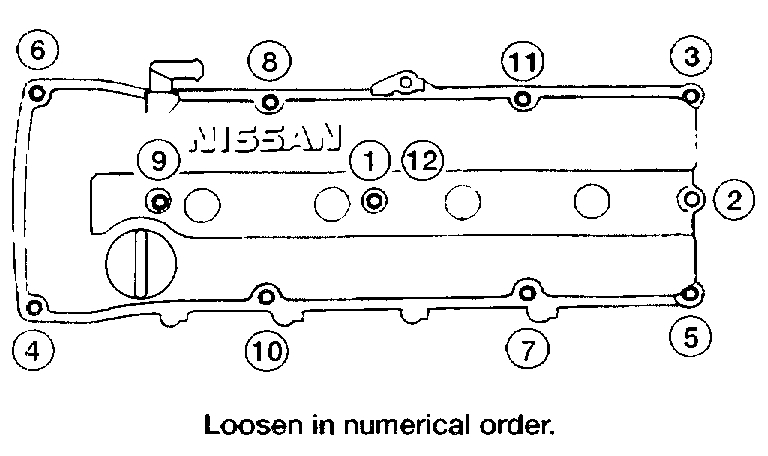
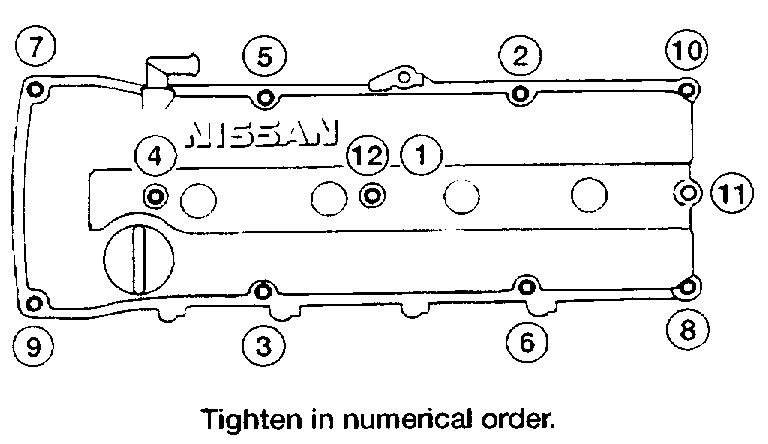
7. Remove the rocker cover.
- Loosen the bolts and remove in numerical order as shown.
pic 6
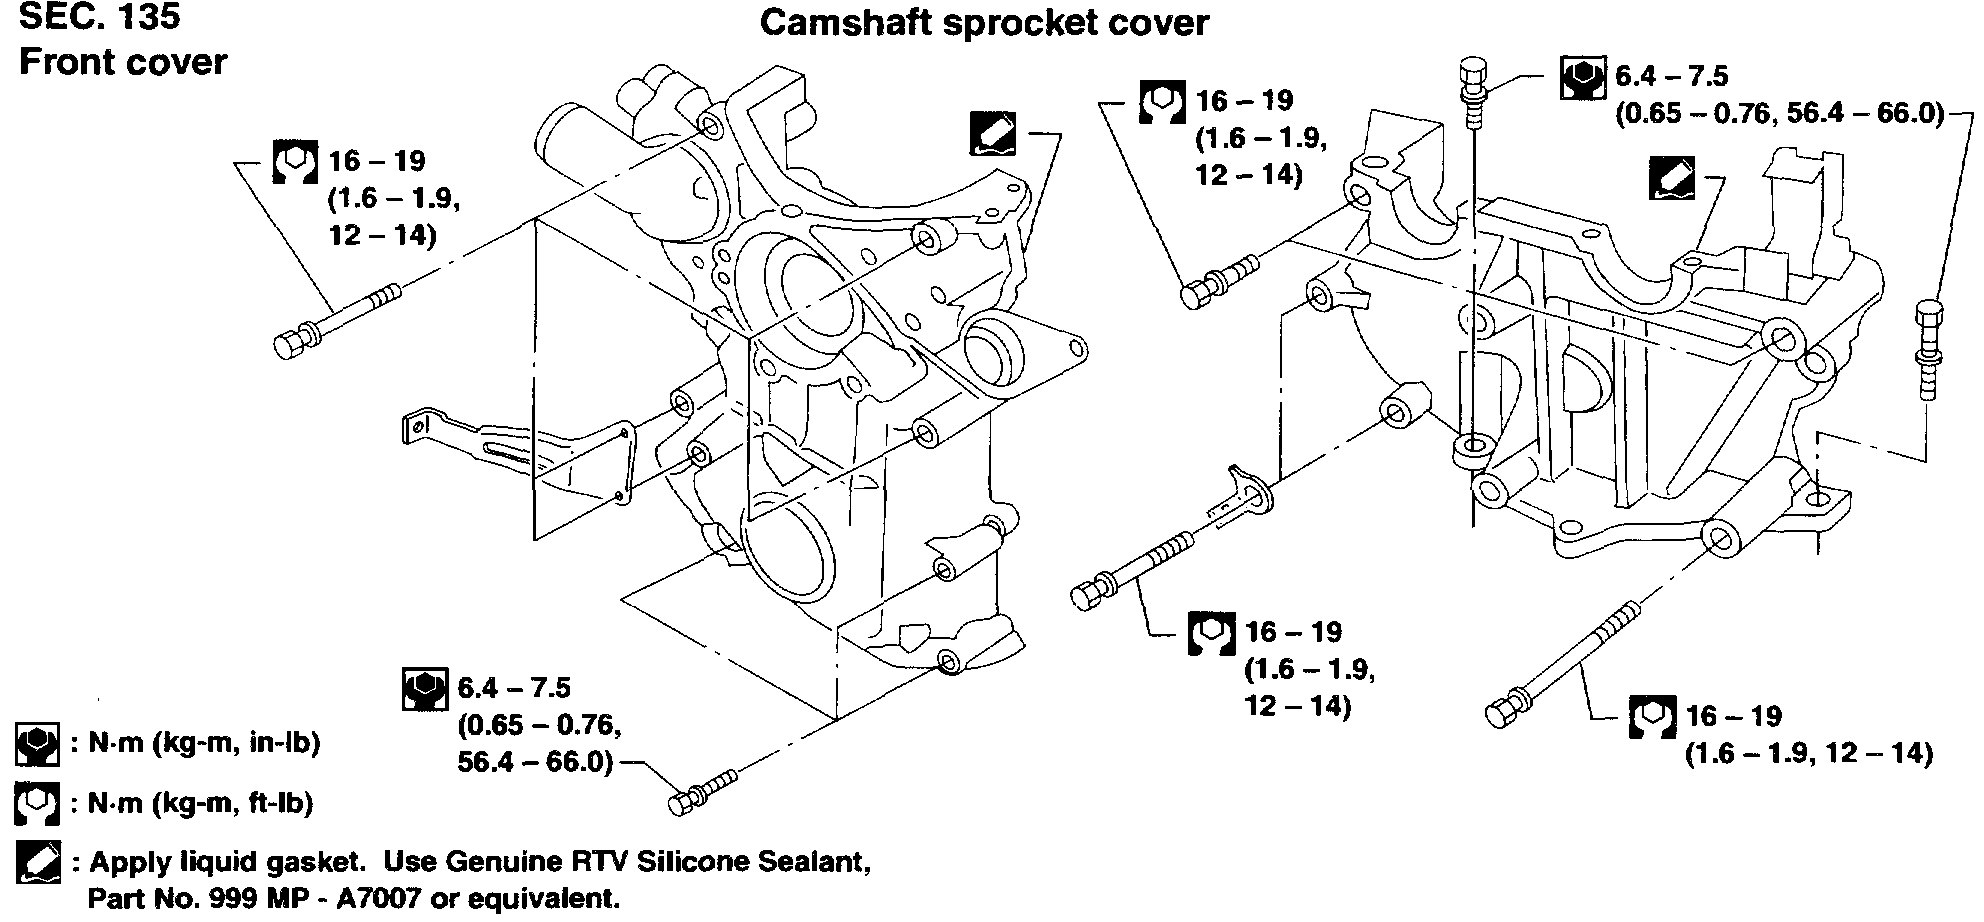
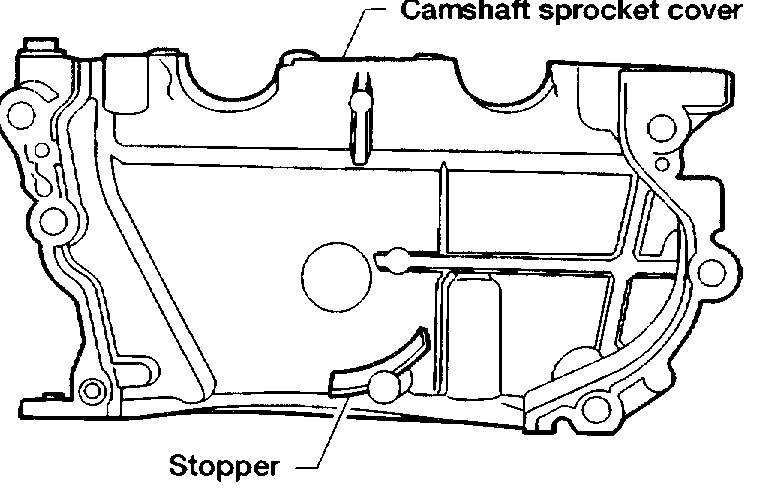
8. Remove the camshaft sprocket cover.
pic 7
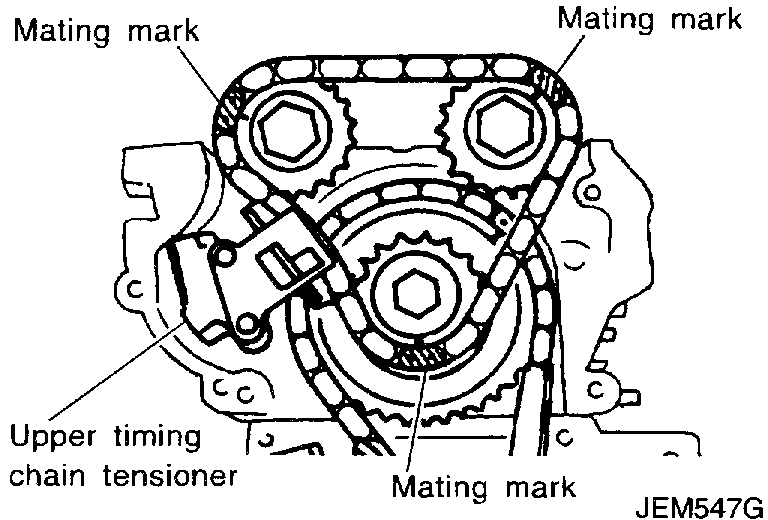
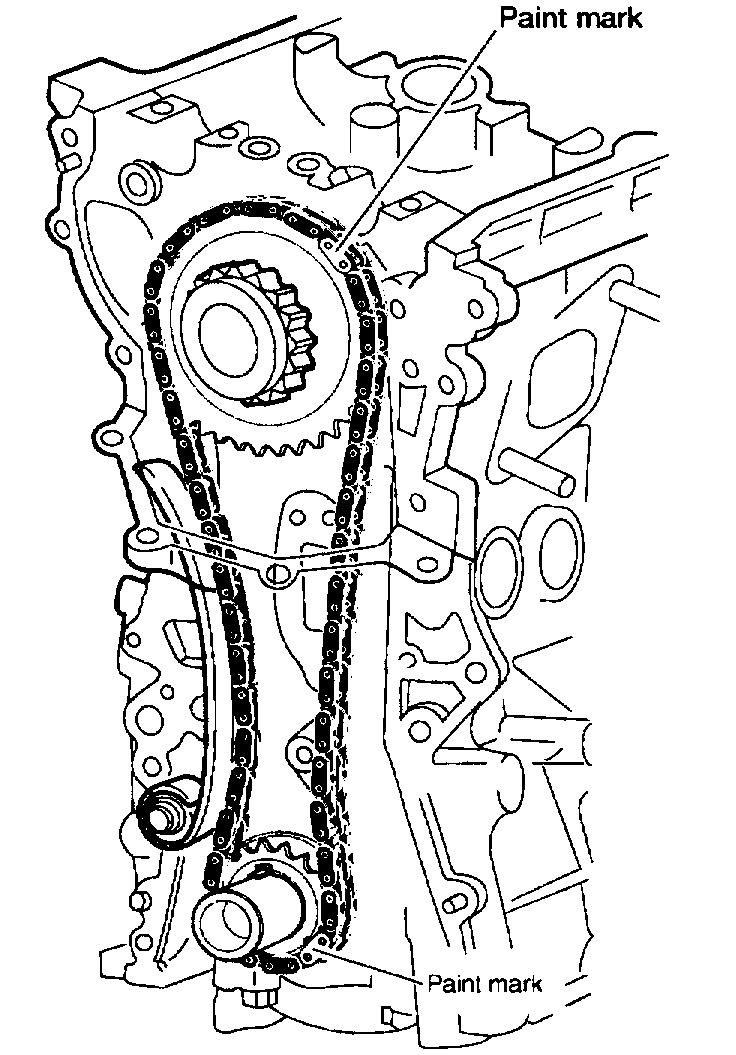
9. Wipe off the links of the timing chain next to the timing marks on the sprockets. Put paint marks on the timing chain, matching them with the timing marks on the cam sprockets and idler sprocket.
10. Remove cam sprocket bolts, cam sprockets and upper timing chain.
IDLER SPROCKET
pic 8
1. Remove upper timing chain.
Refer to "UPPER TIMING CHAIN".
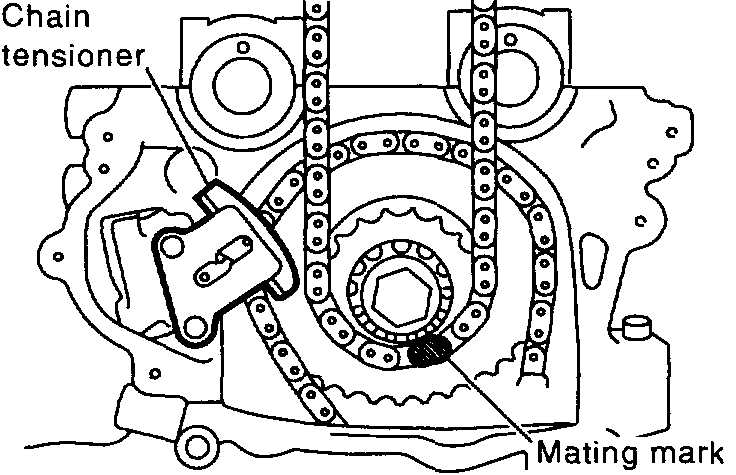
2. Support lower timing chain by using a suitable tool to prevent chain tensioner spring from coming out.
NOTE: This step is only to be applied when the lower cover is not being removed.
3. Remove the idler sprocket.
LOWER TIMING CHAIN
1. Drain coolant by removing the cylinder block drain plug and opening the radiator drain cock.
2. Drain engine oil from drain plug of oil pan.
3. Remove the following parts.
- Alternator drive belt.
- A/C compressor drive belt.
- Cooling fan with coupling.
- Radiator shroud.
4. Remove A/C compressor and position it to the side. Remove the idler pulley and bracket as well.
pic 9
5. Set No. 1 piston to TDC on its compression stroke.
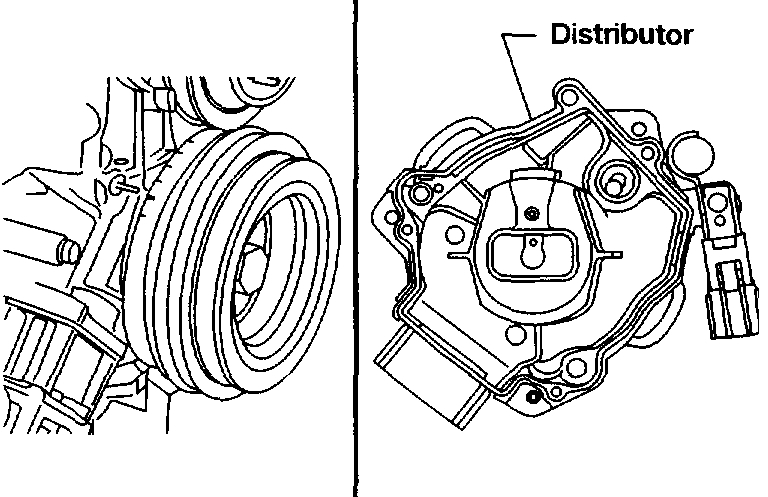
6. Remove the distributor.
pic 10
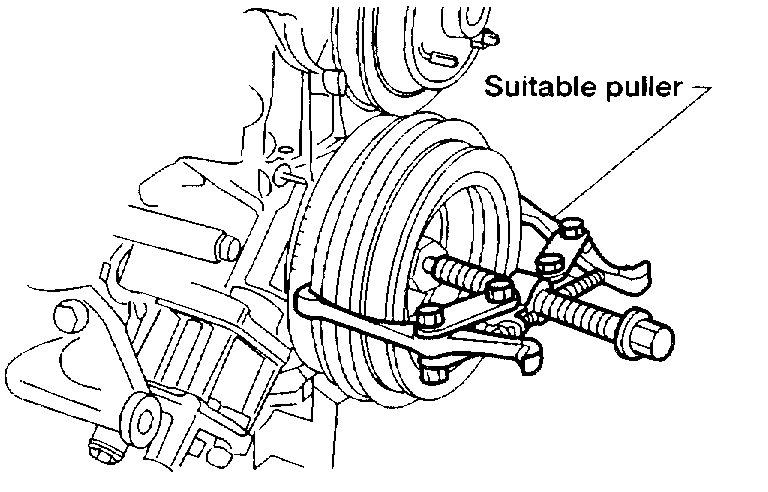
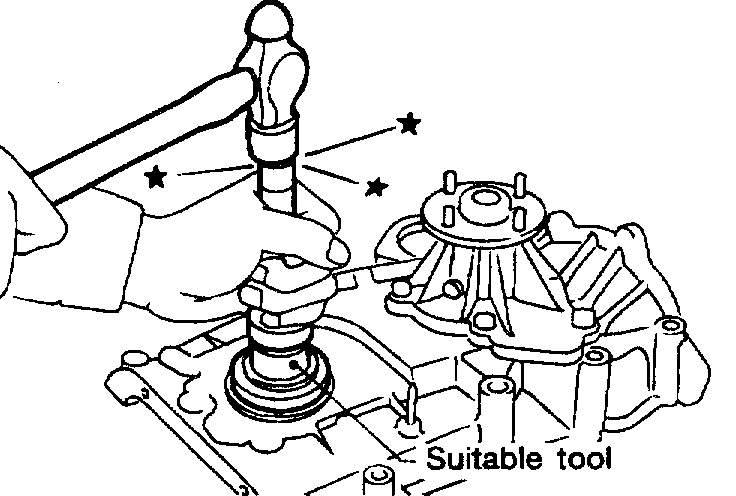
7. Remove the crankshaft pulley with suitable puller.
8. Remove oil pan.
Refer to "Removal".
9. Remove the oil pump and distributor drive shaft, then the oil pickup strainer.
10. Remove the front cover.
CAUTION: Be careful not to tear or damage the cylinder head gasket.
pic 11
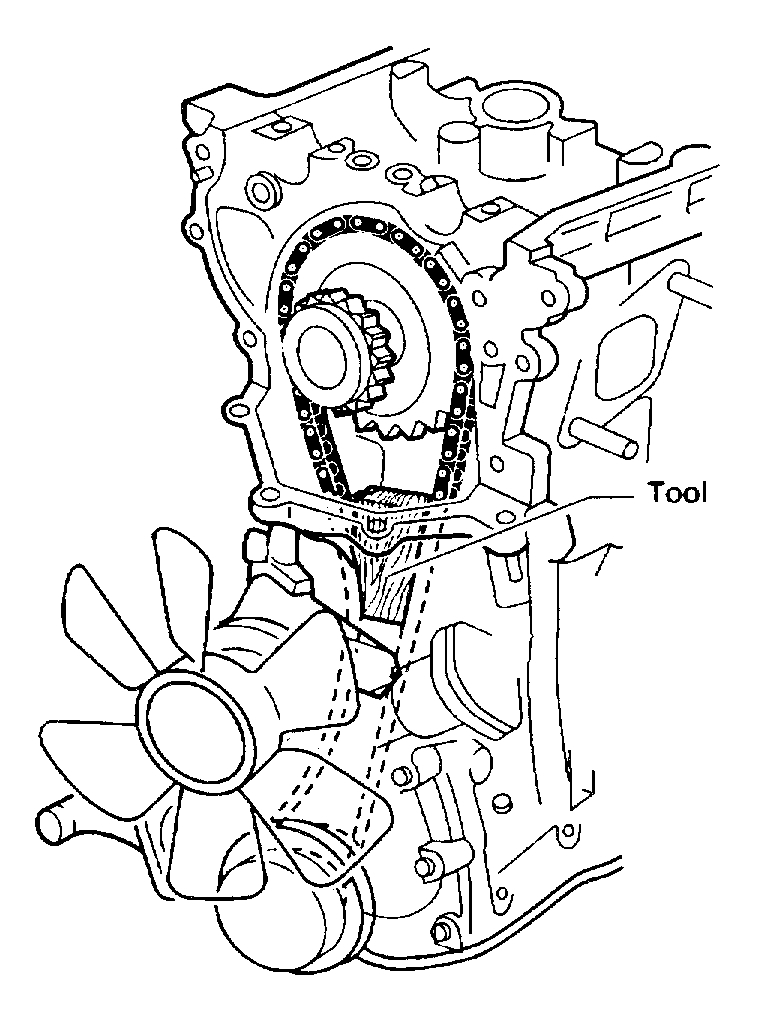
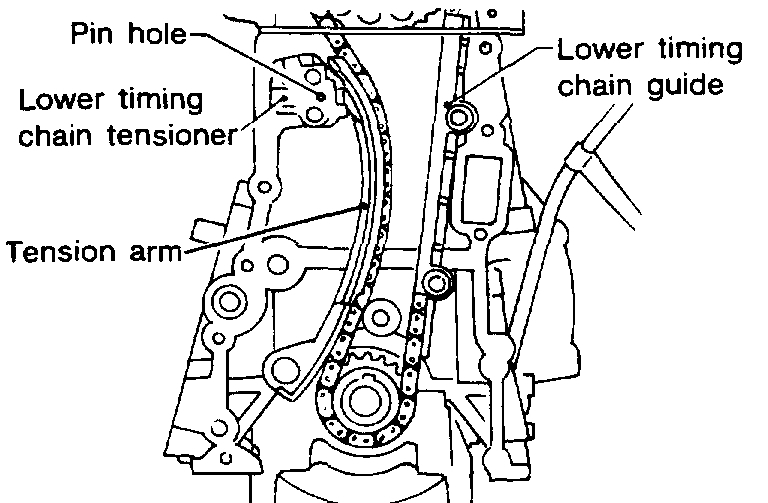
11. Remove the following parts.
- Release the timing chain tensioner. Push piston in and insert a suitable pin into the pin hole.
- Chain tension arm Lower timing chain guide
12. Remove the upper timing chain and idler sprocket. Refer to "UPPER TIMING CHAIN", and "IDLER SPROCKET".
pic 12
13. Wipe off the links of the timing chain next to the timing marks on the sprockets. Put paint marks on the timing chain, matching them with the timing marks on the crankshaft sprocket and idler sprocket.
14. Remove the lower timing chain and sprocket.
oic 13
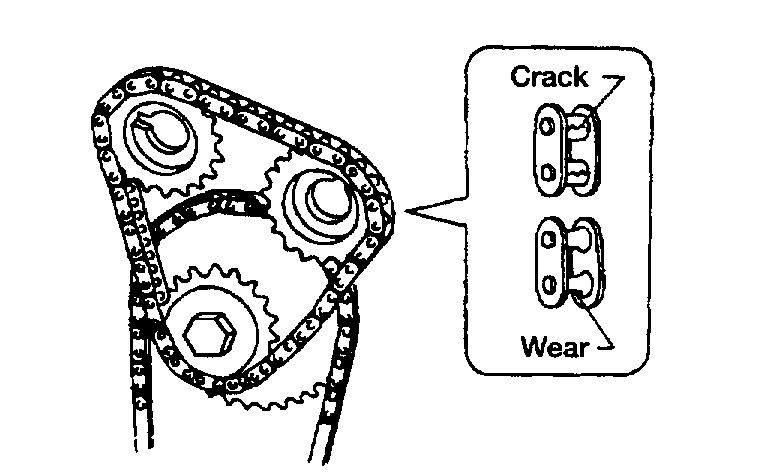
Inspection
Check for cracks and excessive wear at roller links. Replace chain if necessary.
Installation
LOWER TIMING CHAIN
pic 14
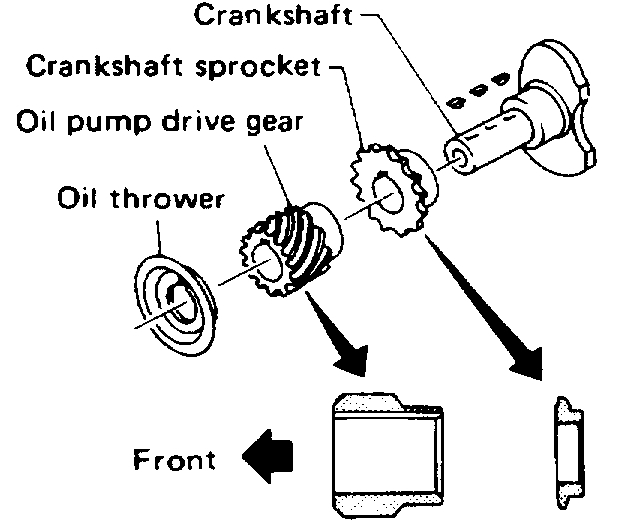
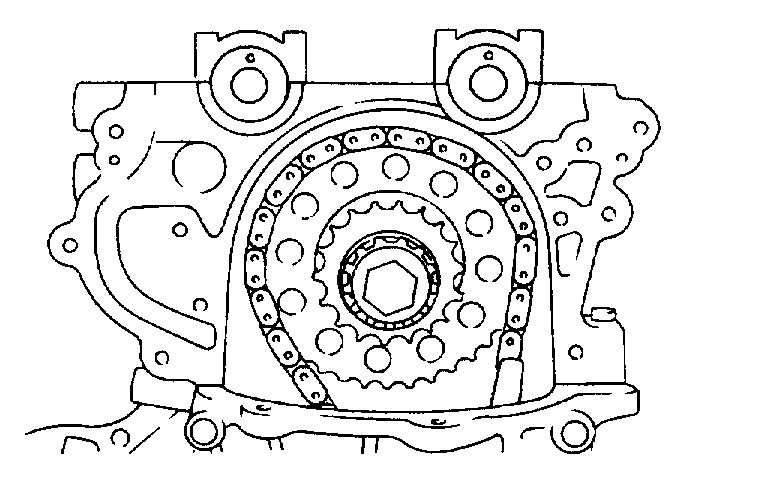
1. Install crankshaft sprocket.
- Make sure that mating marks of crankshaft sprocket face front of engine.
2. Install the idler sprocket and lower timing chain using the mating marks and the paint marks made during the removal process.
CAUTION: Be careful not to tear or damage the cylinder head gasket.
3. Install chain guide and chain tension arm.
4. Install lower chain tensioner and remove the pin securing the piston into the tensioner body.
5. Front cover installation:
- Using a scraper or other suitable tool remove all traces of liquid gasket from the cylinder block and front cover mating surfaces.
pic 15
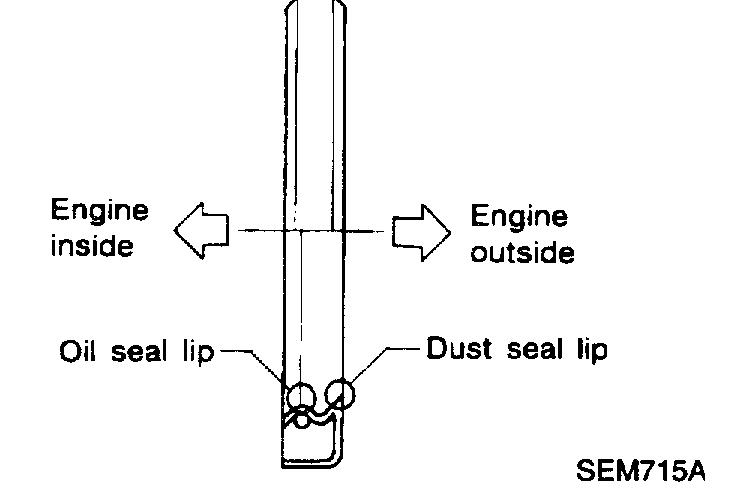
- Install new crankshaft seal in front cover.
- Apply a continuous bead of liquid gasket to front cover. Refer to "LIQUID GASKET APPLICATION PLACES".
NOTE: Use Genuine Nissan RTV Silicone Sealant P/N 999MP-A7007 or equivalent.
pic 16
- Be sure to install new front oil seal. Refer to "FRONT OIL SEAL", under Cylinder Head Assembly; Valve Guide Seal; Service and Repair.
- Also place RTV sealant on the head gasket surface.
- Install the front cover to the engine.
6. Install oil strainer and oil pan. Refer to "Installation".
pic 17
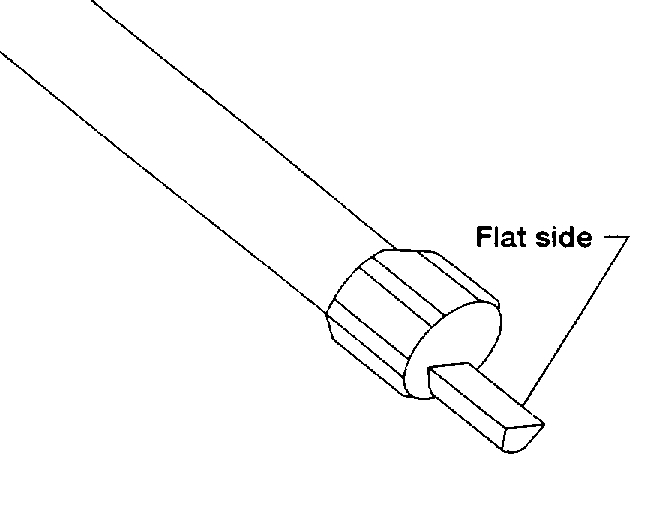
7. Install the oil pump and distributor drive shaft.
NOTE: Make sure the flat side of the distributor drive shaft is facing the engine. Failure to do so will result in the distributor being out of time.
8. Install the following parts: Crankshaft pulley.
- A/C compressor and idler pulley bracket.
- Radiator shroud and cooling fan with coupling.
- A/C compressor, alternator and power steering pump drive belts.
- Air duct.
IDLER SPROCKET
1. Install lower timing chain. Refer to "LOWER TIMING CHAIN".
2. Install idler sprocket and bolt.
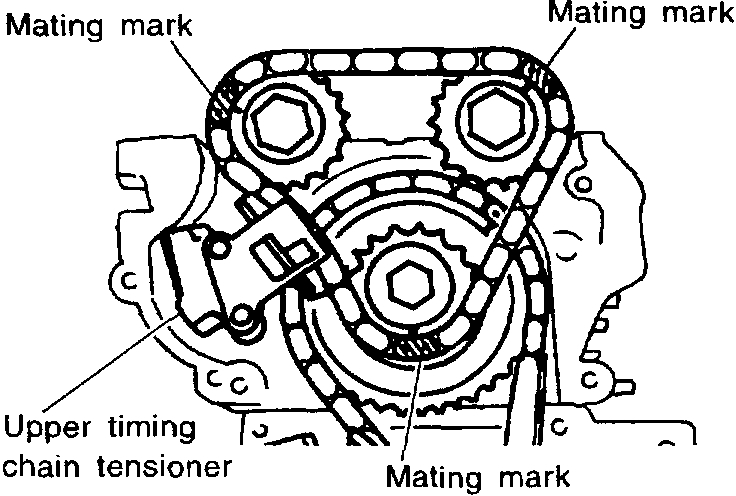
UPPER TIMING CHAIN
pic 18
1. Install lower timing chain and idler sprocket.
Refer to "LOWER TIMING CHAIN" and "IDLER SPROCKET".
pic 19
1 of 2
pic 20
2 of 2
2. Install upper timing chain and sprockets, referring to the painted marks made during removal.
3. Install chain tensioner. Remove the pin holding the tensioner piston in the bore of the tensioner.
4. Install camshaft sprocket cover:
- Use a scraper to remove all traces of liquid gasket from mating surfaces of the engine block and camshaft sprocket cover.
- Apply a continuous bead of RTV sealant to the cover. Refer to "LIQUID GASKET APPLICATION PLACES".
- Also place RTV sealant on the head gasket surface.
NOTE: Use Nissan Genuine RTV Silicone Sealant, Part No. 999MP-A7007 or equivalent.
CAUTION:
- Be careful not to tear or damage the cylinder head gasket.
- Be careful upper timing chain does not slip or jump when installing camshaft sprocket cover.
5. Install the rocker cover gasket on the rocker cover.
- Apply a continuous bead of RTV sealant to the cover. Refer to "LIQUID GASKET APPLICATION PLACES".
pic 21
6. Install rocker cover. Tighten bolts in numerical order.
- 8 - 11 Nm (0.8 - 1.1 kg-m, 69 - 95 inch lbs.).
pic 22
7. Install distributor, aligning as shown.
8. Install vacuum hoses, electrical harnesses, connectors, and harness clamps.
_____________________________
Let me know what you find or if you have other questions.
Take care,
Joe
Images (Click to enlarge)
Mar 8, 2021 at 5:10 PM