Rear brake caliper slide pins T-55 Torx

Tiny
LUKAS MCNEIL
  • MEMBER
  • 2003 CHEVROLET SILVERADO
  • 6.6L
  • V8
  • TURBO
  • 4WD
  • AUTOMATIC
  • 130,000 MILES
I have tried everything I can to get the lower slide pin out of the driver’s side brake caliper, as described in your video about removing and replacing the rear axle seals due to a non working parking brake. I have purchased an impact wrench (gun) along with a set of torque impact bits. I have used PB Blaster. I have pounded on it with a hammer. I cannot get it loose. Any suggestions before I take it in to a shop or completely strip the head out?
Monday, May 27th, 2019 AT 3:57 PM

5 Replies

Tiny
KASEKENNY
  • MECHANIC
  • 18,907 POSTS
Hi Lukas,

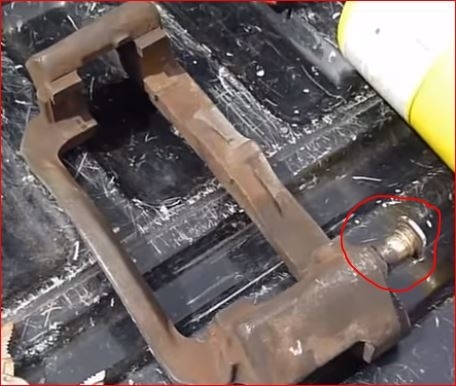
Are you trying to remove the bolt from the slide pin that holds the caliper on or the actual slide pin from the caliper bracket? Picture of the caliper bracket below.

I assume you are trying to remove the actual bolt since you mentioned the T55 bit. If this is the case, more than likely this bolt is cross threaded which means with the repeated heat cycles the bolt has gone through it may not come out.

You can try to heat them with a small plumbers torch but just make sure you remove the brake line and drape everything you don't want to get hot with a welders blanket or some other heavy fabric so they don't get hot. Lastly keep a fire extinguisher close because you don't want to get caught off guard with some oil you didn't see. This should be a last resort because anytime you are dealing with open flame around your vehicle, it is not good to be unprepared.

The only other suggestion that I have is you will need to grind or cut the bolt head off so you can wiggle the caliper off the bolt. Then most likely you will need to replace the caliper bracket because I doubt you will get this out of the bracket.

Let me know what you think and I can see if I can come up with other ideas if you don't feel comfortable doing these. Unfortunately, we are scrapping the bottom of the barrel because you named most of the easiest and most successful techniques. Thanks.
Was this
answer
helpful?
Yes
No
+1
Tuesday, February 23rd, 2021 AT 8:52 AM
Tiny
LUKAS MCNEIL
  • MEMBER
  • 3 POSTS
Yes! That is the bolt I am attempting to remove. I just wonder why it is so hard to remove yet the mechanic I originally took it to didn't mention it. Also, in your video on how to remove and replace the axle seals you don't mention it either. If it comes from the factory with thread-locker on it or it is a part which is commonly extremely difficult to remove, why was this not mentioned in your video about removing and replacing the rear axle seals? I am not blaming you or anything, it just would have been nice to know before I got down on the ground, in the rain, jacked up my truck, took off the wheel, etc. You know? I could have bought the torch I needed before I had to redo all of that - twice. Because as I mentioned earlier, I also purchased a $250.00 impact wrench and two cans of PB Blaster before I realized this was a problem and exceedingly common issue. Now, I am looking at potentially having to replace both rear calipers in addition to everything else I am replacing. Does that make sense? If I would have known this was an issue which commonly leads to replacing the entire part, I would have been able to make a better decision at the onset of this project. I appreciate all of the advice and help. Thank you!
Was this
answer
helpful?
Yes
No
Tuesday, February 23rd, 2021 AT 8:52 AM
Tiny
KASEKENNY
  • MECHANIC
  • 18,907 POSTS
I am sorry you are experiencing this. The unfortunate thing is these are not typically that hard to remove. This is why it was not mentioned in the video. They are simply tightened to the proper torque spec. Most mechanics just tighten them as tight as they can with a hand ratchet.

Hopefully someone did not use thread locker because that is not needed as I have done thousands of brakes jobs and never once put thread locker on these bolts.

I suspect it is one of two things. They have been removed previously and potentially cross threaded and are now seized. Or they have been heated so many times by normal break operation that the dirt, grim, and rust on the threads has seized the bolt tight. Normally we put a small amount of anti seize gel on the threads when reassembling them so this exact issue does not happen.

The techniques I mentioned like the torch are not standard tools needed to do this job so they would not have been mentioned in the video. They are techniques for removing seized bolts that you happen to have on this specific part. Heating a seized bolt would apply to any seized bolt because what you are doing when you heat the metal is expanding it and that will release some of the tension that surrounds the bolt.

Please let me know if I can assist more. Again, sorry this has been such an ordeal.
Was this
answer
helpful?
Yes
No
+1
Tuesday, February 23rd, 2021 AT 8:52 AM
Tiny
LUKAS MCNEIL
  • MEMBER
  • 3 POSTS
Thank you for your response Kenny I appreciate it. I got the torch head and miniature propane bottle yesterday. I will try to heat the T-55 Torx bolt tomorrow and I will let you know how it goes. Please keep making your videos. They are awesome. You do a great job being very clear and concise about each step of every repair in your videos. Thank you for your time and all of your help. It is very appreciated. Please have a Great Day!
Was this
answer
helpful?
Yes
No
Tuesday, February 23rd, 2021 AT 8:52 AM
Tiny
KASEKENNY
  • MECHANIC
  • 18,907 POSTS
Sounds great. Thank you for the kind words. Please make suggestions of things you would like to see if it is not on here and we can definitely pass it on.

Keep me updated. Good luck getting it off.
Was this
answer
helpful?
Yes
No
+1
Tuesday, February 23rd, 2021 AT 8:52 AM

Please login or register to post a reply.

Sponsored links