AURORA
NOTE:
To identify Lamp Control Module (LCM) connector terminals, use illustrations.
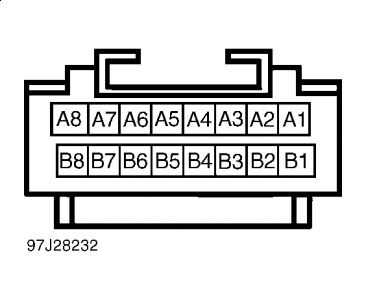
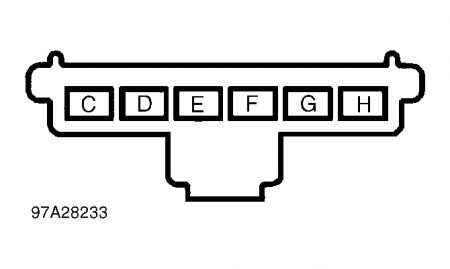
LCM is located under left side of instrument panel.
Headlights Do Not Turn Off
1.If diagnostic system check was performed, go to next step. If diagnostic system check was not performed, go to DIAGNOSTIC SYSTEM CHECK .below
2.Turn ignition off. Disconnect LCM 16-pin connector C1. If headlights turn off, go to step 6). If headlights do not turn off, go to next step.
3.Disconnect LCM 6-pin connector C2. If headlights turn off, go to step 8). If headlights do not turn off, go to step 5).
4.Disconnect 48-pin connector C202 (used for headlight and headlight dimmer switches), located at base of steering column. If headlights turn off, go to step 9). If headlights do not turn off, go to step 6).
5.If low beams will not turn off, repair short to voltage in circuit No. 12 (Tan wire) between headlight dimmer switch and low beam headlights. If high beams will not turn off, repair short to voltage in circuit No. 11 (Light Green wire) between headlight dimmer switch and high beam headlights. Perform DIAGNOSTIC SYSTEM CHECK .
6.Check for short to voltage in circuit No. 103 (White wire) between headlight switch and LCM connector C1. If circuit is okay, go to next step. If circuit is not okay, go to step 11).
7.Replace headlight switch. Perform DIAGNOSTIC SYSTEM CHECK .
8.Replace LCM
9.Check for short to voltage in circuit No. 1346 (Light Blue wire) between headlight dimmer switch and LCM connector C2. If circuit is okay, go to next step. If circuit is not okay, go to step 11).
10.Replace headlight dimmer switch. Perform DIAGNOSTIC SYSTEM CHECK .
11.Repair short to ground in appropriate circuit
DIAGNOSTIC SYSTEM CHECK
Turn ignition off. Turn twilight sentinel off. Turn headlight switch off. All exterior lights should be off. If headlights are not off, see appropriate HEADLIGHTS DO NOT TURN OFF procedure.
Turn parking lights on. All parking lights should be illuminated. If parking light(s) are not illuminated, locate and repair problem in exterior lighting system. See appropriate wiring diagram in EXTERIOR LIGHTS article.
Turn low beam headlights on. Parking lights should remain lit. Both low beam headlights should be illuminated. If low beams do not operate as specified, see appropriate LOW BEAM HEADLIGHTS INOPERATIVE procedure.
Turn high beam headlights on. Headlights should switch from low beam to high beam. If high beams do not operate as specified, see appropriate HIGH BEAM HEADLIGHTS INOPERATIVE procedure.
Turn low beam headlights on. Turn headlights off. Turn ignition switch to RUN position. Apply parking brake. Put gearshift lever in Drive. Expose ambient light sensor to sunlight or bright incandescent light. On Aurora, both low beam headlights should illuminate at reduced intensity. On Riviera, both high beam headlights should illuminate at reduced intensity. On all models, all other exterior lights should be off. If headlights do not operate as specified, see appropriate DAYTIME RUNNING LIGHTS INOPERATIVE procedure.
Put gearshift lever in Park. Turn twilight sentinel on, with twilight sentinel delay in MIN position. Cover ambient light sensor. Both low beam headlights should illuminate at full intensity and all parking lights should turn on within 30 seconds. If headlights do not operate as specified, see appropriate DAYTIME RUNNING LIGHTS INOPERATIVE procedure.
Put twilight sentinel delay in MAX position. Turn ignition off. All exterior lights should turn off after about 3 minutes. If exterior lights do not operate as specified.
Sunday, July 12th, 2009 AT 6:49 AM