The next best suspects are the battery cable connections. There was also a real common problem with the starter motor that caused a single, rather loud clunk each time the ignition switch was turned to "crank", but the instrument cluster didn't go dead with that one. When everything goes dead as you described, there's going to be a poor connection in the area of the battery or the under-hood fuse box. The goal now is to get it to act up and to keep it acting up so we can do some testing. To say that a different way, when the problem occurs, be very gentle with slamming doors and such so the electrical system doesn't come back to life. If it does start working, there's no defect to find at that time.
Next time you try to start the engine, turn the head lights on first, then crank the engine. Eventually when the problem occurs, leave the head light switch on. That will insure current is trying to flow and often prevents the system from working on its own. If you accidentally wiggle or tug on a wire and you suddenly see the head lights light up, you'll know you're working in the area where the cause is.
The test procedure involves taking a series of voltage measurements. For the benefit of others researching this topic, here's a link to an article on how to use a voltmeter:
https://www.2carpros.com/articles/how-to-use-a-voltmeter
There's two ways to do this test. The most common is to take various voltage readings AT multiple places and look for the first one where you lose the 12 volts. The second method is to take the voltage readings across each connection. We're looking at mechanical connections. For example, the first mechanical connection on the positive side is where the battery cable clamp is bolted to the battery's post. Electrically that is one point in the circuit and you should have the same voltage on the post as on the clamp, but again, that would be measuring at two places. Instead, it's faster and more accurate to place one voltmeter probe on the cable clamp and the other probe on the battery's post. Physically the probes will be only a half inch apart. Ideally you should find a reading of 0.00 volts indicating a solid connection. If there's excessive resistance in that connection, voltage will be "dropped" across it, but only when current is trying to flow through that connection. That's where leaving the head light switch on comes in.
In actual practice you're most likely going to find a little voltage at this connection, but it should be in the hundredths of a volt. Given the severity of the symptoms, you can expect to find close to the full 12 volts across the bad connection.
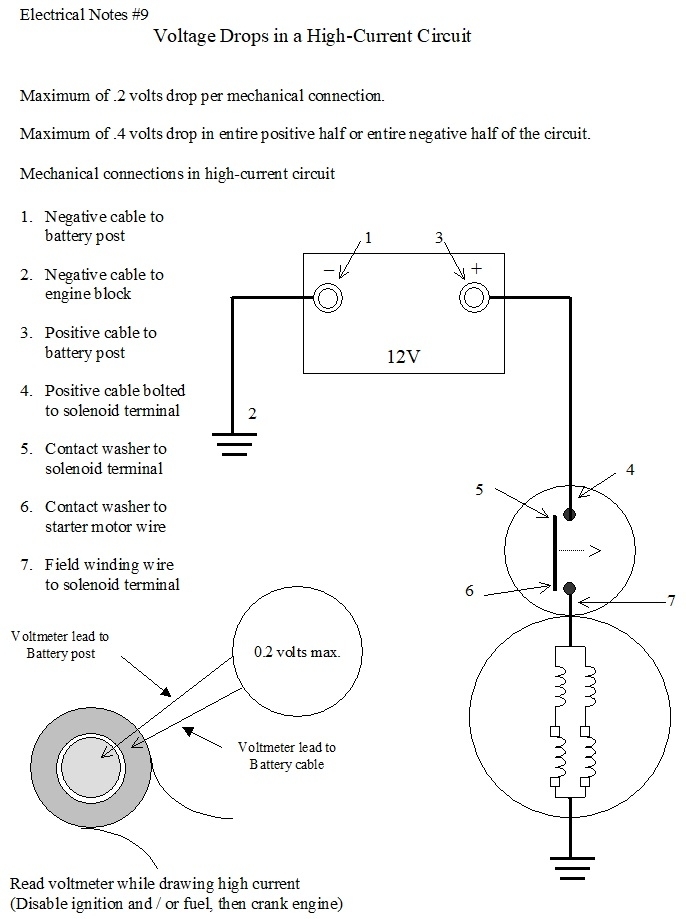
This drawing is of the Electrical Notes I handed out in the classroom after the "class discussion" about these voltage drops. This is for the very high-current starter circuit, and covers more than we need to be concerned with. Start by looking at connection number 3, the positive battery post and cable clamp. The drawing in the lower left shows the placement of the voltmeter probes. Ignore the 0.2 volts shown. That is the maximum voltage drop allowed while the starter is drawing its very high current. Head lights are trying to draw very much less current, but in this case the voltage drop across the bad connection is going to show up as a much higher voltage.
Take the same voltage reading across the negative post and cable clamp. That's connection number 1. If you find a high voltage there, that is the connection that needs to be cleaned and / or tightened.
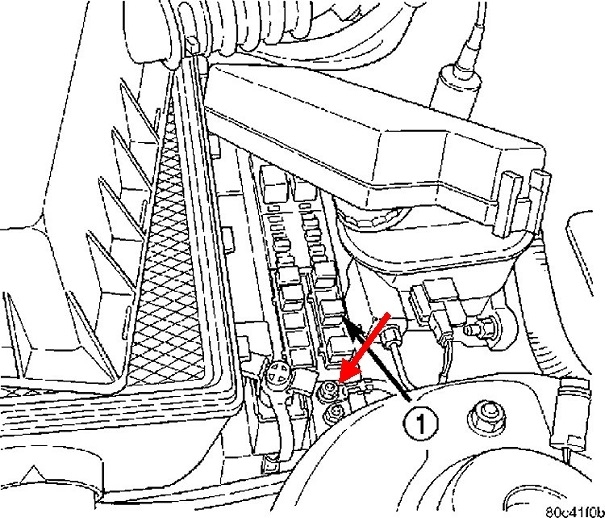
The next two connections aren't shown here. One is that connection at the fuse box I had you tighten. For probe placement, you have to look at the mechanical connection. In this case, place one probe on the top of the threaded stud, and the other one on the terminal bolted to that stud. As before, you're supposed to see 0.00 volts there, but you'll find full battery voltage of over 12 volts when that connection is corroded or vibrated loose.
The last connection is a little trickier. That is where the smaller negative battery wire is bolted to the body sheet metal. That and the battery post / cable clamp are the only mechanical connections in the negative half of the circuit. To save time, you can check that entire half all at once with one voltage measurement. Place one voltmeter probe on the battery's negative post. The other probe goes to a paint-free point on the body. The best place is to find the head of a sheet metal screw that's holding something to the body. Those won't have paint on them. I've also had good luck using the steel lines coming out of the brake master cylinder and the three nuts holding the front strut's upper mount to the body, near the hood hinges. Those nuts and the master cylinder are bolted to painted surfaces, but the nuts usually do a good job of biting through that paint. If you find close to 0.00 volts here, we can move on. If you find close to 12 volts with this test, we'll have to test each connection individually to figure out which one has the bad connection.
Remember, these tests have to be done while the problem is occurring and while something is turned on so current would like to be flowing. If you don't find the defect this way, we'll have to revert to using separate voltage readings at multiple points until we find where the 12 volts is being lost. I don't think it's going to be necessary, but if it comes to that, the place to start is by taking voltage readings in the Power Distribution Center, (PDC). That's the under-hood fuse box. The smaller blade-type fuses have a pair of tiny holes on top for test points. We're not interested in checking the fuses because except for corrosion of loose terminals, fuses are never intermittent. We'll worry about that next if it becomes necessary.
Sep 14, 2021 at 5:39 PM