If equipped, turn the air suspension service switch to the OFF position before raising the vehicle.
Drain the cooling system.
Remove or disconnect the following:
Negative battery cable
Front seats
Carpeting
Rear airflow duct
Heater hoses
Remove the driver's side air bag module by removing or disconnect the following:
SRS module-to-steering wheel bolts, from both sides of the steering wheel.
SRS module and disconnect the electrical connector Horn switch electrical connector
Remove the passenger-s side SRS module by removing or disconnecting the following:
Open the glove box and disconnect the glove compartment isolator
Push inward on the 2 glove box door tabs and lower it
SRS module-s electrical connector
SRS module-to-instrument panel bolts and the module
Remove the instrument panel by removing or disconnecting the following:
Speed control servo nuts and move the servo aside Bolt and disconnect the left side bulkhead connector
Left side bulkhead connector from the dash panel Windshield washer fluid reservoir screw, and position the reservoir aside
Blower motor electrical connector
Air conditioning pressure cut-off switch electrical connector
In-line electrical harness connector
Electronic Automatic Temperature Control (EATC) variable blower motor controller electrical connector Right front wheel
Right front fender splash shield bolts and move the shield away from the cowl
Wiring harness from the evaporator case
Wiring harness from the cowl
Right side instrument panel lower insulator pushpins, disconnect the power point electrical connector, remove the courtesy lamp from the socket and remove the insulator
Unseat the wiring grommet and feed the wiring harness through the cowl
Cowl side trim panels and the windshield side garnish moldings from both sides
Locking clip and the Electronic Crash Sensor (ECS) module electrical connector
Antenna connector
Ground wire bolts from the right side
EATC hose at the evaporator housing
Bolt and disconnect the bulkhead connector from the right side
Pull the door weatherstrip seals away from the instrument panel on both sides
Tunnel brace trim cover
Climate control head vacuum harness connector Instrument panel tunnel brace nuts and the brace Ground wire bolts from the left side
Wiring harness connectors from the left side
Parking brake switch electrical connector
Pry out the instrument panel defroster opening grille, disconnect the electrical connectors and the remove the grille.
Remove or disconnect the following:
3 upper instrument panel screws
Instrument panel cowl side nut from both sides Instrument panel cowl side bolt from the left side Instrument panel
Windshield wiper mounting arm and the pivot shaft Electrical connector and remove the upper cowl extension screw and the extension
Vacuum hoses and the wire harness connector from the evaporative emissions canister purge valve Evaporative emissions purge valve nuts and the valve Cowl side nut
Right side rear fender apron screws and reposition the apron
Evaporator housing nut and screw
Vacuum hoses and the wiring harness connectors Plenum chamber-s lower flange nuts
Plenum chamber-s upper flange nut and the plenum chamber
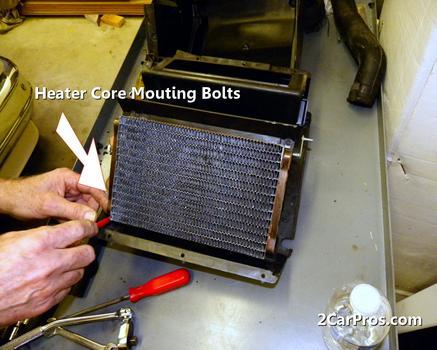
Heater core cover-to-heater plenum chamber screws and the cover
Seal and the heater core
Wednesday, December 2nd, 2009 AT 6:38 PM