1994 GMC Sonoma Ball Joint Won't Budge for Replacement - '9

Tiny
MYOKITIS
  • MEMBER
  • 1994 GMC SONOMA
Suspension problem
1994 GMC Sonoma 6 cyl Four Wheel Drive Automatic 115k miles

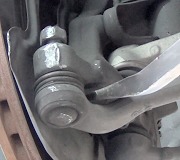
I'm trying to replace my ball joints (upper & lower) in my '94 GMC Sonoma 4x4, and ran into difficulty -- I can't separate it from the steering knuckle! I managed to get the rivets & castle-nut off, but can't get the stud out of the knuckle.

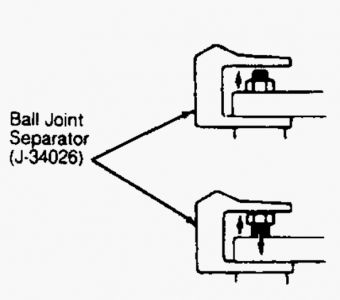
I can't use the special ball joint separator tool I borrowed from the auto store b/c the front transaxle is in the way and have no room to fit the tool in.

The pickle-fork just seems to move the upper control arm around, but the stud won't budge from the bottom.

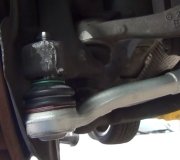
I tried forcing the stud up w/ an improvised jack mechanism, but it's still not budging.

See attached. Any suggestions? Thanks. Mike.


http://www.2carpros.com/forum/automotive_pictures/356834_IMG_9907a_1.jpg


http://www.2carpros.com/forum/automotive_pictures/356834_IMG_9908_2.jpg

Saturday, May 16th, 2009 AT 2:53 PM

1 Reply

Tiny
MERLIN2021
  • MECHANIC
  • 17,250 POSTS
STEERING KNUCKLE Removal Raise and support vehicle. Unload torsion bar tension. See Fig. 2 . Count exact number of tool turns for reassembly reference. Slide, but DO NOT remove, torsion bar forward. 1. Remove wheel and tire assembly. Install Axle Shaft Boot Seal Protector (J-28712 ) to drive axle shaft boot to protect drive axle during repair. Depress brake caliper piston, detach brake caliper and wire aside. Remove brake rotor. 2. Remove drive axle shaft nut cotter pin, retainer, drive axle shaft nut and washer. Slide hub and bearing assembly off drive axle shaft. Remove splash shield. Remove cotter pin and tie rod end stud nut. Using Universal Steering Linkage Puller (J-24319-01 ), separate tie rod end from steering knuckle. 3. Remove upper and lower ball joint stud cotter pins. Place Ball Joint Separator (J-34026 ) over upper ball joint stud. Loosen ball joint stud nut. See Fig. 3 . Back off nut until nut contacts tool. Continue backing off nut until nut forces ball stud out of steering knuckle. Remove spacer. Repeat procedure to separate lower ball joint from steering knuckle. 4. Remove steering knuckle from vehicle. Inspect steering knuckle grease seal for cuts, distortion and wear. Inspect steering knuckle, hub and bearing for damage. Replace as necessary. 5. Installation Using hammer and Steering Knuckle Seal Installer (J-28574 ), install NEW steering knuckle grease seal into steering knuckle. Install spacer (if equipped). Install steering knuckle onto upper and lower ball joint studs. 1. CAUTION: When installing upper and lower ball joint stud nuts, tighten nut to align cotter pin hole. DO NOT tighten ball joint stud nuts more than an additional 1/6 turn to align cotter pin hole. Complete tightening of ball joint stud nuts with vehicle at proper riding height specification.


https://www.2carpros.com/forum/automotive_pictures/62217_Sonomab_1.jpg


https://www.2carpros.com/forum/automotive_pictures/62217_Sonomaa_1.jpg

Was this
answer
helpful?
Yes
No
Sunday, May 17th, 2009 AT 8:20 AM

Please login or register to post a reply.

Sponsored links