DTC 11: Intermittent loss of crankshaft and/or camshaft position sensor signals to PCM.
The diagnostic is quite long, but well worth it.
NO CRANK SIGNAL AT PCM
NOTE: Crank reference signal is monitored during cranking with battery voltage less than 11.5 volts and with manifold vacuum present. DTC may be stored in Powertrain Control Module (PCM) when no signal is received from Crankshaft Position (CKP) sensor during engine cranking or Camshaft Position (CMP) sensor signal is present with no CKP sensor signal. Possible causes are: defective camshaft or crankshaft position sensor, defective crankshaft notches, defective PCM, or defective connectors or wiring.
1. Turn ignition off and back on again. Attempt to start engine while using scan tool to monitor Camshaft Position (CMP) sensor and Crankshaft Position (CKP) sensor state. If either CMP or CKP sensor state changes to present, go to next step. If neither CMP or CKP sensor state changes to present, go to step 7 .
2. Turn ignition off and back on again. Attempt to start engine while using scan tool to monitor Camshaft Position (CMP) sensor and Crankshaft Position (CKP) sensor state. If only CMP sensor
state does not change, go to next step. If only CMP sensor state changes, go to step 7 .
3. Turn ignition off and back on again. Attempt to start engine while using scan tool to monitor Camshaft Position (CMP) sensor and Crankshaft Position (CKP) sensor state. If only CKP sensor state does not change, go to next step. If only CKP sensor state changes, go to go to P0340: NO CAM SIGNAL AT PCM .
4. Start engine. With engine idling, wiggle wiring harness and connectors from camshaft position sensor and crankshaft position sensor to the PCM. Camshaft position sensor is located on rear of cylinder head, just below valve cover. See Fig. 39 and Fig. 40 . Crankshaft position sensor is located on cylinder block, behind generator, near oil filter. See Fig. 41 . PCM is located at driver's side front corner of engine compartment, between battery and fender.
5. If engine does not misfire or stall while wiggling wiring harness and connectors, go to next step. If
engine misfires or stalls while wiggling wiring harness and connectors, repair wiring or connectors between camshaft position sensor, crankshaft position sensor and PCM as necessary that caused engine to misfire or stall. Perform TEST VER-2A .
6. Turn ignition off. Inspect wiring and connectors between camshaft position sensor, crankshaft position sensor and PCM. If no problems exist, test is complete. If any problems exist, repair wiring or connectors as necessary. Perform TEST VER-2A .
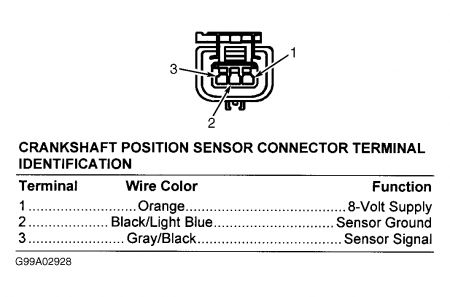
7. Turn ignition off. Disconnect connector at crankshaft position sensor. Crankshaft position sensor is located on cylinder block, behind generator, near oil filter. See Fig. 41 . Turn ignition on. Using voltmeter, check voltage at terminal No. 1 (Orange wire) on connector for crankshaft position sensor. If voltage is more than 7 volts, go to next step. If voltage is 7 volts or less, go to step 16 .
8. Turn ignition off. Connect jumper wire to terminal No. 3 (Gray/Black wire) on connector for crankshaft position sensor. Turn ignition on.
9. Using scan tool, note state of CKP sensor. Momentarily touch remaining end of jumper wire to
terminal No. 2 (Black/Light Blue wire) on connector for crankshaft position sensor several times while monitoring CKP sensor state. If CKP sensor state changes to present, go to next step. If CKP sensor state does not change to present, go to step 11 .
10. Turn ignition off. Remove crankshaft position sensor. Inspect notches on crankshaft for damage or
debris. Crankshaft contains 2 sets of notches ground into the No. 2 counterweight on the crankshaft. If notches on crankshaft are okay and no debris exists, replace crankshaft position sensor. Perform TEST VER-2A . If notches on crankshaft are damaged or debris exists, repair or replace crankshaft as necessary. Perform TEST VER-2A .
11. Turn ignition off. Using ohmmeter, check resistance between ground and terminal No. 2
(Black/Light Blue wire) on connector for crankshaft position sensor. If resistance is less than 5 ohms, go to next step. If resistance is 5 ohms or more, repair open circuit or high resistance on Black/Light Blue wire between PCM and crankshaft position sensor. PCM is located at driver's side front corner of engine compartment, between battery and fender. Perform TEST VER-2A .
12. Ensure ignition is off. Disconnect connectors at PCM. PCM is located at driver's side front corner of engine compartment, between battery and fender.
13. Using ohmmeter, check resistance between terminal No. 3 (Gray/Black wire) on connector for
crankshaft position sensor and PCM connector terminal No. 32 (Gray/Black wire). If resistance is
less than 5 ohms, go to next step. If resistance is 5 ohms or more, repair open circuit on Gray/Black wire between PCM and crankshaft position sensor. Perform TEST VER-2A .
14. Ensure connectors are still disconnected at PCM. Using ohmmeter, check resistance between ground and terminal No. 3 (Gray/Black wire) on connector for crankshaft position sensor. If resistance is 5 ohms or more, go to next step. If resistance is less than 5 ohms, repair short to ground on Gray/Black wire between PCM and crankshaft position sensor. Perform TEST VER-2A .
15. Check PCM power and ground circuits. Perform TEST NTC-16: CHECKING PCM POWER & GROUND CIRCUITS . If PCM power and ground circuits are okay, replace PCM. Perform TEST VER-2A .
16. Turn ignition off. Ensure connector is still disconnected at crankshaft position sensor. Disconnect connector at camshaft position sensor. Camshaft position sensor is located on rear of cylinder
head, just below valve cover. See Fig. 39 and Fig. 40 . Turn ignition on with engine off. Using voltmeter, check voltage at terminal No. 1 (Orange wire) on connector for crankshaft position sensor. If voltage is 7 volts or less, go to next step. If voltage is more than 7 volts, replace camshaft position sensor. Perform TEST VER-2A .
17. Ensure ignition is off. Disconnect connectors at PCM. PCM is located at driver's side front corner of engine compartment, between battery and fender.
18. Using ohmmeter, check resistance between terminal No. 1 (Orange wire) on connector for
crankshaft position sensor and PCM connector terminal No. 44 (Orange wire). If resistance is less
than 5 ohms, go to next step. If resistance is 5 ohms or more, repair open circuit on Orange wire between PCM and crankshaft position sensor. Perform TEST VER-2A .
19. Ensure connectors are disconnected at camshaft position sensor, crankshaft position sensor and PCM. Using ohmmeter, check resistance between ground and terminal No. 1 (Orange wire) on connector for crankshaft position sensor. If resistance is 5 ohms or more, replace PCM. Perform TEST VER-2A . If resistance is less than 5 ohms, repair short to ground on Orange wire between PCM, camshaft position sensor, crankshaft position sensor and vehicle speed sensor. Vehicle speed sensor is mounted on extension housing for passenger's side axle shaft at firewall side of transaxle. See Fig. 42 . Perform TEST VER-2A .
NO CAM SIGNAL AT PCM
NOTE: Cam signal is monitored during engine cranking after a specified number of crankshaft position sensor signals have been detected. DTC may be stored in Powertrain Control Module (PCM) when no signal is received from Camshaft Position (CMP) sensor when crankshaft position sensor signal exists. Possible causes are: engine does not start, defective camshaft position sensor or target magnet, defective PCM, or defective connectors or wiring.
1. Turn ignition on with engine off. Using scan tool, check for DTCs. If global good trip counter is displayed and equal to zero, go to next step. If global good trip counter is not displayed and equal to zero, go to step 12 .
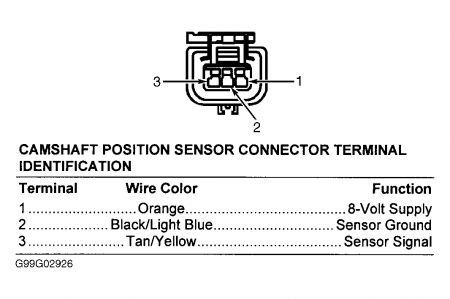
2. Turn ignition off. Disconnect connector at camshaft position sensor. Camshaft position sensor is
located on rear of cylinder head, just below valve cover. See Fig. 39 and Fig. 40 . Inspect connector for corroded, pushed out, miswired or damaged terminals. If terminals are not corroded, pushed out, miswired or damaged, go to next step. If terminals are corroded, pushed out, miswired or damaged, repair as necessary. Perform TEST VER-5A .
3. Turn ignition on with engine off. Using voltmeter, check voltage at terminal No. 1 (Orange wire) on connector for camshaft position sensor. If voltage is more than 7 volts, go to next step. If voltage is 7 volts or less, repair open circuit on Orange wire between camshaft position sensor and PCM. PCM is located at driver's side front corner of engine ompartment, between battery and fender. Perform TEST VER-5A .
4. Using ohmmeter, check resistance between round and terminal No. 2 (Black/Light Blue wire) on connector for camshaft position sensor. If resistance is less than 5 ohms, go to next step. If resistance is 5 ohms or more, repair open circuit on Black/Light Blue wire between PCM and camshaft position sensor. PCM is located at driver's side front corner of engine compartment, between battery and fender. Perform TEST VER-5A .
5. Turn ignition on with engine off. Using scan tool, monitor Camshaft Position (CMP) sensor state while momentarily connecting jumper wire between terminals No. 2 (Black/Light Blue wire) and No. 3 (Tan/Yellow wire) on connector for camshaft position sensor. If CMP sensor state changes, go to next step. If CMP sensor state does not change, go to Step 7 .
6. Turn ignition off. Remove camshaft position sensor from cylinder head. Inspect target magnet and locating dowels for damage or misalignment. See Fig. 44 . Replace target magnet and locating dowels if damaged or misaligned. Perform TEST VER-5A . If target magnet and locating dowels are okay, replace camshaft position sensor. Perform TEST VER-5A .
7. Turn ignition off. Disconnect connectors at PCM. PCM is located at driver's side front corner of engine compartment, between battery and fender.
8. Using ohmmeter, check resistance between terminals No. 1 (Orange wire) and No. 3 (Tan/Yellow
wire) on connector for camshaft position sensor. If resistance is 5 ohms or more, go to next step. If
resistance is less than 5 ohms, repair short circuit between Orange wire and Tan/Yellow wire between camshaft position sensor and PCM. Perform TEST VER-5A .
9. Using ohmmeter, check resistance between terminal No. 3 (Tan/Yellow wire) on connector for
camshaft position sensor and PCM connector terminal No. 33 (Tan/Yellow wire). If resistance is less than 5 ohms, go to next step. If resistance is 5 ohms or more, repair open circuit on Tan/Yellow wire between PCM and camshaft position sensor. Perform TEST VER-5A .
10. With connectors at PCM disconnected, use ohmmeter to check resistance between ground and
terminal No. 3 (Tan/Yellow wire) on connector for camshaft position sensor. If resistance is 5 ohms or more, go to next step. If resistance is less than 5 ohms, repair short to ground on Tan/Yellow wire between PCM and camshaft position sensor. Perform TEST VER-5A .
11. With connectors at PCM disconnected, use ohmmeter to check resistance between terminals No. 2 (Black/Light Blue wire) and No. 3 (Tan/Yellow wire) on connector for camshaft position sensor.
If resistance is 5 ohms or more, replace PCM. Perform TEST VER-5A . If resistance is less than 5 ohms, repair short circuit between Black/Light Blue and Tan/Yellow wire between PCM and camshaft position sensor. Perform TEST VER-5A .
12. Attempt to start engine. If engine starts, go to next step. If engine does not start, perform TEST
NS-SEL: NO START TEST SELECTION .
13. Turn engine off. Inspect wiring and connectors between camshaft position sensor and PCM.
Camshaft position sensor is located on rear of cylinder head, just below valve cover. See Fig. 39 and Fig. 40 . PCM is located at driver's side front corner of engine compartment, between battery and fender. If no problems exist, test is complete. If any problems exist, repair wiring or connectors as necessary. Perform TEST VER-5A .
Monday, February 23rd, 2009 AT 6:23 PM