Coolant in oil

Tiny
PHIL-JR
  • MEMBER
  • 1998 CHRYSLER CIRRUS
  • 2.5L
  • 2WD
  • AUTOMATIC
  • 170,000 MILES
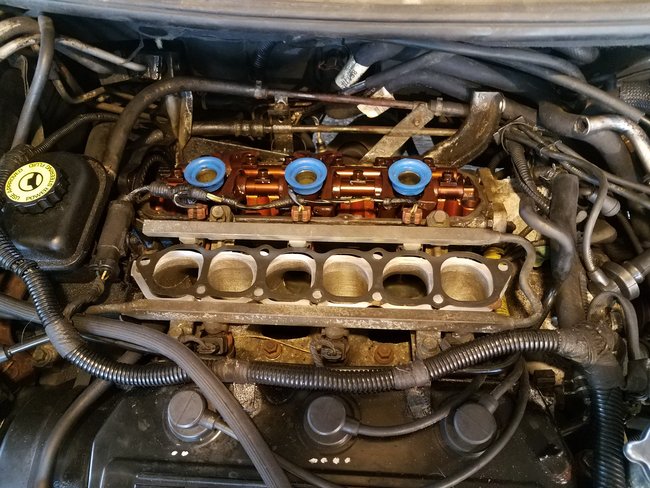
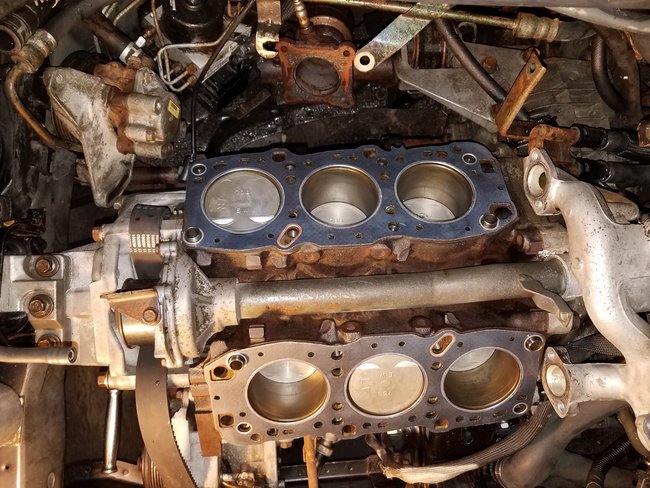
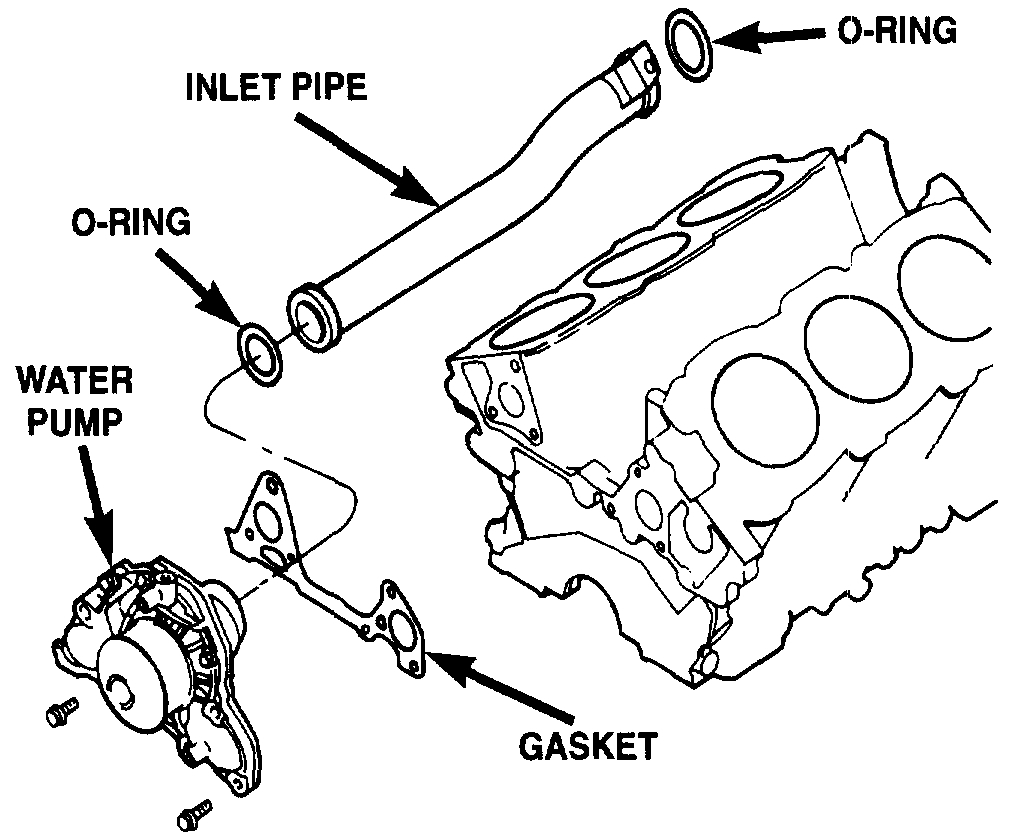
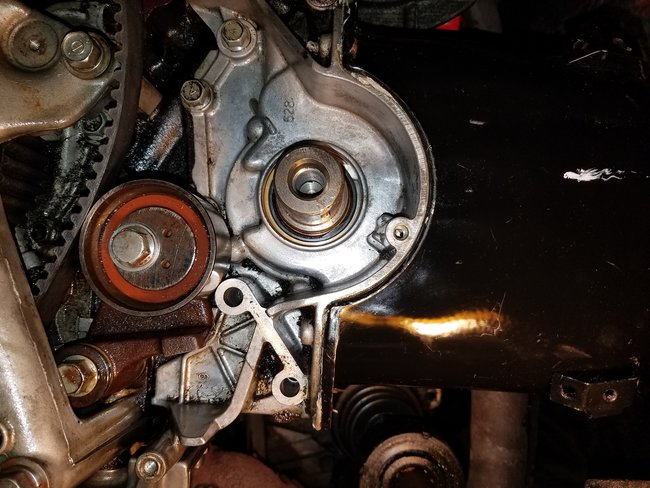
The 1998 Cirrus has coolant leaking into the oil and it is so bad that shortly after the engine is running, oil/water begin spilling out of the crank-case (via the oil pan gasket where the pan cups under the crank shaft).

How can I know if it is a block leak or a head gasket failure? Or is there a third explanation for such a leak?

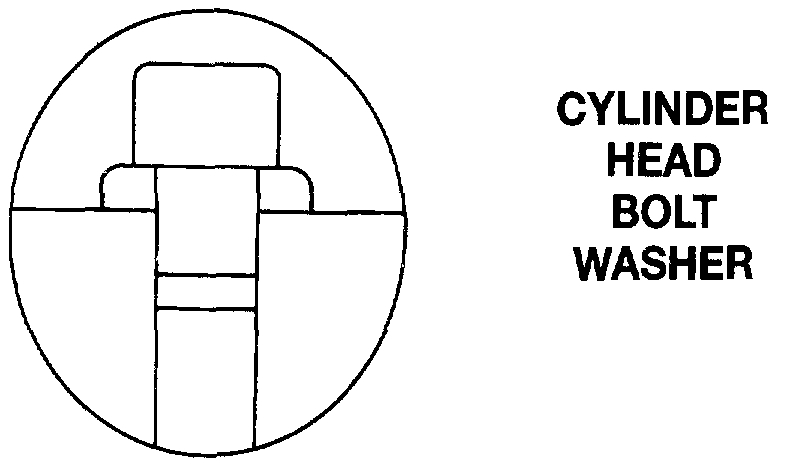
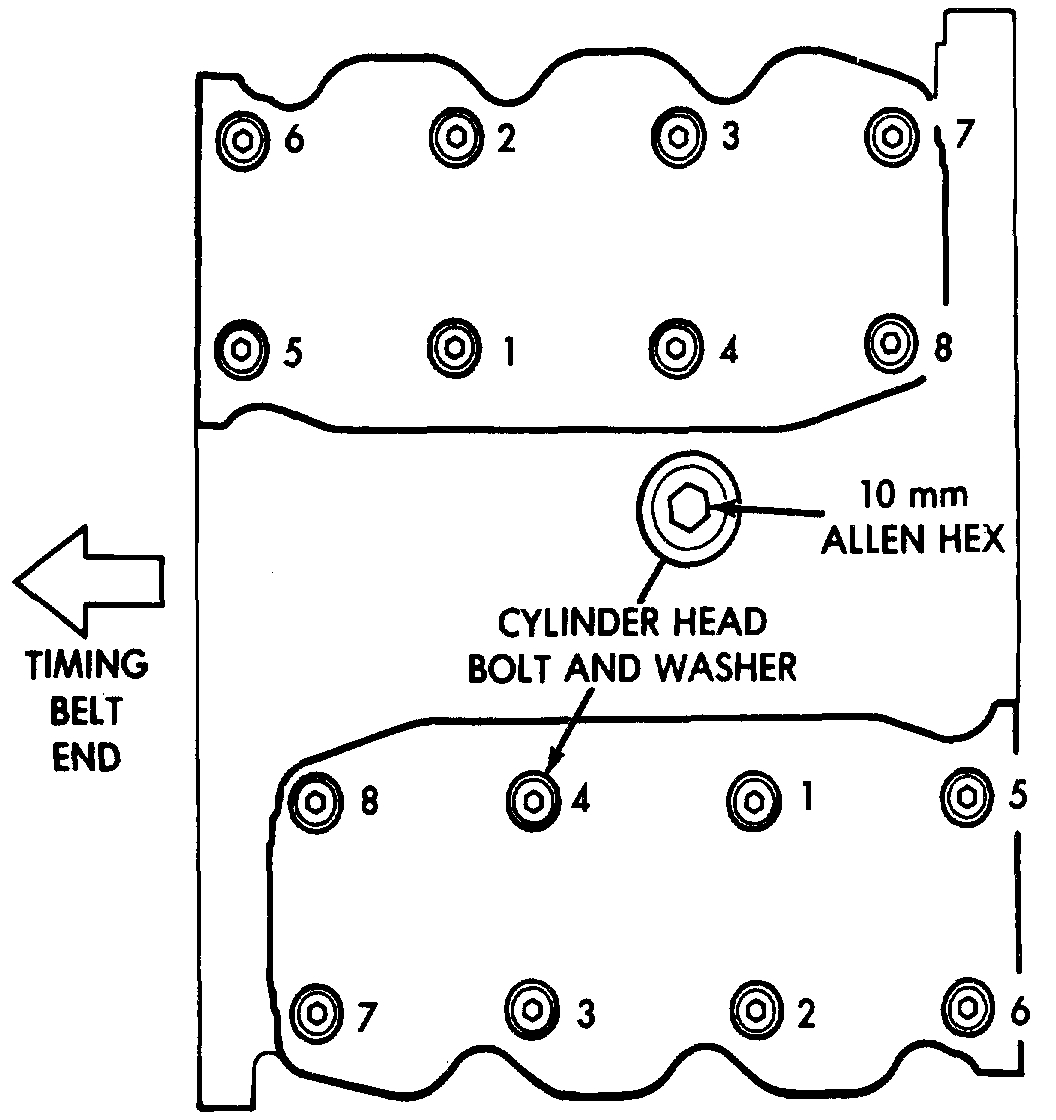
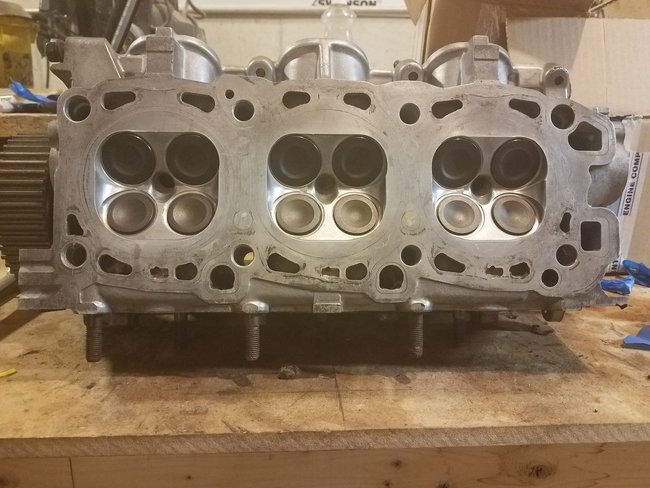
Note: The heads were just reconditioned after the timing belt failed (and took out all of the valves). After reassembly, the engine runs fine but I am not ruling out the possibility that I did not get the head-bolt torque right. Because the oil is will not lubricate properly, I have only run the engine for fifteen to twenty minutes at a time. There is hot air blowing from the cabin heater, and no sign of engine overheating.
Sunday, August 26th, 2018 AT 6:48 PM

11 Replies

Tiny
JACOBANDNICKOLAS
  • MECHANIC
  • 108,179 POSTS
Hi and thanks for using 2CarPros.com.

Chances are a headgasket has failed. Take a look at this link for testing.

https://www.2carpros.com/articles/head-gasket-blown-test

As far as your other question regarding the engine block, to check for cracks, the only way I know how is to magnaflux. It requires the components to be checked to be removed from the car, clean. However, it would not work on aluminum, but instead a dye would be used.

I wanted to add the following directions for you to review to make sure nothing went together wrong. It shows the torque specs also. Pictures 1 and 2 correlate with these directions.

______________________________________________

REMOVAL
1. Drain cooling system.
2. Remove timing belt and camshaft sprockets.
3. Remove upper intake manifold assembly.
4. Remove cylinder head covers and rocker arm assemblies.
5. Remove distributor.
6. Remove exhaust manifolds and cross under pipe.
7. Remove cylinder head bolts and remove cylinder head.

INSTALLATION
1. Clean surfaces of head and block. Install head gasket over locating dowels.
2. Install head on locating dowels.
3. Install 10 mm Allen hex head bolts with washers.

Cylinder Head Bolt Washer
CAUTION: Attach the head bolt washer in the direction shown.

Cylinder Head Bolt Tightening Sequence

4. Tighten bolts in the order. When tightening the cylinder head bolts, tighten gradually, working in two or three steps and finally tighten to specified torque of 108 Nm (80 ft. lbs.).

____________________________
I also wanted to add that the type of head gaskets used changed in 1998. Pre 1998 a composite gasket was used. 1998 changed to a steel gasket to compensate for reduced clearance. One last thought, when preparing aluminum gasket surfaces for new gaskets, it is very easy to damage the surface. If you used a steel gasket cleaner, gasket grinding discs or the equal, the surface may have been damaged.

I hope this helps. Let me know if you have other questions.

Take care,
Joe

Was this
answer
helpful?
Yes
No
+1
Sunday, August 26th, 2018 AT 7:27 PM
Tiny
PHIL-JR
  • MEMBER
  • 6 POSTS
Thanks for the quick response to my question.

I did pretty much follow the head removal/install procedures as you provided. However, the bolt washers seemed to be symmetrical with no significant difference from top to bottom. Here are some other notes, or perhaps clues:

The factory head gaskets, as you noted, were indeed two layer steel. Rather than re-use the old, I used the "replacement" gaskets that came with an upper end gasket kit. They were apparently "composite " gaskets as seen in the uploaded pictures. I also did not use the old bolts either. I bought and installed Felpro TTY bolts though I have not yet re-torqued them as I believe the instructions said ought to be done (after a few miles were put on them? I am also not confidant about the torque applied simply because I only have an old style 'beam' type torque wrench.

Note also, the heads did not go out to a machine shop. I did the refurbish and gambled that the heads were not warped since there was no overheating involved, just the damage done when the pistons were allowed to occupy the same space as the 24 valves.

Except for the coolant leaking into the oil (and the damage it can do in a short time), the car, after just being taken on a twenty minute test drive, performs well and runs better than before the break down.

By the way the leak is only one way, there is no oil making its way into the cooling system. I uploaded pictures of the head mating surface after cleaning and the block with "replacement" head gaskets in place.
Was this
answer
helpful?
Yes
No
Sunday, August 26th, 2018 AT 11:49 PM
Tiny
JACOBANDNICKOLAS
  • MECHANIC
  • 108,179 POSTS
Hi again. The torque wrench you used should have been fine. However, my biggest concern is the change in gaskets. It specified the change was not recommended and could cause internal damage to the engine (most likely the coolant). I hate to say it, but I feel you need to remove the heads and have them inspected for cracks as well as the block, and if they are warped. Additionally, I would get the correct head gaskets. The technical service bulletin (TSB) indicates the new steel gasket design is for reduced clearance. Something is definitely different.

By the way, I read an article on Magnaflux and they make a dye designed to work with aluminum to find possible cracks. You may want to do that.
Was this
answer
helpful?
Yes
No
+1
Monday, August 27th, 2018 AT 5:35 PM
Tiny
PHIL-JR
  • MEMBER
  • 6 POSTS
I did have reservations about using the "replacement" brand gaskets. So I agree, I will redo with the Felpro steel gaskets. But first, for my own piece of mind, I will start by re-torquing the head bolts just to eliminate the possibility that I error in torquing bolts. That would be an easy fix compared to removing the heads again (especially the right/rear head because of the limited space and hardware issues). Anyway, I should mention that there appears to be no problem with moisture, steam, or coolant odor in the exhaust. To me, and with no loss of power, that suggests no coolant is getting by the rings into the crankcase and that confirms your diagnosis of bad head gaskets. Thanks again for your help. I will let you know how it goes.
Was this
answer
helpful?
Yes
No
Monday, August 27th, 2018 AT 9:11 PM
Tiny
JACOBANDNICKOLAS
  • MECHANIC
  • 108,179 POSTS
Welcome back. I am glad to help. I just hope what I told you is helpful. You know, I have been thinking about this issue you are having. It is hard to believe you have that bad of a leak and the engine is running so well. Before you remove the heads, check to make sure the leak is not coming from the water pump inlet tube. It basically is sealed with rubber o-rings which could have been damaged when you removed the heads or the tube may not be seated. The tube runs from the rear of the water pump between the heads and to the thermostat housing. I can almost guarantee you moved it around when taking the heads off. The more I think about it and where the coolant leak is located, I have a very strong feeling that is where the problem is. Please check that before removing the heads. I would really appreciate knowing if that is the problem.

I attached a picture of the inlet tube that I am referring to. Check it first. If it is the problem, I will get you the directions for proper install of the tube/o-rings.

Take care,
Joe
Was this
answer
helpful?
Yes
No
+1
Tuesday, August 28th, 2018 AT 6:22 PM
Tiny
PHIL-JR
  • MEMBER
  • 6 POSTS
Sorry for the long delay in following-up on your suggestions. The delay was due to the labor day holiday and the extreme heat-wave here in the Boston area. Anyway, I checked the water tube o-rings and they are still sealed (no sign of coolant, etc.) And, as noted, I went ahead with pulling the heads again in order to inspect and replace the suspect gaskets. I cannot say that I saw evidence of a blown gasket, but it is still possible that, they being the wrong type of gasket, coolant was getting by the composite material and into the oil return galleys. Well, I did replace the gaskets with the recommended Fel-Pro steel gaskets and the re-assembly is almost complete.
However, I now have new serious issue. While torquing down the fourth left cylinder head bolt, the hex bit separated from its socket and went straight down into the adjacent oil return. I heard it hit the empty oil pan, so I am counting on it staying on the bottom and not being a future threat to the engine. Am I correct in that assessment? Can I leave it there?
Thanks again.
Was this
answer
helpful?
Yes
No
Tuesday, September 11th, 2018 AT 3:02 PM
Tiny
STEVE W.
  • MECHANIC
  • 12,963 POSTS
It would possibly stay there however I am not sure I would trust it to. You can get cheap bore scope cameras these days that can have a magnet attached. That would let you go in through the drain hole and fish out the bit.
Was this
answer
helpful?
Yes
No
+1
Friday, September 14th, 2018 AT 6:20 PM
Tiny
PHIL-JR
  • MEMBER
  • 6 POSTS
I finished replacing the composite head gaskets with the recommended steel gaskets and now coolant is no longer leaking into the oil. I can only conclude that the leak problem was indeed due to the bad choice of gaskets I used in repairing the total valve destruction caused by failure of the timing belt. Incidentally, unless it is just a coincidence, it appears that the coolant/oil mix somehow contributed to the serious oil leak I spoke of earlier. That stream of oil was coming from a blown front oil seal that surprisingly proved to be an easy fix.

Note: I should mention that this car was purchased by my granddaughter from an estate sale and the previous owner was apparently a DYI-er. I mention this because I have one last question and it relates the oil seal. I uploaded a mp4 of the leak and a jpg of the crank shaft with the oil seal removed. In the picture, there seems to be a second seal of which a rubber flap of that appears blown outward. Is that a pump seal? Could that be a future failure? And, if not a pump seal, could someone have somehow doubled-up on the seal? Note also, there may be a chunk of the bore (or seal ring) missing.

Anyway, my granddaughter's first car is no longer leaking anything and all is well, for now anyway. And lastly, yes, I am going to flush (change) the oil again and hopefully retrieve that 10-mm allen bit which found its way into the oil pan. Thanks again for the help.
Was this
answer
helpful?
Yes
No
Saturday, September 22nd, 2018 AT 12:57 PM
Tiny
JACOBANDNICKOLAS
  • MECHANIC
  • 108,179 POSTS
Good to hear from you. I had a feeling the gasket was the issue. Glad that part is fixed.

I have to be honest, I am a bit concerned about the bit that is in the oil pan. See if you can get a flexible handle magnet and fish it out. It cannot get drawn in the oil pump because there is a screen. But there are many moving components in there that could pick it up.

I looked at the picture you attached and that looks like the seal itself is pulled forward. Is that the new seal? There is only one that goes there, so I am not 100% sure what I am seeing.

I attached the directions for replacement along with a pic of the seal/crank. Take a look at it and let me know if you are seeing something different on your vehicle.

PROCEDURES
REMOVAL
1. Remove crankshaft damper.
2. Remove timing belt.
3. Remove crankshaft sprocket and key.
4. Pry out the front seal with a flat tip screwdriver. Cover the end of the screwdriver with a shop towel.

CAUTION: Be careful not to nick or damage crankshaft flange surface or oil pump housing bore.

INSTALLATION

Front Crankshaft Oil Seal

1. Install front crankshaft seal into oil pump housing using Special Tool MD-998717.
2. Reverse removal procedure for installation.

Take care,
Joe
Was this
answer
helpful?
Yes
No
+1
Saturday, September 22nd, 2018 AT 6:14 PM
Tiny
PHIL-JR
  • MEMBER
  • 6 POSTS
The picture I provided of the crank and oil pump area was taken with the leaking seal removed. What is shown in the picture I uploaded, is either another seal or o-ring that may be part of the oil pump. It is clear enough to see) is another seal which is behind the removed seal. It had a portion of its rubber rim seemingly pushed outward. Before installing the new oil seal, I tucked the flap of rubber back in against the crank shaft, making it conform to its adjacent area. The picture also shows what looks like a chunk of the pump bore is possibly damaged. I am not too concerned about those issues because the job is done and there are no leaks.

I will retrieve the 10-mm bit as soon as I get the appropriate tool to do so. At least, I am sure that the piece is out of the way by being down in the lowest position possible and very near the oil drain plug. Thank you for the oil seal install sketch. It confirms that I got it right.
Was this
answer
helpful?
Yes
No
Saturday, September 22nd, 2018 AT 7:38 PM
Tiny
JACOBANDNICKOLAS
  • MECHANIC
  • 108,179 POSTS
I am glad it helped. You did a ton of work on this car!

Take care and let us know if you have questions in the future.
Was this
answer
helpful?
Yes
No
+1
Saturday, September 22nd, 2018 AT 7:44 PM

Please login or register to post a reply.

Sponsored links