Good morning.
The procedure for the 5 and 6 speed are below.
Do not use a vacuum bleeder at all.
Roy
Bleeding is necessary whenever the level of fluid in the reservoir has been allowed to fall so low that air has been drawn into the master cylinder.
5-SPEED
NOTICE: Never, under any circumstances, use fluid which has been bled from a system to fill the clutch master cylinder reservoir as it may be aerated, have too much moisture content and possibly be contaminated.
NOTICE: Always use the correct fastener in the correct location. When you replace a fastener, use ONLY the exact part number for that application. The manufacturer will call out those fasteners that require a replacement after removal. The manufacturer will also call out the fasteners that require thread lockers or thread sealant. UNLESS OTHER WISE SPECIFIED, do not use supplemental coatings (paints, greases, or other corrosion inhibitors) on the threaded fasteners or fastener joint interfaces. Generally, such coatings adversely affect the fastener torque and the joint clamping force, and may damage the fastener. When you install fasteners, use the correct tightening sequence and specifications. Following these instructions can help you avoid damage to parts and systems.
1. Raise and suitably support vehicle.
2. Attach a hose to the bleeder (11) on the clutch actuator and submerge the other end of the hose in a container of hydraulic clutch fluid GM P/N 12345347 or equivalent.
3. Depress the clutch pedal slowly and hold.
4. Loosen the bleeder (11) to purge air.
5. Tighten bleeder (11).
6. Repeat steps 3 and 4 until air is completely purged.
Inspect
- Fill clutch master cylinder reservoir with fluid. Use of hydraulic clutch fluid GM - P/N 12345347 or equivalent is preferred over standard DOT 3 brake fluid.
6-SPEED
NOTICE: Never, under any circumstances, use fluid which has been bled from a system to fill the clutch master cylinder reservoir as it may be aerated, have too much moisture content and possibly be contaminated.
NOTICE: Always use the correct fastener in the correct location. When you replace a fastener, use ONLY the exact part number for that application. The manufacturer will call out those fasteners that require a replacement after removal. The manufacturer will also call out the fasteners that require thread lockers or thread sealant. UNLESS OTHER WISE SPECIFIED, do not use supplemental coatings (paints, greases, or other corrosion inhibitors) on the threaded fasteners or fastener joint interfaces. Generally, such coatings adversely affect the fastener torque and the joint clamping force, and may damage the fastener. When you install fasteners, use the correct tightening sequence and specifications. Following these instructions can help you avoid damage to parts and systems.
1. Loosen clutch master cylinder nuts (23 and 24) to end of threads of U-bolt (25).
2. Clean dirt and grease from the reservoir cap to ensure no foreign substances will enter the system.
3. Remove the reservoir cap and diaphragm.
4. Wrap a piece of mechanics wire around left-hand hood strut bracket (2 or 8) making sure wire is accessible from underside of vehicle.
5. Raise and suitably support vehicle.
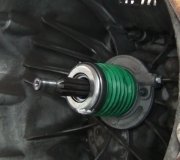
6. Remove actuator cylinder nuts (5).
7. Remove actuator cylinder.
- Retain actuator cylinder in engine compartment using mechanics wire previously installed.
8. Lower vehicle.
9. Grasp actuator cylinder and depress hydraulic actuator cylinder pushrod approximately 20.0 mm (0.0787 inch) into actuator cylinder bore and hold.
10. Install diaphragm and reservoir cap while holding in actuator cylinder pushrod.
11. Release actuator cylinder pushrod.
12. Hold actuator cylinder vertically with the pushrod end facing down.
Important: Actuator cylinder should be lower than the master cylinder.
13. Press pushrod into actuator cylinder bore with short 10.0 mm (0.0390 inch) strokes.
Inspect
- Master cylinder reservoir for air bubbles.
14. Continue until air bubbles are no longer entering reservoir.
15. Raise and suitably support vehicle.
16. Remove actuator cylinder from mechanics wire.
17. Install actuator cylinder.
18. Install actuator cylinder nuts (5).
Tighten
- Clutch actuator cylinder nuts (5) to 20 Nm (15 ft. Lbs.).
19. Lower vehicle.
20. Remove mechanics wire from left-hand hood strut bracket (2 or 8).
21. Install clutch master cylinder nuts (23 and 24).
Tighten Clutch master cylinder nuts (23) to 27 Nm (20 ft. Lbs.).
Inspect
- Fill clutch master cylinder reservoir with fluid.
- Use of hydraulic clutch fluid GM P/N 12345347 or equivalent is preferred over standard DOT 3 brake fluid.
Tuesday, September 3rd, 2019 AT 3:47 AM


