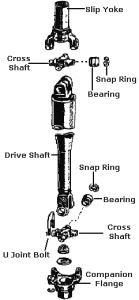
Remove all the snap rings (or C-Clips) that retain bearings in yoke and drive shaft.
Index-mark, Figure 1, the drive shaft components Figure 1.
NOTE: If components are not marked and therefore installed incorrectly, a driveline imbalance and vibration can occur.
Place U-joint in a vise.
Select a wrench socket with an outside diameter slightly smaller than the U-joint bearings. Select another wrench socket with an inside diameter slightly larger than the U-joint bearings.
Place the sockets at opposite bearings in the yoke so that the smaller socket becomes a bearing pusher and the larger socket becomes a bearing receiver when the vise jaws come together, Figure 2. Close vise jaws until both the bearings are free of yoke and remove bearings from the cross or spider.
If bearings will not come all the way out, close vise until bearing in receiver socket protrudes from yoke as much as possible without using excessive force. Then remove from vise and place that portion of bearing that protrudes from yoke between vise jaws. Tighten vise to hold bearing and drive yoke off with a soft hammer.
To remove opposite bearing from yoke, replace in vise with pusher socket on exposed cross journal with receiver socket over bearing cup. Then tighten vise jaws to press bearing back through yoke into receiving socket.
Remove yoke from drive shaft and again place protruding portion of bearing between vise jaws. Then tighten vise to hold bearing while driving yoke off bearing with soft hammer.
Turn spider or cross ¼ turn and use the same procedure to press bearings out of drive shaft.
If old parts are to be reassembled, pack bearing cups with Universal Joint grease. Do not fill cups completely or use excessive amounts as over-lubrication may damage seals during reassembly. Use new seals.
If new parts are being installed, check new bearings for adequate grease before assembling.
With the pusher (smaller) socket, press one bearing part way into drive shaft. Position spider into the partially installed bearing. Place second bearing into drive shaft. Fasten drive shaft in vise so that bearings are in contact with faces of vise jaws, Figure 3. Some spiders are provided with locating lugs that must face toward drive shaft when installed.
Press bearings all the way into position and install snap rings or retainer plates.
Install bearings in yoke in the same manner. When installation is completed, check U-joint for binding or roughness. If free movement is impeded, correct the condition before installation in vehicle. If there is a little binding, try striking the yoke with a brass or plastic hammer. It will be somewhat stiff, but that's okay.
FIGURE 1
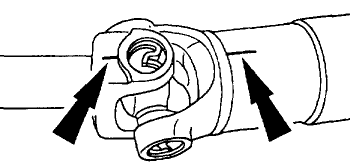
FIGURE 2
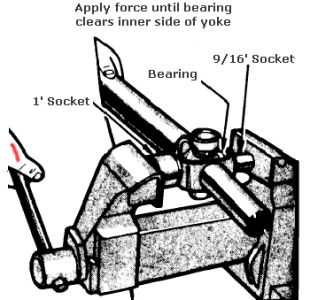
FIGURE 3
Nov 9, 2008 at 10:43 PM
