Differential repair or replacement?

Tiny
DOCFIXIT
  • MECHANIC
  • 18,828 POSTS
Yes on housing first 3 digits are axle ratio. You could measure ring gear to get size
Was this
answer
helpful?
Yes
No
-1
Friday, May 14th, 2021 AT 12:26 PM (Merged)
Tiny
CHUCK01
  • MEMBER
  • 1 POST
  • 1996 CHEVROLET BLAZER
  • 6 CYL
  • 4WD
  • AUTOMATIC
  • 100,000 MILES
I keep going through axle bearings, I put a new one in about two blocks and thump thump it goes
Was this
answer
helpful?
Yes
No
Friday, May 14th, 2021 AT 12:26 PM (Merged)
Tiny
HMAC300
  • MECHANIC
  • 48,601 POSTS
You may need another axle. Those axles were well known for being soft and were hard on bearings. When you remove the axle, carefully check the bearing mating surface for roughness or a gray like area. It wouldn't look polished like the rest. If it is replace it. Also before reinstalling the axle, lube the bearing with grease or oil.
Was this
answer
helpful?
Yes
No
Friday, May 14th, 2021 AT 12:26 PM (Merged)
Tiny
MYSMKD
  • MEMBER
  • 1 POST
  • 1996 CHEVROLET BLAZER
I need to know the gear ratios on my truck so I can replace the rear end
Was this
answer
helpful?
Yes
No
Friday, May 14th, 2021 AT 12:26 PM (Merged)
Tiny
BLUELIGHTNIN6
  • MECHANIC
  • 16,542 POSTS
The rear axle ID is stamped on the forward side of right axle tube. The first 3 digits will indicate the rear axle ratio, the next digit indicates the axle assembly build source code, the next 3 digits indicate the day built in Julian Date form and the last digit identifies the shift build (first or second).
Was this
answer
helpful?
Yes
No
Friday, May 14th, 2021 AT 12:26 PM (Merged)
Tiny
JKENNEDY
  • MEMBER
  • 1 POST
  • 1993 CHEVROLET BLAZER
  • 6 CYL
  • 4WD
  • AUTOMATIC
  • 100,000 MILES
I believe i've lost my rear end. My truck makes a clunking noise and every 100' or so it locks up solid. If I reverse it frees itself again and I can proceed for about another 100'. I think theres a piece popping around in there and from time to time its catching and locking the other parts. If you can confirm this or suggest something else it would be appreciated. In the mean time, if I do need a new rear end is it possible that there are multiple different sizes or are the ratios across the board. (I have another one scrapped) Thanks for your help.

J Kennedy
Was this
answer
helpful?
Yes
No
Friday, May 14th, 2021 AT 12:26 PM (Merged)
Tiny
MHPAUTOS
  • MECHANIC
  • 31,938 POSTS
Hi there, you may have a broken tooth on the crown wheel or pinion, also the spider gears may be damaged, you will have to remove the diff centre to inspect, the ratio will be etched into the crown wheel and pinion set, you would be best advised to get the same ratio.

Mark (mhpautos)
Was this
answer
helpful?
Yes
No
Friday, May 14th, 2021 AT 12:26 PM (Merged)
Tiny
MGAUD
  • MEMBER
  • 2 POSTS
  • 1991 CHEVROLET BLAZER
  • V8
  • 4WD
  • AUTOMATIC
  • 14,200 MILES
I've a fullsized blazer, with 3.73 gearing, and I'm wanting to change this to a 3.08. Is this alright? I don't tow anything, I shall, but nothing huge, and I won't do any SERIOUS 4wheeling? Is this an alright change? I'm thinking of gas mileage, and reducing my tire size, from 31/10.5's to about a 235/75/15. Please tell me, what do you think? Give me some answers, PLEASE! Mg
Was this
answer
helpful?
Yes
No
Friday, May 14th, 2021 AT 12:26 PM (Merged)
Tiny
2CARPRO JACK
  • MECHANIC
  • 11,533 POSTS
Whatever gear ratio you use in the rear, you have to adjust the front accordingly. They have to be within a certain percentage of each other or the transfer cse will be ruined. Find a local shop that does this and see what they suggest, or just go to the smaller tire. Depending on how you drive though, you may not get better mileage. The more RPM's an engine turns the more fuel it uses. Stock size tires would probably yield the best mileage
Was this
answer
helpful?
Yes
No
Friday, May 14th, 2021 AT 12:26 PM (Merged)
Tiny
MGAUD
  • MEMBER
  • 2 POSTS
Yes, I understand, that :"whatever" I change to, I 'll have to change the front, accordingly, however, my desire, is that "IF" I go from a 3.73, to a, for example a 3.08, it'll give me the better mileage, (with smaller tires)> yes, but is it/will it? > Still be able to do the "normal" 4wd tasks, just not "as much" towing ability, would that be alright? Sincerely, Marcel / gaud29@aol. Com
Was this
answer
helpful?
Yes
No
Friday, May 14th, 2021 AT 12:26 PM (Merged)
Tiny
2CARPRO JACK
  • MECHANIC
  • 11,533 POSTS
Some 4wd performance will suffer. More gear is better, depending on what you are doing, but if it is just basic 4wd for snow aound town you will be ok
Was this
answer
helpful?
Yes
No
Friday, May 14th, 2021 AT 12:26 PM (Merged)
Tiny
DONH
  • MEMBER
  • 1 POST
  • 1988 CHEVROLET BLAZER
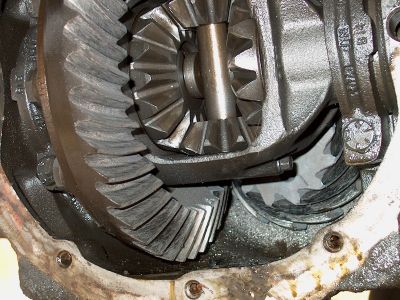
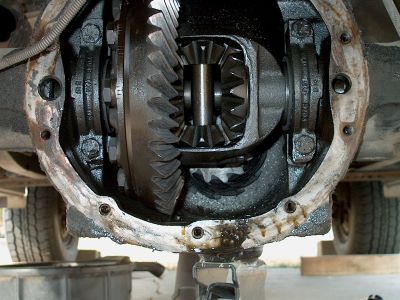
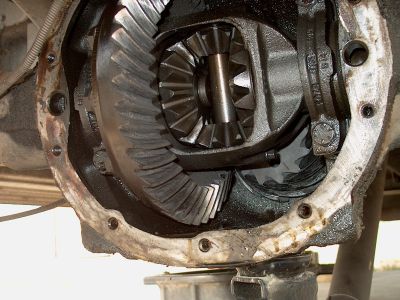
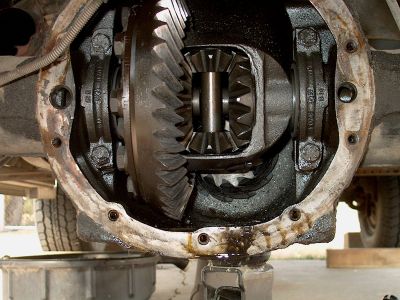
I have a 1988, K5 Blazer, automatic transmission, 4 wheel drive with a 5.7L engine with about 100,000 miles on it. I lost the oil in the rear end and locked up or seized the bearings where the yolk enters the rear end. Possible damage to axle bearings also. I am trying to decide rather to fix what I have, if possible, or find a whole rear end at a salvage yard. I need to know what size rear end came in this vehicle. I have opened it up and all the gears are in pretty good shape. I am fairly sure, no positive, that it is the stock rear end for that year. Can you please tell me what size rear end I have in it? Do you think it is worth re-building? My axles turn freely with no growling or noticeable damage. I would replace anyway. I believe my main problem is the bearing where the drive line and yolk enter the rear end. That is froze up solid, or pretty close to solid. I will included a pic I took and maybe that will help determine some of this. Thank you very much in advance. DonH Sterling, CO


http://www.2carpros.com/forum/automotive_pictures/112189_Blazer_rear_end_002_1.jpg


http://www.2carpros.com/forum/automotive_pictures/112189_Blazer_rear_end_001_1.jpg


http://www.2carpros.com/forum/automotive_pictures/112189_Blazer_rear_end_003_1.jpg


http://www.2carpros.com/forum/automotive_pictures/112189_Blazer_rear_end_004_1.jpg

:?: :?:
Was this
answer
helpful?
Yes
No
Friday, May 14th, 2021 AT 12:26 PM (Merged)
Tiny
MERLIN2021
  • MECHANIC
  • 17,250 POSTS
That is called a 10 bolt rear end. Count the teeth on the ring gear and then divide the number of teeth on the small pinion gear that will give you your ratio. Make sure you measure the overall width and check the spring perches.

If the pinion bearing seized and there is a lot of metallic flaking in the case you are better getting a used rear end and installing it.

Please let us know if you need anything else to get the problem fixed.

Cheers
Was this
answer
helpful?
Yes
No
-1
Friday, May 14th, 2021 AT 12:26 PM (Merged)
Tiny
K5_BLAZER
  • MEMBER
  • 2 POSTS
  • 1984 CHEVROLET BLAZER
  • 6.2L
  • V8
  • 4WD
  • AUTOMATIC
  • 1,000,000 MILES
I am installing new gears I the front end of my vehicle and I got the old shim on the new pinion and new bearings. When I tighten the nut the pinion is too tight to turn and it's not over tightened I barely wrenched it on. And if I back off a bit and turn the pinion then I can hear the (new) crush sleeve has not been crushed it's moving in there. I'm thinking maybe have to go with smaller or no shim on pinion?
Was this
answer
helpful?
Yes
No
Friday, May 14th, 2021 AT 12:26 PM (Merged)
Tiny
JACOBANDNICKOLAS
  • MECHANIC
  • 108,244 POSTS
Welcome to 2CarPros.

I need to know which differential you have. There are several that could have been used. Here is the list of possible differentials.

Adjustments
Borg Warner
Dana/Spicer
Timken/Rockwell - 12 Inch Ring Gear

Let me know.

Joe
Was this
answer
helpful?
Yes
No
Friday, May 14th, 2021 AT 12:26 PM (Merged)
Tiny
K5_BLAZER
  • MEMBER
  • 2 POSTS
It's a GM 10 bolt 8.5 ring gear.
Was this
answer
helpful?
Yes
No
Friday, May 14th, 2021 AT 12:26 PM (Merged)
Tiny
JACOBANDNICKOLAS
  • MECHANIC
  • 108,244 POSTS
Welcome back:

I believe this is what you need. Take a look through it and let me know. The attached pictures correlate with the directions.

__________________________________________

Adjustment
1. Install pinion bearing races in housing using a suitable driver.
2. Lubricate pinion bearings and install bearings in races.
3. Mount depth gauging jig in housing, Fig. 8, noting the following:
a. Assemble gauge plate onto preload stud.
B. Hold pinion bearings in position, insert stud through rear bearing and pilot and front bearing and pilot, then install retaining nut and tighten nut until snug.
C. Rotate tool to ensure bearings are properly seated.
D. Hold preload stud and tighten nut until 20 inch lbs. Of torque, which is required to rotate stud. To prevent damage to bearing, tighten nut in small increments, checking rotating torque after each adjustment.
E. Mount side bearing discs on arbor, using step for disc that corresponds to base of housing.
F. Mount arbor and plunger assembly in housing, ensuring side bearing discs are properly seated, install bearing caps and tighten cap bolts to prevent bearing discs from moving, Fig. 9.
4. Mount dial indicator on arbor stud with indicator contact button bearing against top of arbor plunger.
5. Preload indicator 3/4 revolution and secure to arbor mounting stud in this position.
6. Place arbor plunger on gauge plate, rotating plate as needed so that plunger rests directly on button corresponding to ring gear size.
7. Slowly rock plunger rod back and forth across button while observing dial indicator.
8. At point on button where indicator registers greatest deflection, zero dial indicator. Perform steps 7 and 8 several times to ensure correct setting.
9. Once verified zero reading is obtained, swing plunger aside until it is clear of gauge plate button and record dial indicator reading. Indicator will now read required pinion depth shim thickness for a ``nominal'' pinion.
10. Inspect rear face of drive pinion to be installed for a pinion code number. This number indicates in thousandths of an inch necessary modification of pinion shim thickness obtained in step 9.
11. Select pinion depth adjusting shim as follows:
a. If pinion is stamped with a plus (+) number, add that number of thousandths to dimension obtained in step 9.
B. If pinion is stamped with a minus ( - ) number, subtract that many thousandths from dimension obtained in step 9.
C. If pinion is not stamped with plus or minus number, dimension obtained in step 9 is correct shim thickness.
12. Remove gauging tools and pinion bearings from housing, noting installation position of bearings.

Installation
1. Install selected shim onto pinion shaft, lubricate rear pinion bearing with specified axle lubricant, then press rear bearing onto pinion using suitable spacers.
2. Install new collapsible spacer onto pinion shaft, then insert pinion assembly into housing.
3. Lubricate front pinion bearing, install bearing into housing and tap bearing over pinion shaft with a drift while assistant holds pinion in place. Old pinion nut and a large washer can be used to seat front bearing on pinion, but care must be taken not to collapse spacer if this method is used.
4. Install new pinion seal in housing, coat seal lips with grease, then mount driveshaft yoke on pinion shaft, lightly tapping yoke until several pinion shaft threads protrude from yoke.
5. Coat rear of pinion washer with suitable sealer, then install washer and new pinion nut.
6. Hold driveshaft yoke with suitable tool, then alternately tighten pinion nut and rotate pinion until endplay is reduced to zero.
7. When endplay is reduced to zero, check pinion bearing preload using a torque wrench.
8. Continue tightening pinion nut in small increments until 35-40 inch lbs. Of bearing preload is obtained with new bearings or 20-25 inch lbs. Of bearing preload is obtained with used bearings, rotating pinion and checking preload after each adjustment. Exceeding preload specification will compress collapsible spacer too far, requiring replacement of spacer. If preload specification is exceeded, spacer must be replaced and adjustment procedure must be repeated. Do not loosen pinion nut to reduce preload.

Take care,
Joe
Was this
answer
helpful?
Yes
No
Friday, May 14th, 2021 AT 12:26 PM (Merged)

Please login or register to post a reply.

Sponsored links