Welcome to 2CarPros.
Other than at an idle, does it run good? Have you checked for engine vacuum leaks? Have you checked to see if fuel pressure drops off when it stalls? Does it immediately start after this happens? Have you checked the crankshaft position sensor to see if the engine loses an RPM signal when it stalls?
You have replaced a lot already. My first suspect is a vacuum leak. These engines are known for intake leaks. Lets start with that. Here is a link that shows how to test:
https://www.2carpros.com/articles/how-to-use-an-engine-vacuum-gauge
Next, a bad crankshaft position sensor symptom is the engine will just stall at an idle and not set a code. Take a look through this link.
https://www.2carpros.com/articles/symptoms-of-a-bad-crankshaft-sensor
If you find the sensor is the issue, here is a link that shows in general how one is replaced.
https://www.2carpros.com/articles/crankshaft-angle-sensor-replacement
Here are the directions specific to this vehicle. There are two different designs. I will include both The attached pics correlates with these directions.
+++++++++++++++++++++++++++
REMOVAL PROCEDURE
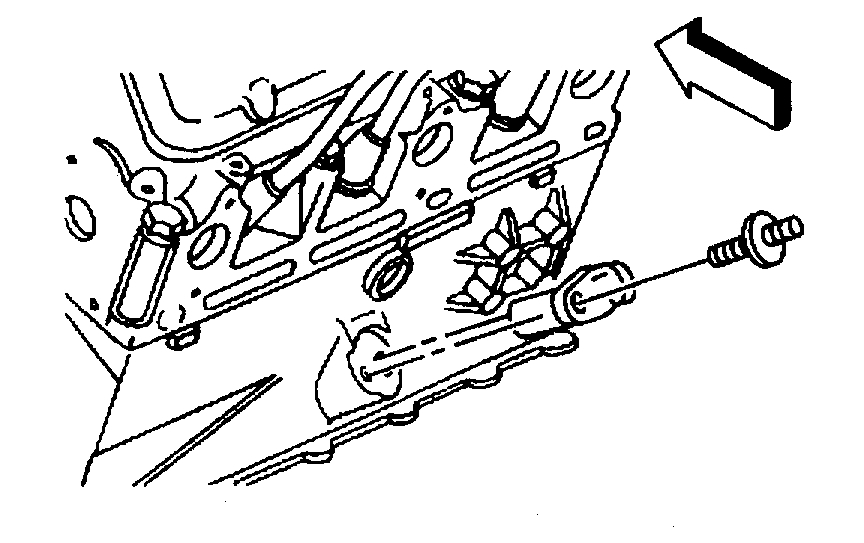
pic 1
1. Turn the steering wheel fully to the left.
2. Raise and support the vehicle. Refer to Lifting and Jacking the Vehicle.
3. Remove the right tire and wheel.
4. Disconnect the crankshaft position (CKP) sensor electrical connector.
5. Remove the CKP sensor bolt.
6. Remove the CKP sensor.
7. Inspect for wear, cracks, or leakage if the CKP sensor is not being replaced.
INSTALLATION PROCEDURE
1. Lubricate the O-ring with clean engine oil before installation and replace if damaged.
pic 1
2. Install the CKP sensor.
3. Install the CKP sensor bolt.
NOTE: Refer to Fastener Notice in Service Precautions.
Tighten
Tighten the bolt to 11 N.m (97 lb in).
4. Connect the CKP sensor electrical connector.
5. Install the right tire and wheel.
6. Lower the vehicle.
7. Perform the crankshaft position (CKP) system variation learn procedure. See: Vehicle > Programming and Relearning
_______________________________________________________________
Type 2
CRANKSHAFT POSITION (CKP) SENSOR REPLACEMENT (24X)
REMOVAL PROCEDURE
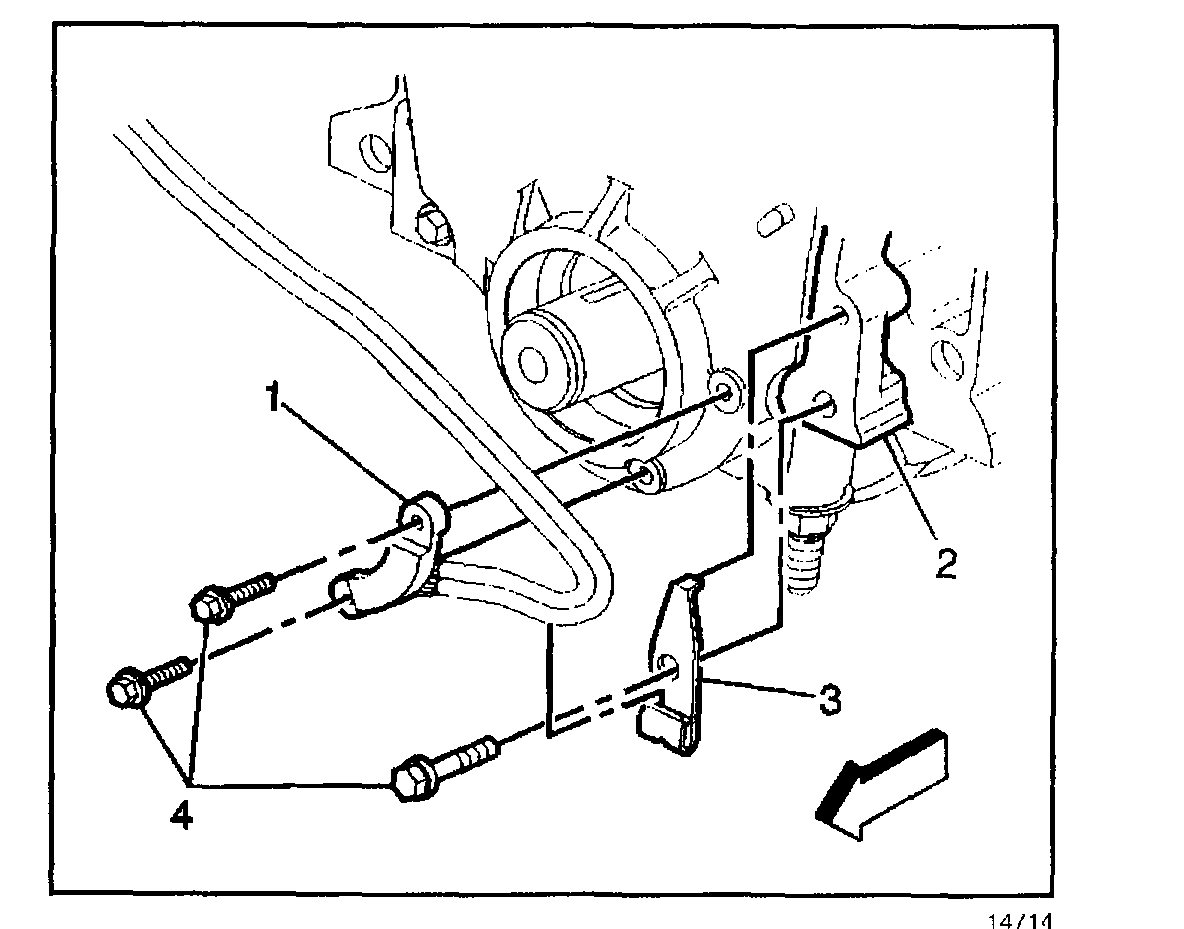
pic 2
1. Raise and support the vehicle. Refer to Lifting and Jacking the Vehicle.
2. Remove the lower air deflector.
3. Remove the crankshaft balancer.
4. Disconnect the crankshaft position (CKP) sensor electrical connector.
5. Note the routing of the sensor harness before removal.
6. Remove the harness retaining bolt (4) and the clip (3).
7. Remove the CKP sensor bolts (4).
8. Remove the CKP sensor (1).
INSTALLATION PROCEDURE
pic 2
1. Install the 24X crankshaft position sensor (1) to the front cover.
2. Install the CKP sensor bolts (4).
NOTE: Refer to Fastener Notice in Service Precautions.
Tighten
Tighten the bolts to 10 N.m (89 lb in).
3. Install the harness retaining clip (3) and the bolt (4).
Tighten
Tighten the bolt (4) to 10 N.m (89 lb in).
4. Connect the CKP sensor electrical connector.
5. Install the CKP sensor harness to the bracket.
6. Install the crankshaft balancer.
7. Install the lower air deflector.
8. Lower the vehicle.
9. Perform the crankshaft position (CKP) system variation learn procedure. See: Vehicle > Programming and Relearning
++++++++++++++++++++++++++++++++++++++++++++++++++
Here are the variation relearn procedures:
CRANKSHAFT POSITION (CKP) - VARIATION LEARN PROCEDURE
1. Install a scan tool.
IMPORTANT: For additional diagnostic information, refer to DTC P1336.
2. With a scan tool, monitor the powertrain control module for DTCs. If other DTCs are set, except DTC P1336, refer to Diagnostic Trouble Code (DTC) List for the applicable DTC that set.
3. With a scan tool, select the crankshaft position (CKP) variation learn procedure.
4. Observe the fuel cut-off for the engine that you are performing the learn procedure on.
5. The scan tool instructs you to perform the following:
- Block the drive wheels.
- Apply the vehicles parking brake.
- Cycle the ignition from OFF to ON.
- Apply and hold the brake pedal.
- Start and idle the engine.
- Turn OFF the A/C.
- Place the vehicle's automatic transmission in Park, or the manual transmission in Neutral.
- The scan tool monitors certain component signals to determine if all the conditions are met to continue with the procedure. The scan tool only displays the condition that inhibits the procedure. The scan tool monitors the following components:
- CKP sensors activity-If there is a CKP sensor condition, refer to the applicable DTC that set.
- Camshaft position (CMP) sensor activity-If there is a CMP sensor condition, refer to the applicable DTC that set.
- Engine coolant temperature (ECT)-If the ECT is not warm enough, idle the engine until the ECT reaches the correct temperature.
6. With the scan tool, enable the CKP system variation learn procedure.
7. Slowly increase the engine speed to the RPM that you observed.
IMPORTANT: While the learn procedure is in progress, release the throttle immediately when the engine starts to decelerate. The engine control is returned to the operator and the engine responds to throttle position after the learn procedure is complete.
8. Immediately release the throttle when fuel cut-off is reached.
9. The scan tool displays Learn Status: Learned this ignition. If the scan tool does NOT display this message and no additional DTCs set, refer to Symptoms - Engine. If a DTC set, refer to Diagnostic Trouble Code (DTC) List for the applicable DTC that set.
10. Turn OFF the ignition for 30 seconds after the learn procedure is completed succe
_______________________
Let me know if this helps or if you have other questions.
Take care,
Joe
Images (Click to enlarge)
May 13, 2019 at 8:02 PM