Hi and thanks for using 2CarPros.com
If there was no fluid, there is a leak. First, inspect under the vehicle for a ruptured steel brake hose, leaking wheel cylinder or caliper. If you see nothing wet, refill the master cylinder and have a helper pump the brakes to see if you can then see the leak. If no leak is detected, chances are the master cylinder is leaking from the rear (where it bolts to the brake booster.
This can help
https://www.2carpros.com/articles/brake-pedal-goes-to-the-floor
If you determine that it is the master cylinder, here are directions and pictures for removal and replacement. Again, if there was no fluid, you see no leaks, chances are the master cylinder is bad.
1999 Dodge or Ram Truck Caravan FWD V6-3.8L VIN L
Vehicle � Brakes and Traction Control � Hydraulic System � Brake Master Cylinder � Service and Repair � Master Cylinder Replacement
MASTER CYLINDER REPLACEMENT
CAUTION: Different types of master cylinders are used on this vehicle. Vehicles equipped with traction control use a center port master cylinder. Vehicles not equipped with traction control use a compensating port master cylinder. Be sure to verify if the vehicle is equipped with traction control and that the correct replacement master cylinder is used. Also, vehicles that are equipped with four wheel disc brakes have a master with a different size piston bore than the other master cylinders. If a new master cylinder is being installed, be sure the correct master cylinder is used for the type of brake system the vehicle is equipped with.
REMOVE
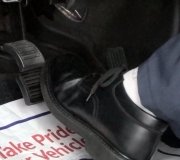
CAUTION: Vacuum in the power brake booster must be pumped down (removed) before removing master cylinder from power brake booster. This is necessary to prevent the power brake booster from sucking in any contamination as the master cylinder is removed. This can be done simply by pumping the brake pedal, with the vehicle's engine not running, until a firm feeling brake pedal is achieved.
With engine not running, pump the brake pedal until a firm pedal is achieved (4-5 strokes).
CAUTION: Before removing the master cylinder filler tube from the brake fluid reservoir, the filler tube, brake fluid reservoir and master cylinder must be thoroughly cleaned. This must be done to prevent dirt particles from falling into the brake fluid reservoir and entering the brakes hydraulic system.
Thoroughly clean all surfaces of the filler neck, brake fluid reservoir, and master cylinder. Use only a solvent such as Mopar Brake Parts Cleaner or an equivalent.
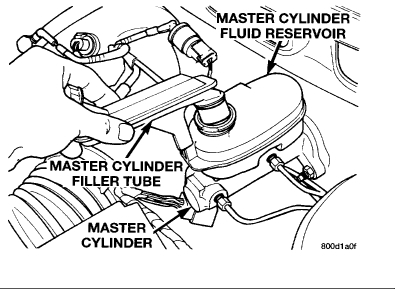
Master Cylinder Filler Tube Removal
Remove master cylinder filler tube from brake fluid reservoir by pushing down and rotating. Then remove the cap from the removed filler tube and install it on the master cylinder reservoir.
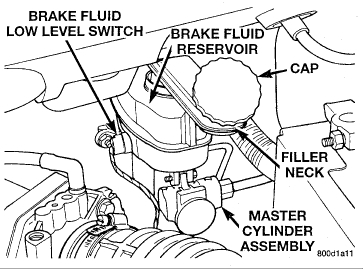
Master Cylinder Assembly
Remove vehicle wiring harness connector, from the brake fluid level sensor, in master cylinder brake fluid reservoir.
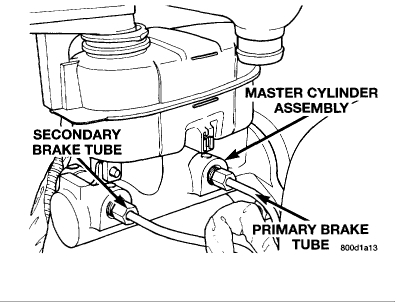
Primary/Secondary Brake Tubes At Master Cylinder
Disconnect the primary and secondary brake tubes from the master cylinder housing. Install sealing plugs in the open brake tube outlets on master cylinder assembly.
CAUTION: Before removing the master cylinder from the power brake vacuum booster, the master cylinder and vacuum booster must be thoroughly cleaned. This must be done to prevent dirt particles from falling into the lower brake vacuum booster.
Clean the area where the master cylinder assembly attaches to the power brake booster. Use only a solvent such as Mopar Brake Parts Cleaner or an equivalent.
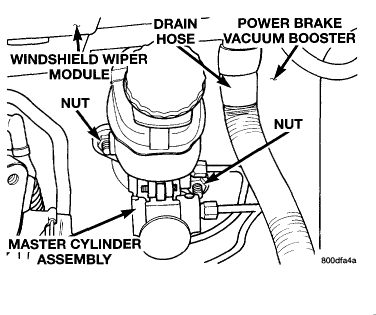
Master Cylinder Mounting To Vacuum Booster
Remove the 2 nuts attaching the master cylinder assembly to the brake vacuum booster.
Slide master cylinder assembly straight out of the power brake vacuum booster.
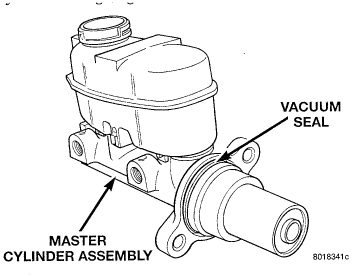
CAUTION: The master cylinder is used to create the seal for holding vacuum in the power brake vacuum booster. The vacuum seal/boot on the master cylinder MUST be replaced whenever the master cylinder is removed from the power brake vacuum booster.
Remove the vacuum seal located on the mounting flange of the master cylinder. The vacuum seal is removed from the master cylinder by carefully pulling it away from the master cylinder. Do not attempt to pry the seal off the master cylinder by inserting a sharp tool between seal and master cylinder casting.
Bleeding Master Cylinder
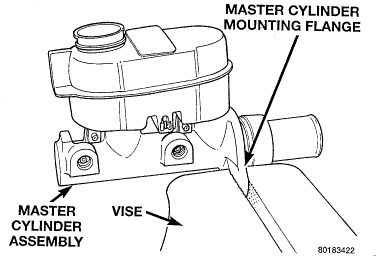
CAUTION: When clamping master cylinder in vise, only clamp master cylinder by its mounting flange, do not clamp on primary piston, seal or body of master cylinder.
Master Cylinder Mounted In Vise
Clamp the master cylinder in a vise using only the mounting flange.
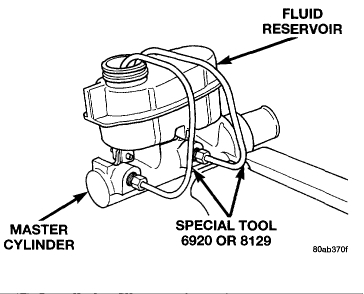
NOTE: Two different size bleeding tubes are used depending on which type of master cylinder the vehicle is equipped with. Vehicles equipped with traction control use a center port master cylinder with a larger diameter brake tube. Vehicles not equipped with traction control use a compensating port master cylinder using a standard 3/16 inch diameter brake tube. Be sure the correct size bleeding tubes are used when bleeding the master cylinder.
Bleed Tubes Installed On Master Cylinder
Install the Bleeding Tubes, Special Tool 6920 for a non-traction control master cylinder or Special Wool 8129 for a traction control master cylinder on the master cylinder. Position bleeding tubes so the outlets of bleeding tubes will be below surface of brake fluid when reservoir is filled to its proper level.
Fill brake fluid reservoir with brake fluid conforming to DOT 3 specifications such as Mopar or an Equivalent.
Using a wooden dowel, depress push rod slowly, and then allow pistons to return to released position. Repeat several times until all air bubbles are expelled from master cylinder.
Remove bleeding tubes from master cylinder outlet ports, and then plug outlet ports and install fill cap on reservoir.
Remove master cylinder from vise.
NOTE: It is not necessary to bleed the ABS Hydraulic Control Unit (HCU) after replacing the master cylinder. But, the base brake hydraulic system must be bled to ensure no air is entered the hydraulic system when the master cylinder was removed.
___________________________________________
INSTALL
CAUTION: When replacing the master cylinder on a vehicle, a NEW vacuum seal MUST be installed on the master cylinder. Use only procedure detailed below for installing the vacuum seal onto the master cylinder.
Vacuum Seal Installed On Master Cylinder
Install a NEW vacuum seal on master cylinder making sure seal sits squarely in groove of master cylinder casting.
Position master cylinder on studs of power brake unit, aligning push rod on power brake vacuum booster with master cylinder push rod.
Install the 2 master cylinder to power brake unit mounting nuts. Then tighten both mounting nuts to a torque of 25 Nm (225 inch lbs.) .
CAUTION: When installing the primary and secondary brake tubes on master cylinder, be sure brake tubes do not contact any other components within the vehicle and that there is slack in the flexible sections of the tubes. This is required due to the movement between the ABS hydraulic control module (HCU) and the master cylinder, when the vehicle is in motion.
Connect the primary and secondary brake tubes to master cylinder primary and secondary ports. Brake tubes must be held securely when tightened to control orientation of flex section. Then fully tighten the tube nuts to a torque of 17 Nm (145 inch lbs.) .
Install the vehicle wiring harness connector, on the brake fluid level sensor in the master cylinder brake fluid reservoir.
Install filler tube into the master cylinder fluid reservoir.
I hope this helps. Let me know if you have other questions.
Take care,
Joe
Images (Click to make bigger)
Sunday, February 21st, 2021 AT 12:38 PM