Hi,
Replacing rear brake pads and rotors really isn't too hard. Plus, if you do it yourself, purchase lifetime parts so you never have to pay for them again.
You can expect rear brakes to last around 30,000 miles, but that changes based on terrain and driving habits.
To get started, here is a link that explains in general how it's done. Use this as a guide.
https://www.2carpros.com/articles/how-to-replace-rear-brake-pads-and-rotors
Here are the directions specific to your vehicle. The attached pics below correlate with these directions.
______________________________________________
2012 Chevrolet Impala V6-3.6L
Rear Disc Brake Pads Replacement
Vehicle Brakes and Traction Control Disc Brake System Brake Pad Service and Repair Removal and Replacement Rear Disc Brake Pads Replacement
REAR DISC BRAKE PADS REPLACEMENT
Rear Disc Brake Pads Replacement
Removal Procedure
Warning:
Refer to Brake Dust Warning See: Brakes and Traction Control > Technician Safety Information > Brake Dust Warning.
1. Inspect the fluid level in the brake master cylinder reservoir.
2. If the brake fluid level is midway between the maximum-full point and the minimum allowable level, then no brake fluid needs to be removed from the reservoir before proceeding. If the brake fluid level is higher than midway between the maximum-full point and the minimum allowable level, then remove brake fluid to the midway point before proceeding.
3. Raise and suitably support the vehicle. Refer to Lifting and Jacking the Vehicle See: Vehicle Lifting > Procedures > Lifting and Jacking the Vehicle.
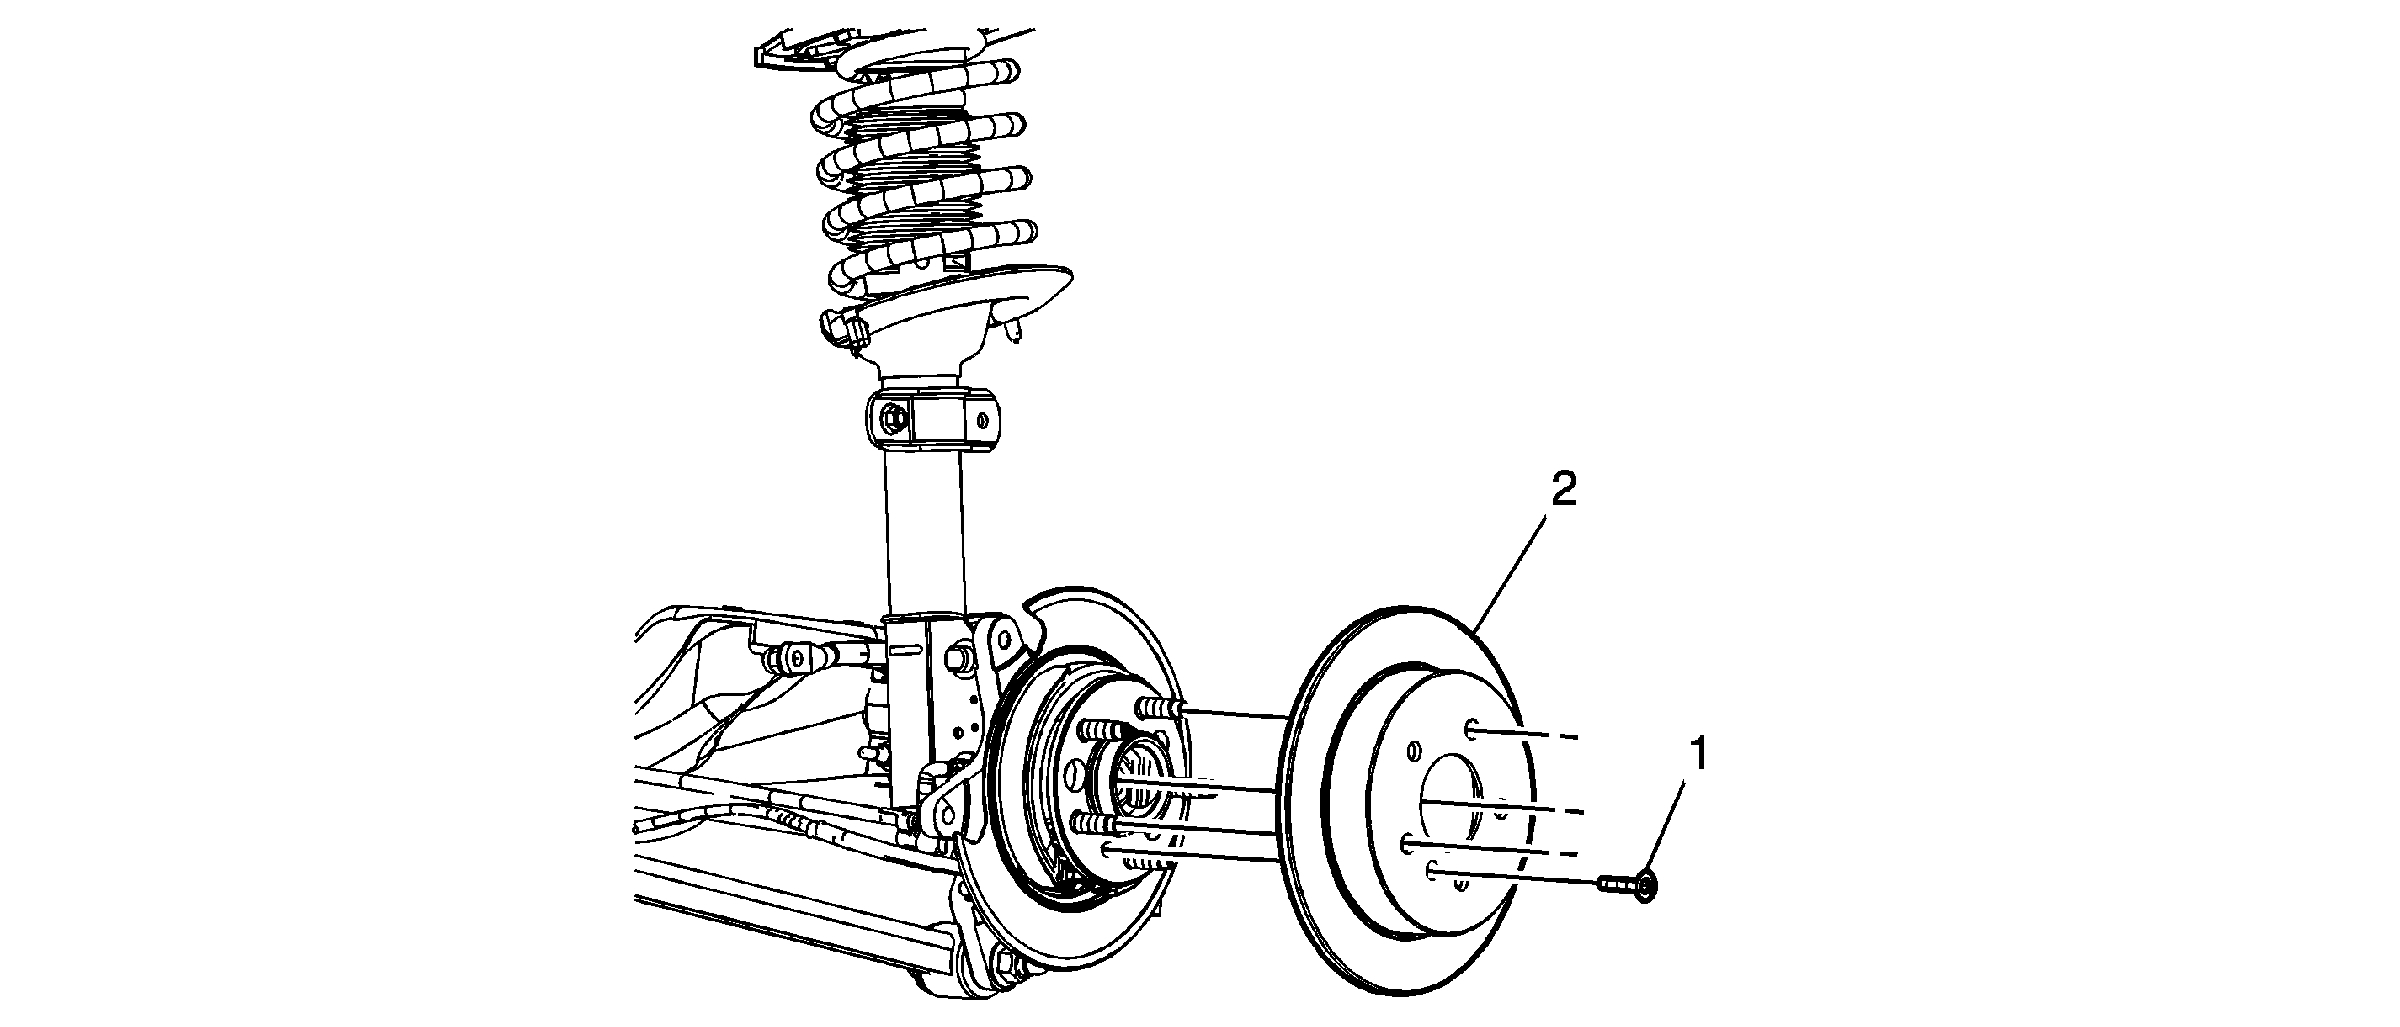
4. Remove the rear tire and the wheel assembly. Refer to Tire and Wheel Removal and Installation See: Wheels and Tires > Removal and Replacement > Tire and Wheel Removal and Installation.
5. Install a hand tightened lug nut to retain the rotor to the hub.
pic 1
6. Compress the caliper piston enough for clearance. Use a C-clamp (3).
pic 2
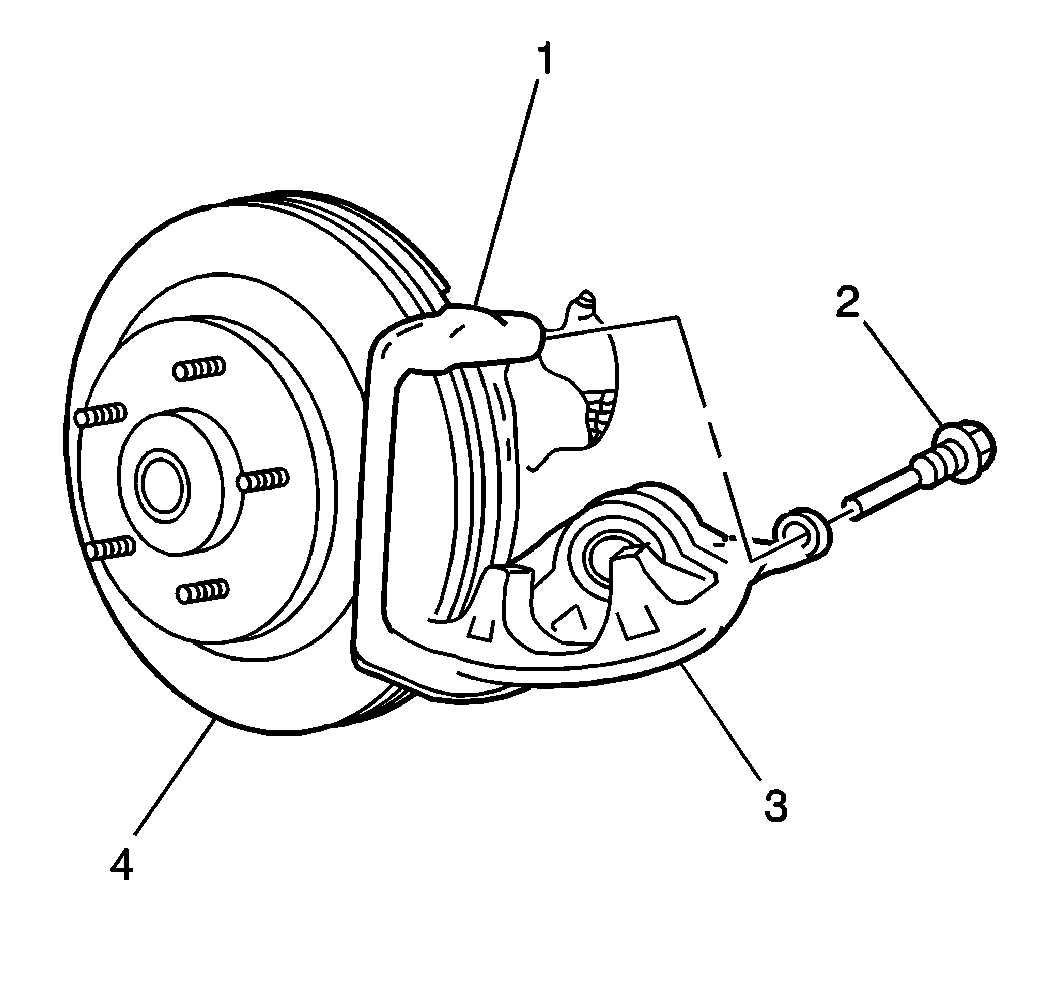
7. Remove the upper caliper bolt (2).
Caution:
Use care to avoid damaging pin boot when rotating caliper.
Caution:
Support the brake caliper with heavy mechanic wire, or equivalent, whenever it is separated from its mount and the hydraulic flexible brake hose is still connected. Failure to support the caliper in this manner will cause the flexible brake hose to bear the weight of the caliper, which may cause damage to the brake hose and in turn may cause a brake fluid leak.
8. Pivot the caliper down in order to access the pads. It is not necessary to remove the caliper.
pic 3
9. Remove the brake pads (2) from the caliper bracket.
10. Remove the 2 pad clips (1) from the caliper bracket.
11. Inspect the caliper mounting hardware for the following conditions:
* Cuts
* Tears
* Deterioration
Replace any hardware if damage exists. Refer to Rear Disc Brake Mounting and Hardware Inspection See: Disc Brake System > Component Tests and General Diagnostics > Rear Disc Brake Mounting and Hardware Inspection.
12. Inspect the caliper dust boot for the following conditions:
* Cuts
* Tears
* Deterioration
Replace the caliper dust boot if damage exists. Refer to Brake Caliper Inspection See: Brake Caliper > Component Tests and General Diagnostics > Brake Caliper Inspection.
13. Inspect the caliper bolts for corrosion or damage. If corrosion exists, use new caliper bolts when installing the caliper.
Installation Procedure
pic 4
1. Bottom the piston into the caliper bore.
Use a C-clamp before installing new brake pads in order to compress the piston. Use an old brake pad or wooden block across the face of the piston to avoid damage to the piston or the caliper boot.
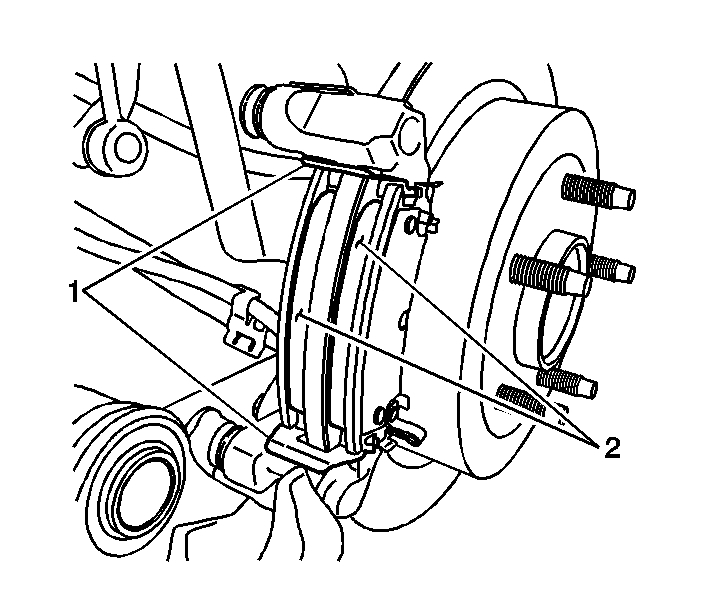
2. Install the 2 retainers (1) to the caliper bracket.
Note:
The wear sensor is on the outside pad. The sensor is positioned at the trailing or downward edge of the pad during forward wheel rotation.
3. Install the pads (2) to the caliper bracket.
pic 5
Caution:
Use care to avoid damaging pin boot when rotating caliper.
4. Swing the caliper (3) upward in position around the pads.
5. Lubricate the bolt and the bolt boot. Use silicone grease.
Caution:
Refer to Fastener Caution See: Vehicle > Vehicle Damage Warnings > Fastener Caution.
6. Install the upper caliper bolt (2).
Tighten the caliper bolt to 44 Nm (32 lb ft).
7. Remove the wheel lug nut retaining the rotor to the hub.
8. Install the rear tire and the wheel assembly. Refer to Tire and Wheel Removal and Installation See: Wheels and Tires > Removal and Replacement > Tire and Wheel Removal and Installation. Align the previous marks on the wheel, hub and bearing.
9. Lower the vehicle.
10. With the engine OFF, gradually apply the brake pedal to approximately 2/3 of its travel distance.
11. Slowly release the brake pedal.
12. Wait 15 seconds, then repeat steps 10 and 11 until a firm brake pedal is obtained. This will properly seat the brake caliper pistons and brake pads.
13. Fill the brake master cylinder reservoir to the proper level. Refer to Master Cylinder Reservoir Filling See: Brake Master Cylinder > Procedures > Master Cylinder Reservoir Filling.
14. Burnish the pads and rotors. Refer to Brake Pad and Rotor Burnishing See: Brake Pad > Procedures > Brake Pad and Rotor Burnishing.
_________________
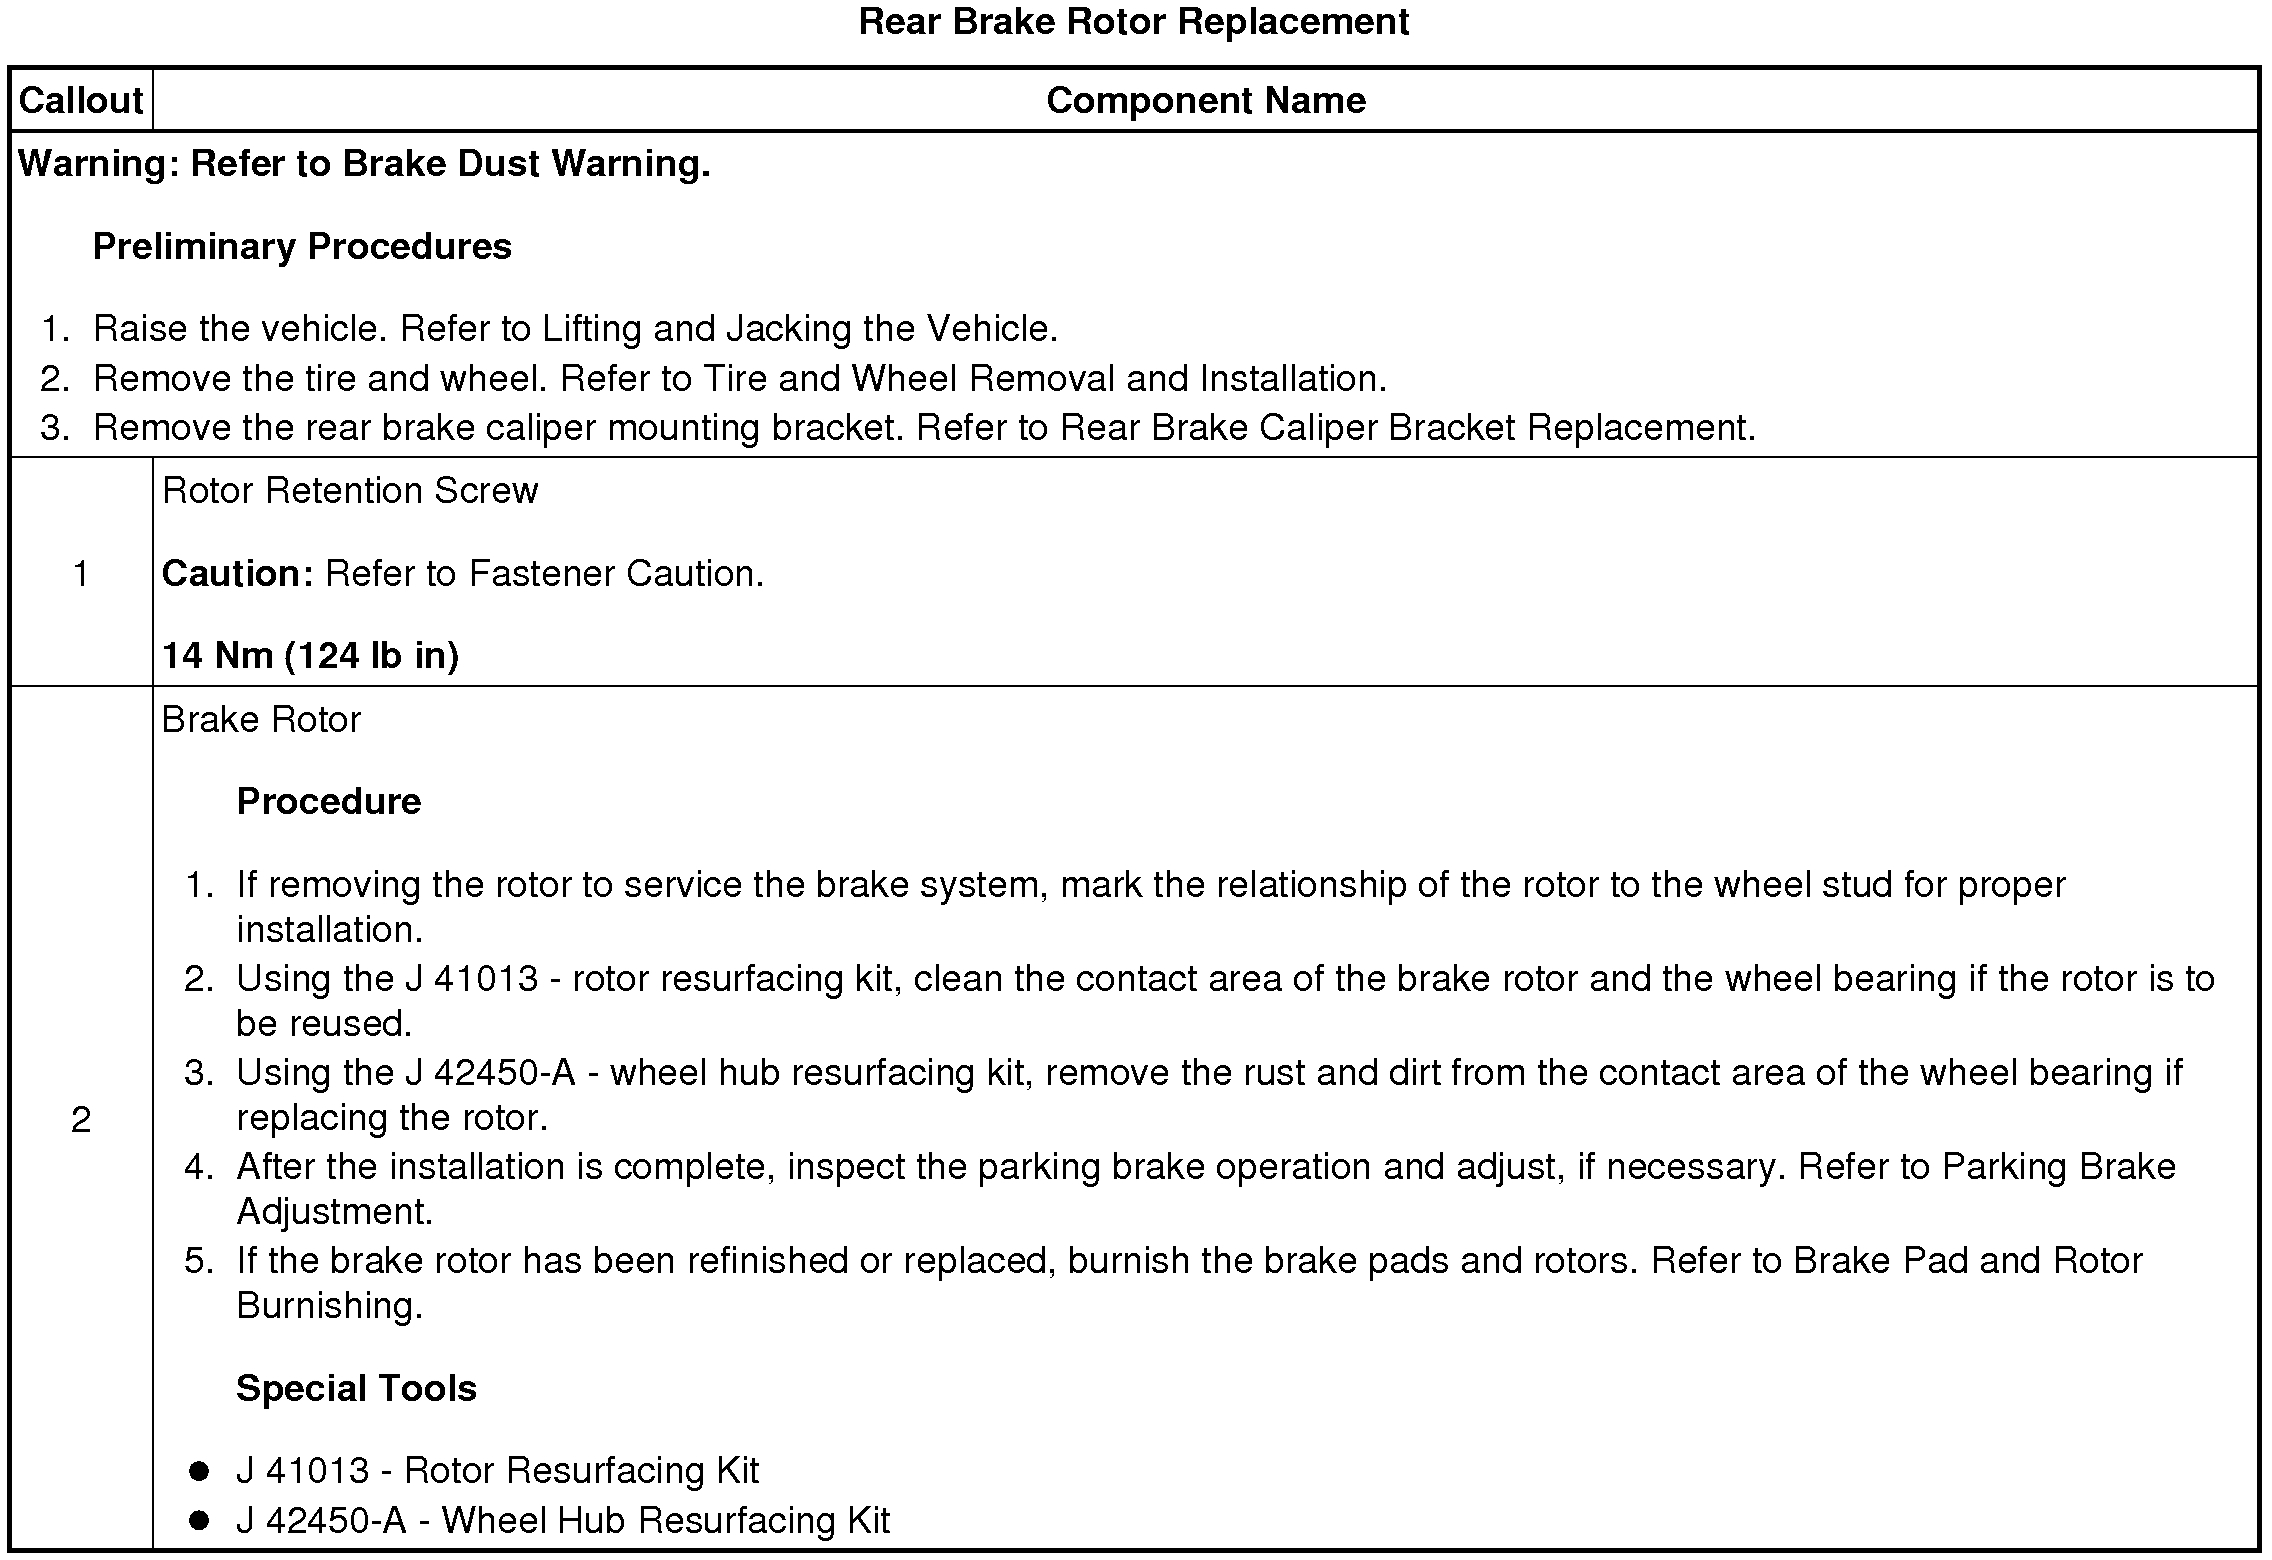
Rotor Replacement
2012 Chevrolet Impala V6-3.6L
Rear Brake Rotor Replacement
Vehicle Brakes and Traction Control Disc Brake System Brake Rotor/Disc Service and Repair Removal and Replacement Rear Brake Rotor Replacement
REAR BRAKE ROTOR REPLACEMENT
Rear Brake Rotor Replacement
pic 6
pic 7
_______________________________________________________________
I hope this helps. Let me know if you have other questions.
Take care and God Bless,
Joe
Images (Click to enlarge)
Mar 1, 2021 at 8:25 PM