A/C on passenger/wife’s side runs 20 degrees warmer than drivers side

Tiny
DELLUNAA
  • MEMBER
  • 2004 DODGE RAM
  • 5.7L
  • V8
  • 4WD
  • AUTOMATIC
  • 167,000 MILES
Truck listed above is a 1500 quad 5.7 hemi.
A/C on passenger/wife’s side runs 20 degrees warmer than drivers side. Big problem!
These temperature reading were at the vents:
1st temperature reading at 45 mph to hwy 66: passenger side 70.8 degrees drivers side 54.1 degrees 16.7 degrees difference.
2nd temperature reading at 65 mph to claremore at end of trip: passenger side 72.1 degrees drivers side 57.0 degrees 15.1 degrees difference.
3rd temperature reading in town claremore: passenger side 67 degrees drivers side 53 degrees 14 degrees difference.
4th temperature reading at 65 mph back to home at end trip passenger side 71.7 degrees drivers side 56.1 degrees 15.6 degrees difference
All the time traveling on the hwy 66 averaged 20 degrees warmer on wife’s side.
Outside air temperature was around 85 degrees.
Inside truck cab temperature was around 75 degrees.

Thanks,
Jim Felland
Thursday, August 27th, 2020 AT 2:30 PM

5 Replies

Tiny
ASEMASTER6371
  • MECHANIC
  • 52,797 POSTS
Good afternoon,

Can you give me the high and low side pressures with the engine running and the A/C on?

https://www.2carpros.com/articles/car-air-conditioner-not-working-or-is-weak

I want to make sure the Freon side is working correctly.

Roy
Was this
answer
helpful?
Yes
No
Friday, April 23rd, 2021 AT 9:44 AM
Tiny
ASEMASTER6371
  • MECHANIC
  • 52,797 POSTS
You can rent a set at a parts store and attach them. I attached a guide for you.

https://www.2carpros.com/articles/re-charge-an-air-conditioner-system

Otherwise you can take it to a shop and ask them to check the pressures for you.

Roy
Was this
answer
helpful?
Yes
No
Friday, April 23rd, 2021 AT 9:44 AM
Tiny
DELLUNAA
  • MEMBER
  • 39 POSTS
Hello Roy,

The high pressure was about 225 psi and the low was about 43 psi at an outside temperature of about 85 degrees and humid. Two cans were added and dye was put in and leaks were not found.
Was this
answer
helpful?
Yes
No
Friday, April 23rd, 2021 AT 9:44 AM
Tiny
ASEMASTER6371
  • MECHANIC
  • 52,797 POSTS
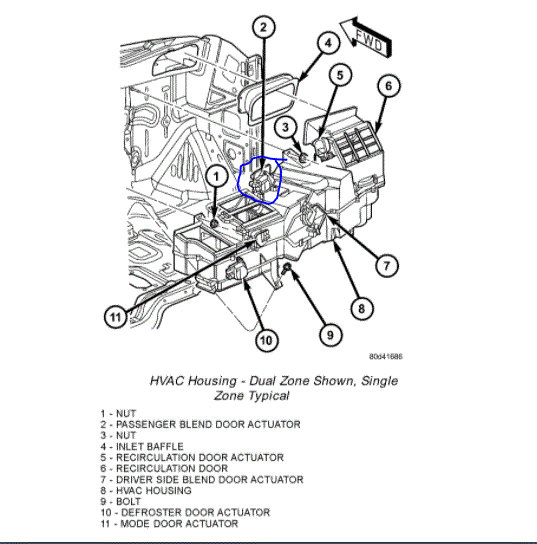
Okay, this sounds like the blend door may not be sealing the heater core and not allowing cold air.

https://www.2carpros.com/articles/replace-blend-door-motor

I attached the procedure below and attached a picture for you of the location.

Roy

REMOVAL

Warning: on vehicles equipped with air-bags, disable the airbag system before attempting any steering wheel, steering column, or instrument panel component diagnosis or service. Disconnect and isolate the battery negative (ground) cable, then wait two minutes for the airbag system capacitor to discharge before performing further diagnosis or service. This is the only sure way to disable the airbag system. Failure to take the proper precautions could result in accidental air-bag deployment and possible personal injury.

NOTE: The single zone heating and air conditioning system is equipped with a single blend door actuator. The dual zone system has two blend door actuators, one for the driver side blend air door and one for the passenger side blend air door. The same service procedures can be used for each of these actuators.

1. Disconnect and isolate the battery negative cable.
2. Remove the instrument panel from the vehicle.
3. Disconnect the wire harness connector from the blend door actuator(s).

HVAC Housing - Dual Zone Shown, Single Zone Typical
imageOpen In New TabZoom/Print

4. Remove the screws that secure the blend door actuator(s) to the HVAC housing.
5. Remove the blend door actuator(s) from the HVAC housing.

INSTALLATION
1. Position the blend door actuator(s) into the HVAC housing. If necessary, rotate the actuator(s) slightly to align the splines on the actuator output sleeve(s) with those on the blend door linkage.
2. Install and tighten the screws that secure the blend door actuator(s) to the HVAC housing. Tighten the screws to 2 Nm (17 in. lbs.).
3. Connect the HVAC wire harness connector to the blend door actuator(s).
4. Install the instrument panel.
5. Reconnect the battery negative cable.
Was this
answer
helpful?
Yes
No
+1
Friday, April 23rd, 2021 AT 9:44 AM
Tiny
DELLUNAA
  • MEMBER
  • 39 POSTS
Thanks Roy, that fixed it you guys are great!
Was this
answer
helpful?
Yes
No
Friday, April 23rd, 2021 AT 9:44 AM

Please login or register to post a reply.

Sponsored links