Good afternoon,
Special equipment is required for Freon recovery so it does not escape into the atmosphere.
https://www.2carpros.com/articles/re-charge-an-air-conditioner-system
Warning: review the warnings and cautions in the front before performing the following operation.
A R-134a refrigerant recovery/recycling/charging station that meets SAE Standard J2210 must be used to recover the refrigerant from an R-134a refrigerant system. Refer to the operating instructions supplied by the equipment manufacturer for the proper care and use of this equipment.
I also attached the procedure for removing the heater core.
https://www.2carpros.com/articles/replace-heater-core
https://www.2carpros.com/articles/coolant-flush-and-refill-all-cars
Let us know if you have any other questions.
Roy
REMOVAL
Warning: on vehicles equipped with air-bags, disable the airbag system before attempting any steering wheel, steering column, or instrument panel component diagnosis or service. Disconnect and isolate the battery negative (ground) cable, then wait two minutes for the airbag system capacitor to discharge before performing further diagnosis or service. This is the only sure way to disable the airbag system. Failure to take the proper precautions could result in accidental air-bag deployment and possible personal injury.
NOTE: Disassembly of the HVAC housing is not required to remove heater core.
1. Remove the HVAC housing. Refer to Housing Assembly HVAC/ Service and Repair/ Removal and Replacement. See: Housing Assembly HVAC > Removal and Replacement
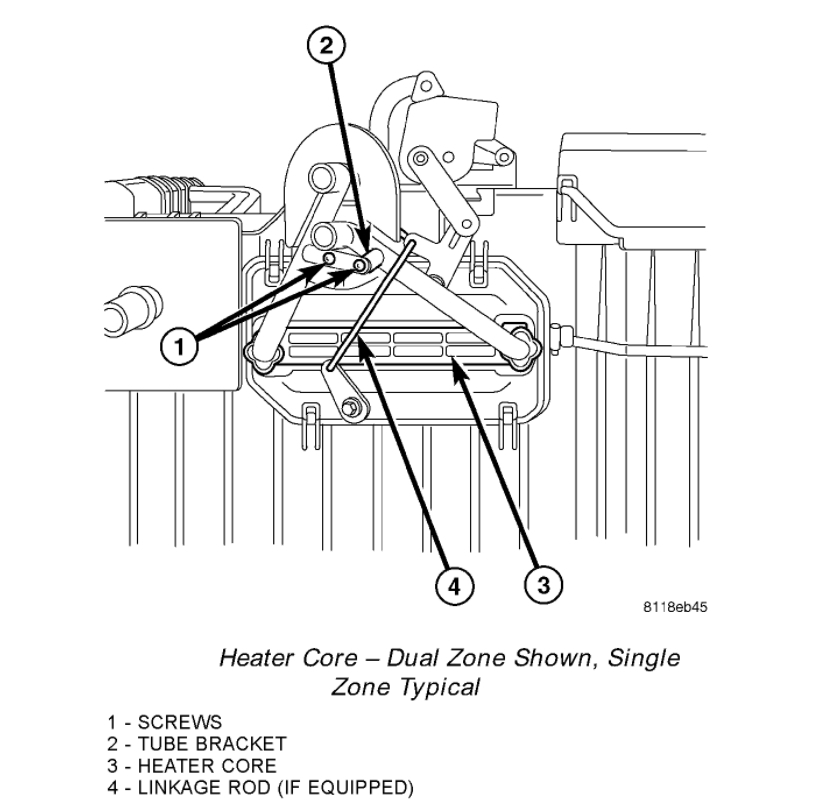
2. Remove the foam seal from the heater core tubes.
Heated Core - Dual Zone Shown, Single Zone Typical
imageOpen In New TabZoom/Print
3. If equipped with the Dual Zone system, remove the linkage rod from the actuator levers to gain access to the heater core.
4. Remove the two screws that secure the heater core tube bracket to the HVAC housing.
5. Remove the heater core tube bracket.
6. Pull the heater core out of the HVAC housing.
7. Inspect all foam seals and repair or replace them as required.
INSTALLATION
1. Install the heater core into the HVAC housing.
2. Position the heater core tube bracket onto the HVAC housing.
3. Install the two screws that secure the heater core bracket to the HVAC housing. Tighten the screws to 2.2 Nm (20 in. lbs.).
4. If equipped with the Dual Zone system, install the linkage rod onto the actuator levers.
5. Install the foam seal onto the heater core tubes.
6. Install the HVAC housing. Refer to Housing Assembly HVAC/ Service and Repair/ Removal and Replacement. See: Housing Assembly HVAC > Removal and Replacement
Housing removal
REMOVAL
Warning: on vehicles equipped with air-bags, disable the airbag system before attempting any steering wheel, steering column, or instrument panel component diagnosis or service. Disconnect and isolate the battery negative (ground) cable, then wait two minutes for the airbag system capacitor to discharge before performing further diagnosis or service. This is the only sure way to disable the airbag system. Failure to take the proper precautions could result in an accidental airbag deployment and possible personal injury.
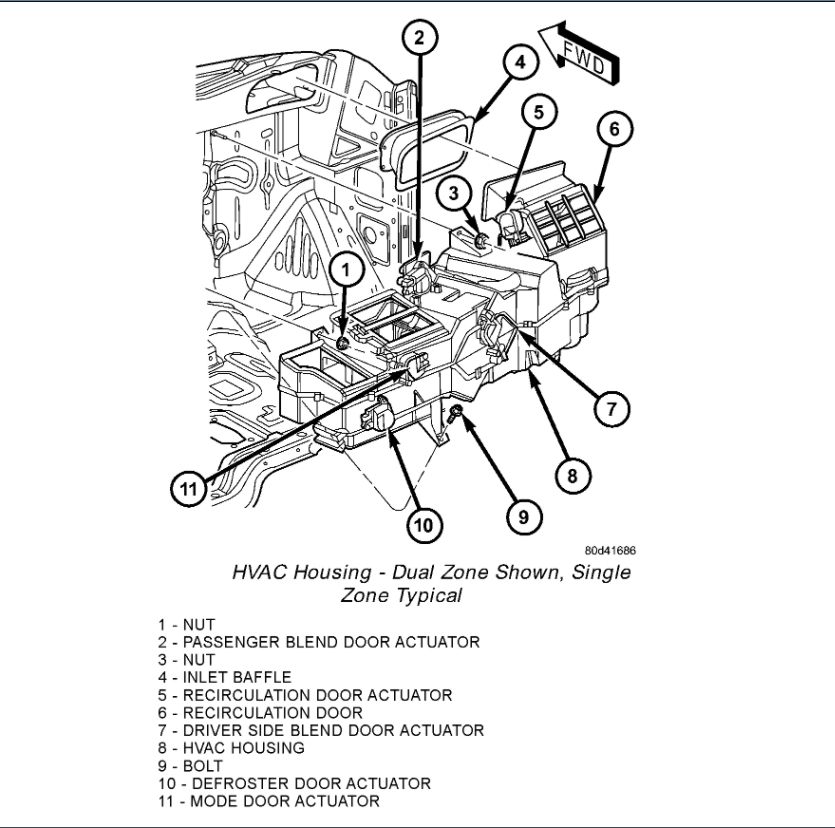
NOTE: The HVAC housing must be removed from the vehicle and the two halves of the housing separated for service access of the heater core, evaporator coil, defrost door, blend door(s) and the recirculation door.
1. Disconnect and isolate the battery negative cable.
2. Drain the engine cooling system .
3. Recover the refrigerant from the refrigerant system.
4. Disconnect the liquid refrigerant line fitting from the evaporator inlet tube. Discard the O-ring seal and install plugs in, or tape over the opened liquid refrigerant line fitting and evaporator inlet tube.
5. Remove the accumulator. Discard the O-ring seals and install plugs in, or tape over the opened refrigerant line fittings and evaporator outlet tube.
6. Disconnect the heater hoses from the heater core tubes. Install plugs in, or tape over the opened heater core tubes.
7. Remove the powertrain control module (PCM) from the engine compartment to gain access to the HVAC housing retaining nuts.
8. Remove the two nuts from the HVAC housing mounting studs in the engine compartment.
9. Remove the instrument panel from the vehicle. Refer to: Body and Frame, Interior Trim, Dashboard/Instrument Panel, Service and Repair, See: Dashboard / Instrument Panel > Removal and Replacement
HVAC Housing - Dual Zone Shown, Single Zone Typical
imageOpen In New TabZoom/Print
10. Remove the bolt that secures the HVAC housing to the floor bracket located in the center of the vehicle.
11. Remove the two nuts from the HVAC housing mounting studs in the passenger compartment.
12. Remove the HVAC housing from inside the vehicle. Take care not to allow any remaining coolant to drain onto the vehicles interior.
INSTALLATION
Warning: if the vehicle is equipped with air conditioning, review the warnings and cautions in plumbing before performing the following operation.
1. Position the HVAC housing into the vehicle. Be certain that the evaporator condensate drain tube and the housing mounting studs are inserted into their correct locations.
2. Install the two nuts that secure the HVAC housing to the mounting studs in the passenger compartment. Tighten the nuts to 6.2 Nm (55 in. lbs.).
3. Install the bolt that secures the HVAC housing to the floor bracket in the passenger compartment. Tighten the bolt to 6.2 Nm (55 in. lbs.).
4. Install the instrument panel. Refer to: Body and Frame, Interior Trim, Dashboard/Instrument Panel, Service and Repair, See: Dashboard / Instrument Panel > Removal and Replacement
5. Install the two nuts that secure the HVAC housing to the mounting studs in the engine compartment. Tighten the nuts to 6.2 Nm (55 in. lbs.).
6. Install the powertrain control module (PCM).
7. Unplug or remove the tape from the heater core tubes and connect the heater hoses to the heater core tubes.
8. Unplug or remove the tape from the opened refrigerant line fittings and the evaporator outlet tube and install the accumulator.
9. Unplug or remove the tape from the liquid line and the evaporator inlet tube fittings. Connect the liquid line coupler to the evaporator inlet tube.
10. Evacuate the refrigerant system.
11. Charge the refrigerant system .
12. Fill the engine cooling system.
13. Connect the battery negative cable.
14. Start the engine and check for proper operation of the heating and air conditioning systems.
Images (Click to enlarge)
Nov 26, 2020 at 10:54 AM