Blower motor and resistor

Tiny
TONY DAVIS
  • MEMBER
  • 1996 FORD EXPLORER
  • V8
  • AWD
  • AUTOMATIC
  • 150,000 MILES
How do I replace a blower motor and resistor in 1996 Ford Explorer heater system?
Wednesday, December 22nd, 2010 AT 11:19 PM

5 Replies

Tiny
SATURNTECH9
  • MECHANIC
  • 30,870 POSTS
You should first figure out which one you need if those are even bad causing the problem. Do you have a multimeter to do some testing?
Was this
answer
helpful?
Yes
No
+1
Thursday, December 23rd, 2010 AT 12:55 AM
Tiny
TONY DAVIS
  • MEMBER
  • 3 POSTS
No but I replaced the fuses and it kicked on again. Then the next morning it wasn't working again. I felt the bottom of the plastic motor housing and it was warm so I beat on it and the blower started working. Ever since then a good beatin seems to make it work. I think the motor is gunked up with brush dust and old grease and minus 0 degree weather is causing it to cease up. Does that sound right maybe?
Was this
answer
helpful?
Yes
No
+1
Thursday, December 23rd, 2010 AT 1:18 AM
Tiny
SATURNTECH9
  • MECHANIC
  • 30,870 POSTS
Sound's like you could have a bad motor or a loose connection at the motor.I wouldn't replace the resistor if you beat on the motor and it start's working on all the speed's.I would first make sure the terminal's to the blower motor were tight before replacing the motor. Here are the instruction's on how to replace the motor.
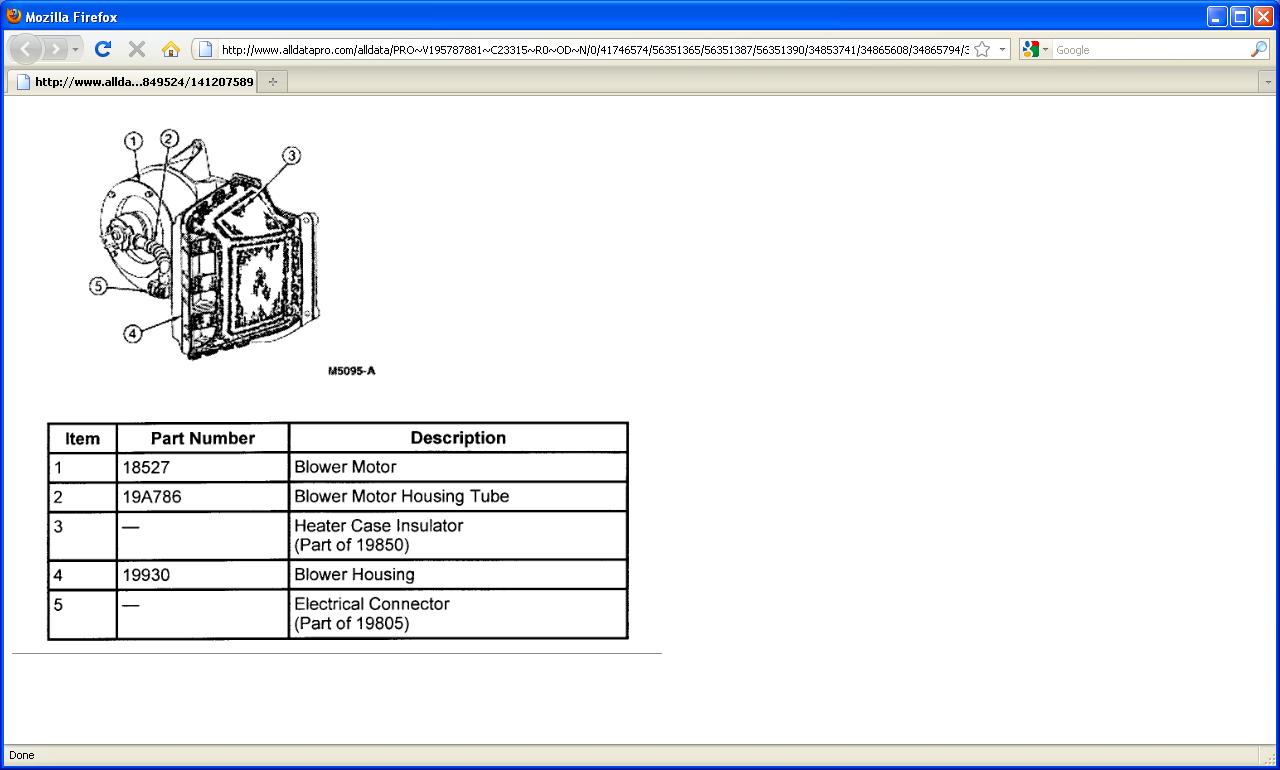
Blower Motor and Blower Motor Wheel Assembly

Removal and Installation

1. Disconnect the battery ground cable(s).
2. Remove the air cleaner in front of the blower motor (18527).
3. Disconnect the wire harness connector from blower motor by pushing down on the connector tabs and pulling the connector off the blower motor.

4. Disconnect the blower motor housing tube (19A786) at the blower motor.
5. Remove three screws attaching the blower motor to the A/C blower housing (19930).
6. Holding blower motor housing tube aside, pull the blower motor from the heater plenum chamber case (1 8A484) and remove it from the vehicle.
7. Remove the blower wheel hub pushnut and, if applicable, the clamp from the shaft. Then, pull the blower motor wheel (18504) from the shaft.

For installation, follow removal steps in reverse order. Check system for proper operation.

NOTE: When the battery has been disconnected and reconnected, some abnormal drive symptoms may occur while the powertrain control module (PCM) (12A650) relearns its adaptive strategy. The vehicle may need to be driven 16 km (10 miles) or more to relearn the strategy.
Was this
answer
helpful?
Yes
No
Thursday, December 23rd, 2010 AT 2:39 AM
Tiny
TONY DAVIS
  • MEMBER
  • 3 POSTS
Thank you for the information. One more thing. Can you provide me with instructions for removing all the plastic covers/housing and/or glove compartment so I can get to the blower motor? I am having trouble figuring out how to get into the dash to work on this. Thanks again.
Was this
answer
helpful?
Yes
No
+1
Thursday, December 23rd, 2010 AT 7:01 AM
Tiny
SATURNTECH9
  • MECHANIC
  • 30,870 POSTS
I don't have any more detail's on replacing the motor it doesn't say anything about removing the glove box. There should be screw's or plastic push expanding pin's holding those panel's on.
Was this
answer
helpful?
Yes
No
Thursday, December 23rd, 2010 AT 7:41 PM

Please login or register to post a reply.

Sponsored links